
User Manual (English)
Page 2
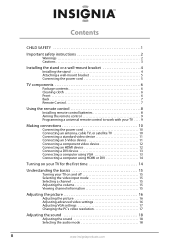
... 4 Installing the stand 4 Attaching a wall-mount bracket 5 Connecting the power cord 5 TV components 6 Package contents 6 Cleaning cloth 6 Front 6 Back 7 Remote Control 7 Using the remote control 8 Installing remote control batteries 8 Aiming the remote control 9 Programming a universal remote control to work with your TV . . . . 9 Making connections 10 Connecting the power cord 10 Connecting an antenna, cable TV...
... 4 Installing the stand 4 Attaching a wall-mount bracket 5 Connecting the power cord 5 TV components 6 Package contents 6 Cleaning cloth 6 Front 6 Back 7 Remote Control 7 Using the remote control 8 Installing remote control batteries 8 Aiming the remote control 9 Programming a universal remote control to work with your TV . . . . 9 Making connections 10 Connecting the power cord 10 Connecting an antenna, cable TV...
User Manual (English)
Page 6
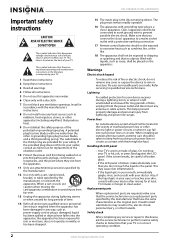
... objects have the same characteristics as vases, shall be connected to earth ground wire to be placed on the apparatus. NS-19E430A10/NS-22E430A10 Important safety instructions CAUTION RISK OF ELECTRIC SHOCK DO NOT OPEN This symbol indicates that dangerous voltage constituting a risk ... apparatus (including amplifiers) that you connect the class I apparatus to a mains socket outlet with a protective earthing connection. 17 Remote control batteries should not be exposed to excessive heat such as radiators, heat registers, stoves, or other electric light or power circuits...
... objects have the same characteristics as vases, shall be connected to earth ground wire to be placed on the apparatus. NS-19E430A10/NS-22E430A10 Important safety instructions CAUTION RISK OF ELECTRIC SHOCK DO NOT OPEN This symbol indicates that dangerous voltage constituting a risk ... apparatus (including amplifiers) that you connect the class I apparatus to a mains socket outlet with a protective earthing connection. 17 Remote control batteries should not be exposed to excessive heat such as radiators, heat registers, stoves, or other electric light or power circuits...
User Manual (English)
Page 10
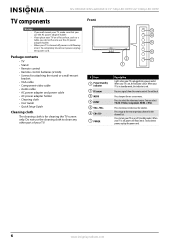
...for cleaning the TV screen only. Press to go to select the video input source. Package contents • TV • Stand • Remote control • Remote control batteries (2 AAA) • Screws for attaching the stand or a wall-mount bracket • VGA cable • Component video cable ...insigniaproducts.com When your TV is in the channel list. Receives signals from the remote control. Press to use the AC power adapter holder. • When your TV is turned off (standby mode). NS-19E430A10/NS-22E430A10 19" 720p LED HDTV/ 22" 1080p LED HDTV TV components Warning •...
...for cleaning the TV screen only. Press to go to select the video input source. Package contents • TV • Stand • Remote control • Remote control batteries (2 AAA) • Screws for attaching the stand or a wall-mount bracket • VGA cable • Component video cable ...insigniaproducts.com When your TV is in the channel list. Receives signals from the remote control. Press to use the AC power adapter holder. • When your TV is turned off (standby mode). NS-19E430A10/NS-22E430A10 19" 720p LED HDTV/ 22" 1080p LED HDTV TV components Warning •...

User Manual (English)
Page 11
... more information, see "Viewing channel information" on page 18. Press to open the on page 13. 19" 720p LED HDTV/ 22" 1080p LED HDTV Back Remote Control 1 2 12 13 3 14 4 5 15 6 1 7 5 8 16 2 17 6 9 18 7 3 4 8 10 9 # Jack 1 (headphone) COMPONENT INPUT 2 (Y, CB/PB, CR/PR, and L/R AUDIO) 3 VGA INPUT 4 VGA AUDIO INPUT 5 ANT...
... more information, see "Viewing channel information" on page 18. Press to open the on page 13. 19" 720p LED HDTV/ 22" 1080p LED HDTV Back Remote Control 1 2 12 13 3 14 4 5 15 6 1 7 5 8 16 2 17 6 9 18 7 3 4 8 10 9 # Jack 1 (headphone) COMPONENT INPUT 2 (Y, CB/PB, CR/PR, and L/R AUDIO) 3 VGA INPUT 4 VGA AUDIO INPUT 5 ANT...
User Manual (English)
Page 12
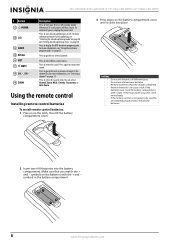
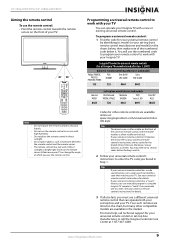
...again to select the aspect ratio. Press to restore the sound. If chemicals touch your skin, wash immediately. • If the remote control is off, power still flows into it clicks into the battery compartment. Make sure that you match the + and - symbols...cause a rash. Using the remote control Installing remote control batteries To install remote control batteries: 1 Press in the battery compartment. 8 www.insigniaproducts.com Cautions • Do not mix batteries of time, remove the batteries. 2 Insert two AAA batteries into place. NS-19E430A10/NS-22E430A10 19" 720p LED HDTV...
...again to select the aspect ratio. Press to restore the sound. If chemicals touch your skin, wash immediately. • If the remote control is off, power still flows into it clicks into the battery compartment. Make sure that you match the + and - symbols...cause a rash. Using the remote control Installing remote control batteries To install remote control batteries: 1 Press in the battery compartment. 8 www.insigniaproducts.com Cautions • Do not mix batteries of time, remove the batteries. 2 Insert two AAA batteries into place. NS-19E430A10/NS-22E430A10 19" 720p LED HDTV...
User Manual (English)
Page 13
... below, then make note of the numbered code below it using the Insignia TV remote to "teach" the commands one at 1-877-467-4289. Codes for details. 3 If all Insignia TVs manufactured after Jan. 1, 2007) Universal remote control manufacturers and models Philips PHDVD5, PH5DSS, PMDVR8, PDVR8 RCA RCU807 ...in the market. www.insigniaproducts.com 9 You will use the numbered code to program your remote control to identify a code that can operate your Insignia TV with a new or existing universal remote control. You may not work if direct sunlight or bright light shines on the chart, ...
... below, then make note of the numbered code below it using the Insignia TV remote to "teach" the commands one at 1-877-467-4289. Codes for details. 3 If all Insignia TVs manufactured after Jan. 1, 2007) Universal remote control manufacturers and models Philips PHDVD5, PH5DSS, PMDVR8, PDVR8 RCA RCU807 ...in the market. www.insigniaproducts.com 9 You will use the numbered code to program your remote control to identify a code that can operate your Insignia TV with a new or existing universal remote control. You may not work if direct sunlight or bright light shines on the chart, ...
User Manual (English)
Page 14
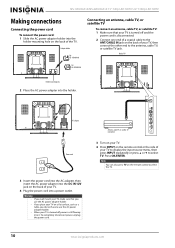
... on the back of your TV, then connect the other end to select TV. To completely disconnect power, unplug the power cord. Press OK/ENTER. NS-19E430A10/NS-22E430A10 19" 720p LED HDTV/ 22" 1080p LED HDTV Making connections Connecting the power cord To connect the power cord: 1 Slide the AC power adapter... the AC power adapter into the holder. Note You can also press TV on a flat surface, such as a table, you place your TV on the remote control to use the AC power adapter holder. • If you do not have to select the TV. 10 www.insigniaproducts.com Warning • If...
... on the back of your TV, then connect the other end to select TV. To completely disconnect power, unplug the power cord. Press OK/ENTER. NS-19E430A10/NS-22E430A10 19" 720p LED HDTV/ 22" 1080p LED HDTV Making connections Connecting the power cord To connect the power cord: 1 Slide the AC power adapter... the AC power adapter into the holder. Note You can also press TV on a flat surface, such as a table, you place your TV on the remote control to use the AC power adapter holder. • If you do not have to select the TV. 10 www.insigniaproducts.com Warning • If...
User Manual (English)
Page 15
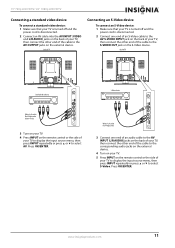
... device. Back of TV Standard video device S-Video device A A White=Left audio Red=Right audio Yellow=Video 3 Turn on your TV. 4 Press INPUT on the remote control or the side of your TV to display the input source menu, then press INPUT repeatedly or press or to select AV. www.insigniaproducts..., then connect the other end of the cable to the corresponding audio jacks on the external device. 4 Turn on your TV. 5 Press INPUT on the remote control or the side of your TV to display the input source menu, then press INPUT repeatedly or press or to select S-Video.
... device. Back of TV Standard video device S-Video device A A White=Left audio Red=Right audio Yellow=Video 3 Turn on your TV. 4 Press INPUT on the remote control or the side of your TV to display the input source menu, then press INPUT repeatedly or press or to select AV. www.insigniaproducts..., then connect the other end of the cable to the corresponding audio jacks on the external device. 4 Turn on your TV. 5 Press INPUT on the remote control or the side of your TV to display the input source menu, then press INPUT repeatedly or press or to select S-Video.

User Manual (English)
Page 16
...your TV, then connect the other end of the cable to the HDMI OUT jack on the external device. NS-19E430A10/NS-22E430A10 19" 720p LED HDTV/ 22" 1080p LED HDTV Connecting a component video device To connect a component...the corresponding audio jacks on the external device. 4 Turn on your TV. 5 Press INPUT on the remote control or the side of your TV to display the input source menu, then press INPUT repeatedly or... select Component. Press OK/ENTER. 3 Turn on your TV. 4 Press INPUT on the remote control or the side of your TV to display the input source menu, then press INPUT repeatedly or ...
...your TV, then connect the other end of the cable to the HDMI OUT jack on the external device. NS-19E430A10/NS-22E430A10 19" 720p LED HDTV/ 22" 1080p LED HDTV Connecting a component video device To connect a component...the corresponding audio jacks on the external device. 4 Turn on your TV. 5 Press INPUT on the remote control or the side of your TV to display the input source menu, then press INPUT repeatedly or... select Component. Press OK/ENTER. 3 Turn on your TV. 4 Press INPUT on the remote control or the side of your TV to display the input source menu, then press INPUT repeatedly or ...

User Manual (English)
Page 17
... cable to the VGA AUDIO INPUT jack on the DVI device. Separate analog audio cables are required. 4 Turn on your TV. 5 Press INPUT on the remote control or the side of your TV, then connect the other end of the cable into the VGA jack on the back of your TV... TV, then connect the other end of the cable into the LINE OUT jack on the computer. 4 Turn on your TV. 5 Press INPUT on the remote control or the side of your TV, then plug the other end of the cable to the DVI OUT jack on page 14. www.insigniaproducts...
... cable to the VGA AUDIO INPUT jack on the DVI device. Separate analog audio cables are required. 4 Turn on your TV. 5 Press INPUT on the remote control or the side of your TV, then connect the other end of the cable into the VGA jack on the back of your TV... TV, then connect the other end of the cable into the LINE OUT jack on the computer. 4 Turn on your TV. 5 Press INPUT on the remote control or the side of your TV, then plug the other end of the cable to the DVI OUT jack on page 14. www.insigniaproducts...
User Manual (English)
Page 18
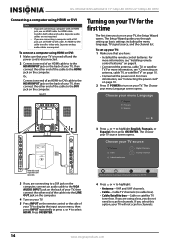
... on the back of your TV, then connect the other end of TV Turning on the computer. Press OK/ENTER. For more information, see "Installing remote control batteries" on page 10. • Connected the power cord. For more information, see "Connecting the power cord" on page 10. 2 Press...antenna, cable TV, or satellite TV. An HDMI cable transfers both video and audio. An HDMI-to select HDMI. Choose your menu Language screen opens. NS-19E430A10/NS-22E430A10 19" 720p LED HDTV/ 22" 1080p LED HDTV Connecting a computer using HDMI or DVI Note • If you through setting up your TV...
... on the back of your TV, then connect the other end of TV Turning on the computer. Press OK/ENTER. For more information, see "Installing remote control batteries" on page 10. • Connected the power cord. For more information, see "Connecting the power cord" on page 10. 2 Press...antenna, cable TV, or satellite TV. An HDMI cable transfers both video and audio. An HDMI-to select HDMI. Choose your menu Language screen opens. NS-19E430A10/NS-22E430A10 19" 720p LED HDTV/ 22" 1080p LED HDTV Connecting a computer using HDMI or DVI Note • If you through setting up your TV...

User Manual (English)
Page 19
... Antenna 0 Cable 0 Cable/Satellite box Scan for channels Digital Channels Analog Channels Move OK Select ENTER MENU Previous EXIT Exit Select Antenna if using the remote control. Note When your TV on and off : 1 Press POWER. You can stop the scan by pressing EXIT. The channel list was created when you...
... Antenna 0 Cable 0 Cable/Satellite box Scan for channels Digital Channels Analog Channels Move OK Select ENTER MENU Previous EXIT Exit Select Antenna if using the remote control. Note When your TV on and off : 1 Press POWER. You can stop the scan by pressing EXIT. The channel list was created when you...
User Manual (English)
Page 22
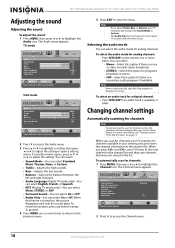
...previous menu. 5 Press EXIT to close the menu. When you press CH and CH , your TV for channels Note You do not need to Custom. NS-19E430A10/NS-22E430A10 19" 720p LED HDTV/ 22" 1080p LED HDTV Adjusting the sound Adjusting the sound To adjust the sound: 1 Press MENU, then press or to...setting or open a setting menu. Selecting the audio mode You can select On or Off. If an audio track is noise or static on the remote one or more times. Changing channel settings Automatically scanning for the first time" on , the picture disappears and only the sound plays. Channel Antenna/...
...previous menu. 5 Press EXIT to close the menu. When you press CH and CH , your TV for channels Note You do not need to Custom. NS-19E430A10/NS-22E430A10 19" 720p LED HDTV/ 22" 1080p LED HDTV Adjusting the sound Adjusting the sound To adjust the sound: 1 Press MENU, then press or to...setting or open a setting menu. Selecting the audio mode You can select On or Off. If an audio track is noise or static on the remote one or more times. Changing channel settings Automatically scanning for the first time" on , the picture disappears and only the sound plays. Channel Antenna/...
User Manual (English)
Page 36
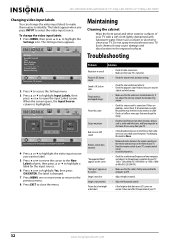
... cable. • Check car traffic or neon signs that your TV's remote control sensor. • Install fresh batteries. Picture has a few bright • A few bright or dark dots on picture • Check for your TV: 1360 × 768 at 60Hz (NS-19E430A10 ) or 1920 × 1080 at your TV is firmly connected to...
... cable. • Check car traffic or neon signs that your TV's remote control sensor. • Install fresh batteries. Picture has a few bright • A few bright or dark dots on picture • Check for your TV: 1360 × 768 at 60Hz (NS-19E430A10 ) or 1920 × 1080 at your TV is firmly connected to...


