

User Manual (English)
Page 2
Table of Contents Important Information ...1 Important Safety Precautions...2 Preparations ...5 Using the Remote Control ...5 Batteries for the Remote Control 5 Power Connection ...5 Antenna Connection...6 Identification of Controls...7 Main Unit...7 Remote Control ...9 Connections...11 Cautions Before Connecting 11 Connect a VCR...11 Connect a Camcorder...12 Connect a DVD player ...13 Connect a DTV receiver ...14 Connect a PC ...15 Connect a VCR ...
Table of Contents Important Information ...1 Important Safety Precautions...2 Preparations ...5 Using the Remote Control ...5 Batteries for the Remote Control 5 Power Connection ...5 Antenna Connection...6 Identification of Controls...7 Main Unit...7 Remote Control ...9 Connections...11 Cautions Before Connecting 11 Connect a VCR...11 Connect a Camcorder...12 Connect a DVD player ...13 Connect a DTV receiver ...14 Connect a PC ...15 Connect a VCR ...

User Manual (English)
Page 8
Preparations Using the Remote Control
Preparations Using the Remote Control

User Manual (English)
Page 10
... select menu. 4. VOL+/Press the vol+ or vol- Functions of Controls Main Unit AC INPUT Power Indicator Remote Sensor A blue indicator lights when the power is on and a red indicator lights when in the CH+ CH- POWER Press this button to the remote control. Identification of VOL+/-, CH+/-, MENU, SOURCE and POWER are also...
... select menu. 4. VOL+/Press the vol+ or vol- Functions of Controls Main Unit AC INPUT Power Indicator Remote Sensor A blue indicator lights when the power is on and a red indicator lights when in the CH+ CH- POWER Press this button to the remote control. Identification of VOL+/-, CH+/-, MENU, SOURCE and POWER are also...

User Manual (English)
Page 12
P.S. 5 13 6 5. Sleep 10. CH+/-: Use to select menu item; Auto 1 9 3. POS 8 15 7. Up, Down 13. PBP 2 10 3 11 4 12 4. to switch channels; Still 11. Size 12. CCD 14. Identification of 9. POWER 2. TV/PC 7 14 Note: The TVPC function means you may view a TV program from a mini window while the main window is displaying a 6. Menu 8.Enter To confirm, enter submenu or toggle the settings of Controls (continued) Remote Control 1. DSP 15. In Menu operation, use CH+/- VOL+/-: Use to adjust volume; 9
P.S. 5 13 6 5. Sleep 10. CH+/-: Use to select menu item; Auto 1 9 3. POS 8 15 7. Up, Down 13. PBP 2 10 3 11 4 12 4. to switch channels; Still 11. Size 12. CCD 14. Identification of 9. POWER 2. TV/PC 7 14 Note: The TVPC function means you may view a TV program from a mini window while the main window is displaying a 6. Menu 8.Enter To confirm, enter submenu or toggle the settings of Controls (continued) Remote Control 1. DSP 15. In Menu operation, use CH+/- VOL+/-: Use to adjust volume; 9

User Manual (English)
Page 13
... quickly jump between current channel and 24 25 How to use remote controls provided with other equipment: This TV can be controlled by many Universal remote controls, for this functionality use the Mitsubishi code selections shown in the manual for your Universal remote control. Mute 22. Remote Control 16 17 18 19 20 Identification of SRS Labs,Inc. 23...
... quickly jump between current channel and 24 25 How to use remote controls provided with other equipment: This TV can be controlled by many Universal remote controls, for this functionality use the Mitsubishi code selections shown in the manual for your Universal remote control. Mute 22. Remote Control 16 17 18 19 20 Identification of SRS Labs,Inc. 23...

User Manual (English)
Page 14
... AUDIO R Rear of the VCR How to the operating manual of the external equipment may be different depending on your LCD TV , press Source control. Refer to connect: Connect the Audio/Video cables between the Audio (L/R)/Video jacks on the panel to avoid any connections. The illustration of the ...in image or color problems. Make sure that all connectors are securely inserted into their terminals. Note: To play VCR 1. Turn on the remote Source Select VGA DVI RF Video1 Video2 SVideo YPbPr1 YPbPr2 11 When connecting an external device, turn the power off on the unit and VCR...
... AUDIO R Rear of the VCR How to the operating manual of the external equipment may be different depending on your LCD TV , press Source control. Refer to connect: Connect the Audio/Video cables between the Audio (L/R)/Video jacks on the panel to avoid any connections. The illustration of the ...in image or color problems. Make sure that all connectors are securely inserted into their terminals. Note: To play VCR 1. Turn on the remote Source Select VGA DVI RF Video1 Video2 SVideo YPbPr1 YPbPr2 11 When connecting an external device, turn the power off on the unit and VCR...

User Manual (English)
Page 15
... Select VGA DVI RF Video1 Video2 SVideo YPbPr1 YPbPr2 12 to select Video2 and press Enter to your LCD TV , press Source button on the remote control. 2. Press CH+/-
... Select VGA DVI RF Video1 Video2 SVideo YPbPr1 YPbPr2 12 to select Video2 and press Enter to your LCD TV , press Source button on the remote control. 2. Press CH+/-
User Manual (English)
Page 16
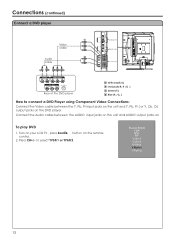
... YPbPr2 13 Connect the Audio cable between the Y, Pb, Pr input jacks on the unit and Y, Pb, Pr ( or Y, Cb, Cr) output jacks on the remote control. 2.
... YPbPr2 13 Connect the Audio cable between the Y, Pb, Pr input jacks on the unit and Y, Pb, Pr ( or Y, Cb, Cr) output jacks on the remote control. 2.
User Manual (English)
Page 17
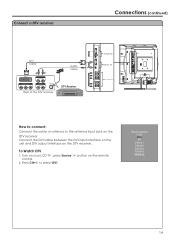
... D-Sub IN AU DI O DVI-D DVI-D IN AU DI O COMPONENT IN How to connect: Connect the cable or antenna to select DVI. Turn on the remote Source Select VGA DVI RF Video1 Video2 SVideo YPbPr1 YPbPr2 14 to the antenna input jack on the DTV receiver . Press CH+/- button on your...
... D-Sub IN AU DI O DVI-D DVI-D IN AU DI O COMPONENT IN How to connect: Connect the cable or antenna to select DVI. Turn on the remote Source Select VGA DVI RF Video1 Video2 SVideo YPbPr1 YPbPr2 14 to the antenna input jack on the DTV receiver . Press CH+/- button on your...

User Manual (English)
Page 18
Press Enter to connect: Connect a D-Sub (VGA) cable between the D-Sub (VGA) jack on the PC and the D-Sub input jack on the unit. Source Select VGA DVI RF Video1 Video2 SVideo YPbPr1 YPbPr2 15 Connections (continued) Connect a PC Audio cable D-Sub cable DVI-D IN D-Sub IN D-Sub D-Sub IN AU DI O DVI-D DVI-D IN AU DI O COMPONENT IN COMPONENT IN How to confirm. 4. Turn on your LCD TV , press Source button on your PC and check for PC system requirements. To Watch the PC screen 1. to select VGA. 3. Turn on the remote control. 2. Press CH+/-
Press Enter to connect: Connect a D-Sub (VGA) cable between the D-Sub (VGA) jack on the PC and the D-Sub input jack on the unit. Source Select VGA DVI RF Video1 Video2 SVideo YPbPr1 YPbPr2 15 Connections (continued) Connect a PC Audio cable D-Sub cable DVI-D IN D-Sub IN D-Sub D-Sub IN AU DI O DVI-D DVI-D IN AU DI O COMPONENT IN COMPONENT IN How to confirm. 4. Turn on your LCD TV , press Source button on your PC and check for PC system requirements. To Watch the PC screen 1. to select VGA. 3. Turn on the remote control. 2. Press CH+/-

User Manual (English)
Page 20
...the selected menu item. Note: To clearly introduce the menu operations , this operation Displaying Status Information Press the DSP button on the remote control. Press the Power button on the remote control, the unit will display current status information such as 17 to confirm ,enter submenu or toggle the settings of item. Turning the... Unit On and Off Turning On Insert the power cord into the wall outlet. Use VOL+/- to -use menu system that appears on the remote MAIN MENU Picture Sound CH System OSD TVPC Setup Color Brightness Contrast Sharpness Tint 2 Use the CH+/-
...the selected menu item. Note: To clearly introduce the menu operations , this operation Displaying Status Information Press the DSP button on the remote control. Press the Power button on the remote control, the unit will display current status information such as 17 to confirm ,enter submenu or toggle the settings of item. Turning the... Unit On and Off Turning On Insert the power cord into the wall outlet. Use VOL+/- to -use menu system that appears on the remote MAIN MENU Picture Sound CH System OSD TVPC Setup Color Brightness Contrast Sharpness Tint 2 Use the CH+/-

User Manual (English)
Page 41
...No power No picture Good picture but no sound Good sound but poor color Poor picture Horizontal dotted line Television not responding to remote control Check item !This may be caused by obstruction to the antenna due to high rise buildings or hills. This is properly connected... S-VHS camera or camcorder connected and having connected another channel. !Adjust the contrast and brightness settings. !Check the Closed Captions control. Replace if necessary. !Clean the remote control sensor lens on again once. 38 Some TEXT modes could block the screen. !Select a correct input. !Is a non-...
...No power No picture Good picture but no sound Good sound but poor color Poor picture Horizontal dotted line Television not responding to remote control Check item !This may be caused by obstruction to the antenna due to high rise buildings or hills. This is properly connected... S-VHS camera or camcorder connected and having connected another channel. !Adjust the contrast and brightness settings. !Check the Closed Captions control. Replace if necessary. !Clean the remote control sensor lens on again once. 38 Some TEXT modes could block the screen. !Select a correct input. !Is a non-...
User Manual (English)
Page 43
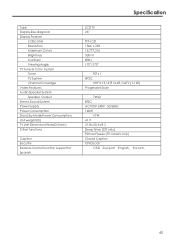
... Output Stereo Sound System Power Supply Power Consumption Stand by Mode Power Consumption Unit weight (lb) TV Unit Dimension (WxHxD) (inch) Other functions Caption Security Remote Control function support for Spanish Specification LCD TV 26" TFT-LCD 1366 x 768 16,777,216 500 nit 800:1 170O/170O FST x 1 NTSC VHF 2-13, UHF...
... Output Stereo Sound System Power Supply Power Consumption Stand by Mode Power Consumption Unit weight (lb) TV Unit Dimension (WxHxD) (inch) Other functions Caption Security Remote Control function support for Spanish Specification LCD TV 26" TFT-LCD 1366 x 768 16,777,216 500 nit 800:1 170O/170O FST x 1 NTSC VHF 2-13, UHF...

User Manual (English)
Page 44
... Jack for PC x 1 Stereo mini phone Jack for DVI-D x 1 L/R RCA for YPbPr/YCbCr x 2 L/R RCA for Video Out x 1 Headphone Jack : Stereo mini phone Jack x 1 1 User Manual 1 Remote Control 1 Power Cord 2 AAA Batteries Display Format Supported by This Unit For D-Sub/DVI: 640X480 @ 60Hz,72Hz,75Hz; 1024X768 @ 60Hz,70Hz,75Hz; 1280X1024 @ 60Hz; For YPbPr...
... Jack for PC x 1 Stereo mini phone Jack for DVI-D x 1 L/R RCA for YPbPr/YCbCr x 2 L/R RCA for Video Out x 1 Headphone Jack : Stereo mini phone Jack x 1 1 User Manual 1 Remote Control 1 Power Cord 2 AAA Batteries Display Format Supported by This Unit For D-Sub/DVI: 640X480 @ 60Hz,72Hz,75Hz; 1024X768 @ 60Hz,70Hz,75Hz; 1280X1024 @ 60Hz; For YPbPr...


