
User Manual
Page 1
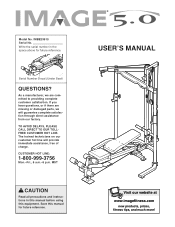
... equipment. If you have questions, or if there are missing or damaged parts, we are committed to providing complete customer satisfaction. Serial Number Decal (Under Seat) QUESTIONS? MST CAUTION Read all precautions and instructions in the space above for future reference. The trained technicians on our customer hot line will guarantee... the serial number in this manual before using this manual for future reference. USER'S MANUAL Visit our website at www.imagefitness.com new products, prizes, fitness tips, and much more!
... equipment. If you have questions, or if there are missing or damaged parts, we are committed to providing complete customer satisfaction. Serial Number Decal (Under Seat) QUESTIONS? MST CAUTION Read all precautions and instructions in the space above for future reference. The trained technicians on our customer hot line will guarantee... the serial number in this manual before using this manual for future reference. USER'S MANUAL Visit our website at www.imagefitness.com new products, prizes, fitness tips, and much more!
User Manual
Page 4
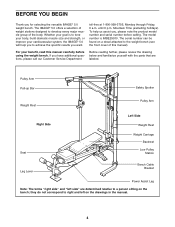
... the drawing below and familiarize yourself with the parts that are determined relative to a person sitting on the bench; The IMAGE® 5.0 offers a selection of weight stations designed to the weight bench (see the front cover of the body. toll-free at 1-800-999-3756, Monday through Friday, 6... a.m. Mountain Time (excluding holidays). Pulley Arm Pull-up Bar Safety Spotter Weight Rest Right Side Seat Pulley Arm ...
... the drawing below and familiarize yourself with the parts that are determined relative to a person sitting on the bench; The IMAGE® 5.0 offers a selection of weight stations designed to the weight bench (see the front cover of the body. toll-free at 1-800-999-3756, Monday through Friday, 6... a.m. Mountain Time (excluding holidays). Pulley Arm Pull-up Bar Safety Spotter Weight Rest Right Side Seat Pulley Arm ...

User Manual
Page 9
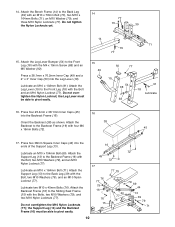
...Press two 38mm x 50mm Inner Caps (52) into the top of the Sliding Seat Frame. Attach the Bench Frame to the Stabilizer with two M10 x 78mm Bolts (70), two M10 Washers ... (77). Press two 75mm Bushings (26) into the end of the Stabilizer (40). Slide the Sliding Seat Frame onto the Bench Frame (14) and engage the Knob into the indicated part of the Front Leg (18). Press a ... Front Leg (18) with two M10 x 62mm Carriage Bolts (74) and two M10 Nylon Locknuts (77). Orient the Bench Frame (14) as shown. Attach the Pull-up Bar (8) to the Right Frame (5) with the bend on top. Press...
...Press two 38mm x 50mm Inner Caps (52) into the top of the Sliding Seat Frame. Attach the Bench Frame to the Stabilizer with two M10 x 78mm Bolts (70), two M10 Washers ... (77). Press two 75mm Bushings (26) into the end of the Stabilizer (40). Slide the Sliding Seat Frame onto the Bench Frame (14) and engage the Knob into the indicated part of the Front Leg (18). Press a ... Front Leg (18) with two M10 x 62mm Carriage Bolts (74) and two M10 Nylon Locknuts (77). Orient the Bench Frame (14) as shown. Attach the Pull-up Bar (8) to the Right Frame (5) with the bend on top. Press...
User Manual
Page 10
... 50 77 19 54 68 92 91 18 Lubricate 16. Attach the 38 Backrest to the Sliding Seat Frame (15) with the Bolt, two M10 Washers (79), and an M10 Nylon Locknut (77). Attach the Bench Frame (14) to the Back Leg (39) with an M10 x 78mm Bolt (70), two M10 x 14...
... 50 77 19 54 68 92 91 18 Lubricate 16. Attach the 38 Backrest to the Sliding Seat Frame (15) with the Bolt, two M10 Washers (79), and an M10 Nylon Locknut (77). Attach the Bench Frame (14) to the Back Leg (39) with an M10 x 78mm Bolt (70), two M10 x 14...
User Manual
Page 11
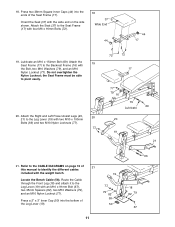
... two 35mm Spacers (82), two M10 Washers (79), and an M10 Nylon Locknut (77). Attach the 19 Seat Frame (17) to the Leg Lever (19) with the Bolt, two M10 Washers (79), and an M10... of 21 this manual to pivot easily. 20. 18. Orient the Seat (37) with the weight bench. 19 Locate the Bench Cable (58). Attach the Seat (37) to the Leg Lever (19) with four M6 x 16mm... Bolts (72). 18 37 Wide End 44 44 17 19. Attach the Right and Left Power Assist Legs (20, 20 21) to the Seat...
... two 35mm Spacers (82), two M10 Washers (79), and an M10 Nylon Locknut (77). Attach the 19 Seat Frame (17) to the Leg Lever (19) with the Bolt, two M10 Washers (79), and an M10... of 21 this manual to pivot easily. 20. 18. Orient the Seat (37) with the weight bench. 19 Locate the Bench Cable (58). Attach the Seat (37) to the Leg Lever (19) with four M6 x 16mm... Bolts (72). 18 37 Wide End 44 44 17 19. Attach the Right and Left Power Assist Legs (20, 20 21) to the Seat...
User Manual
Page 17
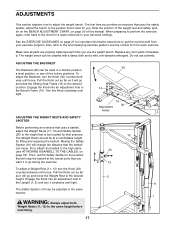
... guide to see ATTACHING A BARBELL TO THE CABLES, on page 18). Pull the Knob out as far as it to go and slide the Sliding Seat Frame (15) to the desired height. Moving the Safety Spotter (10) will change the distance that you want it will go and move . The ... RESTS AND SAFETY SPOTTER Before performing an exercise that uses a barbell, adjust the Weight Rests (11, 12) and Safety Spotter (25) to adjust the weight bench. The Weight Rests should be adjusted in the Upright (1, 2) and turn the Knob (30) counterclock- First, attach the barbell to get the most benefit from...
... guide to see ATTACHING A BARBELL TO THE CABLES, on page 18). Pull the Knob out as far as it to go and slide the Sliding Seat Frame (15) to the desired height. Moving the Safety Spotter (10) will change the distance that you want it will go and move . The ... RESTS AND SAFETY SPOTTER Before performing an exercise that uses a barbell, adjust the Weight Rests (11, 12) and Safety Spotter (25) to adjust the weight bench. The Weight Rests should be adjusted in the Upright (1, 2) and turn the Knob (30) counterclock- First, attach the barbell to get the most benefit from...
User Manual
Page 24
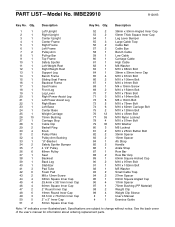
... 9 1 Top Frame 10 1 Safety Spotter 11 1 Left Weight Rest 12 1 Right Weight Rest 13 1 Support Leg 14 1 Bench Frame 15 1 Sliding Seat Frame 16 1 Backrest Frame 17 1 Seat Frame 18 1 Front Leg 19 1 Leg Lever 20 1 Right Power Assist Leg 21 1 Left Power Assist Leg 22 1 Right ...Angled Inner Cap 53 2 50mm Thick Square Inner Cap 54 1 Leg Lever Bumper 55 3 Large Cable Trap 56 2 Cable Ball 57 2 Cable Eye 58 1 Bench Cable 59 1 Low Cable 60 1 Carriage Cable 61 1 High Cable 62 1 M6 Washer 63 1 M10 x 86mm Bolt 64 1 38mm x 50mm Inner ...
... 9 1 Top Frame 10 1 Safety Spotter 11 1 Left Weight Rest 12 1 Right Weight Rest 13 1 Support Leg 14 1 Bench Frame 15 1 Sliding Seat Frame 16 1 Backrest Frame 17 1 Seat Frame 18 1 Front Leg 19 1 Leg Lever 20 1 Right Power Assist Leg 21 1 Left Power Assist Leg 22 1 Right ...Angled Inner Cap 53 2 50mm Thick Square Inner Cap 54 1 Leg Lever Bumper 55 3 Large Cable Trap 56 2 Cable Ball 57 2 Cable Eye 58 1 Bench Cable 59 1 Low Cable 60 1 Carriage Cable 61 1 High Cable 62 1 M6 Washer 63 1 M10 x 86mm Bolt 64 1 38mm x 50mm Inner ...