
English Manual
Page 4
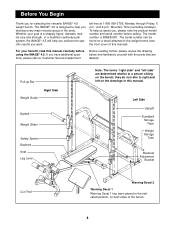
... , please note the product model number and serial number before using the IMAGE® 4.5. The serial number can be found on both sides of the body. The model number is designed to the weight bench (see the front cover of this manual carefully before calling. toll-free at... 1-800-999-3756, Monday through Friday, 6 a.m. Pull-up Bar Weight Guide Right Side Barbell Weight Glider Safety Spotter Backrest Seat Leg Lever Note: The terms "right side" and "left on the bench; Whether your benefit, read this manual). Mountain Time (excluding holidays). they do ...
... , please note the product model number and serial number before using the IMAGE® 4.5. The serial number can be found on both sides of the body. The model number is designed to the weight bench (see the front cover of this manual carefully before calling. toll-free at... 1-800-999-3756, Monday through Friday, 6 a.m. Pull-up Bar Weight Guide Right Side Barbell Weight Glider Safety Spotter Backrest Seat Leg Lever Note: The terms "right side" and "left on the bench; Whether your benefit, read this manual). Mountain Time (excluding holidays). they do ...
English Manual
Page 8
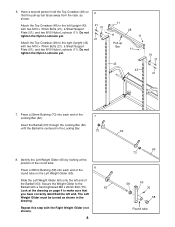
Attach the Top Crossbar (48) to make sure that the pull-up Bar 11 43 43 51 21 21 7. Slide the Left Weight Glider (60) onto the left ...58 60 75 58 Round tube Secure the Weight Glider to the left end of the Locking Bar (62). 7 Insert the Barbell (63) through the Locking Bar (62) until the Barbell is centered in the drawing. Do not tighten the Nylon Locknuts ...yet. 6 21 51 21 11 48 11 11 Pull-up bar faces away from the rack, as shown in the Locking Bar. 73 62 8. 6. Have a second person hold the Top Crossbar (48) so that ...
Attach the Top Crossbar (48) to make sure that the pull-up Bar 11 43 43 51 21 21 7. Slide the Left Weight Glider (60) onto the left ...58 60 75 58 Round tube Secure the Weight Glider to the left end of the Locking Bar (62). 7 Insert the Barbell (63) through the Locking Bar (62) until the Barbell is centered in the drawing. Do not tighten the Nylon Locknuts ...yet. 6 21 51 21 11 48 11 11 Pull-up bar faces away from the rack, as shown in the Locking Bar. 73 62 8. 6. Have a second person hold the Top Crossbar (48) so that ...
English Manual
Page 9
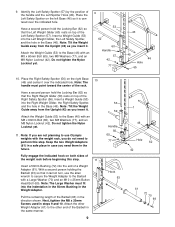
... a Large Washer (70) and an M10 x 25mm Button Head Bolt (69). Have a second person hold the Locking Bar (62) so that the Right Weight Glider (59) rests on top of the rack. Keep the two Weight Adapters (...61) in a safe place in the Base (46). 9. Have a second person hold the Locking Bar (62) so that the Left Weight Glider (60) rests on top of the Barbell in the direction shown. Note:...Handle 57 42 77 43 45 46 Hole 65 10. Note: The handle must fit into the Left Weight Glider, the Left Safety Spotter, and the hole in case you insert it over the ...
... a Large Washer (70) and an M10 x 25mm Button Head Bolt (69). Have a second person hold the Locking Bar (62) so that the Right Weight Glider (59) rests on top of the rack. Keep the two Weight Adapters (...61) in a safe place in the Base (46). 9. Have a second person hold the Locking Bar (62) so that the Left Weight Glider (60) rests on top of the Barbell in the direction shown. Note:...Handle 57 42 77 43 45 46 Hole 65 10. Note: The handle must fit into the Left Weight Glider, the Left Safety Spotter, and the hole in case you insert it over the ...
English Manual
Page 13
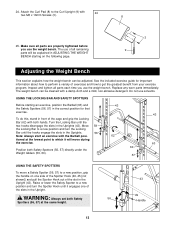
... position for important information about how to perform a variety of the cage and grip the Locking Bar (62) with the Barbell posi- 62 tioned at the same height. 43 49 Handle 13 The weight bench can be cleaned with 24 two M6 x 16mm Screws (3). 8 25. Move 59 the Locking... Bar to a new position, grip the handle on the following page. 3 9 Adjusting the Weight Bench This section explains how the weight bench can be adjusted. Attach the Curl Pad (8) to which it engages one side of the ...
... position for important information about how to perform a variety of the cage and grip the Locking Bar (62) with the Barbell posi- 62 tioned at the same height. 43 49 Handle 13 The weight bench can be cleaned with 24 two M6 x 16mm Screws (3). 8 25. Move 59 the Locking... Bar to a new position, grip the handle on the following page. 3 9 Adjusting the Weight Bench This section explains how the weight bench can be adjusted. Attach the Curl Pad (8) to which it engages one side of the ...
English Manual
Page 18
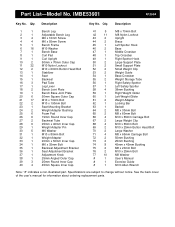
... 12 2 M10 x 60mm Button Head Bolt 13 1 Stabilizer 14 1 Seat 15 1 Backrest 16 3 Pad Tube 17 1 Leg Lever 18 2 Bench Joint Plate 19 1 Bench Base Joint Plate 20 6 50mm Square Outer Cap 21 17 M10 x 70mm Bolt 22 2 M10 x 190mm Bolt 23 1 Seat Mounting Bracket 24...56 1 Right Safety Spotter 57 1 Left Safety Spotter 58 4 38mm Bushing 59 1 Right Weight Glider 60 1 Left Weight Glider 61 2 Weight Adapter 62 1 Locking Bar 63 1 Barbell 64 2 M8 x 30mm Bolt 65 2 M8 x 60mm Bolt 66 4 M10 x 65mm Carriage Bolt 67 2 Large Weight Clip 68 4 M10 ...
... 12 2 M10 x 60mm Button Head Bolt 13 1 Stabilizer 14 1 Seat 15 1 Backrest 16 3 Pad Tube 17 1 Leg Lever 18 2 Bench Joint Plate 19 1 Bench Base Joint Plate 20 6 50mm Square Outer Cap 21 17 M10 x 70mm Bolt 22 2 M10 x 190mm Bolt 23 1 Seat Mounting Bracket 24...56 1 Right Safety Spotter 57 1 Left Safety Spotter 58 4 38mm Bushing 59 1 Right Weight Glider 60 1 Left Weight Glider 61 2 Weight Adapter 62 1 Locking Bar 63 1 Barbell 64 2 M8 x 30mm Bolt 65 2 M8 x 60mm Bolt 66 4 M10 x 65mm Carriage Bolt 67 2 Large Weight Clip 68 4 M10 ...