
English Manual
Page 1
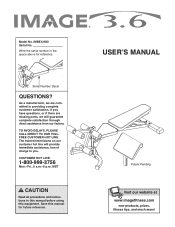
... more! Serial Number Decal QUESTIONS? Save this equipment. As a manufacturer, we will provide immediate assistance, free of charge to you have questions, or if there are missing parts, we are committed to providing complete customer satisfaction. Write the serial number in this manual before using this manual for reference. MST CAUTION Read all precautions and instructions in the space above for...
... more! Serial Number Decal QUESTIONS? Save this equipment. As a manufacturer, we will provide immediate assistance, free of charge to you have questions, or if there are missing parts, we are committed to providing complete customer satisfaction. Write the serial number in this manual before using this manual for reference. MST CAUTION Read all precautions and instructions in the space above for...
English Manual
Page 2
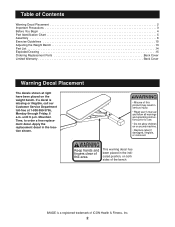
... Begin 4 Part Identification Chart 5 Assembly 6 Exercise Guidelines 10 Adjusting the Weight Bench 13 Part List 14 Exploded Drawing 15 Ordering Replacement Parts Back Cover Limited Warranty Back Cover Warning Decal Placement The decals shown at 1-800-999-3756, Monday through Friday, 6 a.m. IMAGE is missing or illegible, call our Customer Service Department toll-free at right have been placed on or around machine. ¥ Replace label if damaged, illegible, or removed. until...
... Begin 4 Part Identification Chart 5 Assembly 6 Exercise Guidelines 10 Adjusting the Weight Bench 13 Part List 14 Exploded Drawing 15 Ordering Replacement Parts Back Cover Limited Warranty Back Cover Warning Decal Placement The decals shown at 1-800-999-3756, Monday through Friday, 6 a.m. IMAGE is missing or illegible, call our Customer Service Department toll-free at right have been placed on or around machine. ¥ Replace label if damaged, illegible, or removed. until...
English Manual
Page 3
... protect the floor or carpet. 5. Cover the floor beneath the weight bench to support a maximum of this or any commercial, rental, or institutional setting. 4. If you use only. WARNING: Before beginning this product. 3 ICON assumes no responsibility for foot protection while exercising. 9. Keep children under 12 and pets away from moving parts. 6. Replace any time while exercising, stop immediately and begin cooling down...
... protect the floor or carpet. 5. Cover the floor beneath the weight bench to support a maximum of this or any commercial, rental, or institutional setting. 4. If you use only. WARNING: Before beginning this product. 3 ICON assumes no responsibility for foot protection while exercising. 9. Keep children under 12 and pets away from moving parts. 6. Replace any time while exercising, stop immediately and begin cooling down...
English Manual
Page 4
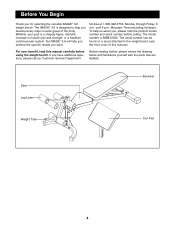
... this manual carefully before calling. Seat Leg Lever Backrest Weight Tube Curl Pad 4 Before You Begin Thank you have additional questions, please call our Customer Service Department Before reading further, please review the drawing below and familiarize yourself with the parts that are labeled. To help us assist you, please note the product model number and serial number before using the weight bench. For...
... this manual carefully before calling. Seat Leg Lever Backrest Weight Tube Curl Pad 4 Before You Begin Thank you have additional questions, please call our Customer Service Department Before reading further, please review the drawing below and familiarize yourself with the parts that are labeled. To help us assist you, please note the product model number and serial number before using the weight bench. For...
English Manual
Page 5
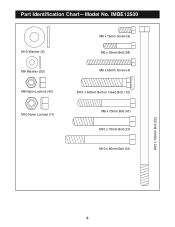
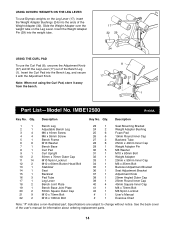
Part Identification ChartÑModel No. IMBE12500 M10 Washer (6) M6 Washer (30) M8 Nylon Locknut (42) M10 Nylon Locknut (11) M6 x 16mm Screw (3) M6 x 35mm Bolt (34) M6 x 55mm Screw (4) M10 x 60mm Button Head Bolt (12) M8 x 70mm Bolt (41) M10 x 70mm Bolt (21) M10 x 80mm Bolt (31) M10 x 190mm Bolt (22) 5
Part Identification ChartÑModel No. IMBE12500 M10 Washer (6) M6 Washer (30) M8 Nylon Locknut (42) M10 Nylon Locknut (11) M6 x 16mm Screw (3) M6 x 35mm Bolt (34) M6 x 55mm Screw (4) M10 x 60mm Button Head Bolt (12) M8 x 70mm Bolt (41) M10 x 70mm Bolt (21) M10 x 80mm Bolt (31) M10 x 190mm Bolt (22) 5
English Manual
Page 6
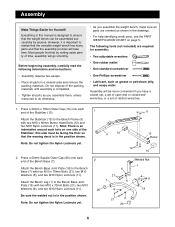
Attach the Bench Leg (1) to the Bench Base (7) with two M10 x 70mm Bolts (21), two M10 Washers (6), and two M10 Nylon Locknuts (11). Press a 50mm x 70mm Outer Cap (10) onto each end of the Bench Base (7). Note: Do not tighten the Nylon Locknuts yet. 2. this manual is completed. ¥ Tighten all parts as you assemble them, unless instructed to realize that the versatile weight bench has...
Attach the Bench Leg (1) to the Bench Base (7) with two M10 x 70mm Bolts (21), two M10 Washers (6), and two M10 Nylon Locknuts (11). Press a 50mm x 70mm Outer Cap (10) onto each end of the Bench Base (7). Note: Do not tighten the Nylon Locknuts yet. 2. this manual is completed. ¥ Tighten all parts as you assemble them, unless instructed to realize that the versatile weight bench has...
English Manual
Page 7
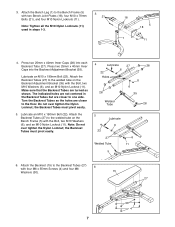
... are turned as shown. Attach the Backrest (15) to the welded tube on the Bench Frame (5) with the Bolt, two M10 Washers (6), and an M10 Nylon Locknut (11). Note: Tighten all the M10 Nylon Locknuts (11) used in the Backrest Tubes but are not centered in steps 1-3. 3 21 18 5 18 1 11 4. the Backrest Tubes must pivot easily. 4 Lubricate...
... are turned as shown. Attach the Backrest (15) to the welded tube on the Bench Frame (5) with the Bolt, two M10 Washers (6), and an M10 Nylon Locknut (11). Note: Tighten all the M10 Nylon Locknuts (11) used in the Backrest Tubes but are not centered in steps 1-3. 3 21 18 5 18 1 11 4. the Backrest Tubes must pivot easily. 4 Lubricate...
English Manual
Page 8
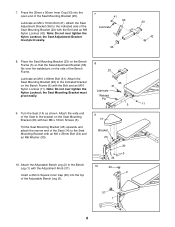
... of the Seat (14) to the bracket on the side of the Adjustable Bench Leg (2). 8 23 36 31 Lubricate Welded Pin 5 9 14 Bracket 23 30 3 34 10 40 2 37 1 23 42 11 8 Attach the Adjustable Bench Leg (2) to the indicated side of the Seat Mounting Bracket (23). Attach the Seat Adjustment Bracket (36) to the Bench Leg (1) with two M6 x 16mm Screws (3). Note: Do not over tighten the...
... of the Seat (14) to the bracket on the side of the Adjustable Bench Leg (2). 8 23 36 31 Lubricate Welded Pin 5 9 14 Bracket 23 30 3 34 10 40 2 37 1 23 42 11 8 Attach the Adjustable Bench Leg (2) to the indicated side of the Seat Mounting Bracket (23). Attach the Seat Adjustment Bracket (36) to the Bench Leg (1) with two M6 x 16mm Screws (3). Note: Do not over tighten the...
English Manual
Page 9
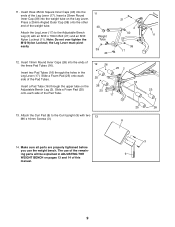
... the Adjustable Bench Leg (2) with two 13 M6 x 16mm Screws (3). 25 26 8 14. Attach the Leg Lever (17) to the Curl Upright (9) with an M10 x 70mm Bolt (21) and an M10 Nylon Locknut (11). The use the weight bench. Slide a Foam Pad (25) onto each side of the Pad Tube. 25 17 11 25 13. 11. Press a ...25mm Angled Outer Cap (38) onto the other end of the Leg Lever (17). Make sure all parts are properly tightened before you use of the remaining parts will be explained in ADJUSTING THE WEIGHT BENCH on pages 13 and 14 of the three Pad ...
... the Adjustable Bench Leg (2) with two 13 M6 x 16mm Screws (3). 25 26 8 14. Attach the Leg Lever (17) to the Curl Upright (9) with an M10 x 70mm Bolt (21) and an M10 Nylon Locknut (11). The use the weight bench. Slide a Foam Pad (25) onto each side of the Pad Tube. 25 17 11 25 13. 11. Press a ...25mm Angled Outer Cap (38) onto the other end of the Leg Lever (17). Make sure all parts are properly tightened before you use of the remaining parts will be explained in ADJUSTING THE WEIGHT BENCH on pages 13 and 14 of the three Pad ...
English Manual
Page 10
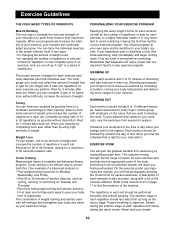
... stage. Weight Loss To lose weight, use a low amount of weight and increase the number of repetitions or sets for each repetition and inhale during the return stroke. This requires moving only the appropriate parts of each set . The exertion stage of the body. Never hold your workouts, vary the exercises from exercising by changing the number of your exercise, your bodyÕs signals. PERSONALIZING YOUR EXERCISE PROGRAM Specifying...
... stage. Weight Loss To lose weight, use a low amount of weight and increase the number of repetitions or sets for each repetition and inhale during the return stroke. This requires moving only the appropriate parts of each set . The exertion stage of the body. Never hold your workouts, vary the exercises from exercising by changing the number of your exercise, your bodyÕs signals. PERSONALIZING YOUR EXERCISE PROGRAM Specifying...
English Manual
Page 11
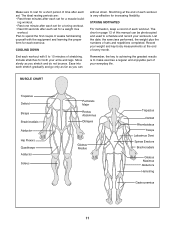
...form for each set for a muscle build- COOLING DOWN End each set . Ease into each workout. STAYING MOTIVATED For motivation, keep a record of each stretch gradually and go only as far as you can be photocopied and used to schedule and record your workouts. Remember, the key...Abductors Hamstring Gastrocnemius 11 List the date, the exercises performed, the weight plus the numbers of every month. Move slowly as you stretch and do not bounce. ing workout. ¥ Rest one minute after each set for a weight loss workout. The chart on page 12 of this manual can without strain....
...form for each set for a muscle build- COOLING DOWN End each set . Ease into each workout. STAYING MOTIVATED For motivation, keep a record of each stretch gradually and go only as far as you can be photocopied and used to schedule and record your workouts. Remember, the key...Abductors Hamstring Gastrocnemius 11 List the date, the exercises performed, the weight plus the numbers of every month. Move slowly as you stretch and do not bounce. ing workout. ¥ Rest one minute after each set for a weight loss workout. The chart on page 12 of this manual can without strain....
English Manual
Page 12
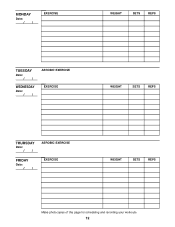
MONDAY Date: / / EXERCISE WEIGHT SETS REPS TUESDAY Date: / / WEDNESDAY Date: / / AEROBIC EXERCISE EXERCISE WEIGHT SETS REPS THURSDAY Date: / / FRIDAY Date: / / AEROBIC EXERCISE EXERCISE WEIGHT SETS REPS Make photocopies of this page for scheduling and recording your workouts. 12
MONDAY Date: / / EXERCISE WEIGHT SETS REPS TUESDAY Date: / / WEDNESDAY Date: / / AEROBIC EXERCISE EXERCISE WEIGHT SETS REPS THURSDAY Date: / / FRIDAY Date: / / AEROBIC EXERCISE EXERCISE WEIGHT SETS REPS Make photocopies of this page for scheduling and recording your workouts. 12
English Manual
Page 13
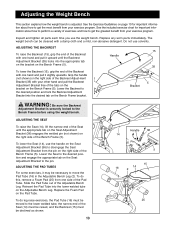
... get the greatest benefit from your exercise program. To lower the Seat (14), use the handle on the Seat Adjustment Bracket (36) to disengage the Seat Adjustment Bracket from the pin on page 10 for important information about how to move the Pad Tube (16) in the Adjustable Bench Leg (2). Replace the Foam Pad on the Bench Frame (5). Replace any worn parts immediately. Lower the Seat to the desired position and...
... get the greatest benefit from your exercise program. To lower the Seat (14), use the handle on the Seat Adjustment Bracket (36) to disengage the Seat Adjustment Bracket from the pin on page 10 for important information about how to move the Pad Tube (16) in the Adjustable Bench Leg (2). Replace the Foam Pad on the Bench Frame (5). Replace any worn parts immediately. Lower the Seat to the desired position and...
English Manual
Page 14
Insert the Weight Adapter Pin (29) into the weight tube. 17 32 29 USING THE CURL PAD To use Olympic weights on the Leg Lever. Description Key No. Specifications are subject to change without notice. See the back cover of the userÕs manual for information about ordering replacement parts. 14 USING OLYMPIC WEIGHTS ON THE LEG LEVER To use the Curl Pad (8), unscrew the Adjustment Knob (37) and lift the Leg Lever (17) out...
Insert the Weight Adapter Pin (29) into the weight tube. 17 32 29 USING THE CURL PAD To use Olympic weights on the Leg Lever. Description Key No. Specifications are subject to change without notice. See the back cover of the userÕs manual for information about ordering replacement parts. 14 USING OLYMPIC WEIGHTS ON THE LEG LEVER To use the Curl Pad (8), unscrew the Adjustment Knob (37) and lift the Leg Lever (17) out...
English Manual
Page 16
... information when calling: ¥ The MODEL NUMBER of the product (IMBE12500) ¥ The NAME of the product (IMAGE¨ 3.6 weight bench) ¥ The SERIAL NUMBER of the product (see the front cover of this manual) ¥ The KEY NUMBER and DESCRIPTION of the desired part(s) (see the PART LIST and the EXPLODED DRAWING on how long an implied warranty lasts. Limited Warranty ICON Health & Fitness, Inc. (ICON), warrants this warranty is authorized by ICON...
... information when calling: ¥ The MODEL NUMBER of the product (IMBE12500) ¥ The NAME of the product (IMAGE¨ 3.6 weight bench) ¥ The SERIAL NUMBER of the product (see the front cover of this manual) ¥ The KEY NUMBER and DESCRIPTION of the desired part(s) (see the PART LIST and the EXPLODED DRAWING on how long an implied warranty lasts. Limited Warranty ICON Health & Fitness, Inc. (ICON), warrants this warranty is authorized by ICON...


