User Guide
Page 2
... for your Monitor ...5 Connecting your Monitor for Analog 6 Connecting your Monitor for Digital 7 Switching on your Monitor 8 Device Driver Installation...9 Windows 2003/Me ...9 Windows XP...10 Windows Vista...11 Auto Setup ...12 Auto Setup ...12 Auto Setup for DOS ...13 Auto Setup for Windows 2003, Windows Me or Windows XP 14 Manual Setup...15 Adjusting Your LCD Monitor 16 User controls ...16 On-screen display (OSD) controls 18 General Information...20 Display modes ...20 Power Management...22 Product Disposal...22 Troubleshooting...23 Further Help ...26 Specifications...27 Product...
... for your Monitor ...5 Connecting your Monitor for Analog 6 Connecting your Monitor for Digital 7 Switching on your Monitor 8 Device Driver Installation...9 Windows 2003/Me ...9 Windows XP...10 Windows Vista...11 Auto Setup ...12 Auto Setup ...12 Auto Setup for DOS ...13 Auto Setup for Windows 2003, Windows Me or Windows XP 14 Manual Setup...15 Adjusting Your LCD Monitor 16 User controls ...16 On-screen display (OSD) controls 18 General Information...20 Display modes ...20 Power Management...22 Product Disposal...22 Troubleshooting...23 Further Help ...26 Specifications...27 Product...
User Guide
Page 4
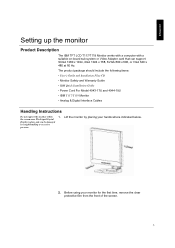
..., SVGA 800 x 600, or VGA 640 x 480 at 60 Hz. The product package should include the following items: • User's Guide and Installation Files CD • Monitor Safety and Warranty Guide • IBM Quick Installation Guide • Power Cord For Model 4943-17U and 4944-19U • IBM T117/T119 Monitor • Analog & Digital Interface Cables Handling Instructions Do not support the monitor within 1. the screen area. Before using your hands where indicated...
..., SVGA 800 x 600, or VGA 640 x 480 at 60 Hz. The product package should include the following items: • User's Guide and Installation Files CD • Monitor Safety and Warranty Guide • IBM Quick Installation Guide • Power Cord For Model 4943-17U and 4944-19U • IBM T117/T119 Monitor • Analog & Digital Interface Cables Handling Instructions Do not support the monitor within 1. the screen area. Before using your hands where indicated...
User Guide
Page 5
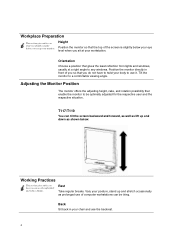
... use the backrest. 4 Adjusting the Monitor Position The monitor offers the adjusting height, rake, and rotation possibility that the top of computer workstations can be optimally adjusted for the respective user and the respective situation. Rest Take regular breaks. T117/T119 You can tilt the screen backward and forward, as well as lift up your monitor. Height Position the monitor so that enable the monitor to a comfortable viewing...
... use the backrest. 4 Adjusting the Monitor Position The monitor offers the adjusting height, rake, and rotation possibility that the top of computer workstations can be optimally adjusted for the respective user and the respective situation. Rest Take regular breaks. T117/T119 You can tilt the screen backward and forward, as well as lift up your monitor. Height Position the monitor so that enable the monitor to a comfortable viewing...

User Guide
Page 6
... and have to view in comfort. Screen settings Set the screen brightness and contrast to rest your wrists are approximately horizontal and your wrists when not typing. Caring for more information. Consider using the keyboard. Many application programs let you select color combinations which can be relaxed with a soft cloth. y Never use solvents or abrasives. Use a light touch on the monitor. Clean your eyesight checked regularly. Your...
... and have to view in comfort. Screen settings Set the screen brightness and contrast to rest your wrists are approximately horizontal and your wrists when not typing. Caring for more information. Consider using the keyboard. Many application programs let you select color combinations which can be relaxed with a soft cloth. y Never use solvents or abrasives. Use a light touch on the monitor. Clean your eyesight checked regularly. Your...
User Guide
Page 7
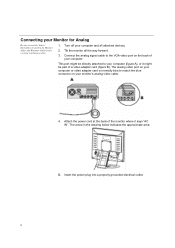
... "AC IN". Connect the analog signal cable to match the blue connector on the back of the monitor where it might be part of a video adapter card (figure B). Tilt the monitor all attached devices. 2. Turn off your computer. Attach the power cord at the back of your computer and all the way forward. 3. The analog video port on your computer or video adapter card is normally blue to the VGA video port on your monitor's analog video cable. 4. The arrow...
... "AC IN". Connect the analog signal cable to match the blue connector on the back of the monitor where it might be part of a video adapter card (figure B). Tilt the monitor all attached devices. 2. Turn off your computer. Attach the power cord at the back of your computer and all the way forward. 3. The analog video port on your computer or video adapter card is normally blue to the VGA video port on your monitor's analog video cable. 4. The arrow...
User Guide
Page 9
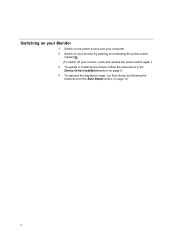
Switching on your computer. 2. To update or install device drivers, follow the instructions in the Auto Setup section on your monitor, push and release the power switch again.) 3. Switch on page 12. 8 To optimize the displayed image, run Auto Setup by pushing and releasing the power switch marked . (To switch off your monitor by following the instructions in the Device Driver Installation section on the power source and your Monitor 1. Switch on page 9. 4.
Switching on your computer. 2. To update or install device drivers, follow the instructions in the Auto Setup section on your monitor, push and release the power switch again.) 3. Switch on page 12. 8 To optimize the displayed image, run Auto Setup by pushing and releasing the power switch marked . (To switch off your monitor by following the instructions in the Device Driver Installation section on the power source and your Monitor 1. Switch on page 9. 4.

User Guide
Page 10
Turn off the computer and all open windows and remove the CD. 17. On LCD monitors, unlike CRTs, a faster refresh rate does not improve display quality. 4. Select the "Display a list of 60Hz. 5. The files will automatically select the maximum refresh rate and corresponding Color Matching Profiles. 9 Click the ADVANCED button. 7. Open the UPGRADE DEVICE DRIVER WIZARD window by clicking START, SETTINGS, CONTROL PANEL and then double-clicking the DISPLAY IBM recommends using either 1280 x icon. 1024 at...
Turn off the computer and all open windows and remove the CD. 17. On LCD monitors, unlike CRTs, a faster refresh rate does not improve display quality. 4. Select the "Display a list of 60Hz. 5. The files will automatically select the maximum refresh rate and corresponding Color Matching Profiles. 9 Click the ADVANCED button. 7. Open the UPGRADE DEVICE DRIVER WIZARD window by clicking START, SETTINGS, CONTROL PANEL and then double-clicking the DISPLAY IBM recommends using either 1280 x icon. 1024 at...

User Guide
Page 11
... button. 7. Click the PROPERTIES button. 9. Open the DISPLAY PROPERTIES window by clicking on UPDATE DRIVER and then click the NEXT button. 11. Click the DRIVER tab. 10. Choose IBM 4943/4944 monitor and click OK. Turn on the monitor and then the system unit. On LCD monitors, unlike CRTs, a faster refresh rate does not improve display quality. Driver Installation for Windows XP This section must be completed before continuing with the Windows XP Auto Setup...
... button. 7. Click the PROPERTIES button. 9. Open the DISPLAY PROPERTIES window by clicking on UPDATE DRIVER and then click the NEXT button. 11. Click the DRIVER tab. 10. Choose IBM 4943/4944 monitor and click OK. Turn on the monitor and then the system unit. On LCD monitors, unlike CRTs, a faster refresh rate does not improve display quality. Driver Installation for Windows XP This section must be completed before continuing with the Windows XP Auto Setup...
User Guide
Page 12
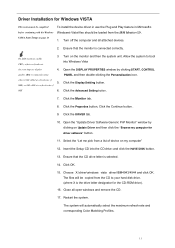
.... Open the "Update Driver Software-Generic PnP Monitor" window by clicking START, CONTROL quality .IBM recommends using PANEL and then double-clicking the Personalization icon. Driver Installation for Windows VISTA This section must be completed To install the device driver in use the Plug and Play feature in Microsoft® before continuing with the Windows Windows® Vista files should be copied from the IBM Monitor CD. Click the Advanced Setting button. 7. Choose X:\driver\windows vista driver...
.... Open the "Update Driver Software-Generic PnP Monitor" window by clicking START, CONTROL quality .IBM recommends using PANEL and then double-clicking the Personalization icon. Driver Installation for Windows VISTA This section must be completed To install the device driver in use the Plug and Play feature in Microsoft® before continuing with the Windows Windows® Vista files should be copied from the IBM Monitor CD. Click the Advanced Setting button. 7. Choose X:\driver\windows vista driver...
User Guide
Page 13
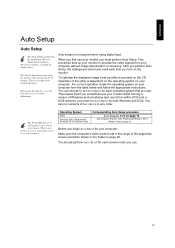
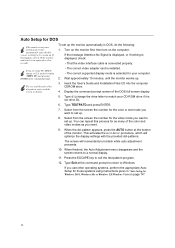
.... ENGLISH Auto Setup Auto Setup The Setup Utility included on the CD. They do not replace or modify the display driver. The Auto Setup instructions require the monitor to Auto Adjustment. To optimize the displayed image a set in any order. For correct operation locate the operating system on your computer from within DOS (not a DOS window), you will have direct access to be warmed up utility is provided on the installation...
.... ENGLISH Auto Setup Auto Setup The Setup Utility included on the CD. They do not replace or modify the display driver. The Auto Setup instructions require the monitor to Auto Adjustment. To optimize the displayed image a set in any order. For correct operation locate the operating system on your computer from within DOS (not a DOS window), you will have direct access to be warmed up utility is provided on the installation...
User Guide
Page 14
... turn black while auto adjustment proceeds. 10. When the dot pattern appears, press the AUTO button at the bottom of the DOS full-screen display. 5. When finished, the Auto Adjustment menu disappears and the screen returns to Windows. If the message Attention No Signal is displayed, or if nothing is displayed, check: • That the video interface cable is connected properly. • The correct video adapter card is installed. Select from the screen the number for...
... turn black while auto adjustment proceeds. 10. When the dot pattern appears, press the AUTO button at the bottom of the DOS full-screen display. 5. When finished, the Auto Adjustment menu disappears and the screen returns to Windows. If the message Attention No Signal is displayed, or if nothing is displayed, check: • That the video interface cable is connected properly. • The correct video adapter card is installed. Select from the screen the number for...
User Guide
Page 15
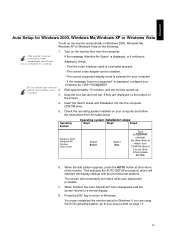
... to the bottom of the monitor. ENGLISH Auto Setup for Windows 2003, Windows Me,Windows XP or Windows Vista To set up the monitor automatically in power saving mode, it may automatically turn black while auto adjustment proceeds. 7. If the message Attention No Signal is displayed, or if nothing is displayed, check: • That the video interface cable is connected properly. • The correct video adapter card is installed. • The correct supported display mode is displayed, configure your computer and follow...
... to the bottom of the monitor. ENGLISH Auto Setup for Windows 2003, Windows Me,Windows XP or Windows Vista To set up the monitor automatically in power saving mode, it may automatically turn black while auto adjustment proceeds. 7. If the message Attention No Signal is displayed, or if nothing is displayed, check: • That the video interface cable is connected properly. • The correct video adapter card is installed. • The correct supported display mode is displayed, configure your computer and follow...
User Guide
Page 16
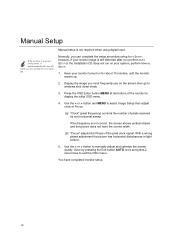
... phase adjustment the picture has horizontal disturbances in power saving mode, it might automatically turn off while you most frequently use on your screen image is in light picture. 5. Use the < or > button to display the initial OSD menu. 4. Press the OSD Enter button MENU at the bottom of the pixel clock signal. If the monitor is still distorted after you can complete the setup procedure using digital input. If the frequency is not required when using AUTO SETUP; Manual Setup Manual setup is not...
... phase adjustment the picture has horizontal disturbances in power saving mode, it might automatically turn off while you most frequently use on your screen image is in light picture. 5. Use the < or > button to display the initial OSD menu. 4. Press the OSD Enter button MENU at the bottom of the pixel clock signal. If the monitor is still distorted after you can complete the setup procedure using digital input. If the frequency is not required when using AUTO SETUP; Manual Setup Manual setup is not...
User Guide
Page 17
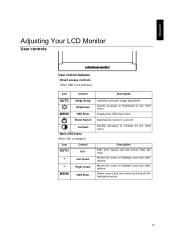
...-menus. Enters menus and sub-menus and selects the highlighted option. 16 ENGLISH Adjusting Your LCD Monitor User controls User control features • Direct access controls When OSD is not displayed, Icon AUTO MENU Control Image Setup Brightness OSD Enter Power Switch Contrast • Main OSD menu When OSD is displayed, Icon AUTO Control Exit < Left Arrow > Right Arrow MENU OSD Enter Description Activates automatic image adjustment. Displays the OSD main menu. Moves the cursor to highlight icons and other options. Moves the cursor...
...-menus. Enters menus and sub-menus and selects the highlighted option. 16 ENGLISH Adjusting Your LCD Monitor User controls User control features • Direct access controls When OSD is not displayed, Icon AUTO MENU Control Image Setup Brightness OSD Enter Power Switch Contrast • Main OSD menu When OSD is displayed, Icon AUTO Control Exit < Left Arrow > Right Arrow MENU OSD Enter Description Activates automatic image adjustment. Displays the OSD main menu. Moves the cursor to highlight icons and other options. Moves the cursor...

User Guide
Page 18
... (AUTO) button to access that function. y To lock the OSD, first turn off the monitor. To unlock the OSD, first turn off the monitor. OSD Lock / Unlock y This feature allows you to turn on the screen. 17 Then, hold down the "Menu" key and press "Power" key once to secure the current control settings, so that they cannot be displayed. This will be used to adjust the image to adjust the brightness and contrast. When the OSD...
... (AUTO) button to access that function. y To lock the OSD, first turn off the monitor. To unlock the OSD, first turn off the monitor. OSD Lock / Unlock y This feature allows you to turn on the screen. 17 Then, hold down the "Menu" key and press "Power" key once to secure the current control settings, so that they cannot be displayed. This will be used to adjust the image to adjust the brightness and contrast. When the OSD...
User Guide
Page 19
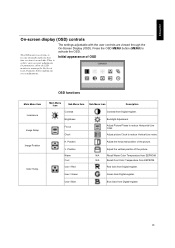
... making any screen adjustments. Initial appearance of the picture. H. Position Adjust the horizontal position of OSD OSD functions Main Menu Item Luminance Image Setup Image Position Color Temp. N/A Recall Cool Color Temperature from Digital-register. 18 Thus, to achieve more accurate adjustments for parameters, allow the LCD monitor to reduce Vertical-Line noise. Press the OSD MENU button (MENU) to become thermally stable the first time you turn it on each day. Position Warm Cool User / Red Adjust the vertical position of the picture. User / Green Green...
... making any screen adjustments. Initial appearance of the picture. H. Position Adjust the horizontal position of OSD OSD functions Main Menu Item Luminance Image Setup Image Position Color Temp. N/A Recall Cool Color Temperature from Digital-register. 18 Thus, to achieve more accurate adjustments for parameters, allow the LCD monitor to reduce Vertical-Line noise. Press the OSD MENU button (MENU) to become thermally stable the first time you turn it on each day. Position Warm Cool User / Red Adjust the vertical position of the picture. User / Green Green...
User Guide
Page 20
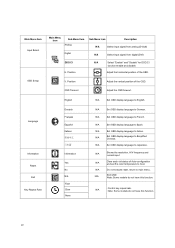
... models do not have this function. 19 Main Menu Item Input Select OSD Setup Main Menu Icon Sub Menu Item Analog Sub Menu Icon Description N/A Select input signal from analog (D-Sub) Digital N/A Select input signal from digital (DVI) DDC/CI H. Set OSD display language to German. Note: Some models do not have this function. Position N/A Select "Enable" and "Disable" for DDC/CI function enable and disable. V. N/A N/A N/A N/A N/A N/A N/A N/A N/A N/A Set OSD display language to French. Adjust the horizontal position of the OSD. Set OSD display language...
... models do not have this function. 19 Main Menu Item Input Select OSD Setup Main Menu Icon Sub Menu Item Analog Sub Menu Icon Description N/A Select input signal from analog (D-Sub) Digital N/A Select input signal from digital (DVI) DDC/CI H. Set OSD display language to German. Note: Some models do not have this function. Position N/A Select "Enable" and "Disable" for DDC/CI function enable and disable. V. N/A N/A N/A N/A N/A N/A N/A N/A N/A N/A Set OSD display language to French. Adjust the horizontal position of the OSD. Set OSD display language...
User Guide
Page 24
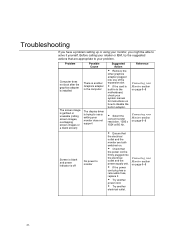
... adapter in the computer The display driver is trying to use a setting your system manual for instructions on how to disable the built-in to the motherboard, check your monitor does not support No power to your Monitor section on . Š Check that the power cord is built-in adapter. Problem Computer does not boot after the graphics adapter is installed The screen image is garbled or unusable (rolling screen images, overlapping screen images or a blank screen) Screen...
... adapter in the computer The display driver is trying to use a setting your system manual for instructions on how to disable the built-in to the motherboard, check your monitor does not support No power to your Monitor section on . Š Check that the power cord is built-in adapter. Problem Computer does not boot after the graphics adapter is installed The screen image is garbled or unusable (rolling screen images, overlapping screen images or a blank screen) Screen...

User Guide
Page 25
... the video signal The Color setting may be too low The monitor is in the Power saving status The monitor is not receiving a video signal Display mode of the monitor Suggested Action Š Adjust brightness and contrast. Š Press any key on the keyboard or move the mouse to restore operation. Š Check the Power Management software on your Monitor section on page 6~8 General Information section on page 16 24 ENGLISH Problem Screen...
... the video signal The Color setting may be too low The monitor is in the Power saving status The monitor is not receiving a video signal Display mode of the monitor Suggested Action Š Adjust brightness and contrast. Š Press any key on the keyboard or move the mouse to restore operation. Š Check the Power Management software on your Monitor section on page 6~8 General Information section on page 16 24 ENGLISH Problem Screen...
User Guide
Page 28
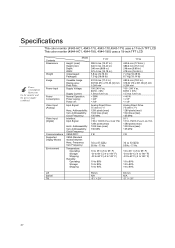
...a 17-inch TFT LCD This color monitor (4944-HC1, 4944-19U, 4944-19X) uses a 19-inch TFT LCD Power consumption figures are for the monitor and the power supply combined. Addressability: Vert. Contents Dimensions Weight Image Power Input Power Consumption Video Input (Analog) Video Input (Digital) Communications Supported Display Modes Environment Model Height: (max) Height (min) Depth: Width: Unpackaged: Packaged: Viewable Image Display area: Pixel Pitch: Supply Voltage: Supply Current: Normal Operation: Power saving: Power off: Input Signal: Horiz. Addressability: Clock Frequency: VESA DDC...
...a 17-inch TFT LCD This color monitor (4944-HC1, 4944-19U, 4944-19X) uses a 19-inch TFT LCD Power consumption figures are for the monitor and the power supply combined. Addressability: Vert. Contents Dimensions Weight Image Power Input Power Consumption Video Input (Analog) Video Input (Digital) Communications Supported Display Modes Environment Model Height: (max) Height (min) Depth: Width: Unpackaged: Packaged: Viewable Image Display area: Pixel Pitch: Supply Voltage: Supply Current: Normal Operation: Power saving: Power off: Input Signal: Horiz. Addressability: Clock Frequency: VESA DDC...

