

User Manual
Page 1
User's Manual DTT-3600 Digital Terrestrial MHP Receiver The default PIN Code is set to 0000.
User's Manual DTT-3600 Digital Terrestrial MHP Receiver The default PIN Code is set to 0000.

User Manual
Page 2
... HUMAX Corporation) Not to safely install, use and maintain the installation. Keep this user's manual carefully to be able to be copied, used or translated in this manual. The information in part or whole without notice. Warranty The warranty does not cover parts which could damage the equipment or other apparatus. • Note Indicates additional information to make the user aware of possible problems...
... HUMAX Corporation) Not to safely install, use and maintain the installation. Keep this user's manual carefully to be able to be copied, used or translated in this manual. The information in part or whole without notice. Warranty The warranty does not cover parts which could damage the equipment or other apparatus. • Note Indicates additional information to make the user aware of possible problems...

User Manual
Page 3
...108/CE, regarding the reduction of batteries specified above. No user serviceable parts inside. The illegal disposal of the product by the customer results in the application of the ...customer must be supported. Before you are not using the remote control for the environment and the health. The symbol with the type of dangerous substances in return for electronic and electro technical refuse. GB3 User's Manual In order to qualified service personnel. This symbol indicates important instructions accompanying the product. In addition the utilization of batteries...
...108/CE, regarding the reduction of batteries specified above. No user serviceable parts inside. The illegal disposal of the product by the customer results in the application of the ...customer must be supported. Before you are not using the remote control for the environment and the health. The symbol with the type of dangerous substances in return for electronic and electro technical refuse. GB3 User's Manual In order to qualified service personnel. This symbol indicates important instructions accompanying the product. In addition the utilization of batteries...

User Manual
Page 4
...power company. • Disconnect the product from the type of the product. 6. CONNECTION TO THE TV • Disconnect the product from the mains before connecting or disconnecting the cable from the TV. ATTACHMENTS • Do not use any unsupported attachments as these may result in electric fire or shock. 3. GB4 User's Manual... extension cord or adapter as this product only from the mains before cleaning. • Use a light damp cloth (no objects filled with liquid should not be placed on the apparatus. 4. If you start any maintenance or installation procedures....
...power company. • Disconnect the product from the type of the product. 6. CONNECTION TO THE TV • Disconnect the product from the mains before connecting or disconnecting the cable from the TV. ATTACHMENTS • Do not use any unsupported attachments as these may result in electric fire or shock. 3. GB4 User's Manual... extension cord or adapter as this product only from the mains before cleaning. • Use a light damp cloth (no objects filled with liquid should not be placed on the apparatus. 4. If you start any maintenance or installation procedures....

User Manual
Page 5
...twist the power cord. • Make sure to disconnect the power cord holding the plug. • Keep heating appliances as far as possible from melting. • The mains plug, as the original part. REPLACEMENT of PARTS • When replacement of lightning. 3. GB5 User's Manual To ...power plug with wet hands. • Disconnect the power cord in additional damage to prevent the cover vinyl from the power cord in the unit, where they can be sure the service technician uses replacement parts specified by the manufacturer or those that you continue to lightning and power...
...twist the power cord. • Make sure to disconnect the power cord holding the plug. • Keep heating appliances as far as possible from melting. • The mains plug, as the original part. REPLACEMENT of PARTS • When replacement of lightning. 3. GB5 User's Manual To ...power plug with wet hands. • Disconnect the power cord in additional damage to prevent the cover vinyl from the power cord in the unit, where they can be sure the service technician uses replacement parts specified by the manufacturer or those that you continue to lightning and power...

User Manual
Page 6
... GB15 2.5 Connecting the Audio System GB16 2.6 Powering On GB17 3. Software Update GB32 5.1 OTA (Over the Air GB32 6. Service and Support GB38 GB6 User's Manual Menu GB23 4.1 Channel GB23 4.2 Preference GB25 4.3 System GB28 4.4 Pay Per View Services GB31 5. Specification GB36 8. Before Using the Product GB7 1.1 Package Contents GB7 1.2 Front Panel GB8 1.3 Rear Panel GB9 1.4 Remote control GB10 2. Trouble Shooting GB33 6.1 Trouble Shooting GB33 6.2 Error Message GB34 7. Basic Operation GB18 3.1 Installation Wizard...
... GB15 2.5 Connecting the Audio System GB16 2.6 Powering On GB17 3. Software Update GB32 5.1 OTA (Over the Air GB32 6. Service and Support GB38 GB6 User's Manual Menu GB23 4.1 Channel GB23 4.2 Preference GB25 4.3 System GB28 4.4 Pay Per View Services GB31 5. Specification GB36 8. Before Using the Product GB7 1.1 Package Contents GB7 1.2 Front Panel GB8 1.3 Rear Panel GB9 1.4 Remote control GB10 2. Trouble Shooting GB33 6.1 Trouble Shooting GB33 6.2 Error Message GB34 7. Basic Operation GB18 3.1 Installation Wizard...
User Manual
Page 8
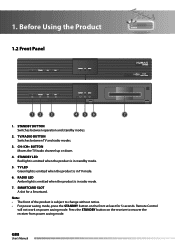
... is in standby mode. 5. Remote Control will not work on the front at least for a Smartcard. GB8 User's Manual CH-/CH+ BUTTON Moves the TV/radio channel up or down. 4. STANDBY BUTTON Switches between TV and radio modes. 3. SMARTCARD SLOT A slot for 5 seconds. Press the STANDBY button on the receiver to change without notice. • For power saving mode, press the STANDBY button on power saving mode. Before Using the Product...
... is in standby mode. 5. Remote Control will not work on the front at least for a Smartcard. GB8 User's Manual CH-/CH+ BUTTON Moves the TV/radio channel up or down. 4. STANDBY BUTTON Switches between TV and radio modes. 3. SMARTCARD SLOT A slot for 5 seconds. Press the STANDBY button on the receiver to change without notice. • For power saving mode, press the STANDBY button on power saving mode. Before Using the Product...
User Manual
Page 9
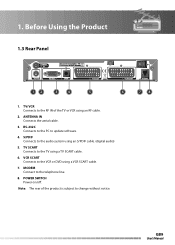
...RF IN of the product is subject to the VCR or DVD using an S/PDIF cable. (digital audio) 5. VCR SCART Connects to change without notice. Before Using the Product ANTENNA IN 9 90-250V~50/60Hz TV/VCR RS-... 8 1. S/PDIF Connects to the TV using an RF cable. 2. Note: The rear of the TV or VCR using a TV SCART cable. 6. MODEM Connect to update software. 4. GB9 User's Manual ANTENNA IN Connects the aerial cable. 3. POWER SWITCH Power on/off. TV SCART Connects to the audio system using a VCR SCART cable. 7. DTT-3600/DTV-4700_ (100119) 1. RS-232C Connects to the PC to...
...RF IN of the product is subject to the VCR or DVD using an S/PDIF cable. (digital audio) 5. VCR SCART Connects to change without notice. Before Using the Product ANTENNA IN 9 90-250V~50/60Hz TV/VCR RS-... 8 1. S/PDIF Connects to the TV using an RF cable. 2. Note: The rear of the TV or VCR using a TV SCART cable. 6. MODEM Connect to update software. 4. GB9 User's Manual ANTENNA IN Connects the aerial cable. 3. POWER SWITCH Power on/off. TV SCART Connects to the audio system using a VCR SCART cable. 7. DTT-3600/DTV-4700_ (100119) 1. RS-232C Connects to the PC to...
User Manual
Page 10
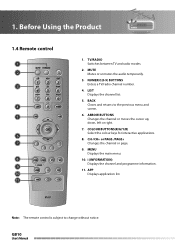
... audio tempo1ra2rily. 3. BACK Closes and screen. GB10 User's Manual returns to change without notice. ARROW BUTTONS 14 Changes the channel or moves the cursor up, down, left or right. 7. i (INFORMATION) 16 Displays the channel and programme information. 11. TV/RADIO Switches between TV and radio modes. 2. CH-/CH+ or PAGE-/PAGE+ Changes the channel or page. 9. Before Using the Product 1.4 Remote control 1 2 3 4 5 6 7 8 9 10 11 1. MENU Displays the main menu...
... audio tempo1ra2rily. 3. BACK Closes and screen. GB10 User's Manual returns to change without notice. ARROW BUTTONS 14 Changes the channel or moves the cursor up, down, left or right. 7. i (INFORMATION) 16 Displays the channel and programme information. 11. TV/RADIO Switches between TV and radio modes. 2. CH-/CH+ or PAGE-/PAGE+ Changes the channel or page. 9. Before Using the Product 1.4 Remote control 1 2 3 4 5 6 7 8 9 10 11 1. MENU Displays the main menu...

User Manual
Page 12
... the TV with the particular equipments for gaining optimum signal quality. Select the most appropriate procedure depending on the equipment you encounter any problems setting up your product, please contact your local product distributor. 2.1 Connecting the Antenna Connect your aerial to the ANTENNA IN. Note: If ...you have. ANTENNA IN 9 90-250V~50/60Hz TV/VCR RS-232C SPDIF TV SCART VCR SCART MODEM GB12 User's Manual ANTENNA ...
... the TV with the particular equipments for gaining optimum signal quality. Select the most appropriate procedure depending on the equipment you encounter any problems setting up your product, please contact your local product distributor. 2.1 Connecting the Antenna Connect your aerial to the ANTENNA IN. Note: If ...you have. ANTENNA IN 9 90-250V~50/60Hz TV/VCR RS-232C SPDIF TV SCART VCR SCART MODEM GB12 User's Manual ANTENNA ...

User Manual
Page 16
Setup 2.5 Connecting the Audio System Connect the product and the Dolby Digital decoder for higher quality sound using an S/PDIF cable. ANTENNA IN 9 90-250V~50/60Hz TV/VCR RS-232C SPDIF TV SCART VCR SCART MODEM S/PDIF Cable S/PDIF GB16 User's Manual 2.
Setup 2.5 Connecting the Audio System Connect the product and the Dolby Digital decoder for higher quality sound using an S/PDIF cable. ANTENNA IN 9 90-250V~50/60Hz TV/VCR RS-232C SPDIF TV SCART VCR SCART MODEM S/PDIF Cable S/PDIF GB16 User's Manual 2.
User Manual
Page 18
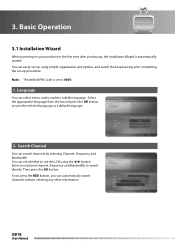
... list and press the OK button to search directly. 3. You can search channels by selecting Channel, Frequency and Bandwidth. Search Channel You can set -up using the t/u button. If you press the RED button, you can automatically search channels without entering any other information. Note: The default PIN Code is automatically started. Basic Operation 3.1 Installation Wizard When powering on your desired channel, frequency and Bandwidth to save the selected language as a default language...
... list and press the OK button to search directly. 3. You can search channels by selecting Channel, Frequency and Bandwidth. Search Channel You can set -up using the t/u button. If you press the RED button, you can automatically search channels without entering any other information. Note: The default PIN Code is automatically started. Basic Operation 3.1 Installation Wizard When powering on your desired channel, frequency and Bandwidth to save the selected language as a default language...

User Manual
Page 21
... displayed in multiple audio languages, you can select the language that you can also display the subtitle language list by pressing the GREEN button while the program banner is available in the selected language at the bottom of the following methods. 1. Press the SOUNDTRACK button to display soundtrack list and select your desired channel numeric using the NUMERIC(0-9) button to move to the channel directly. 3. Channel Change You can switch channel using...
... displayed in multiple audio languages, you can select the language that you can also display the subtitle language list by pressing the GREEN button while the program banner is available in the selected language at the bottom of the following methods. 1. Press the SOUNDTRACK button to display soundtrack list and select your desired channel numeric using the NUMERIC(0-9) button to move to the channel directly. 3. Channel Change You can switch channel using...
User Manual
Page 23
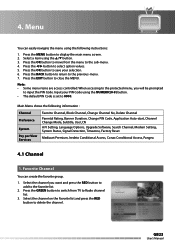
...(0-9) button. • The default PIN Code is set to the sub-menu. 4. Press the t/u button to the favorite list. 2. Select the channel on the Favorite list and press the RED button to display the main menu screen. 2. Favorite Channel You can easily navigate the menu using the following information : Channel Preference System Pay per View Services Favorite Channel, Block Channel, Change Channel No, Delete Channel Parental Rating, Banner Duration, Change PIN Code, Application Auto-start, Channel Change Mode, Subtitle, Use LCN A/V Setting, Language Options, Upgrade Software...
...(0-9) button. • The default PIN Code is set to the sub-menu. 4. Press the t/u button to the favorite list. 2. Select the channel on the Favorite list and press the RED button to display the main menu screen. 2. Favorite Channel You can easily navigate the menu using the following information : Channel Preference System Pay per View Services Favorite Channel, Block Channel, Change Channel No, Delete Channel Parental Rating, Banner Duration, Change PIN Code, Application Auto-start, Channel Change Mode, Subtitle, Use LCN A/V Setting, Language Options, Upgrade Software...
User Manual
Page 24
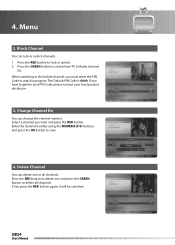
... RED button again, it will be canceled. Delete Channel You can change the channel number. If you have forgotten your PIN Code, please contact your local product distributor. 3. Change Channel No You can delete one and press the GREEN button to Radio channel list. GB24 User's Manual Block Channel You can lock or unlock channels. 1. Select a channel you must enter the PIN Code to save. 4. 4. Press the RED button to lock or unlock. 2. Menu...
... RED button again, it will be canceled. Delete Channel You can change the channel number. If you have forgotten your PIN Code, please contact your local product distributor. 3. Change Channel No You can delete one and press the GREEN button to Radio channel list. GB24 User's Manual Block Channel You can lock or unlock channels. 1. Select a channel you must enter the PIN Code to save. 4. 4. Press the RED button to lock or unlock. 2. Menu...

User Manual
Page 25
4. Menu 4.2 Preference 1. Parental Rating You can set the duration of the mini EPG to watch the program which is blocked by the age level. • The default PIN Code is 0000. 2. Select the age level. (No Control, 7years, 12 years, 14years, 18years, Lock All) Note: • You have to enter PIN Code to be automatically displayed when you have set. Banner Duration You can block programs according to the age level you switch the channel. (0sec, 3sec, 5sec, 10sec, 15sec) GB25 User's Manual
4. Menu 4.2 Preference 1. Parental Rating You can set the duration of the mini EPG to watch the program which is blocked by the age level. • The default PIN Code is 0000. 2. Select the age level. (No Control, 7years, 12 years, 14years, 18years, Lock All) Note: • You have to enter PIN Code to be automatically displayed when you have set. Banner Duration You can block programs according to the age level you switch the channel. (0sec, 3sec, 5sec, 10sec, 15sec) GB25 User's Manual

User Manual
Page 26
... confirm. Application Auto-start mode will be started automatically at every modification of program. 5. Channel Change Mode You can choose the channel navigation mode among All TV, All Radio and Favorite Channels. Menu 3. GB26 User's Manual If it is 0000. • If you have forgotten your PIN Code, please contact your PIN Code. Note: • The default PIN Code is selected, all interactive application in auto-start You can change the existing PIN Code into a new...
... confirm. Application Auto-start mode will be started automatically at every modification of program. 5. Channel Change Mode You can choose the channel navigation mode among All TV, All Radio and Favorite Channels. Menu 3. GB26 User's Manual If it is 0000. • If you have forgotten your PIN Code, please contact your PIN Code. Note: • The default PIN Code is selected, all interactive application in auto-start You can change the existing PIN Code into a new...

User Manual
Page 32
....com for downloading software versions. Update software when the quality of receiving signal strength is off during software update. If the power is not recommendable due to -date software. GB32 User's Manual 5. It is essential to have the most up-to bad weather, perform the software upgrade later. The equipment must be careful not to pull out the Signal line (co-axial Cable) during software update, it is...
....com for downloading software versions. Update software when the quality of receiving signal strength is off during software update. If the power is not recommendable due to -date software. GB32 User's Manual 5. It is essential to have the most up-to bad weather, perform the software upgrade later. The equipment must be careful not to pull out the Signal line (co-axial Cable) during software update, it is...
User Manual
Page 33
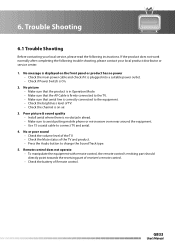
... connected to change the Sound Track type. 5. No or poor sound • Check the volume level of the TV. • Check the Mute status of the TV and product. • Press the Audio button to the equipment. • Check the brightness level of Remote control. GB33 User's Manual If the product does not work normally after completing the following instructions. Poor picture & sound quality • Install...
... connected to change the Sound Track type. 5. No or poor sound • Check the volume level of the TV. • Check the Mute status of the TV and product. • Press the Audio button to the equipment. • Check the brightness level of Remote control. GB33 User's Manual If the product does not work normally after completing the following instructions. Poor picture & sound quality • Install...

User Manual
Page 34
... or the Smartcard in use is not a NAGRA. Smartcard may be damaged. Trouble Shooting 6.2 Error Message 1. Check if the antenna cable is unplugged. Insert Smartcard. OSD Messages Error message in full AV mode Signal is weak • Please check antenna and RF cable • Unplug and plug power cord Service not available No Channels Blocked by parental rating Blocked by user Error Message in scaled AV mode Signal is...
... or the Smartcard in use is not a NAGRA. Smartcard may be damaged. Trouble Shooting 6.2 Error Message 1. Check if the antenna cable is unplugged. Insert Smartcard. OSD Messages Error message in full AV mode Signal is weak • Please check antenna and RF cable • Unplug and plug power cord Service not available No Channels Blocked by parental rating Blocked by user Error Message in scaled AV mode Signal is...


