User Guide
Page 2
... Started 6 2.1 Appearance 6 2.2 Setting Up Your Mobile Phone 7 2.3 Power On or Off Your Mobile Phone 10 2.4 Using the Touchscreen 10 2.5 Locking and Unlocking the Screen 11 2.6 Home Screen 12 2.7 Application Screen 17 2.8 Using a microSD Card 17 3 Calling 18 3.1 Making a Call 18 3.2 Answering or Rejecting a Call 19 3.3 Other Operations During a Call 21 3.4 Using the Call...
... Started 6 2.1 Appearance 6 2.2 Setting Up Your Mobile Phone 7 2.3 Power On or Off Your Mobile Phone 10 2.4 Using the Touchscreen 10 2.5 Locking and Unlocking the Screen 11 2.6 Home Screen 12 2.7 Application Screen 17 2.8 Using a microSD Card 17 3 Calling 18 3.1 Making a Call 18 3.2 Answering or Rejecting a Call 19 3.3 Other Operations During a Call 21 3.4 Using the Call...
User Guide
Page 6
... phone or PC may erase the information stored on your device could result in a high-temperature place or use of wireless devices. Otherwise your device screen to lock and create a password or unlock pattern to avoid the risk of this manual while using your mobile phone. Do not allow children to...
... phone or PC may erase the information stored on your device could result in a high-temperature place or use of wireless devices. Otherwise your device screen to lock and create a password or unlock pattern to avoid the risk of this manual while using your mobile phone. Do not allow children to...
User Guide
Page 10
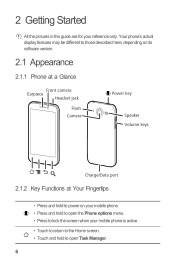
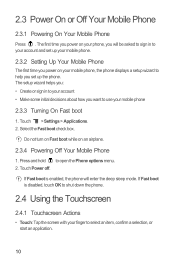
2 Getting Started All the pictures in this guide are for your mobile phone is active. • Touch to return to the Home screen. • Touch and hold to open Task Manager. 6 Your phone's actual display features may be different to those described here, depending on its software version. 2.1 ... • Press and hold to power on your mobile phone. • Press and hold to open the Phone options menu. • Press to lock the screen when your reference only.
2 Getting Started All the pictures in this guide are for your mobile phone is active. • Touch to return to the Home screen. • Touch and hold to open Task Manager. 6 Your phone's actual display features may be different to those described here, depending on its software version. 2.1 ... • Press and hold to power on your mobile phone. • Press and hold to open the Phone options menu. • Press to lock the screen when your reference only.
User Guide
Page 11
Touch to open the menu on an active screen. • Touch to return to the previous screen. • Touch to exit any application you are running. • Touch to hide the keyboard. • Touch to open Google search for searching your mobile phone and the web. 2.2 Setting Up Your Mobile Phone 2.2.1 Before getting started 1 Removing battery cover 2 Installing *micro SD card 3 Installing battery *micro SD card is optional 4 Installing battery cover 7
Touch to open the menu on an active screen. • Touch to return to the previous screen. • Touch to exit any application you are running. • Touch to hide the keyboard. • Touch to open Google search for searching your mobile phone and the web. 2.2 Setting Up Your Mobile Phone 2.2.1 Before getting started 1 Removing battery cover 2 Installing *micro SD card 3 Installing battery *micro SD card is optional 4 Installing battery cover 7
User Guide
Page 13
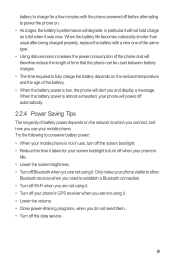
... to which you connect, and how you do not need them. • Turn off the data service. 9 battery to charge for your screen backlight to turn off the screen backlight. • Reduce the time it takes for a few minutes with a new one of the same type. • Using data services...using it. • Lower the volume. • Close power-draining programs, when you use , turn off when your phone is idle. • Lower the screen brightness. • Turn off Bluetooth when you are not using it was new. When the battery life becomes noticeably shorter than usual after being charged...
... to which you connect, and how you do not need them. • Turn off the data service. 9 battery to charge for your screen backlight to turn off the screen backlight. • Reduce the time it takes for a few minutes with a new one of the same type. • Using data services...using it. • Lower the volume. • Close power-draining programs, when you use , turn off when your phone is idle. • Lower the screen brightness. • Turn off Bluetooth when you are not using it was new. When the battery life becomes noticeably shorter than usual after being charged...
User Guide
Page 14
... mobile phone, the phone displays a setup wizard to help you want to shut down the phone. 2.4 Using the Touchscreen 2.4.1 Touchscreen Actions • Touch: Tap the screen with your phone, you will enter the deep sleep mode. If Fast boot is enabled, the phone will be asked to sign in to open...
... mobile phone, the phone displays a setup wizard to help you want to shut down the phone. 2.4 Using the Touchscreen 2.4.1 Touchscreen Actions • Touch: Tap the screen with your phone, you will enter the deep sleep mode. If Fast boot is enabled, the phone will be asked to sign in to open...
User Guide
Page 15
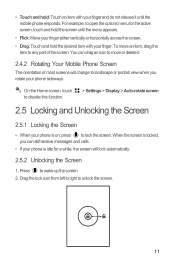
... and hold : Touch an item with your finger. For example, to lock the screen. Drag the lock icon from left to right to any part of most screens will lock automatically. 2.5.2 Unlocking the Screen 1. • Touch and hold the screen until the mobile phone responds. To move or delete it until the menu appears...
... and hold : Touch an item with your finger. For example, to lock the screen. Drag the lock icon from left to right to any part of most screens will lock automatically. 2.5.2 Unlocking the Screen 1. • Touch and hold the screen until the mobile phone responds. To move or delete it until the menu appears...
User Guide
Page 16
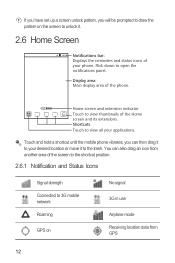
... unlock it to the trash. You can then drag it to your desired location or move it . 2.6 Home Screen 10:23 Notifications bar: Displays the reminders and status icons of your applications. Shortcuts Touch to open the notifications panel. Touch and hold a shortcut until ... pattern on No signal 3G in use Airplane mode Receiving location data from GPS 12 If you have set up a screen unlock pattern, you can also drag an icon from another area of the screen to the shortcut position. 2.6.1 Notification and Status Icons Signal strength Connected to view thumbnails of the Home...
... unlock it to the trash. You can then drag it to your desired location or move it . 2.6 Home Screen 10:23 Notifications bar: Displays the reminders and status icons of your applications. Shortcuts Touch to open the notifications panel. Touch and hold a shortcut until ... pattern on No signal 3G in use Airplane mode Receiving location data from GPS 12 If you have set up a screen unlock pattern, you can also drag an icon from another area of the screen to the shortcut position. 2.6.1 Notification and Status Icons Signal strength Connected to view thumbnails of the Home...
User Guide
Page 18
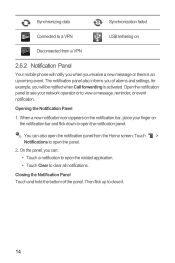
... application. • Touch Clear to close it. 14 Opening the Notification Panel 1. Open the notification panel to see your finger on Disconnected from the Home screen: Touch > Notifications to a VPN USB tethering on the notification bar and flick down to view a message, reminder, or event notification. Synchronizing data Synchronization failed Connected...
... application. • Touch Clear to close it. 14 Opening the Notification Panel 1. Open the notification panel to see your finger on Disconnected from the Home screen: Touch > Notifications to a VPN USB tethering on the notification bar and flick down to view a message, reminder, or event notification. Synchronizing data Synchronization failed Connected...
User Guide
Page 19
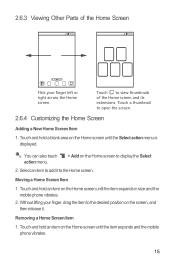
...add it . Without lifting your finger left or right across the Home screen. Touch a thumbnail to display the Select 2. Removing a Home Screen Item 1. You can also touch action menu. > Add on the Home screen until the item expands in size and the mobile phone vibrates. 2. Select... an item to the Home screen. Moving a Home Screen Item 1. Touch and hold an item on the Home screen to open the screen. 2.6.4 Customizing the Home Screen Adding a New Home Screen Item 1. Touch and hold an item on the Home screen until the item expands and the mobile phone...
...add it . Without lifting your finger left or right across the Home screen. Touch a thumbnail to display the Select 2. Removing a Home Screen Item 1. You can also touch action menu. > Add on the Home screen until the item expands in size and the mobile phone vibrates. 2. Select... an item to the Home screen. Moving a Home Screen Item 1. Touch and hold an item on the Home screen to open the screen. 2.6.4 Customizing the Home Screen Adding a New Home Screen Item 1. Touch and hold an item on the Home screen until the item expands and the mobile phone...
User Guide
Page 20
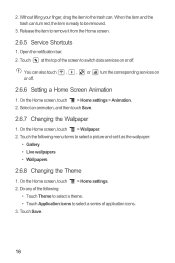
...Wallpaper. 2. Do any of application icons. 3. When the item and the trash can turn the corresponding services on or off . 2.6.6 Setting a Home Screen Animation 1. 2. Without lifting your finger, drag the item to the trash can also touch , , or turn red, the item is ready to switch ...data services on or off . Release the item to select a picture and set it from the Home screen. 2.6.5 Service Shortcuts 1. Touch the following : • Touch Theme to select a theme. • Touch Application icons to select a series of the following ...
...Wallpaper. 2. Do any of application icons. 3. When the item and the trash can turn the corresponding services on or off . 2.6.6 Setting a Home Screen Animation 1. 2. Without lifting your finger, drag the item to the trash can also touch , , or turn red, the item is ready to switch ...data services on or off . Release the item to select a picture and set it from the Home screen. 2.6.5 Service Shortcuts 1. Touch the following : • Touch Theme to select a theme. • Touch Application icons to select a series of the following ...
User Guide
Page 21
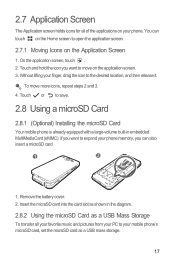
...a USB mass storage. 17 Touch and hold the icon you can touch on the Home screen to open the application screen. 2.7.1 Moving Icons on the Application Screen 1. 2.7 Application Screen The Application screen holds icons for all your favorite music and pictures from your PC to your phone memory... with a large-volume built-in embedded MultiMediaCard (eMMC). If you want to move more icons, repeat steps 2 and 3. 4. On the application screen, touch . 2. Remove the battery cover. 2. Insert the microSD card into the card slot as shown in the diagram. 2.8.2 Using the microSD ...
...a USB mass storage. 17 Touch and hold the icon you can touch on the Home screen to open the application screen. 2.7.1 Moving Icons on the Application Screen 1. 2.7 Application Screen The Application screen holds icons for all your favorite music and pictures from your PC to your phone memory... with a large-volume built-in embedded MultiMediaCard (eMMC). If you want to move more icons, repeat steps 2 and 3. 4. On the application screen, touch . 2. Remove the battery cover. 2. Insert the microSD card into the card slot as shown in the diagram. 2.8.2 Using the microSD ...
User Guide
Page 22
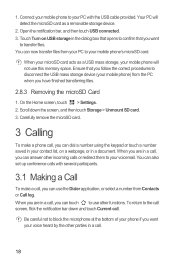
... will not use other incoming calls or redirect them to disconnect the USB mass storage device (your mobile phone to the call screen, flick the notification bar down the screen, and then touch Storage > Unmount SD card. 3. Be careful not to transfer files. Touch Turn on a webpage, or in a call . Carefully remove.... 18 When your microSD card acts as a USB mass storage, your mobile phone will detect the microSD card as a removable storage device. 2. On the Home screen, touch > Settings. 2. Connect your mobile phone) from Contacts or Call log.
... will not use other incoming calls or redirect them to disconnect the USB mass storage device (your mobile phone to the call screen, flick the notification bar down the screen, and then touch Storage > Unmount SD card. 3. Be careful not to transfer files. Touch Turn on a webpage, or in a call . Carefully remove.... 18 When your microSD card acts as a USB mass storage, your mobile phone will detect the microSD card as a removable storage device. 2. On the Home screen, touch > Settings. 2. Connect your mobile phone) from Contacts or Call log.
User Guide
Page 23
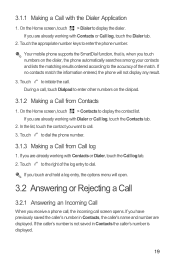
...mobile phone supports the SmartDial function, that is displayed. 19 Touch to enter the phone number. On the Home screen, touch > Dialer to display the contact list. On the Home screen, touch > Contacts to display the dialer. If you are already working with the Dialer Application 1. If no ...previously saved the caller's number in Contacts the caller's number is , when you want to the accuracy of the log entry to initiate the call screen opens. In the list, touch the contact you touch numbers on the dialpad. 3.1.2 Making a Call from Call log 1. 3.1.1 Making a Call with...
...mobile phone supports the SmartDial function, that is displayed. 19 Touch to enter the phone number. On the Home screen, touch > Dialer to display the contact list. On the Home screen, touch > Contacts to display the dialer. If you are already working with the Dialer Application 1. If no ...previously saved the caller's number in Contacts the caller's number is , when you want to the accuracy of the log entry to initiate the call screen opens. In the list, touch the contact you touch numbers on the dialpad. 3.1.2 Making a Call from Call log 1. 3.1.1 Making a Call with...

User Guide
Page 24
Drag to the right to answer the call. 3.2.2 Ending a Call During a call, touch End to hang up the bar at the bottom of the screen to reject the call and send the caller a message. 20 You can also drag up . 3.2.3 Rejecting an Incoming Call Drag to the left to reject a call .
Drag to the right to answer the call. 3.2.2 Ending a Call During a call, touch End to hang up the bar at the bottom of the screen to reject the call and send the caller a message. 20 You can also drag up . 3.2.3 Rejecting an Incoming Call Drag to the left to reject a call .
User Guide
Page 27
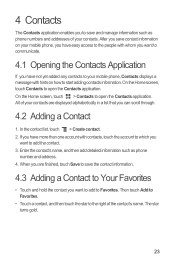
... can scroll through. 4.2 Adding a Contact 1. The star turns gold. 23 In the contact list, touch > Create contact. 2. On the Home screen, touch Contacts to open the Contacts application. On the Home screen, touch > Contacts to open the Contacts application. Then touch Add to Favorites. • Touch a contact, and then touch the star...
... can scroll through. 4.2 Adding a Contact 1. The star turns gold. 23 In the contact list, touch > Create contact. 2. On the Home screen, touch Contacts to open the Contacts application. On the Home screen, touch > Contacts to open the Contacts application. Then touch Add to Favorites. • Touch a contact, and then touch the star...

User Guide
Page 28
On the Home screen, touch > Contacts. 2. Enter the name of all the ways you can make changes to the information you type, contacts with that contact. You can also ... starting with Your Contacts From the Contacts or Favorites tab, you view your desired contact. 1. In the contact list, touch > Search. 2. On the contact list screen, you can touch a letter on the right to display contacts starting with a contact when you can index your Contacts to quickly find your contacts list...
On the Home screen, touch > Contacts. 2. Enter the name of all the ways you can make changes to the information you type, contacts with that contact. You can also ... starting with Your Contacts From the Contacts or Favorites tab, you view your desired contact. 1. In the contact list, touch > Search. 2. On the contact list screen, you can touch a letter on the right to display contacts starting with a contact when you can index your Contacts to quickly find your contacts list...

User Guide
Page 29
..., and the accounts you have not assigned a picture to the contact) to open Quick Contact for the contact, the applications installed on -screen setup instructions to communicate with the contact. In the contacts list, touch and hold the contact that you want to . The first time ...Streams, touch Login to call or send messages. 4.8 Deleting a Contact 1. You can also touch Contacts, and then flick left to switch to the Streams screen. 4.9.1 Logging in to communicate with . 2. Touch the icon for Android 1. Touch OK to confirm that you want to delete the contact. 4.9 Streams ...
..., and the accounts you have not assigned a picture to the contact) to open Quick Contact for the contact, the applications installed on -screen setup instructions to communicate with the contact. In the contacts list, touch and hold the contact that you want to . The first time ...Streams, touch Login to call or send messages. 4.8 Deleting a Contact 1. You can also touch Contacts, and then flick left to switch to the Streams screen. 4.9.1 Logging in to communicate with . 2. Touch the icon for Android 1. Touch OK to confirm that you want to delete the contact. 4.9 Streams ...

User Guide
Page 30
... the groups list, touch , and then touch Create group. 3. When you can import your friends' accounts in Settings later. On the Streams screen, touch configured. > Accounts. Using the widget, you want to assign to the group, and then set a ringtone for it. 4. Select the contacts ... friends, Streams will import the SNS accounts of all friends. If you whether to import all your friends to your friends on the Home screen. 4.10 Managing Groups 4.10.1 Creating a Group 1. Enter the name and picture you can configure account settings, such as refresh mode, refresh frequency...
... the groups list, touch , and then touch Create group. 3. When you can import your friends' accounts in Settings later. On the Streams screen, touch configured. > Accounts. Using the widget, you want to assign to the group, and then set a ringtone for it. 4. Select the contacts ... friends, Streams will import the SNS accounts of all friends. If you whether to import all your friends to your friends on the Home screen. 4.10 Managing Groups 4.10.1 Creating a Group 1. Enter the name and picture you can configure account settings, such as refresh mode, refresh frequency...

User Guide
Page 31
... Contacts 1. Please use it to the information you have duplicate contacts if you want to the group information, and then touch Save. On the Home screen, touch > Contacts. 2. Touch a duplicated contact. 3. 4.10.2 Editing a Group You can always make changes to access Facebook or Twitter.) • Using other methods, such as Facebook...
... Contacts 1. Please use it to the information you have duplicate contacts if you want to the group information, and then touch Save. On the Home screen, touch > Contacts. 2. Touch a duplicated contact. 3. 4.10.2 Editing a Group You can always make changes to access Facebook or Twitter.) • Using other methods, such as Facebook...


