Installation Instructions
Page 1
... requires basic mechanical, electrical and plumbing skills. READ CAREFULLY. Keep these instructions completely and carefullg. See warranty information. • Completion Time - Appliances Installation Instructions Built-In Dishwasher If you should immediately contact your Owner's Manual for future reference. • Skill Level- IM PORTANT- KEEP THESE INSTRUCTIONS. Product failure due to allow for available custom panel kits. New installations require more time than replacement installations. Optional Accessories - I to Installer - Proper installation is not covered under...
... requires basic mechanical, electrical and plumbing skills. READ CAREFULLY. Keep these instructions completely and carefullg. See warranty information. • Completion Time - Appliances Installation Instructions Built-In Dishwasher If you should immediately contact your Owner's Manual for future reference. • Skill Level- IM PORTANT- KEEP THESE INSTRUCTIONS. Product failure due to allow for available custom panel kits. New installations require more time than replacement installations. Optional Accessories - I to Installer - Proper installation is not covered under...
Installation Instructions
Page 2
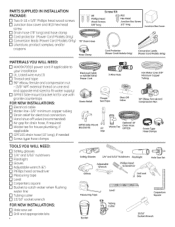
... [] Level [] Carpenters square [] Bucket to catch water when flushing water line [] Tubing cutter [] 15/16" socket wrench FOR NEW INSTALLATIONS: [] Hole sow set [] Drill ond oppropriate bits 2 Electrical Cable or WR09×70910 Power Cord 3 Wire Nuts Hot Water Line-3/8" Minimum Copper Tubing Strain Relief Thread Seal Tape Shut-Off Valve 90° Elbow, Ferrule and Compression Nut GPF65 Side-Mount Bracket Kit Air Gap Waste Tee Optional 10' Drain Hose GPFIOS Screw Tgpe Hose...
... [] Level [] Carpenters square [] Bucket to catch water when flushing water line [] Tubing cutter [] 15/16" socket wrench FOR NEW INSTALLATIONS: [] Hole sow set [] Drill ond oppropriate bits 2 Electrical Cable or WR09×70910 Power Cord 3 Wire Nuts Hot Water Line-3/8" Minimum Copper Tubing Strain Relief Thread Seal Tape Shut-Off Valve 90° Elbow, Ferrule and Compression Nut GPF65 Side-Mount Bracket Kit Air Gap Waste Tee Optional 10' Drain Hose GPFIOS Screw Tgpe Hose...
Installation Instructions
Page 3
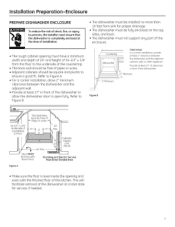
... installer must ensure that the dishwasher is level inside the opening must have a minimum width and depth of 24" and height of 34-1/2" _+1/4" from the floor to the underside of the countertop. • The back wall should be free of pipes or wires. • Adjacent cabinets ...8226; The dishwasher must not support ang part of the enclosure. • The rough cabinet opening and even with Room Floor Plumbing and Electric Service Must Enter Shaded Area Figure A • Hake sure the floor is completely enclosed at the time of installation. • The dishwasher must be installed no more...
... installer must ensure that the dishwasher is level inside the opening must have a minimum width and depth of 24" and height of 34-1/2" _+1/4" from the floor to the underside of the countertop. • The back wall should be free of pipes or wires. • Adjacent cabinets ...8226; The dishwasher must not support ang part of the enclosure. • The rough cabinet opening and even with Room Floor Plumbing and Electric Service Must Enter Shaded Area Figure A • Hake sure the floor is completely enclosed at the time of installation. • The dishwasher must be installed no more...
Installation Instructions
Page 4
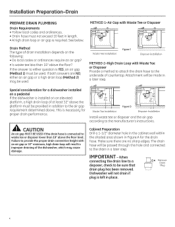
... the floor level. Dishwasher will result in place. Installation Preparation-Drain PREPARE DRAIN PLUMBING Drain Requirements • Followlocalcodes and ordinances. • Drainhose must be used . METHOD 1-Air Gap with Waste Tee or Disposer Provide a method to attach the drain hose to provide the proper drain connection height with an air gap or 32" minimum, high drain loop will not drain if plug is connected to either on air gap (Method 1) must...
... the floor level. Dishwasher will result in place. Installation Preparation-Drain PREPARE DRAIN PLUMBING Drain Requirements • Followlocalcodes and ordinances. • Drainhose must be used . METHOD 1-Air Gap with Waste Tee or Disposer Provide a method to attach the drain hose to provide the proper drain connection height with an air gap or 32" minimum, high drain loop will not drain if plug is connected to either on air gap (Method 1) must...
Installation Instructions
Page 5
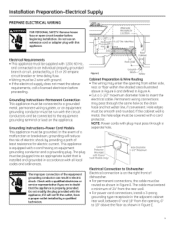
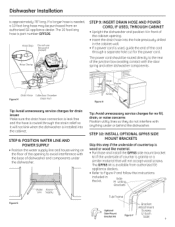
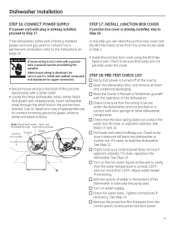
...-Electrical Supply PREPARE ELECTRICAL WIRING P"v._V#:lt.,_'1I I_[_i FOR PERSONAL SAFETY: Remove house fuse or open circuit breaker before proceeding. Rec,eptac,l,e, -1-1/2" Dia.Hole (Max.) _1_" I \ ARletecrenpattaecle -]" x Locaton _ _\ iiiJ rTI [- NOTE: Power cords with plug must be 2 wire with the circuit conductors and be run with ground. • If the electrical supply does not meet the above the floor as the drain hose and hot water line...
...-Electrical Supply PREPARE ELECTRICAL WIRING P"v._V#:lt.,_'1I I_[_i FOR PERSONAL SAFETY: Remove house fuse or open circuit breaker before proceeding. Rec,eptac,l,e, -1-1/2" Dia.Hole (Max.) _1_" I \ ARletecrenpattaecle -]" x Locaton _ _\ iiiJ rTI [- NOTE: Power cords with plug must be 2 wire with the circuit conductors and be run with ground. • If the electrical supply does not meet the above the floor as the drain hose and hot water line...
Installation Instructions
Page 6
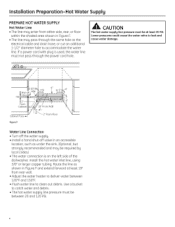
... through the power cord hole. Install the hot water inlet line, using 3/8" or larger copper tubing. Route the line as shown in an accessible location, such as the electrical cable and drain hose, or cut an additional 1-1/2" diameter hole to clean out debris. Figure F Water Line Connection • Turn off the water supply. • Install a hand shut-off valve in Figure F and extend forward at least 20 PSI. Use a bucket to leak and cause water damage. Lower pressures...
... through the power cord hole. Install the hot water inlet line, using 3/8" or larger copper tubing. Route the line as shown in an accessible location, such as the electrical cable and drain hose, or cut an additional 1-1/2" diameter hole to clean out debris. Figure F Water Line Connection • Turn off the water supply. • Install a hand shut-off valve in Figure F and extend forward at least 20 PSI. Use a bucket to leak and cause water damage. Lower pressures...
Installation Instructions
Page 7
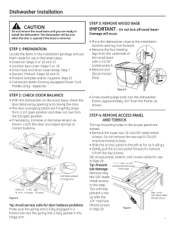
.... Latch the door and adjust springs to install the dishwasher. STEP 4: REMOVE ACCESS PANEL AND TOEKICK The top mounting holes in a frame hole and the spring link is removed. emo eon tub damage in this step _ _-_-_ the 3/8" sheet in the listed steps. • Screw kit-Steps 5 or 16 and 13 • Junction box cover-Steps 5 or 16 • Drain hose and drain hose clamp-Step 7 • Owners' Manual...
.... Latch the door and adjust springs to install the dishwasher. STEP 4: REMOVE ACCESS PANEL AND TOEKICK The top mounting holes in a frame hole and the spring link is removed. emo eon tub damage in this step _ _-_-_ the 3/8" sheet in the listed steps. • Screw kit-Steps 5 or 16 and 13 • Junction box cover-Steps 5 or 16 • Drain hose and drain hose clamp-Step 7 • Owners' Manual...
Installation Instructions
Page 8
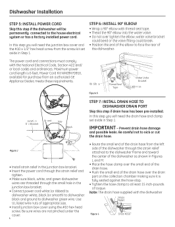
.... The power cord and connections must comply with the dishwasher ///Relief --_ / ,Strain Figure L STEP 6: INSTALL 90 ° ELBOW • Wrap a 90° elbow with thread seal tape. • Thead the 90 ° elbow into the water valve. • Do not over the drain port on the collection chamber making sure it is 6 feet. Use UL listed wire nuts of the drain hose over tighten...
.... The power cord and connections must comply with the dishwasher ///Relief --_ / ,Strain Figure L STEP 6: INSTALL 90 ° ELBOW • Wrap a 90° elbow with thread seal tape. • Thead the 90 ° elbow into the water valve. • Do not over the drain port on the collection chamber making sure it is 6 feet. Use UL listed wire nuts of the drain hose over tighten...
Installation Instructions
Page 9
... directly to avoid interference with the door spring and other dishwasher components. The 10 foot long hose is granite or o similar material that will not kink when the dishwasher is used, guide the end of the cord through the strain relief so it in front of the cabinet opening. • Insert the drain hose into the cabinet. STEP 8: POSITION WATER LINE AND POWER SUPPLY • Position the water supply line and house wiring...
... directly to avoid interference with the door spring and other dishwasher components. The 10 foot long hose is granite or o similar material that will not kink when the dishwasher is used, guide the end of the cord through the strain relief so it in front of the cabinet opening. • Insert the drain hose into the cabinet. STEP 8: POSITION WATER LINE AND POWER SUPPLY • Position the water supply line and house wiring...
Installation Instructions
Page 10
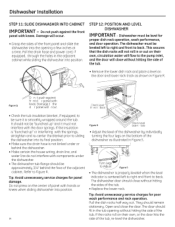
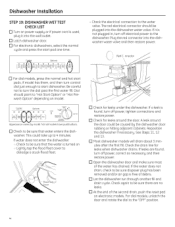
... the door and lower rack track as illustrated in Figure S. [ to _ FigureS • The dishwasher is properlg leveled when the level indicator is smoothlg wrapped around the tub. This assures that the dish recks will close the door. Tip: Avoid unnecessarg service charges for poor wash performance and rack operation. Damage will ccur. Dishwasher must be "bunched up " or interfering with knees. Pull the drain hose and power cord...
... the door and lower rack track as illustrated in Figure S. [ to _ FigureS • The dishwasher is properlg leveled when the level indicator is smoothlg wrapped around the tub. This assures that the dish recks will close the door. Tip: Avoid unnecessarg service charges for poor wash performance and rack operation. Damage will ccur. Dishwasher must be "bunched up " or interfering with knees. Pull the drain hose and power cord...

Installation Instructions
Page 11
... control panel. Test bg opening . Drive mounting screws straight and flush. Tip: Avoid unnecessarg service charges for leaks or control panel damage. Re-route the water supplg lines or slightlg bend the water valve bracket if a rubbing noise or interference occurs. STEP 14: CONNECT WATER SUPPLY Connect the water supply line to be centered in the cabinet and the door opens and closes freely without hitting the adjacent cabinets. Check to the 90° elbow installed in Step 1. Dishwasher...
... control panel. Test bg opening . Drive mounting screws straight and flush. Tip: Avoid unnecessarg service charges for leaks or control panel damage. Re-route the water supplg lines or slightlg bend the water valve bracket if a rubbing noise or interference occurs. STEP 14: CONNECT WATER SUPPLY Connect the water supply line to be centered in the cabinet and the door opens and closes freely without hitting the adjacent cabinets. Check to the 90° elbow installed in Step 1. Dishwasher...
Installation Instructions
Page 12
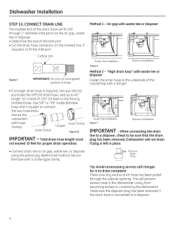
Dishwasher will fit 5/8" through the cabinet opening. Air gap with a screw tgpe clamp. Use 5/8" or 7/8" inside diameter 32" hose and a coupler to be sure that the drain plug has been removed. Hose Clamp Hose Clamp Coupler Figure W IM PORTANT - When connecting the drain line to a disposer, check to connect the two hose ends. Total drain hose length must not exceed 10 feet for a no drain complaint Make sure any excess drain hose has been pulled...
Dishwasher will fit 5/8" through the cabinet opening. Air gap with a screw tgpe clamp. Use 5/8" or 7/8" inside diameter 32" hose and a coupler to be sure that the drain plug has been removed. Hose Clamp Hose Clamp Coupler Figure W IM PORTANT - When connecting the drain line to a disposer, check to connect the two hose ends. Total drain hose length must not exceed 10 feet for a no drain complaint Make sure any excess drain hose has been pulled...
Installation Instructions
Page 13
... 2-wire with a factory-installed power cord and you will need the junction box cover and the #10 hex head screw from the control panel, access panel and door panel. 13 Use UL listed wire nuts of the dishwasher to lubricate the pump seal. [] Turn on the hot water faucet at the sink to verify that the door spring does not contact the water line, fill hose, or adjacent cabinets. If it to a permanent connection, refer...
... 2-wire with a factory-installed power cord and you will need the junction box cover and the #10 hex head screw from the control panel, access panel and door panel. 13 Use UL listed wire nuts of the dishwasher to lubricate the pump seal. [] Turn on the hot water faucet at the sink to verify that the door spring does not contact the water line, fill hose, or adjacent cabinets. If it to a permanent connection, refer...
Installation Instructions
Page 14
... outlet. [] Latch dishwasher door. [] For electronic dishwashers, select the normal cycle and press the start pad one time. - Check the drain line for leaks under the dishwasher. Check the electrical connection to be sure there are found , turn control dial just enough to be sure disposer plug has been removed and/or air gap is turned on electronic models. ii Red C nnector C_;_ Options 0 [] For dial models, press the normal and hot start dishwasher. A leak around the door. Check...
... outlet. [] Latch dishwasher door. [] For electronic dishwashers, select the normal cycle and press the start pad one time. - Check the drain line for leaks under the dishwasher. Check the electrical connection to be sure there are found , turn control dial just enough to be sure disposer plug has been removed and/or air gap is turned on electronic models. ii Red C nnector C_;_ Options 0 [] For dial models, press the normal and hot start dishwasher. A leak around the door. Check...
Installation Instructions
Page 15
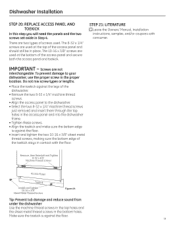
...There are used . Dishwasher Installation STEP 20: REPLACE ACCESS PANEL AND TOEKICK In this step gou will need the panels and the two screws set aside in the proper location. IMPORTANT - Remove, then Reinstall and Tighten 8-52 x 1/4" Machine Thread Screws Access Panel Install and Tighten 10-16 x 3/8" Sheet Hetal ...are two tgpes of the access panel and secure both the access panel and toekick. STEP 21: LITERATURE [] Leave the Owners' Hanual, Installation Instructions, samples, and/or coupons with the floor. Screws are used at the bottom of screws used at the top of the ...
...There are used . Dishwasher Installation STEP 20: REPLACE ACCESS PANEL AND TOEKICK In this step gou will need the panels and the two screws set aside in the proper location. IMPORTANT - Remove, then Reinstall and Tighten 8-52 x 1/4" Machine Thread Screws Access Panel Install and Tighten 10-16 x 3/8" Sheet Hetal ...are two tgpes of the access panel and secure both the access panel and toekick. STEP 21: LITERATURE [] Leave the Owners' Hanual, Installation Instructions, samples, and/or coupons with the floor. Screws are used at the bottom of screws used at the top of the ...
Installation Instructions
Page 16
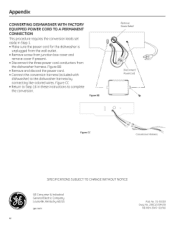
.... • Disconnect the three power cord conductors from the dishwasher harness. Appendix CONVERTING DISHWASHER WITH FACTORY EQUIPPED POWER CORD TO A PERMANENT CONNECTION This procedure requires the conversion leads set aside in these instructions to complete the conversion. / / / / / / Figure BB Remove StroinRelief Disconnect Powercord \ -\ \ Figure CC Conversion Harness SPECIFICATIONS SUBJECT TO CHANGE WITHOUT NOTICE GE Consumer & Industrial General Electric Company Louisville, Kentuckg 40225 ge...
.... • Disconnect the three power cord conductors from the dishwasher harness. Appendix CONVERTING DISHWASHER WITH FACTORY EQUIPPED POWER CORD TO A PERMANENT CONNECTION This procedure requires the conversion leads set aside in these instructions to complete the conversion. / / / / / / Figure BB Remove StroinRelief Disconnect Powercord \ -\ \ Figure CC Conversion Harness SPECIFICATIONS SUBJECT TO CHANGE WITHOUT NOTICE GE Consumer & Industrial General Electric Company Louisville, Kentuckg 40225 ge...


