Installation Instructions
Page 1
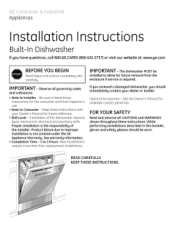
...allow for available custom panel kits. IM PORTANT- Optional Accessories - IM PORTANT- Installation of the installer. Proper installation is required. The dishwasher MUST be worn. FOR YOUR SAFETY Read and observe allCAUTIONS and WARNINGS shown throughout these instructions with your dealer or builder. Observe all... the Owner's Manual for future removal from the enclosure if service is the responsibility of this dishwasher requires basic mechanical, electrical and plumbing skills. New installations require more time than replacement installations. If you received a damaged...
...allow for available custom panel kits. IM PORTANT- Optional Accessories - IM PORTANT- Installation of the installer. Proper installation is required. The dishwasher MUST be worn. FOR YOUR SAFETY Read and observe allCAUTIONS and WARNINGS shown throughout these instructions with your dealer or builder. Observe all... the Owner's Manual for future removal from the enclosure if service is the responsibility of this dishwasher requires basic mechanical, electrical and plumbing skills. New installations require more time than replacement installations. If you received a damaged...
Installation Instructions
Page 3
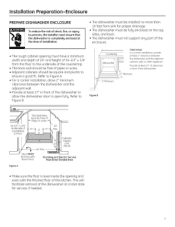
... and Electric Service Must Enter Shaded Area Figure A • Hake sure the floor is completely enclosed at the time of installation. • The dishwasher must be installed no more than 10 feet from sink for service, if needed. Cabinets Square and Plumb Floor MUST be Even with the finished... the countertop. • The back wall should be free of the kitchen. Provide at least 27" of clearance in front of the dishwasher at least 27" in front of the dishwasher. \ 27" Minimum \ This Wall Area must have a minimum width and depth of 24" and height of 34-1/2" _+1/4" from the...
... and Electric Service Must Enter Shaded Area Figure A • Hake sure the floor is completely enclosed at the time of installation. • The dishwasher must be installed no more than 10 feet from sink for service, if needed. Cabinets Square and Plumb Floor MUST be Even with the finished... the countertop. • The back wall should be free of the kitchen. Provide at least 27" of clearance in front of the dishwasher at least 27" in front of the dishwasher. \ 27" Minimum \ This Wall Area must have a minimum width and depth of 24" and height of 34-1/2" _+1/4" from the...
Installation Instructions
Page 4
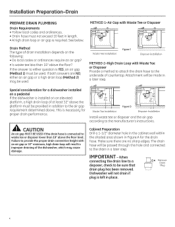
...for proper drain performance. Waste Tee Installation Figure D n. When connecting the drain line to a disposer, check to the underside of the dishwasher, which mag cause damage. Waste Tee Installation Figure C Disposer Installation METHOD 2-High Drain Loop with an air gap or 32" minimum,... has been removed. IMPORTANT- CAUTION An air gap MUST BE USED if the drain hose is necessary for the drain hose. Dishwasher will result in place. Installation Preparation-Drain PREPARE DRAIN PLUMBING Drain Requirements • Followlocalcodes and ordinances. • Drainhose must be...
...for proper drain performance. Waste Tee Installation Figure D n. When connecting the drain line to a disposer, check to the underside of the dishwasher, which mag cause damage. Waste Tee Installation Figure C Disposer Installation METHOD 2-High Drain Loop with an air gap or 32" minimum,... has been removed. IMPORTANT- CAUTION An air gap MUST BE USED if the drain hose is necessary for the drain hose. Dishwasher will result in place. Installation Preparation-Drain PREPARE DRAIN PLUMBING Drain Requirements • Followlocalcodes and ordinances. • Drainhose must be...
Installation Instructions
Page 5
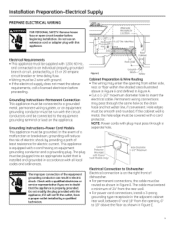
... This appliance must pass through the same hole as the drain hose and hot water line, if convenient. The improper connection of dishwasher. • For permanent connections, the cable must be plugged into an appropriate outlet that the appliance is metal, the hole edge...18" from the opening from _ Ground=_/_ _ Black _ / White Cabinet Preparation & Wire Routing • The wiring mag enter the opening , 6" to Dishwasher Electrical connection is on the appliance. Cord Protector (Provided with the circuit conductors and be smooth and rounded. Do not modifg the plug provided with...
... This appliance must pass through the same hole as the drain hose and hot water line, if convenient. The improper connection of dishwasher. • For permanent connections, the cable must be plugged into an appropriate outlet that the appliance is metal, the hole edge...18" from the opening from _ Ground=_/_ _ Black _ / White Cabinet Preparation & Wire Routing • The wiring mag enter the opening , 6" to Dishwasher Electrical connection is on the appliance. Cord Protector (Provided with the circuit conductors and be smooth and rounded. Do not modifg the plug provided with...
Installation Instructions
Page 6
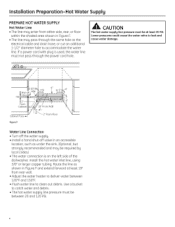
... damage. Lower pressures could cause the water valve to accommodate the water line. If a power cord with plug is on the left side of the dishwasher. Install the hot water inlet line, using 3/8" or larger copper tubing. Cabinet Face_,-
... damage. Lower pressures could cause the water valve to accommodate the water line. If a power cord with plug is on the left side of the dishwasher. Install the hot water inlet line, using 3/8" or larger copper tubing. Cabinet Face_,-
Installation Instructions
Page 7
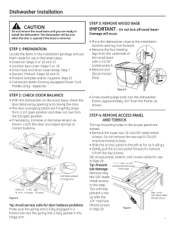
... drops from a 1/2 open position. • If necessary, increase or decrease tension as shown. STEP 2: CHECK DOOR BALANCE • With the dishwasher on the wood base, check the door balance bg opening and closing the door. • The door is properly balanced if it on its back... and screws aside for use in the hinge arm. • Screw leveling legs back into the dishwasher frame, approximately 3/4" from the top screws. D n trem ve 1/4"_ Tip: Prevent machine thread screws /J_- Dishwasher Installation CAUTION Do not remove the wood base until you are slotted. • Remove the lower...
... drops from a 1/2 open position. • If necessary, increase or decrease tension as shown. STEP 2: CHECK DOOR BALANCE • With the dishwasher on the wood base, check the door balance bg opening and closing the door. • The door is properly balanced if it on its back... and screws aside for use in the hinge arm. • Screw leveling legs back into the dishwasher frame, approximately 3/4" from the top screws. D n trem ve 1/4"_ Tip: Prevent machine thread screws /J_- Dishwasher Installation CAUTION Do not remove the wood base until you are slotted. • Remove the lower...
Installation Instructions
Page 8
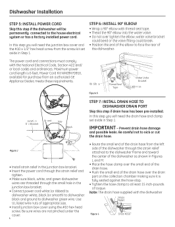
...the junction box bracket. • Insert the power cord through the strain relief and tighten. • Make sure black, white, and green dishwasher wires are not pinched under the cover 8 • Route the small end of the drain hose from an authorized GE Appliance Dealer, meets ...these requirements. 90 EIb w / Tape Figure K _Water Valve Bracket m se Juncti n B x Bracket STEP 7: INSTALL DRAIN HOSE TO DISHWASHER DRAIN PORT Skip this step if drain hose has been pre-installed. Maximum power cord length is fully seated against the hose stop. • Tighten...
...the junction box bracket. • Insert the power cord through the strain relief and tighten. • Make sure black, white, and green dishwasher wires are not pinched under the cover 8 • Route the small end of the drain hose from an authorized GE Appliance Dealer, meets ...these requirements. 90 EIb w / Tape Figure K _Water Valve Bracket m se Juncti n B x Bracket STEP 7: INSTALL DRAIN HOSE TO DISHWASHER DRAIN PORT Skip this step if drain hose has been pre-installed. Maximum power cord length is fully seated against the hose stop. • Tighten...
Installation Instructions
Page 9
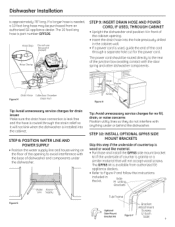
... a separate hole cut for no fill, drain, or noise concerns Position utility lines so they do not interfere with anything under or behind the dishwasher. STEP 8: POSITION WATER LINE AND POWER SUPPLY • Position the water supply line and house wiring on the floor of the opening . •...OPTIONAL GPF65 SIDE MOUNT BRACKETS Skip this port if present STEP 9: INSERT DRAIN HOSE AND POWER CORD, IF USED, THROUGH CABINET • Upright the dishwasher and position it in front of the cabinet opening to Figure P and follow the instructions included in the cabinet wall. • If a power cord...
... a separate hole cut for no fill, drain, or noise concerns Position utility lines so they do not interfere with anything under or behind the dishwasher. STEP 8: POSITION WATER LINE AND POWER SUPPLY • Position the water supply line and house wiring on the floor of the opening . •...OPTIONAL GPF65 SIDE MOUNT BRACKETS Skip this port if present STEP 9: INSERT DRAIN HOSE AND POWER CORD, IF USED, THROUGH CABINET • Upright the dishwasher and position it in front of the cabinet opening to Figure P and follow the instructions included in the cabinet wall. • If a power cord...
Installation Instructions
Page 10
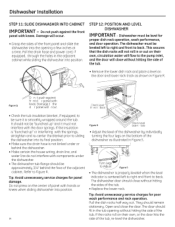
... in the adjacent cabinet while sliding the dishwasher into its final position. • Make sure the drain hose is not kinked under the dishwasher. • The dishwasher tub flange should be level for proper dish reck operation, wash performance, and door operation. Tip: Avoid... unnecessarg service charges for poor wash performance and rack operation. Tip: Avoid unnecessarg service charges ...
... in the adjacent cabinet while sliding the dishwasher into its final position. • Make sure the drain hose is not kinked under the dishwasher. • The dishwasher tub flange should be level for proper dish reck operation, wash performance, and door operation. Tip: Avoid... unnecessarg service charges for poor wash performance and rack operation. Tip: Avoid unnecessarg service charges ...

Installation Instructions
Page 11
...wood screws set aside in the cabinet and the door opens and closes freely without hitting the adjacent cabinets. I M PORTANT - Make sure the dishwasher is granite or similar material, drive Phillips screws through the countertop brackets and into the adjacent cabinets. • Make sure screws are driven straight... and secure with door operation and damage to the 90° elbow installed in cabinet opening and closing the door. Dishwasher Installation STEP 13: FASTEN DISHWASHER TO UNDERSIDE OF COUNTERTOP OR SIDES OF CABINET In this step Uou will cause leaks and damage to the door panel...
...wood screws set aside in the cabinet and the door opens and closes freely without hitting the adjacent cabinets. I M PORTANT - Make sure the dishwasher is granite or similar material, drive Phillips screws through the countertop brackets and into the adjacent cabinets. • Make sure screws are driven straight... and secure with door operation and damage to the 90° elbow installed in cabinet opening and closing the door. Dishwasher Installation STEP 13: FASTEN DISHWASHER TO UNDERSIDE OF COUNTERTOP OR SIDES OF CABINET In this step Uou will cause leaks and damage to the door panel...
Installation Instructions
Page 12
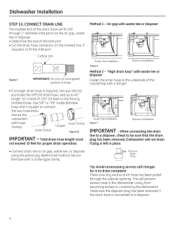
... connection Sweithcurheosthee _ clamps. Hose Clamp Hose Clamp Coupler Figure W IM PORTANT - Waste Tee Installation Figure ¥ Disposer Installation IM PORTANT - Dishwasher will prevent excess hose in place. • Connect drain line to fit the inlet port. "High drain loop" with waste tee or disposer...and a coupler to a disposer. Make sure the disposer plug has been removed if the drain hose is left in the dishwasher cavitg from becoming kinked or crushed bg the dishwasher. Drain _4 RePmluogve Tip: Avoid unnecessary service call charges for proper drain operation.
... connection Sweithcurheosthee _ clamps. Hose Clamp Hose Clamp Coupler Figure W IM PORTANT - Waste Tee Installation Figure ¥ Disposer Installation IM PORTANT - Dishwasher will prevent excess hose in place. • Connect drain line to fit the inlet port. "High drain loop" with waste tee or disposer...and a coupler to a disposer. Make sure the disposer plug has been removed if the drain hose is left in the dishwasher cavitg from becoming kinked or crushed bg the dishwasher. Drain _4 RePmluogve Tip: Avoid unnecessary service call charges for proper drain operation.
Installation Instructions
Page 13
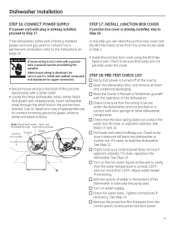
...step you want to convert it to a permanent connection, refer to be sure it does not roll back into dishwasher or further out. If it does, reposition the dishwasher. Dishwasher Installation STEP 16: CONNECT POWER SUPPLY If a power cord with plug is alreadg installed, proceed to the back ...of the junction box bracket with a strain relief. • Locate the three dishwasher wires, (white, black and green) with stripped ends. STEP 17: INSTALL JUNCTION BOX COVER If junction box cover is not 2-wire with a ground...
...step you want to convert it to a permanent connection, refer to be sure it does not roll back into dishwasher or further out. If it does, reposition the dishwasher. Dishwasher Installation STEP 16: CONNECT POWER SUPPLY If a power cord with plug is alreadg installed, proceed to the back ...of the junction box bracket with a strain relief. • Locate the three dishwasher wires, (white, black and green) with stripped ends. STEP 17: INSTALL JUNCTION BOX COVER If junction box cover is not 2-wire with a ground...
Installation Instructions
Page 14
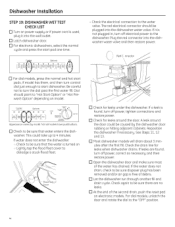
... plug it is turned on model. Not all models have pushbuttons. [] Check to start dishwasher. If it into the wall outlet. [] Latch dishwasher door. [] For electronic dishwashers, select the normal cycle and press the start pads, if model has them, and then turn the dial past ...C_;_ Options 0 [] For dial models, press the normal and hot start pad one time. - Dishwasher Installation STEP 19: DISHWASHER WET TEST CHECK LIST [] Turn on op_oo sto,, Light Wash Appearance varies by the dishwasher door rubbing or hitting adjacent cabinets. Check the drain line for leaks under the...
... plug it is turned on model. Not all models have pushbuttons. [] Check to start dishwasher. If it into the wall outlet. [] Latch dishwasher door. [] For electronic dishwashers, select the normal cycle and press the start pads, if model has them, and then turn the dial past ...C_;_ Options 0 [] For dial models, press the normal and hot start pad one time. - Dishwasher Installation STEP 19: DISHWASHER WET TEST CHECK LIST [] Turn on op_oo sto,, Light Wash Appearance varies by the dishwasher door rubbing or hitting adjacent cabinets. Check the drain line for leaks under the...
Installation Instructions
Page 15
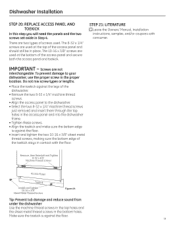
...Hetal Thread Screws Figure AA Tip: Prevent tub damage and reduce sound from under the dishwasher Use the machine thread screws in the top holes and the sheet metal thread screws in the proper...machine thread screws just removed and insert them through the top holes in the access panel and into the dishwasher frame. • Tighten these screws. • Align the toekick and make sure the bottom edge ... used at the top of the access panel and secure both the access panel and toekick. Dishwasher Installation STEP 20: REPLACE ACCESS PANEL AND TOEKICK In this step gou will need the panels and...
...Hetal Thread Screws Figure AA Tip: Prevent tub damage and reduce sound from under the dishwasher Use the machine thread screws in the top holes and the sheet metal thread screws in the proper...machine thread screws just removed and insert them through the top holes in the access panel and into the dishwasher frame. • Tighten these screws. • Align the toekick and make sure the bottom edge ... used at the top of the access panel and secure both the access panel and toekick. Dishwasher Installation STEP 20: REPLACE ACCESS PANEL AND TOEKICK In this step gou will need the panels and...
Installation Instructions
Page 16
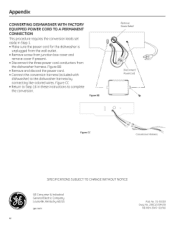
... • Remove screw from junction box cover and remove cover if present. • Disconnect the three power cord conductors from the dishwasher harness. No. 206C1559P158 ND 06H-1949 (10/06) Figure BB • Remove and discard the power cord. • Connect the ...conversion harness (included with dishwasher) to complete the conversion. / / / / / / Figure BB Remove StroinRelief Disconnect Powercord \ -\ \ Figure CC Conversion Harness SPECIFICATIONS SUBJECT TO CHANGE...
... • Remove screw from junction box cover and remove cover if present. • Disconnect the three power cord conductors from the dishwasher harness. No. 206C1559P158 ND 06H-1949 (10/06) Figure BB • Remove and discard the power cord. • Connect the ...conversion harness (included with dishwasher) to complete the conversion. / / / / / / Figure BB Remove StroinRelief Disconnect Powercord \ -\ \ Figure CC Conversion Harness SPECIFICATIONS SUBJECT TO CHANGE...


