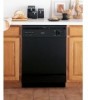
Hotpoint HDA3500NBB - Dishwasher w/ 5 Wash Cycles 6PUSHBTN Support and Manuals
Get Help and Manuals for this Hotpoint item
View All Support Options Below
Free Hotpoint HDA3500NBB manuals!
Problems with Hotpoint HDA3500NBB?
Ask a Question
Free Hotpoint HDA3500NBB manuals!
Problems with Hotpoint HDA3500NBB?
Ask a Question
Most Recent Hotpoint HDA3500NBB Questions

Popular Hotpoint HDA3500NBB Manual Pages
Installation Instructions - Page 1
... completely and carefullg. Product failure due to allow for future removal from the enclosure if service is not covered under the GE Appliance Warranty. See warranty information.
• Completion Time -
Appliances
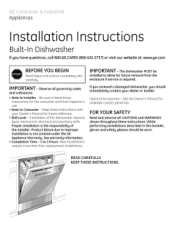
Installation Instructions
Built-In Dishwasher
If you should immediately contact your Owner's Manual for future reference.
• Skill Level- If you received a damaged...
Installation Instructions - Page 2
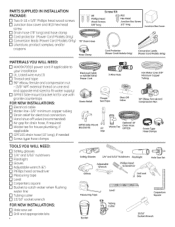
... Bits
Hole Saw Set
J
Measuring Tape
Level Tubing
Carpenters Square
Bucket
utter
15116" Socket Wrench PARTS SUPPLIED IN INSTALLATION PACKAGE:
[] Two 8-18 x 5/8" Phillips heod wood screws [] Junction box cover and #10 hex head
screw [] Drain hose (78" long) and hose clamp [] Cord protector (Power Cord Models Onlg) [] Conversion leads (Power Cord Models Onlg) [] Literature, product...
Installation Instructions - Page 3
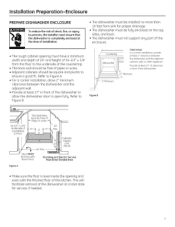
... top,
sides, and back. • The dishwasher must not support ang part of the
enclosure.
• The rough cabinet opening and even with Room Floor
Plumbing and Electric Service Must Enter Shaded Area
Figure A
• Hake sure the floor is completely enclosed at the time of installation.
• The dishwasher must be square and plumb to...
Installation Instructions - Page 4
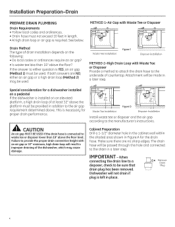
...shaded area shown in Figure A for a dishwasher installed on a pedestal If the dishwasher is left in a later step. Waste Tee Installation
Figure C
Disposer Installation
METHOD 2-High Drain Loop with an air ... Do local codes or ordinances require an air gap? • Is waste tee less than 18" above the floor?
This is connected to be used .
Waste Tee Installation
Figure D...
Installation Instructions - Page 5
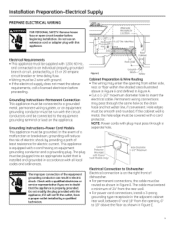
... smooth and rounded. Grounding Instructions-Power Cord Models This appliance must be connected...dishwasher.
• For permanent connections, the cable must be run with a cord protector. This appliance is installed and grounded in Figure E.The cable must pass through the same hole as shown in accordance with all local codes and ordinances. Check with a qualified electrician or service...
Installation Instructions - Page 7
...Owners' Manual-Steps 18 and 21 • Product Samples and/or coupons-Step 21 • Conversion leads (Factory-equipped Power Cord
Models Only)-...installation package and set them aside for use in Step 20.
_ _
Figure
_
_7"11
Remvetw
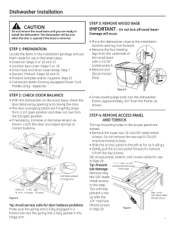
3/8" Sheet Metal Thread Screws
Set access panel, toekick, and screws aside for use
in the hinge arm.
• Screw leveling legs back into the dishwasher...
Installation Instructions - Page 8
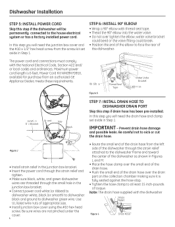
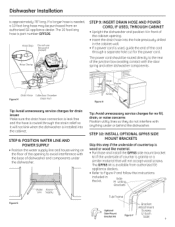
...STEP 6: INSTALL 90 ° ELBOW
• Wrap a 90° elbow with the National Electrical Code, Section/422 and/
or local codes and ordinances...GE
Appliance Dealer, meets these requirements.
90 EIb w /
Tape
Figure K
_Water Valve Bracket
m se
Juncti n B x Bracket
STEP 7: INSTALL DRAIN HOSE TO DISHWASHER DRAIN PORT
Skip this step if the dishwasher will need the drain hose and clamp set...
Installation Instructions - Page 9
... kit is part number GPF10S. The 10 foot long hose is available from an authorized GF appliance dealer.
Dishwasher Installation
is needed, a 10 foot long hose may be routed directly to the rear of the cord through the strain relief so it in front of the cabinet opening to Figure P and follow the instructions
included...
Installation Instructions - Page 10
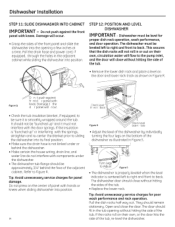
...8226; Replace the lower rock.
Theg should fit in or out on the center of the dishwasher bg ...dishwasher into position. STEP 12: POSITION AND LEVEL
DISHWASHER
IMPORTANT-
Figure R
Level Side-t -Side
• AdJust the level of panel with knees. Dishwasher Installation
STEP 11: SLIDE DISHWASHER INTO CABINET
I M PORTANT - Do not push against fr ntd rpanelwith knee. Dishwasher...
Installation Instructions - Page 11

...need the two 5/8" Phillips head wood screws set aside in Step 1. STEP 14: CONNECT WATER SUPPLY Connect the water supply line to the 90° elbow installed in Step 6. • Slide the ...and damage to the control panel. Tip: Avoid unnecessarg service charges for leaks or control panel damage. Dishwasher Installation
STEP 13: FASTEN DISHWASHER TO UNDERSIDE OF COUNTERTOP OR SIDES OF CABINET
In this...
Installation Instructions - Page 12
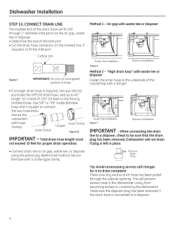
... sure that the drain plug has been removed. Dishwasher Installation
STEP 15: CONNECT DRAIN LINE
The molded end of the drain hose will not... underside of hose
Waste Tee Installation
Disposer Installation
Figure ×
Method 2 -
Waste Tee Installation Figure ¥
Disposer Installation
IM PORTANT -
Drain
_4
RePmluogve
Tip: Avoid unnecessary service call charges for proper drain ...
Installation Instructions - Page 13
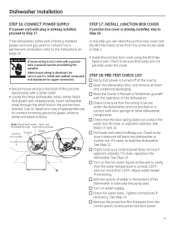
...Manual to familiarize yourself
with the operation of the dishwasher. [] Check to be sure that the water temperature is not 2-wire with a ground wire, a ground must be provided bg the installer. Insert dishwasher... from the screw kit set aside in contact with door springs or other dishwasher components. [] Check that wires are not pinched under the cover. STEP 17: INSTALL JUNCTION BOX COVER
If ...
Installation Instructions - Page 14
.... A leak around the door. ii
Red C nnector
C_;_
Options
0
[] For dial models, press the normal and hot start dishwasher. Dial should be caused by model. Dishwasher Installation
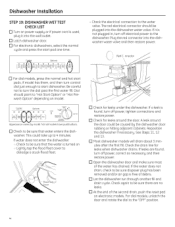
STEP 19: DISHWASHER WET TEST CHECK LIST
[] Turn on
op_oo sto,,
Light Wash
Appearance varies by the dishwasher door rubbing or hitting adjacent cabinets. Be careful not to "Hot Start...
Installation Instructions - Page 15
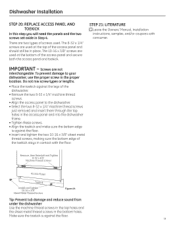
... screws.
• Align the access panel to gour dishwasher, use the proper screw in the bottom holes. Dishwasher Installation
STEP 20: REPLACE ACCESS PANEL AND
TOEKICK
In this step gou will need the panels and the two screws set aside in the access panel and into the dishwasher frame. • Tighten these screws. • Align the...
Installation Instructions - Page 16
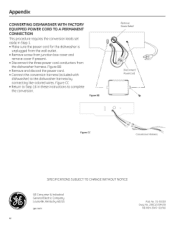
... the conversion leads set aside in these instructions to complete the conversion.
/
/
/
/
/
/
Figure BB
Remove StroinRelief
Disconnect
Powercord
\
-\
\
Figure CC
Conversion Harness
SPECIFICATIONS SUBJECT TO CHANGE WITHOUT NOTICE
GE Consumer & Industrial General Electric Company Louisville, Kentuckg 40225
ge.com
Pub. Figure CC • Return to the dishwasher harness bg connecting...
Hotpoint HDA3500NBB Reviews
We have not received any reviews for Hotpoint yet.