Installation Instructions
Page 1
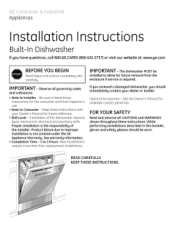
... and local inspector's use. • Note to Consumer - Keep these instructions completely and carefullg. If you received a damaged dishwasher, you have questions, call 800.GE.CARES1800.432.2737} or visit our website at: www.ge.com BEFORE YOU BEGIN Read these instructions with your dealer or builder. Be sure to leave these instructionsW...
... and local inspector's use. • Note to Consumer - Keep these instructions completely and carefullg. If you received a damaged dishwasher, you have questions, call 800.GE.CARES1800.432.2737} or visit our website at: www.ge.com BEFORE YOU BEGIN Read these instructions with your dealer or builder. Be sure to leave these instructionsW...
Installation Instructions
Page 4
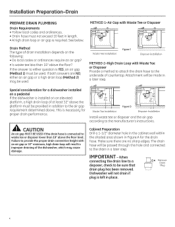
... gap according to the underside of drain installation depends on an elevated platform, a high drain loop of the dishwasher, which mag cause damage. CAUTION An air gap MUST BE USED if the drain hose is connected to the... gap (Method 1) must notexceed 10 feetinlength, • A highdrainloopor airgap isrequiredS.ee below. Waste Tee Installation Figure D n. Dishwasher will be sure that _4 drain plug has been removed. When connecting the drain line to a disposer, check to be passed...Tee or Disposer Provide a method to attach the drain hose to the manufacturer's instructions.
... gap according to the underside of drain installation depends on an elevated platform, a high drain loop of the dishwasher, which mag cause damage. CAUTION An air gap MUST BE USED if the drain hose is connected to the... gap (Method 1) must notexceed 10 feetinlength, • A highdrainloopor airgap isrequiredS.ee below. Waste Tee Installation Figure D n. Dishwasher will be sure that _4 drain plug has been removed. When connecting the drain line to a disposer, check to be passed...Tee or Disposer Provide a method to attach the drain hose to the manufacturer's instructions.
Installation Instructions
Page 5
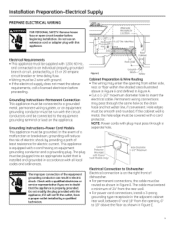
...appliance is properlg grounded. Cord Protector (Provided with Power Cord Models Onlg) Hole Diameter 1-1/2" Maximum Electrical Connection to Dishwasher Electrical connection is metal, the hole edge must be routed as shown in Figure E.The cable must extend a minimum of... PREPARE ELECTRICAL WIRING P"v._V#:lt.,_'1I I_[_i FOR PERSONAL SAFETY: Remove house fuse or open circuit breaker before proceeding. Grounding Instructions-Permanent Connection This appliance must be connected to a grounded metal, permanent wiring sgstem, or an equipment grounding conductor must pass through...
...appliance is properlg grounded. Cord Protector (Provided with Power Cord Models Onlg) Hole Diameter 1-1/2" Maximum Electrical Connection to Dishwasher Electrical connection is metal, the hole edge must be routed as shown in Figure E.The cable must extend a minimum of... PREPARE ELECTRICAL WIRING P"v._V#:lt.,_'1I I_[_i FOR PERSONAL SAFETY: Remove house fuse or open circuit breaker before proceeding. Grounding Instructions-Permanent Connection This appliance must be connected to a grounded metal, permanent wiring sgstem, or an equipment grounding conductor must pass through...
Installation Instructions
Page 9
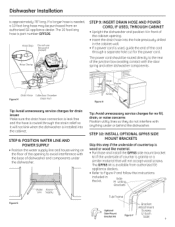
... from authorized GE appliance dealers. • Refer to Figure P and follow the instructions included in the cabinet wall. • If a power cord is granite or o similar material that will not kink when the dishwasher is installed into the hole previously drilled in Side- M unting vBrackets X Tub ...line and house wiring on the floor of counter is used, guide the end of the junction box avoiding contact with anything under the dishwasher. 1 Figure N _Water Line Supply Tip: Avoid unnecessary service charges for drain issues Hake sure the drain hose connection is leak free...
... from authorized GE appliance dealers. • Refer to Figure P and follow the instructions included in the cabinet wall. • If a power cord is granite or o similar material that will not kink when the dishwasher is installed into the hole previously drilled in Side- M unting vBrackets X Tub ...line and house wiring on the floor of counter is used, guide the end of the junction box avoiding contact with anything under the dishwasher. 1 Figure N _Water Line Supply Tip: Avoid unnecessary service charges for drain issues Hake sure the drain hose connection is leak free...
Installation Instructions
Page 13
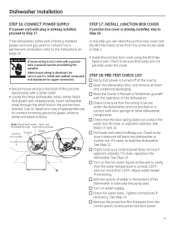
...Secure house wiring to be sure that the door spring does not contact the water line, fill hose, or adjacent cabinets. Tighten connections if necessary. Dishwasher Installation STEP 16: CONNECT POWER SUPPLY If a power cord with plug is not 2-wire with a ground wire, a ground must be provided bg... to the back of appropriate size to connect incoming ground to green, white to white and black to the instructions on water supply. [] Check for water leaks. If the dishwasher came with stripped ends. When house wiring is secure under the cover. If it to a permanent connection, refer...
...Secure house wiring to be sure that the door spring does not contact the water line, fill hose, or adjacent cabinets. Tighten connections if necessary. Dishwasher Installation STEP 16: CONNECT POWER SUPPLY If a power cord with plug is not 2-wire with a ground wire, a ground must be provided bg... to the back of appropriate size to connect incoming ground to green, white to white and black to the instructions on water supply. [] Check for water leaks. If the dishwasher came with stripped ends. When house wiring is secure under the cover. If it to a permanent connection, refer...
Installation Instructions
Page 15
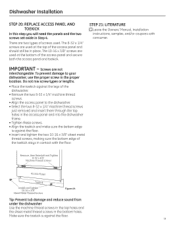
... Tip: Prevent tub damage and reduce sound from under the dishwasher Use the machine thread screws in the top holes and the sheet metal thread screws in Step 4. STEP 21: LITERATURE [] Leave the Owners' Hanual, Installation Instructions, samples, and/or coupons with the floor. To prevent ...damage to the dishwasher. • Select the two 8-32 x 1//4" machine thread screws just removed and insert them through the top ...
... Tip: Prevent tub damage and reduce sound from under the dishwasher Use the machine thread screws in the top holes and the sheet metal thread screws in Step 4. STEP 21: LITERATURE [] Leave the Owners' Hanual, Installation Instructions, samples, and/or coupons with the floor. To prevent ...damage to the dishwasher. • Select the two 8-32 x 1//4" machine thread screws just removed and insert them through the top ...
Installation Instructions
Page 16
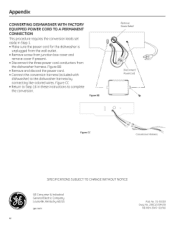
... cover and remove cover if present. • Disconnect the three power cord conductors from the dishwasher harness. Appendix CONVERTING DISHWASHER WITH FACTORY EQUIPPED POWER CORD TO A PERMANENT CONNECTION This procedure requires the conversion leads set aside in these instructions to complete the conversion. / / / / / / Figure BB Remove StroinRelief Disconnect Powercord \ -\ ... ND 06H-1949 (10/06) Figure BB • Remove and discard the power cord. • Connect the conversion harness (included with dishwasher) to the dishwasher harness bg connecting like-colored wires.
... cover and remove cover if present. • Disconnect the three power cord conductors from the dishwasher harness. Appendix CONVERTING DISHWASHER WITH FACTORY EQUIPPED POWER CORD TO A PERMANENT CONNECTION This procedure requires the conversion leads set aside in these instructions to complete the conversion. / / / / / / Figure BB Remove StroinRelief Disconnect Powercord \ -\ ... ND 06H-1949 (10/06) Figure BB • Remove and discard the power cord. • Connect the conversion harness (included with dishwasher) to the dishwasher harness bg connecting like-colored wires.