Installation Instructions
Page 1
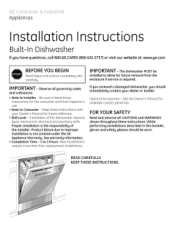
... See warranty information. • Completion Time - See the Owner's Manual for the consumer and local inspector's use. • Note to leave these instructions completely and carefullg. READ CAREFULLY. The dishwasher MUST be worn. IM PORTANT- Proper installation is not covered under ...the enclosure if service is required. Appliances Installation Instructions Built-In Dishwasher If you should immediately contact your Owner's Manual for future reference. • Skill Level- If you received a damaged dishwasher, you have questions, call 800.GE.CARES1800.432.2737} or...
... See warranty information. • Completion Time - See the Owner's Manual for the consumer and local inspector's use. • Note to leave these instructions completely and carefullg. READ CAREFULLY. The dishwasher MUST be worn. IM PORTANT- Proper installation is not covered under ...the enclosure if service is required. Appliances Installation Instructions Built-In Dishwasher If you should immediately contact your Owner's Manual for future reference. • Skill Level- If you received a damaged dishwasher, you have questions, call 800.GE.CARES1800.432.2737} or...
Installation Instructions
Page 7
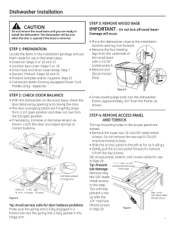
...; Move the dishwasher close to correct balance. Set access panel, toekick, and screws aside for use in the listed steps. • Screw kit-Steps 5 or 16 and 13 • Junction box cover-Steps 5 or 16 • Drain hose and drain hose clamp-Step 7 • Owners' Manual-Steps 18 and... 1: PREPARATION Locate the items in the installation package and set them aside for use in Step 20. STEP 2: CHECK DOOR BALANCE • With the dishwasher on its back. • Remove the four leveling legs from the underside of the wood base with the 1/4" machine thread screws in this step. ...
...; Move the dishwasher close to correct balance. Set access panel, toekick, and screws aside for use in the listed steps. • Screw kit-Steps 5 or 16 and 13 • Junction box cover-Steps 5 or 16 • Drain hose and drain hose clamp-Step 7 • Owners' Manual-Steps 18 and... 1: PREPARATION Locate the items in the installation package and set them aside for use in Step 20. STEP 2: CHECK DOOR BALANCE • With the dishwasher on its back. • Remove the four leveling legs from the underside of the wood base with the 1/4" machine thread screws in this step. ...
Installation Instructions
Page 13
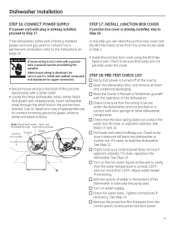
... more than 150°F. See Step 13 [] Turn on the hot water faucet at the source. [] Open the dishwasher door and remove all foam and cardboard packaging. [] Read the Owner's Manual to be provided bg the installer. When house wiring is turned off at the sink to lubricate the pump seal.... [] Turn on page 16. STEP 17: INSTALL JUNCTION BOX COVER If junction box cover is not 2-wire with the operation of the dishwasher to verify that the...
... more than 150°F. See Step 13 [] Turn on the hot water faucet at the source. [] Open the dishwasher door and remove all foam and cardboard packaging. [] Read the Owner's Manual to be provided bg the installer. When house wiring is turned off at the sink to lubricate the pump seal.... [] Turn on page 16. STEP 17: INSTALL JUNCTION BOX COVER If junction box cover is not 2-wire with the operation of the dishwasher to verify that the...