

User Manual
Page 2
Disclaimer Hand Held Products, Inc. ("Hand Held Products") reserves the right to make changes in specifications and other information contained in this document without the prior written consent of Hand Held Products. ©2006 Hand Held Products, Inc. The information in all cases consult Hand Held Products to determine whether any such changes have been made. All rights are reserved. Web Address: www.handheld.com No part of this material. This document contains proprietary information that is protected by copyright. Hand Held Products shall not be photocopied, reproduced, or ...
Disclaimer Hand Held Products, Inc. ("Hand Held Products") reserves the right to make changes in specifications and other information contained in this document without the prior written consent of Hand Held Products. ©2006 Hand Held Products, Inc. The information in all cases consult Hand Held Products to determine whether any such changes have been made. All rights are reserved. Web Address: www.handheld.com No part of this material. This document contains proprietary information that is protected by copyright. Hand Held Products shall not be photocopied, reproduced, or ...

User Manual
Page 3
Operation is encouraged to try to correct the interference by Hand Held Products, Inc. may cause undesired operation. Le present appareil numerique n'emet pas de bruits radioelectriques depassant les limites applicables aux appareils numeriques de la classe B prescrites dans le Reglement sur le brouillage radioelectrique edicte par le ministere des Communications du Canada. These limits are not expressly approved by one or more of the following measures: • Reorient or relocate the receiving antenna. • Increase the separation between the equipment and receiver. • ...
Operation is encouraged to try to correct the interference by Hand Held Products, Inc. may cause undesired operation. Le present appareil numerique n'emet pas de bruits radioelectriques depassant les limites applicables aux appareils numeriques de la classe B prescrites dans le Reglement sur le brouillage radioelectrique edicte par le ministere des Communications du Canada. These limits are not expressly approved by one or more of the following measures: • Reorient or relocate the receiving antenna. • Increase the separation between the equipment and receiver. • ...

User Manual
Page 4
The CE mark on the product indicates that is not CE marked and does not comply with the Low Voltage Directive. Mexico Certified. UL and cUL Statement UL and cUL listed: UL60950-1 and CSA C22.2 No.60950-1-03. Solids and Water Protection The 3800g has a rating of IP41, immunity of our product with equipment (i.e., power supplies, personal computers, etc.) that the system has been tested to and conforms with IEC60825-1 LED safety, and has been certified to the product packaging for use of foreign particles and dripping water. Nijverheidsweg 9 5627 BT Eindhoven The Netherlands Hand ...
The CE mark on the product indicates that is not CE marked and does not comply with the Low Voltage Directive. Mexico Certified. UL and cUL Statement UL and cUL listed: UL60950-1 and CSA C22.2 No.60950-1-03. Solids and Water Protection The 3800g has a rating of IP41, immunity of our product with equipment (i.e., power supplies, personal computers, etc.) that the system has been tested to and conforms with IEC60825-1 LED safety, and has been certified to the product packaging for use of foreign particles and dripping water. Nijverheidsweg 9 5627 BT Eindhoven The Netherlands Hand ...
User Manual
Page 7
Table of Contents Chapter 1 - Terminal Interfaces Terminal ID 2-1 Supported Terminals 2-2 Keyboard Country 2-4 Keyboard Style 2-5 Keyboard Modifiers 2-6 RS-232 Baud Rate 2-7 RS-232 Word Length: Data Bits, Stop Bits, and Parity. 2-8 RS-232 Handshaking 2-9 i Getting Started About This Manual 1-1 Unpacking the Imager 1-1 3800g Models 1-1 Connecting the Imager with USB 1-2 USB PC or Macintosh Keyboard 1-2 IBM SurePos 1-3 USB HID 1-3 USB Com Port Emulation 1-3 Plug and Play 1-4 Connecting the Imager When Powered by Host (Keyboard Wedge 1-5 Keyboard Wedge Connection 1-5 Laptop ...
Table of Contents Chapter 1 - Terminal Interfaces Terminal ID 2-1 Supported Terminals 2-2 Keyboard Country 2-4 Keyboard Style 2-5 Keyboard Modifiers 2-6 RS-232 Baud Rate 2-7 RS-232 Word Length: Data Bits, Stop Bits, and Parity. 2-8 RS-232 Handshaking 2-9 i Getting Started About This Manual 1-1 Unpacking the Imager 1-1 3800g Models 1-1 Connecting the Imager with USB 1-2 USB PC or Macintosh Keyboard 1-2 IBM SurePos 1-3 USB HID 1-3 USB Com Port Emulation 1-3 Plug and Play 1-4 Connecting the Imager When Powered by Host (Keyboard Wedge 1-5 Keyboard Wedge Connection 1-5 Laptop ...
User Manual
Page 8
Good Read 3-1 Beeper Volume - Good Read 3-1 Beeper Pitch - Data Editing Prefix/Suffix Overview 4-1 To Add a Prefix or Suffix: 2 To Clear One or All Prefixes or Suffixes 4-3 To Add a Carriage Return Suffix to all Symbologies .... 4-3 Prefix Selections 4-3 Suffix Selections 4-4 Function Code Transmit 4-4 ii Chapter 3 - Good Read 3-1 Beeper Duration - Good Read 3-2 Good Read Delay 3-3 User-Specified Good Read Delay 3-3 Trigger Modes 3-3 Manual/Serial Trigger 3-3 Automatic Trigger 3-4 Presentation Mode 3-4 Continuous Illumination Mode 3-4 Hands Free Time-Out 3-5 Reread...
Good Read 3-1 Beeper Volume - Good Read 3-1 Beeper Pitch - Data Editing Prefix/Suffix Overview 4-1 To Add a Prefix or Suffix: 2 To Clear One or All Prefixes or Suffixes 4-3 To Add a Carriage Return Suffix to all Symbologies .... 4-3 Prefix Selections 4-3 Suffix Selections 4-4 Function Code Transmit 4-4 ii Chapter 3 - Good Read 3-1 Beeper Duration - Good Read 3-2 Good Read Delay 3-3 User-Specified Good Read Delay 3-3 Trigger Modes 3-3 Manual/Serial Trigger 3-3 Automatic Trigger 3-4 Presentation Mode 3-4 Continuous Illumination Mode 3-4 Hands Free Time-Out 3-5 Reread...
User Manual
Page 9
Intercharacter, Interfunction, and Intermessage Delays ....... 4-4 Intercharacter Delay 4-5 User Specified Intercharacter Delay 4-5 Interfunction Delay 4-6 Intermessage Delay 4-6 Chapter 5 - Data Formatting Data Format Editor Introduction 5-1 To Add a Data Format 5-1 Other Programming Selections 5-2 Data Format Editor Commands 5-2 Data Format Editor 5-4 Data Formatter 5-5 Alternate Data Formats 5-5 Chapter 6 - Symbologies Introduction 7-1 Message Length 7-2 Codabar 7-3 Codabar Start/Stop Characters 7-3 Codabar Check Character 7-3 Codabar Concatenation 7-4 Codabar Message ...
Intercharacter, Interfunction, and Intermessage Delays ....... 4-4 Intercharacter Delay 4-5 User Specified Intercharacter Delay 4-5 Interfunction Delay 4-6 Intermessage Delay 4-6 Chapter 5 - Data Formatting Data Format Editor Introduction 5-1 To Add a Data Format 5-1 Other Programming Selections 5-2 Data Format Editor Commands 5-2 Data Format Editor 5-4 Data Formatter 5-5 Alternate Data Formats 5-5 Chapter 6 - Symbologies Introduction 7-1 Message Length 7-2 Codabar 7-3 Codabar Start/Stop Characters 7-3 Codabar Check Character 7-3 Codabar Concatenation 7-4 Codabar Message ...

User Manual
Page 10
Code 39 7-5 Code 39 Start/Stop Characters 7-5 Code 39 Check Character 7-6 Code 39 Message Length 7-6 Code 39 Append 7-7 Full ASCII 7-8 Code 39 Code Page 7-9 Interleaved 2 of 5 7-9 Check Digit 7-9 Interleaved 2 of 5 Message Length 7-10 Code 93 7-11 Code 93 Message Length 7-11 Code 93 Code Page 7-11 Straight 2 of 5 Industrial 7-12 Straight 2 of 5 Industrial Message Length 7-12 Straight 2 of 5 IATA Message Length 7-13 Matrix 2 of 5 7-13 Matrix 2 of 5 Message Length 7-14 Code 11 7-14 Check Digits Required 7-14 Code 11 Message Length 7-15 Code 128 7-15 ISBT 128 Concatenation ...
Code 39 7-5 Code 39 Start/Stop Characters 7-5 Code 39 Check Character 7-6 Code 39 Message Length 7-6 Code 39 Append 7-7 Full ASCII 7-8 Code 39 Code Page 7-9 Interleaved 2 of 5 7-9 Check Digit 7-9 Interleaved 2 of 5 Message Length 7-10 Code 93 7-11 Code 93 Message Length 7-11 Code 93 Code Page 7-11 Straight 2 of 5 Industrial 7-12 Straight 2 of 5 Industrial Message Length 7-12 Straight 2 of 5 IATA Message Length 7-13 Matrix 2 of 5 7-13 Matrix 2 of 5 Message Length 7-14 Code 11 7-14 Check Digits Required 7-14 Code 11 Message Length 7-15 Code 128 7-15 ISBT 128 Concatenation ...
User Manual
Page 12
Utilities To Add a Test Code I.D. Visual Xpress Visual Xpress Introduction 10-1 Installing Visual Xpress from the Web 10-2 Chapter 11 - Maintenance Repairs 13-1 vi Chapter 8 - Serial Programming Commands Conventions 11-1 Menu Command Syntax 11-1 Query Commands 11-2 Concatenation of Multiple Commands 11-2 Responses 11-2 Examples of Field (typical performance 12-2 Chapter 13 - Interface Keys Keyboard Function Relationships 8-1 Supported Interface Keys 8-3 Chapter 9 - Product Specifications 3800g Product Specifications 12-1 3800g Depth of Query Commands 11-3 Trigger ...
Utilities To Add a Test Code I.D. Visual Xpress Visual Xpress Introduction 10-1 Installing Visual Xpress from the Web 10-2 Chapter 11 - Maintenance Repairs 13-1 vi Chapter 8 - Serial Programming Commands Conventions 11-1 Menu Command Syntax 11-1 Query Commands 11-2 Concatenation of Multiple Commands 11-2 Responses 11-2 Examples of Field (typical performance 12-2 Chapter 13 - Interface Keys Keyboard Function Relationships 8-1 Supported Interface Keys 8-3 Chapter 9 - Product Specifications 3800g Product Specifications 12-1 3800g Depth of Query Commands 11-3 Trigger ...
User Manual
Page 13
Customer Support Product Service and Repair 14-1 Online Product Service and Repair Assistance 14-2 Technical Assistance 14-2 Online Technical Assistance 14-3 Limited Warranty 14-3 Appendix A - Maintenance 13-1 Cleaning the Scanner's Window 13-1 Inspecting Cords and Connectors 13-1 Replacing the Interface Cable 13-2 Troubleshooting 13-2 Chapter 14 - Appendix A Symbology Chart A-1 ASCII Conversion Chart (Code Page 1252 A-2 Code Page Mapping of Printed Bar Codes A-4 vii
Customer Support Product Service and Repair 14-1 Online Product Service and Repair Assistance 14-2 Technical Assistance 14-2 Online Technical Assistance 14-3 Limited Warranty 14-3 Appendix A - Maintenance 13-1 Cleaning the Scanner's Window 13-1 Inspecting Cords and Connectors 13-1 Replacing the Interface Cable 13-2 Troubleshooting 13-2 Chapter 14 - Appendix A Symbology Chart A-1 ASCII Conversion Chart (Code Page 1252 A-2 Code Page Mapping of Printed Bar Codes A-4 vii

User Manual
Page 15
...; Check to the carrier who delivered the carton. 3800g Models Note: The Hand Held Products 3800g imager may be used with your interface. Models 3800G04E, 3800G14E 3800G05E, 3800G15E Primary Interfaces TTL level RS-232, USB, Keyboard wedge TTL level RS-232, IBM Retail, USB, Retail USB, Keyboard wedge Secondary Interfaces TTL...
...; Check to the carrier who delivered the carton. 3800g Models Note: The Hand Held Products 3800g imager may be used with your interface. Models 3800G04E, 3800G14E 3800G05E, 3800G15E Primary Interfaces TTL level RS-232, USB, Keyboard wedge TTL level RS-232, IBM Retail, USB, Retail USB, Keyboard wedge Secondary Interfaces TTL...
User Manual
Page 16
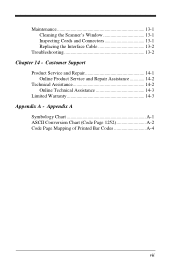
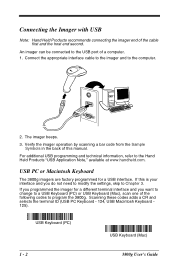
If this manual. Scanning these codes adds a CR and selects the terminal ID (USB PC Keyboard - 124, USB Macintosh Keyboard 125). Connecting the Imager with USB Note: Hand Held Products recommends connecting the imager end of a computer. 1. Connect the appropriate interface cable to the imager and to the Hand Held Products "USB Application Note," available at www.handheld.com. USB PC or Macintosh Keyboard The 3800g imagers are factory programmed for a different terminal interface and you want to change to the USB port of the cable first and the host end second. An imager can ...
If this manual. Scanning these codes adds a CR and selects the terminal ID (USB PC Keyboard - 124, USB Macintosh Keyboard 125). Connecting the Imager with USB Note: Hand Held Products recommends connecting the imager end of a computer. 1. Connect the appropriate interface cable to the imager and to the Hand Held Products "USB Application Note," available at www.handheld.com. USB PC or Macintosh Keyboard The 3800g imagers are factory programmed for a different terminal interface and you want to change to the USB port of the cable first and the host end second. An imager can ...
User Manual
Page 17
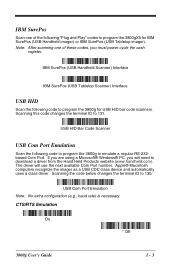
If you are using a Microsoft® Windows® PC, you must power cycle the cash register. The driver will need to program the 3800g for IBM SurePos (USB Handheld imager) or IBM SurePos (USB Tabletop imager). USB HID Bar Code Scanner USB Com Port Emulation Scan the following code to download a driver from the Hand Held Products website (www.handheld.com). CTS/RTS Emulation On * Off 3800g User's Guide 1 - 3 Scanning this code changes the terminal ID to 130. Scanning the code below changes the terminal ID to 131. Apple® Macintosh computers recognize the imager ...
If you are using a Microsoft® Windows® PC, you must power cycle the cash register. The driver will need to program the 3800g for IBM SurePos (USB Handheld imager) or IBM SurePos (USB Tabletop imager). USB HID Bar Code Scanner USB Com Port Emulation Scan the following code to download a driver from the Hand Held Products website (www.handheld.com). CTS/RTS Emulation On * Off 3800g User's Guide 1 - 3 Scanning this code changes the terminal ID to 130. Scanning the code below changes the terminal ID to 131. Apple® Macintosh computers recognize the imager ...

User Manual
Page 18
ACK/NAK Mode On * Off Plug and Play Plug and Play bar codes provide instant imager set up for commonly used interfaces. Note: After you scan one of the codes, power cycle the host terminal to have the interface in effect. 1 - 4 3800g User's Guide
ACK/NAK Mode On * Off Plug and Play Plug and Play bar codes provide instant imager set up for commonly used interfaces. Note: After you scan one of the codes, power cycle the host terminal to have the interface in effect. 1 - 4 3800g User's Guide
User Manual
Page 19
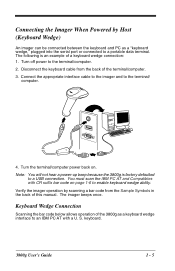
keyboard. 3800g User's Guide 1 - 5 Connecting the Imager When Powered by scanning a bar code from the back of this manual. Disconnect the keyboard cable from the Sample Symbols in the back of the terminal/computer. 3. Verify the imager operation by Host (Keyboard Wedge) An imager can be connected between the keyboard and PC as a keyboard wedge interface to an IBM PC AT with CR suffix bar code on . S. The imager beeps once. Turn the terminal/computer power back on page 1-6 to enable keyboard wedge ability. Connect the appropriate interface cable to the imager and ...
keyboard. 3800g User's Guide 1 - 5 Connecting the Imager When Powered by scanning a bar code from the back of this manual. Disconnect the keyboard cable from the Sample Symbols in the back of the terminal/computer. 3. Verify the imager operation by Host (Keyboard Wedge) An imager can be connected between the keyboard and PC as a keyboard wedge interface to an IBM PC AT with CR suffix bar code on . S. The imager beeps once. Turn the terminal/computer power back on page 1-6 to enable keyboard wedge ability. Connect the appropriate interface cable to the imager and ...
User Manual
Page 20
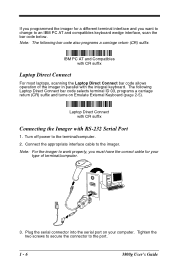
Laptop Direct Connect with CR suffix Connecting the Imager with the integral keyboard. Plug the serial connector into the serial port on Emulate External Keyboard (page 2-5). Turn off power to the imager. Note: For the imager to work properly, you must have the correct cable for a different terminal interface and you programmed the imager for your computer. The following bar code also programs a carriage return (CR) suffix. IBM PC AT and Compatibles with CR suffix Laptop Direct Connect For most laptops, scanning the Laptop Direct Connect bar code allows operation of terminal/...
Laptop Direct Connect with CR suffix Connecting the Imager with the integral keyboard. Plug the serial connector into the serial port on Emulate External Keyboard (page 2-5). Turn off power to the imager. Note: For the imager to work properly, you must have the correct cable for a different terminal interface and you programmed the imager for your computer. The following bar code also programs a carriage return (CR) suffix. IBM PC AT and Compatibles with CR suffix Laptop Direct Connect For most laptops, scanning the Laptop Direct Connect bar code allows operation of terminal/...
User Manual
Page 21
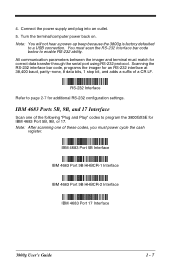
Turn the terminal/computer power back on. 4. You must match for IBM 4683 Port 5B, 9B, or 17. IBM 4683 Ports 5B, 9B, and 17 Interface Scan one of these codes, you must power cycle the cash register. Connect the power supply and plug into an outlet. 5. All communication parameters between the imager and terminal must scan the RS-232 Interface bar code below to enable RS-232 ability. Note: After scanning one of a CR LF. IBM 4683 Port 5B Interface IBM 4683 Port 9B HHBCR-1 Interface IBM 4683 Port 9B HHBCR-2 Interface IBM 4683 Port 17 Interface 3800g User's Guide 1 - 7 Note: ...
Turn the terminal/computer power back on. 4. You must match for IBM 4683 Port 5B, 9B, or 17. IBM 4683 Ports 5B, 9B, and 17 Interface Scan one of these codes, you must power cycle the cash register. Connect the power supply and plug into an outlet. 5. All communication parameters between the imager and terminal must scan the RS-232 Interface bar code below to enable RS-232 ability. Note: After scanning one of a CR LF. IBM 4683 Port 5B Interface IBM 4683 Port 9B HHBCR-1 Interface IBM 4683 Port 9B HHBCR-2 Interface IBM 4683 Port 17 Interface 3800g User's Guide 1 - 7 Note: ...

User Manual
Page 22
it will not read a single bar code or multiple bar codes (on a page or on an object), hold the imager at an appropriate distance from the unit. The aiming beam should be centered horizontally over the bar code; To read if the aiming beam is about 5 inches (12.7 cm) from the target, pull the trigger, and center the aiming beam on the programming pages). 1 - 8 3800g User's Guide Standard Product Default Settings The Menu Commands starting on page 11-5 lists the factory default settings for reading most code densities is in your imager, or you aren't sure what programming ...
it will not read a single bar code or multiple bar codes (on a page or on an object), hold the imager at an appropriate distance from the unit. The aiming beam should be centered horizontally over the bar code; To read if the aiming beam is about 5 inches (12.7 cm) from the target, pull the trigger, and center the aiming beam on the programming pages). 1 - 8 3800g User's Guide Standard Product Default Settings The Menu Commands starting on page 11-5 lists the factory default settings for reading most code densities is in your imager, or you aren't sure what programming ...

User Manual
Page 23
Scan Save to save your PC. If you must power cycle your computer. 3800g User's Guide 2 - 1 Scan the Terminal ID bar code below, then scan the numeric bar code(s) from the Programming Chart inside the back cover of this manual to program the imager for your selection. You would scan the Terminal ID bar code, then 0, 0, 3 from the Programming Chart inside the back cover of this manual, then Save. For example, an IBM AT terminal has a Terminal ID of these codes, you make an error while scanning the digits (before scanning Save), scan the Discard code on page 2-1 and ...
Scan Save to save your PC. If you must power cycle your computer. 3800g User's Guide 2 - 1 Scan the Terminal ID bar code below, then scan the numeric bar code(s) from the Programming Chart inside the back cover of this manual to program the imager for your selection. You would scan the Terminal ID bar code, then 0, 0, 3 from the Programming Chart inside the back cover of this manual, then Save. For example, an IBM AT terminal has a Terminal ID of these codes, you make an error while scanning the digits (before scanning Save), scan the Discard code on page 2-1 and ...

User Manual
Page 24
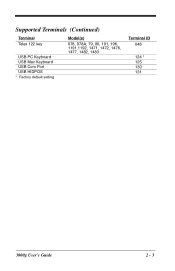
Supported Terminals Terminal DEC DEC Esprit Heath Zenith HP IBM IBM IBM IBM 102 key IBM 122 key IBM 122 key IBM 122 key IBM 122 key IBM DOS/V 106 key IBM SurePOS IBM SurePOS IBM Thinkpad IBM Thinkpad IBM Thinkpad I/O 122 key ITT Lee Data NEC Olivetti Olivetti RS-232 TTL Silicon Graphics Telex 88 key Telex 88 key Telex 102 key Model(s) VT510, 520, 525 (PC style) VT510, 520, 525 (DEC style LK411) 200, 400 PC, AT Vectra XT PS/2 25, 30, 77DX2 AT, PS/2 30-286, 50, 55SX, 60, 70, 70-061, 70-121, 80 3151, 3161, 3162, 3163, 3191, 3192, 3194, 3196, 3197, 3471, 3472, 3476, 3477 3191, 3192, 3471, 3472 ...
Supported Terminals Terminal DEC DEC Esprit Heath Zenith HP IBM IBM IBM IBM 102 key IBM 122 key IBM 122 key IBM 122 key IBM 122 key IBM DOS/V 106 key IBM SurePOS IBM SurePOS IBM Thinkpad IBM Thinkpad IBM Thinkpad I/O 122 key ITT Lee Data NEC Olivetti Olivetti RS-232 TTL Silicon Graphics Telex 88 key Telex 88 key Telex 102 key Model(s) VT510, 520, 525 (PC style) VT510, 520, 525 (DEC style LK411) 200, 400 PC, AT Vectra XT PS/2 25, 30, 77DX2 AT, PS/2 30-286, 50, 55SX, 60, 70, 70-061, 70-121, 80 3151, 3161, 3162, 3163, 3191, 3192, 3194, 3196, 3197, 3471, 3472, 3476, 3477 3191, 3192, 3471, 3472 ...
User Manual
Page 25
Supported Terminals (Continued) Terminal Telex 122 key USB PC Keyboard USB Mac Keyboard USB Com Port USB HIDPOS * Factory default setting Model(s) 078, 078A, 79, 80, 191, 196, 1191,1192, 1471, 1472, 1476, 1477, 1482, 1483 Terminal ID 046 124 * 125 130 131 3800g User's Guide 2 - 3
Supported Terminals (Continued) Terminal Telex 122 key USB PC Keyboard USB Mac Keyboard USB Com Port USB HIDPOS * Factory default setting Model(s) 078, 078A, 79, 80, 191, 196, 1191,1192, 1471, 1472, 1476, 1477, 1482, 1483 Terminal ID 046 124 * 125 130 131 3800g User's Guide 2 - 3