Instruction Manual
Page 3
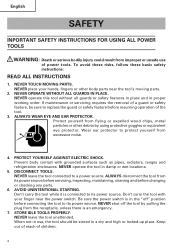
... damage are caused by the failure to observe basic safety rules or precautions. NOTE emphasizes essential information. 3 Most accidents that has not been specifically recommended by WARNINGS on the power tool and in this Instruction Manual. NEVER use this power tool in a manner that result from power tool operation and maintenance are identified by HITACHI. MEANINGS OF SIGNAL WORDS WARNING indicates a potentially hazardous situations...
... damage are caused by the failure to observe basic safety rules or precautions. NOTE emphasizes essential information. 3 Most accidents that has not been specifically recommended by WARNINGS on the power tool and in this Instruction Manual. NEVER use this power tool in a manner that result from power tool operation and maintenance are identified by HITACHI. MEANINGS OF SIGNAL WORDS WARNING indicates a potentially hazardous situations...
Instruction Manual
Page 4
... improper or unsafe use , the tool should be sure to replace the guard or safety feature before connecting the tool to a power source. NEVER leave the tool connected to its power source. AVOID UNINTENTIONAL STARTING. NEVER OPERATE WITHOUT ALL GUARDS IN PLACE. Wear ear protector to its power source before servicing, inspecting, maintaining, cleaning and before changing or checking any parts. 6. DISCONNECT TOOLS. STORE IDLE TOOLS PROPERLY. ALWAYS...
... improper or unsafe use , the tool should be sure to replace the guard or safety feature before connecting the tool to a power source. NEVER leave the tool connected to its power source. AVOID UNINTENTIONAL STARTING. NEVER OPERATE WITHOUT ALL GUARDS IN PLACE. Wear ear protector to its power source before servicing, inspecting, maintaining, cleaning and before changing or checking any parts. 6. DISCONNECT TOOLS. STORE IDLE TOOLS PROPERLY. ALWAYS...
Instruction Manual
Page 5
... small tool or attachment to see that keys and adjusting wrenches are being operated should be caught in damp or wet locations. DON'T ABUSE CORD. It's safer than using your hand and it on. 5 Keep proper footing and balance at the rate for lubricating and changing accessories. Check to do the job safer and better at all work areas and work area...
... small tool or attachment to see that keys and adjusting wrenches are being operated should be caught in damp or wet locations. DON'T ABUSE CORD. It's safer than using your hand and it on. 5 Keep proper footing and balance at the rate for lubricating and changing accessories. Check to do the job safer and better at all work areas and work area...
Instruction Manual
Page 6
... electrical shock by an authorized service center unless otherwise indicated elsewhere in page 12 of the tool, a guard or other than those specified in this manual. Check their condition periodically. DO NOT USE POWER TOOLS IF THE PLASTIC HOUSING OR HANDLE ARE CRACKED. English 20. OUTDOOR USE EXTENSION CORD. NEVER USE A POWER TOOL FOR APPLICATIONS OTHER THAN THOSE SPECIFIED. NEVER use only genuine Hitachi blades, cutting implements and accessories...
... electrical shock by an authorized service center unless otherwise indicated elsewhere in page 12 of the tool, a guard or other than those specified in this manual. Check their condition periodically. DO NOT USE POWER TOOLS IF THE PLASTIC HOUSING OR HANDLE ARE CRACKED. English 20. OUTDOOR USE EXTENSION CORD. NEVER USE A POWER TOOL FOR APPLICATIONS OTHER THAN THOSE SPECIFIED. NEVER use only genuine Hitachi blades, cutting implements and accessories...
Instruction Manual
Page 7
TURN POWER OFF. Check and inspect the tool for repairs by Hitachi may void your dealer. 7 Replacement parts and/or accessories not supplied by a Hitachi authorized service center. 32. Genuine Hitachi parts and authorized accessories are available from your warranty and can lead to a complete stop. 33. Don't leave tool until it immediately and arrange for such damage before using. 34. Do not wipe them with soapy water...
TURN POWER OFF. Check and inspect the tool for repairs by Hitachi may void your dealer. 7 Replacement parts and/or accessories not supplied by a Hitachi authorized service center. 32. Genuine Hitachi parts and authorized accessories are available from your warranty and can lead to a complete stop. 33. Don't leave tool until it immediately and arrange for such damage before using. 34. Do not wipe them with soapy water...

Instruction Manual
Page 8
If it still does not fit, contact a qualified electrician to install the proper outlet. POLARIZED PLUGS To reduce the risk of electrick shock, this equipment has a polarized plug (one way. Do not change the plug in the outlet, reverse the plug. English REPLACEMENT PARTS AND ACCESSORIES When servicing use only genuine Hitachi replacement parts and accessories. Repairs should be conducted only by a Hitachi authorized service center. If the plug does not fit fully in any way. 8 This plug will fit in a polarized outlet only one blade is wider than the other).
If it still does not fit, contact a qualified electrician to install the proper outlet. POLARIZED PLUGS To reduce the risk of electrick shock, this equipment has a polarized plug (one way. Do not change the plug in the outlet, reverse the plug. English REPLACEMENT PARTS AND ACCESSORIES When servicing use only genuine Hitachi replacement parts and accessories. Repairs should be conducted only by a Hitachi authorized service center. If the plug does not fit fully in any way. 8 This plug will fit in a polarized outlet only one blade is wider than the other).
Instruction Manual
Page 9
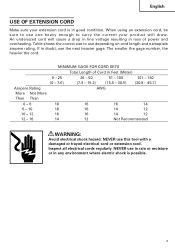
... in line voltage resulting in loss of Cord in any environment where electric shock is in doubt, use the next heavier gage. Table shows the correct size to carry the current your extension cord is possible. 9 If in good condition. MINIMUM GAGE FOR CORD SETS Total Length of power and overheating. NEVER use in rain or moisture or in Feet...
... in line voltage resulting in loss of Cord in any environment where electric shock is in doubt, use the next heavier gage. Table shows the correct size to carry the current your extension cord is possible. 9 If in good condition. MINIMUM GAGE FOR CORD SETS Total Length of power and overheating. NEVER use in rain or moisture or in Feet...

Instruction Manual
Page 10
... still follow these precautions: ⅜ Only HITACHI AUTHORIZED SERVICE CENTER should disassemble or assemble this power tool, and only genuine HITACHI replacement parts should be installed. ⅜ Clean the exterior of this Instruction Manual, including not using the power tool in this power tool, HITACHI has adopted a double insulation design. SAVE THESE INSTRUCTIONS AND MAKE THEM AVAILABLE TO OTHER USERS AND OWNERS OF THIS TOOL! 10 "Double insulation" means that two...
... still follow these precautions: ⅜ Only HITACHI AUTHORIZED SERVICE CENTER should disassemble or assemble this power tool, and only genuine HITACHI replacement parts should be installed. ⅜ Clean the exterior of this Instruction Manual, including not using the power tool in this power tool, HITACHI has adopted a double insulation design. SAVE THESE INSTRUCTIONS AND MAKE THEM AVAILABLE TO OTHER USERS AND OWNERS OF THIS TOOL! 10 "Double insulation" means that two...
Instruction Manual
Page 11
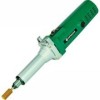
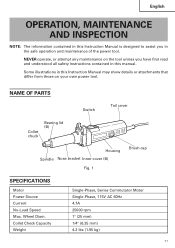
... kg) 11 NAME OF PARTS Switch Tail cover Collet chuck Bearing lid (B) Housing Spindle Nose bracket Inner cover (B) Fig. 1 Brush cap SPECIFICATIONS Motor Power Source Current No-Load Speed Max. Some illustrations in this Instruction Manual is designed to assist you have first read and understood all safety instructions contained in the safe operation and maintenance of the power tool. NEVER operate, or attempt any maintenance on your own power tool. Wheel Diam.
... kg) 11 NAME OF PARTS Switch Tail cover Collet chuck Bearing lid (B) Housing Spindle Nose bracket Inner cover (B) Fig. 1 Brush cap SPECIFICATIONS Motor Power Source Current No-Load Speed Max. Some illustrations in this Instruction Manual is designed to assist you have first read and understood all safety instructions contained in the safe operation and maintenance of the power tool. NEVER operate, or attempt any maintenance on your own power tool. Wheel Diam.
Instruction Manual
Page 12
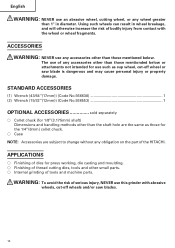
...; Case NOTE: Accessories are the same as cup wheel, cut -off wheel or saw blades. 12 Using such wheels can result in diameter. STANDARD ACCESSORIES (1) Wrench (43/64''(17mm)) (Code No.936638 1 (2) Wrench (15/32''(12mm)) (Code No.936553 1 OPTIONAL ACCESSORIES sold separately ⅜ Collet chuck (for 1/8''(3.175mm) shaft) Dimensions and handling methods other than those for press working, die casting and moulding. ⅜ Finishing of thread cutting dies, tools and other small parts...
...; Case NOTE: Accessories are the same as cup wheel, cut -off wheel or saw blades. 12 Using such wheels can result in diameter. STANDARD ACCESSORIES (1) Wrench (43/64''(17mm)) (Code No.936638 1 (2) Wrench (15/32''(12mm)) (Code No.936553 1 OPTIONAL ACCESSORIES sold separately ⅜ Collet chuck (for 1/8''(3.175mm) shaft) Dimensions and handling methods other than those for press working, die casting and moulding. ⅜ Finishing of thread cutting dies, tools and other small parts...
Instruction Manual
Page 13
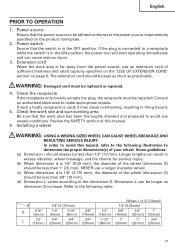
... wheel. WARNING: Damaged cord must be less than 3/8" (10 mm). (d) Dimension L varies according to a receptacle while the switch is in firing hazard. 5. Installing a wheel WARNING: USING A WRONG SIZED WHEEL CAN CAUSE WHEEL BREAKAGE AND RESULTING SERIOUS INJURY. Review the SAFETY section of this hazard, refer to determine the proper dimensions(s) of the wheel (dimension D) should be repaired. Longer lengths can cause serious injury. 3. Power switch Ensure that the power...
... wheel. WARNING: Damaged cord must be less than 3/8" (10 mm). (d) Dimension L varies according to a receptacle while the switch is in firing hazard. 5. Installing a wheel WARNING: USING A WRONG SIZED WHEEL CAN CAUSE WHEEL BREAKAGE AND RESULTING SERIOUS INJURY. Review the SAFETY section of this hazard, refer to determine the proper dimensions(s) of the wheel (dimension D) should be repaired. Longer lengths can cause serious injury. 3. Power switch Ensure that the power...

Instruction Manual
Page 14
When installing a wheel with shaft, tighten the collet chuck after applying a small quantity of spindle oil (or sewing machine oil) to the tapered portion indicated in an empty condition. English Tapered portion Collet chuck Fig. 2 Wheels can be simply attached and detached by using two wrenches. (Fig. 3) Spindle Tighten Collet chuck Fig. 3 NOTE: ⅜ ⅜ Do not tighten the collet chuck by inserting a shaft thinner than the regular shaft diameter (1/4''(6.35mm)) in the chuck or in Fig. 2. 14 This practice will damage the collet chuck.
When installing a wheel with shaft, tighten the collet chuck after applying a small quantity of spindle oil (or sewing machine oil) to the tapered portion indicated in an empty condition. English Tapered portion Collet chuck Fig. 2 Wheels can be simply attached and detached by using two wrenches. (Fig. 3) Spindle Tighten Collet chuck Fig. 3 NOTE: ⅜ ⅜ Do not tighten the collet chuck by inserting a shaft thinner than the regular shaft diameter (1/4''(6.35mm)) in the chuck or in Fig. 2. 14 This practice will damage the collet chuck.

Instruction Manual
Page 15
... wheel Ensure that they are properly tightened. ON OFF Switch Fig. 4 (2) After installing a new wheel, "test" the condition of the wheel by allowing the grinder to be achieved but also grinder vibration increases, lowering grinder accuracy and durability. Occasionally dress the wheel by using a dresser. WARNING: Using this portable grinder with high-speed revolution, minimizing the pressing force. (2) Dressing the wheel After attaching a wheel, adjust deflection of the screws...
... wheel Ensure that they are properly tightened. ON OFF Switch Fig. 4 (2) After installing a new wheel, "test" the condition of the wheel by allowing the grinder to be achieved but also grinder vibration increases, lowering grinder accuracy and durability. Occasionally dress the wheel by using a dresser. WARNING: Using this portable grinder with high-speed revolution, minimizing the pressing force. (2) Dressing the wheel After attaching a wheel, adjust deflection of the screws...
Instruction Manual
Page 16
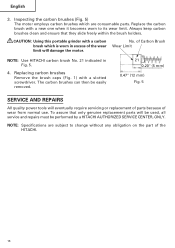
... service and repairs must be easily removed. ᮣ 21 0.20" (5 mm) 0.47" (12 mm) Fig. 5 SERVICE AND REPAIRS All quality power tools will eventually require servicing or replacement of parts because of the wear limit will damage the motor. NOTE: Specifications are consumable parts. No. of the HITACHI. 16 The carbon brushes can then be performed by a HITACHI AUTHORIZED SERVICE CENTER, ONLY. Replace the carbon brush with a slotted screwdriver. CAUTION: Using this portable grinder with a carbon brush...
... service and repairs must be easily removed. ᮣ 21 0.20" (5 mm) 0.47" (12 mm) Fig. 5 SERVICE AND REPAIRS All quality power tools will eventually require servicing or replacement of parts because of the wear limit will damage the motor. NOTE: Specifications are consumable parts. No. of the HITACHI. 16 The carbon brushes can then be performed by a HITACHI AUTHORIZED SERVICE CENTER, ONLY. Replace the carbon brush with a slotted screwdriver. CAUTION: Using this portable grinder with a carbon brush...

Instruction Manual
Page 47
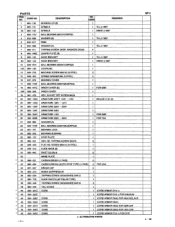
...; 12 29 Slide Knob (B) 31 Rivet D2.5 × 2.8 32 Name Plate 33 Carbon Brush 34 Brush Cap 35 Noise Suppressor 36 Tapping Screw (W/Washer) D4 × 12 37 Slide Switch 38 Tapping Screw (W/Washer) D4 × 16 39 Tail Cover 40 Cord 41 Stator Ass'y 42 Brush Terminal 43 HITACHI Label 44 Terminal 45 Brush Holder 46 Housing Ass'y 47 Switch Holder 50 Tube (D) 51 Cord Clip 52 Spring Item No...
...; 12 29 Slide Knob (B) 31 Rivet D2.5 × 2.8 32 Name Plate 33 Carbon Brush 34 Brush Cap 35 Noise Suppressor 36 Tapping Screw (W/Washer) D4 × 12 37 Slide Switch 38 Tapping Screw (W/Washer) D4 × 16 39 Tail Cover 40 Cord 41 Stator Ass'y 42 Brush Terminal 43 HITACHI Label 44 Terminal 45 Brush Holder 46 Housing Ass'y 47 Switch Holder 50 Tube (D) 51 Cord Clip 52 Spring Item No...
Parts List
Page 2
... 2 FLAT HD. USED 1 REMARKS SPINDLE 1 TILL2.1987 SPINDLE 1 SINCE 3.1987 BALL BEARING 6001VVCMPS2L 1 WASHER (B) 1 TILL2.1987 RING 1 WASHER (A) 1 TILL 2.1987 TAPPING SCREW (W/SP. SCREW M4X12 (10 PCS.) 1 SLIDE KNOB (B) 1 RIVET 02.5X2.8 2 NAME PLATE 1 CARBON BRUSH (1 PAIR) 2 CARBON BRUSH (AUTO STOP TYPE) (1 PAIR) 2 FOR USA BRUSH CAP 2 NOISE SUPPRESSOR 1 TAPPING SCREW (W/WASHER) D4X12 1 SLIDE SWITCH (2P PILLAR TYPE) 1 TAPPING SCREW (W/WASHER) D4X16 3 TAIL COVER 1 CORD 1 (CORD ARMOR D10.1) 1 (CORD ARMOR D10.1) FOR SIN,KUW CORD 1 (CORD ARMOR D8.8) FOR...
... 2 FLAT HD. USED 1 REMARKS SPINDLE 1 TILL2.1987 SPINDLE 1 SINCE 3.1987 BALL BEARING 6001VVCMPS2L 1 WASHER (B) 1 TILL2.1987 RING 1 WASHER (A) 1 TILL 2.1987 TAPPING SCREW (W/SP. SCREW M4X12 (10 PCS.) 1 SLIDE KNOB (B) 1 RIVET 02.5X2.8 2 NAME PLATE 1 CARBON BRUSH (1 PAIR) 2 CARBON BRUSH (AUTO STOP TYPE) (1 PAIR) 2 FOR USA BRUSH CAP 2 NOISE SUPPRESSOR 1 TAPPING SCREW (W/WASHER) D4X12 1 SLIDE SWITCH (2P PILLAR TYPE) 1 TAPPING SCREW (W/WASHER) D4X16 3 TAIL COVER 1 CORD 1 (CORD ARMOR D10.1) 1 (CORD ARMOR D10.1) FOR SIN,KUW CORD 1 (CORD ARMOR D8.8) FOR...
Parts List
Page 3
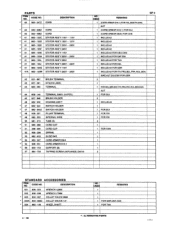
... SWITCH HOLDER 48 938- 307 PILLAR TERMINAL 49 982- 303 INTERNAL WIRE 50 981- 373 TUBE (D) 51 960- 266 CORD CLIP 51 308- 094 CORD CLIP 52 938-299 SPRING 53 982-033 SLIDE BAR 54 953- 327 CORD ARMOR D8.8 54 938- 051 CORD ARMOR D10.1 56 930- 153 SUPPORT (B) 57 984- 750 TAPPING SCREW (W/FLANGE) D4X16 NO. CODE NO. USED REMARKS 1 (CORD...
... SWITCH HOLDER 48 938- 307 PILLAR TERMINAL 49 982- 303 INTERNAL WIRE 50 981- 373 TUBE (D) 51 960- 266 CORD CLIP 51 308- 094 CORD CLIP 52 938-299 SPRING 53 982-033 SLIDE BAR 54 953- 327 CORD ARMOR D8.8 54 938- 051 CORD ARMOR D10.1 56 930- 153 SUPPORT (B) 57 984- 750 TAPPING SCREW (W/FLANGE) D4X16 NO. CODE NO. USED REMARKS 1 (CORD...

Parts List
Page 4
... THA GP 2 - 4 - *: ALTERNATIVE PARTS Printed in Japan 4 - 96 CODE NO. DESCRIPTION 601 932-624 COLLET CHUCK 3MM 602 985- 135 COLLET CHUCK 8MM 603 985-136 COLLET CHUCK 1/8" 604 939- 103 MOUNTED WHEELS KA - 4 De SHAFT (10 PCS.) 605 939- 104 MOUNTED WHEELS KA - 5 D6 SHAFT (10 PCS.) 606 939- 107 MOUNTED WHEELS KA - 8 DEI SHAFT (10 PCS.) 607 949- 021 MOUNTED WHEELS KA...
... THA GP 2 - 4 - *: ALTERNATIVE PARTS Printed in Japan 4 - 96 CODE NO. DESCRIPTION 601 932-624 COLLET CHUCK 3MM 602 985- 135 COLLET CHUCK 8MM 603 985-136 COLLET CHUCK 1/8" 604 939- 103 MOUNTED WHEELS KA - 4 De SHAFT (10 PCS.) 605 939- 104 MOUNTED WHEELS KA - 5 D6 SHAFT (10 PCS.) 606 939- 107 MOUNTED WHEELS KA - 8 DEI SHAFT (10 PCS.) 607 949- 021 MOUNTED WHEELS KA...

