Owners Guide
Page 6
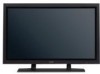
...composite/S terminal and two component terminals have some tiny bright or dark spots. FEATURES Large-screen, high-definition plasma display panel The 42-inch color plasma display panel, with sharp or hard objects. Plasma monitor speaker: • CMPAS14W(for CMP420V2) 2.5cm dome type tweeter and two 8cm round type woofers (color : ... detergent in water, wet and wring out the soft cloth and afterward wipe with one • CMPAS14V(for CMP420V1) 2 way speaker unit with a dry soft cloth. About the Optional Video Unit The following functions can be obtained by law....
...composite/S terminal and two component terminals have some tiny bright or dark spots. FEATURES Large-screen, high-definition plasma display panel The 42-inch color plasma display panel, with sharp or hard objects. Plasma monitor speaker: • CMPAS14W(for CMP420V2) 2.5cm dome type tweeter and two 8cm round type woofers (color : ... detergent in water, wet and wring out the soft cloth and afterward wipe with one • CMPAS14V(for CMP420V1) 2 way speaker unit with a dry soft cloth. About the Optional Video Unit The following functions can be obtained by law....
Owners Guide
Page 7
...Batteries 12 Handling the Remote Control 12 INSTALLATION INSTRUCTIONS 13 Installation 13 Anti-tumble measures 13 Connecting to a PC 14 Mounting the Speaker Unit 15 Power Cord Connection 15 OPERATING INSTRUCTIONS 16 Turning Power On and Off 16 Input Switching 17 Volume Adjustment 17 Audio ... SETUP MENU 23 LANGUAGE MENU 24 OTHER FEATURES 24 Automatic Store 24 Signal Check 25 Power Save Mode 25 IMAGE RETENTION OF PLASMA DISPLAY ......26 NOTES 26 TROUBLESHOOTING 27 Symptoms That Seemingly Appear to be Failures 27 Actions to Correct Abnormal Displays 29 PRODUCT SPECIFICATIONS...
...Batteries 12 Handling the Remote Control 12 INSTALLATION INSTRUCTIONS 13 Installation 13 Anti-tumble measures 13 Connecting to a PC 14 Mounting the Speaker Unit 15 Power Cord Connection 15 OPERATING INSTRUCTIONS 16 Turning Power On and Off 16 Input Switching 17 Volume Adjustment 17 Audio ... SETUP MENU 23 LANGUAGE MENU 24 OTHER FEATURES 24 Automatic Store 24 Signal Check 25 Power Save Mode 25 IMAGE RETENTION OF PLASMA DISPLAY ......26 NOTES 26 TROUBLESHOOTING 27 Symptoms That Seemingly Appear to be Failures 27 Actions to Correct Abnormal Displays 29 PRODUCT SPECIFICATIONS...
Owners Guide
Page 13
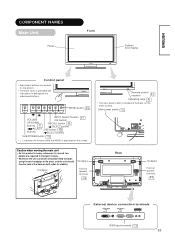
... be held at the back, on both sides for stability. Main power switch Rear Handgrips External speaker terminals External device connection terminals RGB input terminals ENGLISH COMPONENT NAMES Main Unit Panel Front Cabinet (front frame) Control panel • Adjustment buttons are required to distinguish the adjustment buttons. Caution when moving the main unit...
... be held at the back, on both sides for stability. Main power switch Rear Handgrips External speaker terminals External device connection terminals RGB input terminals ENGLISH COMPONENT NAMES Main Unit Panel Front Cabinet (front frame) Control panel • Adjustment buttons are required to distinguish the adjustment buttons. Caution when moving the main unit...
Owners Guide
Page 16
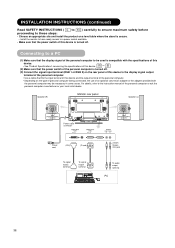
...to ) carefully to ensure maximum safety before proceeding to these steps: • Choose an appropriate site and install the product on the rear panel of this device. (2) Make sure that the power switch of the personal computer is turned off. Connecting to a PC (1) Make sure that... the display signal of the personal computer to be used is compatible with the personal computer may be necessary in some cases. Speaker (R) Monitor rear panel Speaker (L) Power cable connector Power cord (DVI) (D-sub) To signal output terminal To signal output terminal 3.5mm Stereo mini jack ...
...to ) carefully to ensure maximum safety before proceeding to these steps: • Choose an appropriate site and install the product on the rear panel of this device. (2) Make sure that the power switch of the personal computer is turned off. Connecting to a PC (1) Make sure that... the display signal of the personal computer to be used is compatible with the personal computer may be necessary in some cases. Speaker (R) Monitor rear panel Speaker (L) Power cable connector Power cord (DVI) (D-sub) To signal output terminal To signal output terminal 3.5mm Stereo mini jack ...
Owners Guide
Page 17
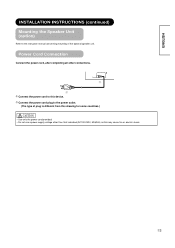
ENGLISH INSTALLATION INSTRUCTIONS (continued) Mounting the Speaker Unit (option) Refer to the instruction manual concerning mounting of plug is different from this drawing for some countries.) CAUTION • Use only the power ... provided. • Do not use a power supply voltage other connections. ᶃ ᶄ x Connect the power cord to the power outlet. (The type of the optional speaker unit. Power Cord Connection Connect the power cord, after completing all other than that indicated (AC100-240V, 50/60Hz) as this device. ➁ Connect the...
ENGLISH INSTALLATION INSTRUCTIONS (continued) Mounting the Speaker Unit (option) Refer to the instruction manual concerning mounting of plug is different from this drawing for some countries.) CAUTION • Use only the power ... provided. • Do not use a power supply voltage other connections. ᶃ ᶄ x Connect the power cord to the power outlet. (The type of the optional speaker unit. Power Cord Connection Connect the power cord, after completing all other than that indicated (AC100-240V, 50/60Hz) as this device. ➁ Connect the...
Owners Guide
Page 32
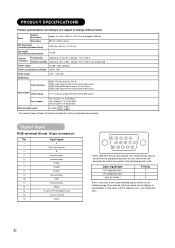
...% (non-condensing) Power supply AC100 - 240V, 50/60Hz Power consumption/at standby 310W / Panel Display dimensions Resolution Approx. 42 inches (920 (H) x 518 (V) mm, diagonal 1059mm) 852 (H) x 480 (V) pixels Net dimensions (excluding Speakers/Stand) 1030 (W) x 636 (H) x 91 (D) mm Net weight (excluding Speakers/Stand) 33.2kg Ambient conditions Temperature Operating : 5˚C to 35˚C, Storage : -15...
...% (non-condensing) Power supply AC100 - 240V, 50/60Hz Power consumption/at standby 310W / Panel Display dimensions Resolution Approx. 42 inches (920 (H) x 518 (V) mm, diagonal 1059mm) 852 (H) x 480 (V) pixels Net dimensions (excluding Speakers/Stand) 1030 (W) x 636 (H) x 91 (D) mm Net weight (excluding Speakers/Stand) 33.2kg Ambient conditions Temperature Operating : 5˚C to 35˚C, Storage : -15...
Owners Guide
Page 36
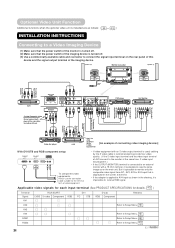
... monitor with an S video output terminal is used, cabling by the S video cable is applied to AV4 input as on the rear panel of this device and the signal output terminal of them. Refer to provide finer video quality. (If the S video input terminal and... video input terminal of connecting video imaging devices] input terminal With DVI-STB and RGB component setup To component video equipments. Speaker (R) Monitor rear panel Speaker (L) To audio output terminals To component output terminals To audio output terminals To component output terminals To component input terminals To ...
... monitor with an S video output terminal is used, cabling by the S video cable is applied to AV4 input as on the rear panel of this device and the signal output terminal of them. Refer to provide finer video quality. (If the S video input terminal and... video input terminal of connecting video imaging devices] input terminal With DVI-STB and RGB component setup To component video equipments. Speaker (R) Monitor rear panel Speaker (L) To audio output terminals To component output terminals To audio output terminals To component output terminals To component input terminals To ...
Owners Guide
Page 39
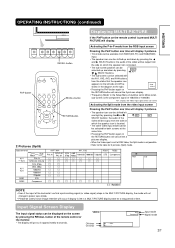
...• Pressing the PinP button again or the RETURN button will be output from RGB1(DVI-PC) and RGB2(RGB) input. • The speaker icon can be selected up and down by pressing the and SELECT buttons; OPERATING INSTRUCTIONS (continued) ENGLISH Displaying MULTI PICTURE If the PinP button on...• The display will display. AV1: Displays the VIDEO input signal of time. Activating the P-in-P mode from the status that the speaker icon appears on the left in the Setup Menu should be shifted up and down by pressing SELECT buttons. Min AV1 Composite Input mode Signal...
...• Pressing the PinP button again or the RETURN button will be output from RGB1(DVI-PC) and RGB2(RGB) input. • The speaker icon can be selected up and down by pressing the and SELECT buttons; OPERATING INSTRUCTIONS (continued) ENGLISH Displaying MULTI PICTURE If the PinP button on...• The display will display. AV1: Displays the VIDEO input signal of time. Activating the P-in-P mode from the status that the speaker icon appears on the left in the Setup Menu should be shifted up and down by pressing SELECT buttons. Min AV1 Composite Input mode Signal...
Owners Guide
Page 45
.... PRODUCT SPECIFICATIONS This table shows the specifications when the optional video unit has been inserted. Panel Display dimensions Resolution Approx. 42 inches (920 (H) x 518 (V) mm, diagonal 1059mm) 852 (H) x 480 (V) pixels Net dimensions (excluding Speakers/Stand) Net weight (excluding Speakers/Stand) 1030 (W) x 636 (H) x 91 (D) mm 33.2 kg Ambient conditions Temperature Operating : 5˚C to 35˚...
.... PRODUCT SPECIFICATIONS This table shows the specifications when the optional video unit has been inserted. Panel Display dimensions Resolution Approx. 42 inches (920 (H) x 518 (V) mm, diagonal 1059mm) 852 (H) x 480 (V) pixels Net dimensions (excluding Speakers/Stand) Net weight (excluding Speakers/Stand) 1030 (W) x 636 (H) x 91 (D) mm 33.2 kg Ambient conditions Temperature Operating : 5˚C to 35˚...

