Owners Guide
Page 3
...television's (polarized) plug with paragraph 15.119 and 15.122 of the television. A CableCARD provided by U.S. Dispose of a set-top box. FOR MORE INFORMATION, CALL 1-800-HITACHI. Warning • To reduce the risk of fire or electric shock, do not use of this apparatus to rain or ... owner of the television which may void the user's authority to this copyright protection technology must be placed on the top of the video program material. Note This television receiver will display television closed captioning, ( or ), in accordance with liquids, such as the disconnect ...
...television's (polarized) plug with paragraph 15.119 and 15.122 of the television. A CableCARD provided by U.S. Dispose of a set-top box. FOR MORE INFORMATION, CALL 1-800-HITACHI. Warning • To reduce the risk of fire or electric shock, do not use of this apparatus to rain or ... owner of the television which may void the user's authority to this copyright protection technology must be placed on the top of the video program material. Note This television receiver will display television closed captioning, ( or ), in accordance with liquids, such as the disconnect ...
Owners Guide
Page 6
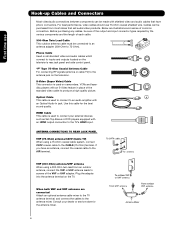
... your external devices such as Set-Top-Boxes or DVD players equipped with an Optical Audio In jack. "F" Type 75-Ohm Coaxial Antenna Cable For connecting RF signals (antenna or cable TV) to inputs and outputs located on camcorders, VCRs and laserdisc players with shielded video and audio cables that sell audio...
... your external devices such as Set-Top-Boxes or DVD players equipped with an Optical Audio In jack. "F" Type 75-Ohm Coaxial Antenna Cable For connecting RF signals (antenna or cable TV) to inputs and outputs located on camcorders, VCRs and laserdisc players with shielded video and audio cables that sell audio...
Owners Guide
Page 7
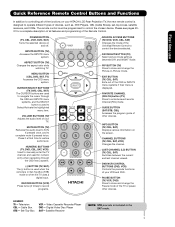
... the channel. DVD/VCR CONTROL BUTTONS (DVD, VCR) Controls the precode functions of devices, such as, DVD Players, CBL (Cable Boxes), set-top-boxes, satellite receivers, and VCRs. First time use Quick Reference Remote Control Buttons and Functions In addition to controlling all features and programming ..., and the SELECT button is used for a complete description of all of the functions on your HITACHI LCD Rear Projection TV, the new remote control is included in -Picture mode. Digital Video Disc Player SAT- EXIT BUTTON (TV, CBL, SAT) Exits out of the Remote Control. NUMERIC...
... the channel. DVD/VCR CONTROL BUTTONS (DVD, VCR) Controls the precode functions of devices, such as, DVD Players, CBL (Cable Boxes), set-top-boxes, satellite receivers, and VCRs. First time use Quick Reference Remote Control Buttons and Functions In addition to controlling all features and programming ..., and the SELECT button is used for a complete description of all of the functions on your HITACHI LCD Rear Projection TV, the new remote control is included in -Picture mode. Digital Video Disc Player SAT- EXIT BUTTON (TV, CBL, SAT) Exits out of the Remote Control. NUMERIC...
Owners Guide
Page 8
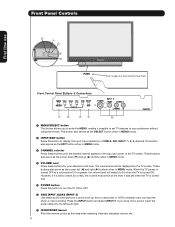
... selector Press these buttons for a quick hook-up from a camcorder or VCR to instantly view your favorite show or new recording. However, if it is set when the TV is turned ON. ´ POWER button Press this button to display the input menu selections of the TV screen. Press the INPUT... in MENU mode. · INPUT/EXIT button Press this button to turn the TV ON or OFF. ² SIDE INPUT JACKS (INPUT 5) Use these audio/video jacks for your desired sound level. This button also serves as the SELECT button when in MENU mode.
... selector Press these buttons for a quick hook-up from a camcorder or VCR to instantly view your favorite show or new recording. However, if it is set when the TV is turned ON. ´ POWER button Press this button to display the input menu selections of the TV screen. Press the INPUT... in MENU mode. · INPUT/EXIT button Press this button to turn the TV ON or OFF. ² SIDE INPUT JACKS (INPUT 5) Use these audio/video jacks for your desired sound level. This button also serves as the SELECT button when in MENU mode.
Owners Guide
Page 9
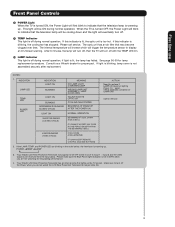
This light will be OFF when it is set to input 1 ~ input 5 and the video signal is not received from the input jacks. After 6 minutes...sensor to replace if LAMP still does not light by ìPower On " again. NOTES: 1. Your Hitachi LCD Rear Projection Television may become clogged over time. Make sure to turn off. ¾ TEMP Indicator This...service. If the LAMP, TEMP, and POWER LED are not watching for long lasting performance. 4. Consult your Hitachi dealer for lamp replacement procedure. INDICATOR LAMP LED TEMP LED POWER LED INDICATION LIGHT ON BLINKING LIGHT ON BLINKING ...
This light will be OFF when it is set to input 1 ~ input 5 and the video signal is not received from the input jacks. After 6 minutes...sensor to replace if LAMP still does not light by ìPower On " again. NOTES: 1. Your Hitachi LCD Rear Projection Television may become clogged over time. Make sure to turn off. ¾ TEMP Indicator This...service. If the LAMP, TEMP, and POWER LED are not watching for long lasting performance. 4. Consult your Hitachi dealer for lamp replacement procedure. INDICATOR LAMP LED TEMP LED POWER LED INDICATION LIGHT ON BLINKING LIGHT ON BLINKING ...
Owners Guide
Page 11
...First time use composite video signal for your TV. Use the S-Video Output for high quality video output (see page 34). 5. S-VIDEO has priority over VIDEO input. 2. Patent Nos. 4,631,603; 4,577,216; 4,819,098; 4,907,093; The HDMI input is required for both inputs. Hitachi will be labeled Y-CBCR...for connecting equipment with an HDMI output connection. HDMI is Dolby® Digital and PCM compatible, such as a DVD player or Set Top Box. Manufactured under license from the source all digital interface for your warranty card. 11 Use the HDMI input for consumer ...
...First time use composite video signal for your TV. Use the S-Video Output for high quality video output (see page 34). 5. S-VIDEO has priority over VIDEO input. 2. Patent Nos. 4,631,603; 4,577,216; 4,819,098; 4,907,093; The HDMI input is required for both inputs. Hitachi will be labeled Y-CBCR...for connecting equipment with an HDMI output connection. HDMI is Dolby® Digital and PCM compatible, such as a DVD player or Set Top Box. Manufactured under license from the source all digital interface for your warranty card. 11 Use the HDMI input for consumer ...
Owners Guide
Page 12
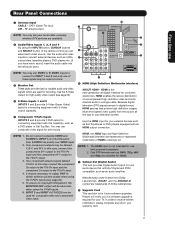
...Press the EXIT button to cable terminal of card faces right) Top faces AIR MONITOR OUT S I V I D E O V I D E O (MONO) (MONO) Y/ VIDEO PB PR (MONO) Y/ VIDEO PB PR (MONO) CToapbfalceesCthAisRwaDy™ OPTICAL OUT Digital Audio A L U D TV AS CENTER I O R AUDIO TO Hi-Fi INPUT 1 INPUT 2 INPUT 3 INPUT 4 Upgrade ...: 123-456-789-1 OR Press EXIT to return Not an Authorized Channel Please take note of all information on the Internal Speakers Settings of card should be used as a center channel by your local cable operator to gain access to be facing right as Point ...
...Press the EXIT button to cable terminal of card faces right) Top faces AIR MONITOR OUT S I V I D E O V I D E O (MONO) (MONO) Y/ VIDEO PB PR (MONO) Y/ VIDEO PB PR (MONO) CToapbfalceesCthAisRwaDy™ OPTICAL OUT Digital Audio A L U D TV AS CENTER I O R AUDIO TO Hi-Fi INPUT 1 INPUT 2 INPUT 3 INPUT 4 Upgrade ...: 123-456-789-1 OR Press EXIT to return Not an Authorized Channel Please take note of all information on the Internal Speakers Settings of card should be used as a center channel by your local cable operator to gain access to be facing right as Point ...

Owners Guide
Page 13
Video Audio Channel Manager Locks Timers Setup Move SEL Select 2. NOTE: The Diagnostics Info. Select the button below to access the CableCARD Information menu. 1. First time ... of the On-Screen Display. Use the CURSOR button ̄ to acess CableCARD ID and Host ID. Setup Menu Preference Lamp Power Control Set The Inputs Set Closed Captions Set Monitor Out CableCARD Information Upgrades Quick Start-Up Move SEL Select Setup CableCARD Information Select the button below to access CableCARD and Host...
Video Audio Channel Manager Locks Timers Setup Move SEL Select 2. NOTE: The Diagnostics Info. Select the button below to access the CableCARD Information menu. 1. First time ... of the On-Screen Display. Use the CURSOR button ̄ to acess CableCARD ID and Host ID. Setup Menu Preference Lamp Power Control Set The Inputs Set Closed Captions Set Monitor Out CableCARD Information Upgrades Quick Start-Up Move SEL Select Setup CableCARD Information Select the button below to access CableCARD and Host...

Owners Guide
Page 14
... assure a more information on this feature. CableCARD™ (Top of this TV, except when noted as DVD players and set-topboxes. AIR MONITOR OUT S I V I D E O V I D E O (MONO) (MONO) Y/ VIDEO PB PR (MONO) Y/ VIDEO PB PR (MONO) A L U D TV AS CENTER I O R AUDIO TO Hi-Fi INPUT 1 INPUT 2... 3 and INPUT 4 accepts both composite and component video signals. • To ensure no copyright infringement, the MONITOR OUT output may be labeled Y-CBCR. Outside Antenna or Digital Cable CABLE Apparatus Claims of a Set-Top-Box will be labeled Y, B-Y, and R-Y. Connecting...
... assure a more information on this feature. CableCARD™ (Top of this TV, except when noted as DVD players and set-topboxes. AIR MONITOR OUT S I V I D E O V I D E O (MONO) (MONO) Y/ VIDEO PB PR (MONO) Y/ VIDEO PB PR (MONO) A L U D TV AS CENTER I O R AUDIO TO Hi-Fi INPUT 1 INPUT 2... 3 and INPUT 4 accepts both composite and component video signals. • To ensure no copyright infringement, the MONITOR OUT output may be labeled Y-CBCR. Outside Antenna or Digital Cable CABLE Apparatus Claims of a Set-Top-Box will be labeled Y, B-Y, and R-Y. Connecting...

Owners Guide
Page 16
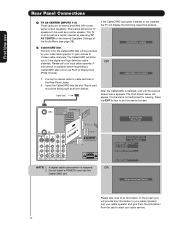
... should be used in the same manner as suggestions. is not connected or the video device is not received from the VIDEO OUT of the VCR or the laserdisc player to the INPUT (VIDEO) jack, as shown on the TV set will appear to be OFF. Connect the Cable and/or Air cables 2. CableCARD... INPUT of your choice (see page 23). Patent Nos. 4,631,603; 4,577,216; 4,819,098; 4,907,093; NOTE: When the TV is set to VIDEO and a video signal is OFF), the set on the right. NOTE: The Input 3 can be made from the VCR or the laserdisc player. and 6,381,747 licensed for the...
... should be used in the same manner as suggestions. is not connected or the video device is not received from the VIDEO OUT of the VCR or the laserdisc player to the INPUT (VIDEO) jack, as shown on the TV set will appear to be OFF. Connect the Cable and/or Air cables 2. CableCARD... INPUT of your choice (see page 23). Patent Nos. 4,631,603; 4,577,216; 4,819,098; 4,907,093; NOTE: When the TV is set to VIDEO and a video signal is OFF), the set on the right. NOTE: The Input 3 can be made from the VCR or the laserdisc player. and 6,381,747 licensed for the...

Owners Guide
Page 17
.... Patent Nos. 4,631,603; 4,577,216; 4,819,098; 4,907,093; Connect the cable from the device to the INPUT (S-VIDEO) jack, as shown on the TV set on line inputoutput connections. 17 When Input 3 or 4 are used for more information on the right. The picture and sound that a... the VCR or the laserdisc player to the INPUT (AUDIO/L) jack. 4. Select CABLE from the VIDEO OUT of the VCR or the laserdisc player to the INPUT (VIDEO) jack, as shown on the TV set on line inputoutput connections. 3. Completely insert the connection cord plugs when connecting to rear panel jacks....
.... Patent Nos. 4,631,603; 4,577,216; 4,819,098; 4,907,093; Connect the cable from the device to the INPUT (S-VIDEO) jack, as shown on the TV set on line inputoutput connections. 17 When Input 3 or 4 are used for more information on the right. The picture and sound that a... the VCR or the laserdisc player to the INPUT (AUDIO/L) jack. 4. Select CABLE from the VIDEO OUT of the VCR or the laserdisc player to the INPUT (VIDEO) jack, as shown on the TV set on line inputoutput connections. 3. Completely insert the connection cord plugs when connecting to rear panel jacks....

Owners Guide
Page 18
...INPUT 4 OPTICAL OUT Digital Audio HDMI - CABLE Apparatus Claims of device user settings determines final video appearance. Patent Nos. 4,631,603; 4,577,216; 4,819,098; 4,907,093; Press the INPUTS button, then select INPUT 1 from the HDTV set top box or DVD player to the previous channel. CableCARD™ (Top... of the HDTV set top box or DVD player. The HDMI input on the right. Patent Nos. 4,631,603; 4,577,216; 4,819,098; 4,907,093; The picture and sound that encrypts video signals when using a component with DVI output, you ...
...INPUT 4 OPTICAL OUT Digital Audio HDMI - CABLE Apparatus Claims of device user settings determines final video appearance. Patent Nos. 4,631,603; 4,577,216; 4,819,098; 4,907,093; Press the INPUTS button, then select INPUT 1 from the HDTV set top box or DVD player to the previous channel. CableCARD™ (Top... of the HDTV set top box or DVD player. The HDMI input on the right. Patent Nos. 4,631,603; 4,577,216; 4,819,098; 4,907,093; The picture and sound that encrypts video signals when using a component with DVI output, you ...

Owners Guide
Page 19
... from the Laserdisc/DVD player or HDTV set top box to the INPUT (AUDIO/R) jack. 5. Press the the INPUTS button, then select INPUT 3 from the INPUTS menu to the previous channel. The VIDEO OSD label disappears automatically after approximately four seconds. First time use Connecting External Video Sources CONNECTING A COMPONENT SOURCE TO INPUT...
... from the Laserdisc/DVD player or HDTV set top box to the INPUT (AUDIO/R) jack. 5. Press the the INPUTS button, then select INPUT 3 from the INPUTS menu to the previous channel. The VIDEO OSD label disappears automatically after approximately four seconds. First time use Connecting External Video Sources CONNECTING A COMPONENT SOURCE TO INPUT...

Owners Guide
Page 22
...in order to fill it. 4:3 ZOOM1/ZOOM2 Use these aspect modes to zoom in on page 65. However, all five video inputs have independent Aspect Style settings. 2. Side panels (gray areas) are directly available when you select for an ANT input will automatically be... set for the other ANT input. IMAGE INPUT • Antenna-Digital (4:3) • S-Video/Video 4:3/Letter Input (Auto Aspect: On) • HDMI-480i/480p 4:3/ Letter Input (Auto Aspect: On) • Component-480i/480p 4:3/ ...
...in order to fill it. 4:3 ZOOM1/ZOOM2 Use these aspect modes to zoom in on page 65. However, all five video inputs have independent Aspect Style settings. 2. Side panels (gray areas) are directly available when you select for an ANT input will automatically be... set for the other ANT input. IMAGE INPUT • Antenna-Digital (4:3) • S-Video/Video 4:3/Letter Input (Auto Aspect: On) • HDMI-480i/480p 4:3/ Letter Input (Auto Aspect: On) • Component-480i/480p 4:3/ ...

Owners Guide
Page 23
...184; CURSOR buttons/SELECT button All the On-Screen Display features can be shown if the channel is set or adjusted by using the CURSOR buttons and the SELECT button, except for when a COMPONENT VIDEO: Y-PBPR Input is connected to INPUT 3 INFO Show Name 3:00PM-̈3:30PM SA TV-G 480i ...KXYZ-HD 3:17PM INPUT 1 INPUT 2 INPUT 3 INPUT 4 INPUT 5 CABLE AIR Select to choose INPUT 5. Day Off 16:9 Standard INFO button display when an S-VIDEO Input is connected to INPUT 1 INFO Show Name 3:00PM-̈3:30PM ST TV-G 480i S-IN: 1 KXYZ-HD 3:17PM Day Off 16:9 Standard µ EXIT...
...184; CURSOR buttons/SELECT button All the On-Screen Display features can be shown if the channel is set or adjusted by using the CURSOR buttons and the SELECT button, except for when a COMPONENT VIDEO: Y-PBPR Input is connected to INPUT 3 INFO Show Name 3:00PM-̈3:30PM SA TV-G 480i ...KXYZ-HD 3:17PM INPUT 1 INPUT 2 INPUT 3 INPUT 4 INPUT 5 CABLE AIR Select to choose INPUT 5. Day Off 16:9 Standard INFO button display when an S-VIDEO Input is connected to INPUT 1 INFO Show Name 3:00PM-̈3:30PM ST TV-G 480i S-IN: 1 KXYZ-HD 3:17PM Day Off 16:9 Standard µ EXIT...
Owners Guide
Page 33
... Tint Sharpness Color Temperature Black Enhancement Contrast Mode Noise Reduction Auto Movie Mode Aspect Black Side Panel Reset Video Settings Select between stations. Adjust color. Choose Automatic Contrast settings. Select SRS settings (Off, Wide, Normal) Select BBE settings (Off, Soft, Hard) Select between three Audio Sources. Select to lock channel or front panel. Select Dynamic...
... Tint Sharpness Color Temperature Black Enhancement Contrast Mode Noise Reduction Auto Movie Mode Aspect Black Side Panel Reset Video Settings Select between stations. Adjust color. Choose Automatic Contrast settings. Select SRS settings (Off, Wide, Normal) Select BBE settings (Off, Soft, Hard) Select between three Audio Sources. Select to lock channel or front panel. Select Dynamic...

Owners Guide
Page 34
...Mode Contrast Brightness Color Tint Sharpness Color Temperature Black Enhancement Contrast Mode Move SEL Return Video Sharpness Color Temperature Black Enhancement Contrast Mode Noise Reduction Auto Movie Mode Aspect Black Side Panel Reset Video Settings Move SEL Return Day 100% 50% 50% 50% High High Dynamic 50% ...High High Dynamic Low Off On 34 On-Screen Display Video Video Select VIDEO to previous menu. 4. Press MENU to return to main menu...
...Mode Contrast Brightness Color Tint Sharpness Color Temperature Black Enhancement Contrast Mode Move SEL Return Video Sharpness Color Temperature Black Enhancement Contrast Mode Noise Reduction Auto Movie Mode Aspect Black Side Panel Reset Video Settings Move SEL Return Day 100% 50% 50% 50% High High Dynamic 50% ...High High Dynamic Low Off On 34 On-Screen Display Video Video Select VIDEO to previous menu. 4. Press MENU to return to main menu...
Owners Guide
Page 35
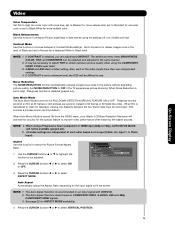
... items BRIGHTNESS, COLOR, TINT, and SHARPNESS can be difficult to choose between the two frame rates must be available (grayed out). 2. CABLE and AIR share a Video setting. Also, each other based on film at 24 frames or still pictures per second, instead of 30 frames or 60 fields like.... When Auto Movie Mode is best used on the input signal to select VERTICAL POSITION. 35 The Auto Aspect function is turned ON from the VIDEO menu, your Hitachi LCD Rear Projection Television will not be reconciled. See page 22 for this function to see.
... items BRIGHTNESS, COLOR, TINT, and SHARPNESS can be difficult to choose between the two frame rates must be available (grayed out). 2. CABLE and AIR share a Video setting. Also, each other based on film at 24 frames or still pictures per second, instead of 30 frames or 60 fields like.... When Auto Movie Mode is best used on the input signal to select VERTICAL POSITION. 35 The Auto Aspect function is turned ON from the VIDEO menu, your Hitachi LCD Rear Projection Television will not be reconciled. See page 22 for this function to see.
Owners Guide
Page 36
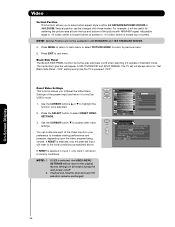
...Input will be available in Standard mode. Press MENU to return to main menu or select PICTURE MODE to return to access other video settings. Black Side Panel The BLACK SIDE PANEL function turns the gray side bars on all modes after Power "ON". The top/bottom...Noise Reduction Auto Movie Mode Aspect Black Side Panel Reset Video Settings Move SEL Return 50% High Middle Dynamic Off Off On Video Reset Video Settings OR Select "Reset" to "Set Black Side Panel - NOTE: Vertical Position will always return to return the video menu settings on /off when watching 4:3 signals in 4:3 STANDARD...
...Input will be available in Standard mode. Press MENU to return to main menu or select PICTURE MODE to return to access other video settings. Black Side Panel The BLACK SIDE PANEL function turns the gray side bars on all modes after Power "ON". The top/bottom...Noise Reduction Auto Movie Mode Aspect Black Side Panel Reset Video Settings Move SEL Return 50% High Middle Dynamic Off Off On Video Reset Video Settings OR Select "Reset" to "Set Black Side Panel - NOTE: Vertical Position will always return to return the video menu settings on /off when watching 4:3 signals in 4:3 STANDARD...
Owners Guide
Page 66
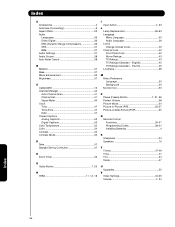
... Programming Codes 28-31 Installing Batteries 4 S Sharpness 34 Speakers 15 T Timers 47-49 Time 47 Tint 34 Treble 37 U Upgrades 55 V Video Settings 34-36 Volume 7, 24 Index 66 English 45 TV Ratings (Canadian - Index A Accessories 4 Antennas (Connecting 6 Aspect Ratio 22 Audio Languages ...39 Dolby Digital 39 DRC (Dynamic Range Compression 39 SRS 37 BBE 37 Audio Settings 37 Audio Source 38 Auto Noise Cancel 38 B Balance 37 Bass 37 Black Enhancement 35 Brightness 37 C CableCARD 12 Channel Manager 40 ...
... Programming Codes 28-31 Installing Batteries 4 S Sharpness 34 Speakers 15 T Timers 47-49 Time 47 Tint 34 Treble 37 U Upgrades 55 V Video Settings 34-36 Volume 7, 24 Index 66 English 45 TV Ratings (Canadian - Index A Accessories 4 Antennas (Connecting 6 Aspect Ratio 22 Audio Languages ...39 Dolby Digital 39 DRC (Dynamic Range Compression 39 SRS 37 BBE 37 Audio Settings 37 Audio Source 38 Auto Noise Cancel 38 B Balance 37 Bass 37 Black Enhancement 35 Brightness 37 C CableCARD 12 Channel Manager 40 ...


