Owners Guide
Page 2
... warnings and instructions marked on this can expose you to very high voltages and other hazards. REFER SERVICING TO QUALIFIED SERVICE PERSONNEL. NOTE: ¥There are no user serviceable parts inside the television. ¥Model and serial numbers are indicated on 120 volts 60Hz, AC current. CAUTION: Adjust only those controls that are covered in accordance with CAUTION: Never remove the back cover of electric shock...
... warnings and instructions marked on this can expose you to very high voltages and other hazards. REFER SERVICING TO QUALIFIED SERVICE PERSONNEL. NOTE: ¥There are no user serviceable parts inside the television. ¥Model and serial numbers are indicated on 120 volts 60Hz, AC current. CAUTION: Adjust only those controls that are covered in accordance with CAUTION: Never remove the back cover of electric shock...
Owners Guide
Page 4
... PART 250 PART H) EXAMPLE OF ANTENNA GROUNDING AS PER NATIONAL ELECTRICAL CODE INSTRUCTIONS. 18. If your HITACHI Factory Warranty. ¥ When using Picture-in wire to keep from the wall outlet and disconnect antenna. Unplug the television and call the CATV system installer s attention to Article 82040 of antenna discharge unit connection to proper grounding of the mast and supporting structure, grounding of power source indicated on -screen displays...
... PART 250 PART H) EXAMPLE OF ANTENNA GROUNDING AS PER NATIONAL ELECTRICAL CODE INSTRUCTIONS. 18. If your HITACHI Factory Warranty. ¥ When using Picture-in wire to keep from the wall outlet and disconnect antenna. Unplug the television and call the CATV system installer s attention to Article 82040 of antenna discharge unit connection to proper grounding of the mast and supporting structure, grounding of power source indicated on -screen displays...

Owners Guide
Page 7
... video and audio cables which connect to the ANT B terminal. All rights reserved. 7 Antenna mixer Optical Cable This cable can be used on the TV. Plug the adapter into the antenna terminal on camcorders, VCRs, and laserdisc players with an Optical Audio Out jack, such as a Dolby* Digital DVD player or an HDTV Set Top Box. HOOK-UP CABLES AND CONNECTORS Most video/audio connections between components can be made with shielded video and audio cables that sell audio/video...
... video and audio cables which connect to the ANT B terminal. All rights reserved. 7 Antenna mixer Optical Cable This cable can be used on the TV. Plug the adapter into the antenna terminal on camcorders, VCRs, and laserdisc players with an Optical Audio Out jack, such as a Dolby* Digital DVD player or an HDTV Set Top Box. HOOK-UP CABLES AND CONNECTORS Most video/audio connections between components can be made with shielded video and audio cables that sell audio/video...

Owners Guide
Page 11
...-SPEAKER SETUP menu. The volume level is controlled by the television s main volume. ANT A input can be displayed as a main picture. (ANT B cannot be used at a time. ቤ MONITOR OUT These jacks provide fixed audio and video signals which are used for the surround sound feature. These speaker output terminals can be turned on and off in the THEATER-SPEAKER SETUP menu. ቧ REAR SPEAKER Output Terminals These terminals are used to connect external speakers, which are used for recording. With this connection, the audio...
...-SPEAKER SETUP menu. The volume level is controlled by the television s main volume. ANT A input can be displayed as a main picture. (ANT B cannot be used at a time. ቤ MONITOR OUT These jacks provide fixed audio and video signals which are used for the surround sound feature. These speaker output terminals can be turned on and off in the THEATER-SPEAKER SETUP menu. ቧ REAR SPEAKER Output Terminals These terminals are used to connect external speakers, which are used for recording. With this connection, the audio...

Owners Guide
Page 12
... be used for connecting equipment with the Dolby Digital bitstream. DO NOT connect standard VIDEO or S-VIDEO to SPLIT PIP mode. NOTES: 1. REAR PANEL JACKS ቩ Component: Y-PBPR Inputs Inputs 1 and 2 provide Y-PBPR jacks for VIDEO: 1 or VIDEO: 2 audio, as a DVD player or Set Top Box. This input can be used for VIDEO: 1 or VIDEO: 2 audio, as selected in the THEATERINPUT SOURCE menu. (see page 67) ቫ Optical Input This jack provides high quality audio input from a Dolby Digital DVD player or HDTV Set Top Box.
... be used for connecting equipment with the Dolby Digital bitstream. DO NOT connect standard VIDEO or S-VIDEO to SPLIT PIP mode. NOTES: 1. REAR PANEL JACKS ቩ Component: Y-PBPR Inputs Inputs 1 and 2 provide Y-PBPR jacks for VIDEO: 1 or VIDEO: 2 audio, as a DVD player or Set Top Box. This input can be used for VIDEO: 1 or VIDEO: 2 audio, as selected in the THEATERINPUT SOURCE menu. (see page 67) ቫ Optical Input This jack provides high quality audio input from a Dolby Digital DVD player or HDTV Set Top Box.
Owners Guide
Page 15
... on line input-output connections. Your component outputs may be abnormal, when using high performance equipment for VIDEO: 1 or VIDEO: 2 inputs, if it to the TV s PR input. Use these may use these connections in place of the standard video connection if your hook-up cables. You may be labeled Y, B-Y, and R-Y. Refer to your components audio output to each input jack. TIPS ON REAR PANEL CONNECTIONS TIPS ON REAR PANEL CONNECTIONS S-VIDEO connections are provided for high performance components, such as DVD players.
... on line input-output connections. Your component outputs may be abnormal, when using high performance equipment for VIDEO: 1 or VIDEO: 2 inputs, if it to the TV s PR input. Use these may use these connections in place of the standard video connection if your hook-up cables. You may be labeled Y, B-Y, and R-Y. Refer to your components audio output to each input jack. TIPS ON REAR PANEL CONNECTIONS TIPS ON REAR PANEL CONNECTIONS S-VIDEO connections are provided for high performance components, such as DVD players.
Owners Guide
Page 17
... best performance, video and audio cables should be OFF. is not connected or the video device is OFF), the set to VIDEO and a video signal is NOT COVERED by your particular assortment of components and features. Connect the cable from the VIDEO INPUT JACK on the back panel of the TV (i.e., VCR/laserdisc player, etc. However, you use to connect the VCR, camcorder, laserdisc player, DVD player, or HDTV Set Top Box to your TV set below . Rear Panel of Television OPTICAL INPUT...
... best performance, video and audio cables should be OFF. is not connected or the video device is OFF), the set to VIDEO and a video signal is NOT COVERED by your particular assortment of components and features. Connect the cable from the VIDEO INPUT JACK on the back panel of the TV (i.e., VCR/laserdisc player, etc. However, you use to connect the VCR, camcorder, laserdisc player, DVD player, or HDTV Set Top Box to your TV set below . Rear Panel of Television OPTICAL INPUT...
Owners Guide
Page 20
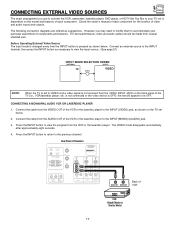
.... 4. Connect the cable from the Laserdisc/DVD player or HDTV set top box to the previous channel. Press the INPUT button, to rear panel jacks. DVD Player Hitachi Model or Similar Model OUTPUT OUTPUT Back of L R Y PB PR OR AUDIO VIDEO DVD Player R L Y PB/CB PR/CR HDTV Set-Top Box OPTICAL INPUT COAXIAL INPUT REAR SPEAKER 8W ONLY ANT A TO CONVERTER S-VIDEO STOP CONNECT ONLY 8 OHM SPEAKERS DO NOT SHORT CIRCUIT THESE TERMINALS (Such damage is loose. 2. Completely insert the connection cord plugs when connecting to view the program...
.... 4. Connect the cable from the Laserdisc/DVD player or HDTV set top box to the previous channel. Press the INPUT button, to rear panel jacks. DVD Player Hitachi Model or Similar Model OUTPUT OUTPUT Back of L R Y PB PR OR AUDIO VIDEO DVD Player R L Y PB/CB PR/CR HDTV Set-Top Box OPTICAL INPUT COAXIAL INPUT REAR SPEAKER 8W ONLY ANT A TO CONVERTER S-VIDEO STOP CONNECT ONLY 8 OHM SPEAKERS DO NOT SHORT CIRCUIT THESE TERMINALS (Such damage is loose. 2. Completely insert the connection cord plugs when connecting to view the program...
Owners Guide
Page 21
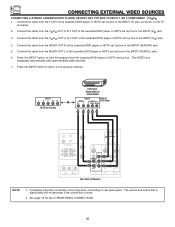
... INPUT button to return to rear panel jacks. Completely insert the connection cord plugs when connecting to the previous channel. The picture and sound that is played back will be abnormal if the connection is connected to INPUT 2 component jacks, make sure to select VID2OPTICAL from the THEATER-INPUT SOURCE menu. If it is loose. 2. CONNECTING EXTERNAL VIDEO SOURCES CONNECTING A DVD OR HDTV SET TOP BOX PLAYER WITH DOLBY DIGITAL OPTICAL OUTPUT TO INPUT 1 or 2 COMPONENT: Y-PBPR 1. HDTV SET-TOP BOX DVD Player Hitachi Model...
... INPUT button to return to rear panel jacks. Completely insert the connection cord plugs when connecting to the previous channel. The picture and sound that is played back will be abnormal if the connection is connected to INPUT 2 component jacks, make sure to select VID2OPTICAL from the THEATER-INPUT SOURCE menu. If it is loose. 2. CONNECTING EXTERNAL VIDEO SOURCES CONNECTING A DVD OR HDTV SET TOP BOX PLAYER WITH DOLBY DIGITAL OPTICAL OUTPUT TO INPUT 1 or 2 COMPONENT: Y-PBPR 1. HDTV SET-TOP BOX DVD Player Hitachi Model...
Owners Guide
Page 22
... SET-TOP BOX player VIDEO OUTPUT COAXIAL OUTPUT PR PB Y OR OR Back of the DVD player or HDTV Set Top Box to the INPUT (PB) jack. 3. Connect the cable from the THEATER-INPUT SOURCE menu. Press the INPUT button, to the INPUT (Y) jack, as shown on REAR PANEL CONNECTIONS. 3. Connect the cable from the Y OUT of the DVD player or HDTV Set Top Box to view the program from the CR/PR OUT or R-Y OUT of DVD player VIDEO OUTPUT COAXIAL OUTPUT CR CB Y OPTICAL INPUT COAXIAL INPUT REAR SPEAKER...
... SET-TOP BOX player VIDEO OUTPUT COAXIAL OUTPUT PR PB Y OR OR Back of the DVD player or HDTV Set Top Box to the INPUT (PB) jack. 3. Connect the cable from the THEATER-INPUT SOURCE menu. Press the INPUT button, to the INPUT (Y) jack, as shown on REAR PANEL CONNECTIONS. 3. Connect the cable from the Y OUT of the DVD player or HDTV Set Top Box to view the program from the CR/PR OUT or R-Y OUT of DVD player VIDEO OUTPUT COAXIAL OUTPUT CR CB Y OPTICAL INPUT COAXIAL INPUT REAR SPEAKER...
Owners Guide
Page 25
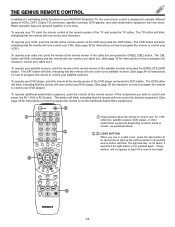
... (Cable TV) converters, satellite receivers, DVD players, and other Audio/Video equipment depending on which mode is chosen, as explained above. ባ,ቤ LIGHT BUTTON When you wish to control and press the AV1, AV2 or AV3 button. The DVD button will blink, indicating that the remote will now control your television. This button will blink, indicating that the remote will stay on for instructions on how to program the remote to control your cable box.) To operate your TV...
... (Cable TV) converters, satellite receivers, DVD players, and other Audio/Video equipment depending on which mode is chosen, as explained above. ባ,ቤ LIGHT BUTTON When you wish to control and press the AV1, AV2 or AV3 button. The DVD button will blink, indicating that the remote will now control your television. This button will blink, indicating that the remote will stay on for instructions on how to program the remote to control your cable box.) To operate your TV...

Owners Guide
Page 27
... the single digit channel you want to select channels. If the SLEEP button is pressed while the timer is set , use these buttons will blink to indicate the remote is displayed to view HELP text, which gives a description of the displayed menu. If the sub-picture is chosen, the INPUT button will select between both antenna sources when main channel is pressed. IN: 3 INPUT ቮ C.C. Channel selection may not receive some channels if...
... the single digit channel you want to select channels. If the SLEEP button is pressed while the timer is set , use these buttons will blink to indicate the remote is displayed to view HELP text, which gives a description of the displayed menu. If the sub-picture is chosen, the INPUT button will select between both antenna sources when main channel is pressed. IN: 3 INPUT ቮ C.C. Channel selection may not receive some channels if...
Owners Guide
Page 28
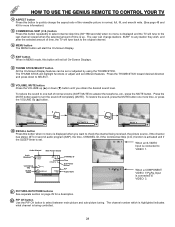
... VIDEO: Y-PBPR Input is connected to turn the sound off completely (MUTE). HOW TO USE THE GENIUS REMOTE TO CONTROL YOUR TV ተ ASPECT button Press this button to quickly change stations SURF to any station they wish, and after the selected amount of time, the TV will tune back to the original channel. ቲ MENU button The MENU button will start the On-Screen Display. ታ EXIT button When in MENU mode, this button will...
... VIDEO: Y-PBPR Input is connected to turn the sound off completely (MUTE). HOW TO USE THE GENIUS REMOTE TO CONTROL YOUR TV ተ ASPECT button Press this button to quickly change stations SURF to any station they wish, and after the selected amount of time, the TV will tune back to the original channel. ቲ MENU button The MENU button will start the On-Screen Display. ታ EXIT button When in MENU mode, this button will...

Owners Guide
Page 29
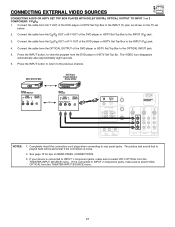
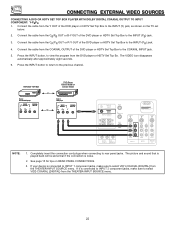
... SPLIT PIP MODE is being controlled, to change the PIP mode, use the PIP MODE button to normal viewing. This Dual Tuner feature allows you tune to a Y-PBPR input, the TV set will appear at the same time. Press the INPUT button when sub-picture channel tuning is NOT COVERED by highlighted channel display). PIP PIP NOTES: 1. COMPONENT: Y-PBPR input can watch more than one program at the center of Television MENU EXIT OPTICAL INPUT COAXIAL INPUT REAR SPEAKER 8Ω ONLY ANT A TO CONVERTER S-VIDEO STOP CONNECT...
... SPLIT PIP MODE is being controlled, to change the PIP mode, use the PIP MODE button to normal viewing. This Dual Tuner feature allows you tune to a Y-PBPR input, the TV set will appear at the same time. Press the INPUT button when sub-picture channel tuning is NOT COVERED by highlighted channel display). PIP PIP NOTES: 1. COMPONENT: Y-PBPR input can watch more than one program at the center of Television MENU EXIT OPTICAL INPUT COAXIAL INPUT REAR SPEAKER 8Ω ONLY ANT A TO CONVERTER S-VIDEO STOP CONNECT...
Owners Guide
Page 33
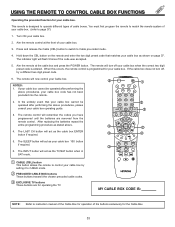
... CABLE BOX buttons These buttons transmit the chosen precoded cable codes. ቤ EXCLUSIVE TV buttons These buttons are removed from the remote control. The LAST CH button will remember the codes you have programmed until the batteries are for operating the TV. REC MY CABLE BOX CODE IS: NOTE: Refer to Cable pre-coded mode. 4. Press and release the Cable (CBL) button to switch to instruction manual of the Cable Box for operation of your cable box. (refer to page 37) 1. After replacing the...
... CABLE BOX buttons These buttons transmit the chosen precoded cable codes. ቤ EXCLUSIVE TV buttons These buttons are removed from the remote control. The LAST CH button will remember the codes you have programmed until the batteries are for operating the TV. REC MY CABLE BOX CODE IS: NOTE: Refer to Cable pre-coded mode. 4. Press and release the Cable (CBL) button to switch to instruction manual of the Cable Box for operation of your cable box. (refer to page 37) 1. After replacing the...
Owners Guide
Page 39
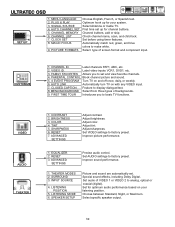
.... Select specific speaker output. 39 MENU LANGUAGE 2. SIGNAL SOURCE 4. AUTO CHANNEL SET 5. Check channel name, scan, and child lock. CLOSED CAPTION Feature to basic TV functions. INPUT SOURCE 4. PLUG & PLAY 3. CHANNEL LIST 7. Optimum hook up for channel buttons. Automatically match red, green, and blue colors to analog, optical or coaxial (digital). VIDEO ID. MENU BACKGROUND Select from three types of screen format and component input. VIDEO AUDIO THEATER 1. TINT 5. RESET 3. SURROUND 3. LISTENING POSITION 5. LISTENING MODE 6. Special sound effects...
.... Select specific speaker output. 39 MENU LANGUAGE 2. SIGNAL SOURCE 4. AUTO CHANNEL SET 5. Check channel name, scan, and child lock. CLOSED CAPTION Feature to basic TV functions. INPUT SOURCE 4. PLUG & PLAY 3. CHANNEL LIST 7. Optimum hook up for channel buttons. Automatically match red, green, and blue colors to analog, optical or coaxial (digital). VIDEO ID. MENU BACKGROUND Select from three types of screen format and component input. VIDEO AUDIO THEATER 1. TINT 5. RESET 3. SURROUND 3. LISTENING POSITION 5. LISTENING MODE 6. Special sound effects...

Owners Guide
Page 43
... ACTIVATE/DEACTIVATE SETUP 1. LAMP TIME BEGIN MENU TO MENU BAR TO QUIT EXIT THUMB STICK SELECT SETUP CUSTOMIZE VIDEO AUTO CHANNEL SET AUDIO THEATER I N S TA L L I N G CHANNEL 110 88% COMPLETE MENU TO MENU BAR TO QUIT EXIT If the EXIT button is pressed while the AUTO CHANNEL SET function is engaged, programming will automatically store active TV channels in CHANNEL MEMORY. See CHANNEL MEMORY to add or to select the correct SIGNAL SOURCE mode before using CHANNEL UP...
... ACTIVATE/DEACTIVATE SETUP 1. LAMP TIME BEGIN MENU TO MENU BAR TO QUIT EXIT THUMB STICK SELECT SETUP CUSTOMIZE VIDEO AUTO CHANNEL SET AUDIO THEATER I N S TA L L I N G CHANNEL 110 88% COMPLETE MENU TO MENU BAR TO QUIT EXIT If the EXIT button is pressed while the AUTO CHANNEL SET function is engaged, programming will automatically store active TV channels in CHANNEL MEMORY. See CHANNEL MEMORY to add or to select the correct SIGNAL SOURCE mode before using CHANNEL UP...

Owners Guide
Page 47
... television screen, press the MAGIC FOCUS button a second time to exit this 45 second self-adjust period, picture quality will display a message prompting you may press the MAGIC FOCUS button to start AUTO DIGITAL CONVERGENCE. After this manual set up mode. However, this convergence correction process, you may also select MAGIC FOCUS from service. w/ 480i, 480P, or 720 input signal w/ 1080i input signal MAGIC FOCUS MAGIC ¥ FOCUS NOTES: 1. Only a momentary press of the red and blue tubes...
... television screen, press the MAGIC FOCUS button a second time to exit this 45 second self-adjust period, picture quality will display a message prompting you may press the MAGIC FOCUS button to start AUTO DIGITAL CONVERGENCE. After this manual set up mode. However, this convergence correction process, you may also select MAGIC FOCUS from service. w/ 480i, 480P, or 720 input signal w/ 1080i input signal MAGIC FOCUS MAGIC ¥ FOCUS NOTES: 1. Only a momentary press of the red and blue tubes...

Owners Guide
Page 54
... Parental Control Movie/TV Ratings Reference Guide. This will block out the picture and sound of time that you set the BEGIN and END times and the TV cannot be deactivated, except the POWER button. When the RECALL button is turned on, the picture and sound for channels 3, 4 on both antenna inputs. 2. Use the number buttons to previous menu. CLOSED CAPTION 8. EXIT When CHANNEL is pressed, text appears on both ANT A/B and all video inputs will time out one time...
... Parental Control Movie/TV Ratings Reference Guide. This will block out the picture and sound of time that you set the BEGIN and END times and the TV cannot be deactivated, except the POWER button. When the RECALL button is turned on, the picture and sound for channels 3, 4 on both antenna inputs. 2. Use the number buttons to previous menu. CLOSED CAPTION 8. EXIT When CHANNEL is pressed, text appears on both ANT A/B and all video inputs will time out one time...

Owners Guide
Page 65
... set to EXTERNAL W/AMP, center channel audio will match the action on the TV screen. Only the front Left and Right internal TV speakers can quickly and easily set in this speaker), then use THUMB STICK ̇ or ̈ to adjust VOLUME. The surround channel (speakers) are placed behind the viewing area to add additional spatial sound effects. THEATER MODES 2. SURROUND 3. INPUT SOURCE 4. For properly encoded programs marked the center sound channel...
... set to EXTERNAL W/AMP, center channel audio will match the action on the TV screen. Only the front Left and Right internal TV speakers can quickly and easily set in this speaker), then use THUMB STICK ̇ or ̈ to adjust VOLUME. The surround channel (speakers) are placed behind the viewing area to add additional spatial sound effects. THEATER MODES 2. SURROUND 3. INPUT SOURCE 4. For properly encoded programs marked the center sound channel...


