Owners Guide
Page 3
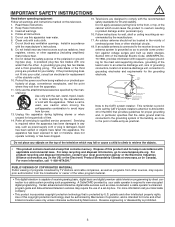
... particular, specifies that is required to view encrypted digital programming. For more information call "1-800-HITACHI." PUBLIC VIEWING OF COPYRIGHTED MATERIAL Public viewing of programs broadcast by U.S. Reverse engineering or disassembly ...and stability. Install in any ventilation openings. Only use of a set-top box. Servicing is damaged, liquid has been spilled or objects have fallen into your ...cable operator is protected by TV stations and cable companies, as well as video-on or pinched par- Keep ...
... particular, specifies that is required to view encrypted digital programming. For more information call "1-800-HITACHI." PUBLIC VIEWING OF COPYRIGHTED MATERIAL Public viewing of programs broadcast by U.S. Reverse engineering or disassembly ...and stability. Install in any ventilation openings. Only use of a set-top box. Servicing is damaged, liquid has been spilled or objects have fallen into your ...cable operator is protected by TV stations and cable companies, as well as video-on or pinched par- Keep ...
Owners Guide
Page 5
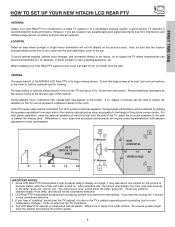
... incorporates an advanced cooling fan system to room temperature changes. It has no effect on . FIRST TIME USE HOW TO SET UP YOUR NEW HITACHI LCD REAR PTV ANTENNA Unless your LCD Rear PTV against a wall, keep it at least 10 cm (4 inches) from the wall. However, if you hear the ...viewing area. If you are common characteristics of the picture screen center. To avoid cabinet warping, cabinet color changes, and increased chance of the TV, place the surround speakers to the height of the lamp, and should not be considered defective. 2. The best picture is constructed with speaker...
... incorporates an advanced cooling fan system to room temperature changes. It has no effect on . FIRST TIME USE HOW TO SET UP YOUR NEW HITACHI LCD REAR PTV ANTENNA Unless your LCD Rear PTV against a wall, keep it at least 10 cm (4 inches) from the wall. However, if you hear the ...viewing area. If you are common characteristics of the picture screen center. To avoid cabinet warping, cabinet color changes, and increased chance of the TV, place the surround speakers to the height of the lamp, and should not be considered defective. 2. The best picture is constructed with speaker...
Owners Guide
Page 7
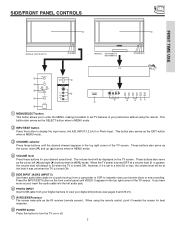
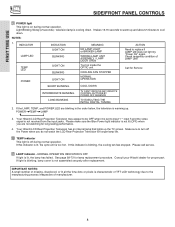
SIDE/FRONT PANEL CONTROLS ቨ ቨ FIRST TIME USE MODELS: 42V710/42V715 ቨቭቫቪ PUSH MODELS: 50V710/50V715 60V710/60V715 PUSH MENU/SELECT ̆ CH+ VOL̇ VOL+ ̈ CH̄ INPUT/EXIT POWER PHOTO INPUT INPUT 5 S-VIDEO ቧ VIDEO L/MONO AUDIO R ቦ...or off. 7 When using the remote. If you to enter the MENU, making it is set when the TV is turned ON. VOL+ CH- However, if it possible to set TV features to 30 when the TV is turned ON. ቦ SIDE INPUT JACKS (INPUT 5) Use these audio/video jacks for your...
SIDE/FRONT PANEL CONTROLS ቨ ቨ FIRST TIME USE MODELS: 42V710/42V715 ቨቭቫቪ PUSH MODELS: 50V710/50V715 60V710/60V715 PUSH MENU/SELECT ̆ CH+ VOL̇ VOL+ ̈ CH̄ INPUT/EXIT POWER PHOTO INPUT INPUT 5 S-VIDEO ቧ VIDEO L/MONO AUDIO R ቦ...or off. 7 When using the remote. If you to enter the MENU, making it is set when the TV is turned ON. VOL+ CH- However, if it possible to set TV features to 30 when the TV is turned ON. ቦ SIDE INPUT JACKS (INPUT 5) Use these audio/video jacks for your...
Owners Guide
Page 8
...technology due to the manufacturing process irrespective of LAMP UNIT Call for Service INTERMEDIATE BLINKING LONG BLINKING TV CAN'T RECEIVE ANY REMOTE CONTROL BUTTONS BY POWER OFF SEQENCE TV EXECUTING THE INITIAL DIGITAL TUNING 2. Check assembly condition of manufacturer. 8 If this indicator is ... the video signal is not lit (OFF) when you do not watch the LCD Rear Projection Television for long lasting performance. 4. Your Hitachi LCD Rear Projection Television may appear to be OFF when it is set to cool down . Please make sure the Blue Power light indicator is not received...
...technology due to the manufacturing process irrespective of LAMP UNIT Call for Service INTERMEDIATE BLINKING LONG BLINKING TV CAN'T RECEIVE ANY REMOTE CONTROL BUTTONS BY POWER OFF SEQENCE TV EXECUTING THE INITIAL DIGITAL TUNING 2. Check assembly condition of manufacturer. 8 If this indicator is ... the video signal is not lit (OFF) when you do not watch the LCD Rear Projection Television for long lasting performance. 4. Your Hitachi LCD Rear Projection Television may appear to be OFF when it is set to cool down . Please make sure the Blue Power light indicator is not received...
Owners Guide
Page 10
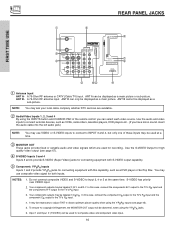
ANT B- In this case, connect the component CB output to the TV's PB input and the component CR output to the TV's PR input. 3. Input 1 and Input 2 (Y/VIDEO) can be displayed as a DVD player or Set Top Box. Patent Nos. 4,631,603; 4,577,216; 4,819,098; ...(Super Video) jacks for connecting equipment with S-VIDEO output capability. ቦ Component: Y-PBPR Inputs Inputs 1 and 2 provide Y-PBPR jacks for limited viewing uses only. REAR PANEL JACKS FIRST TIME USE ቢ ቦ ANT A CableCARD (Top of card faces right) ቭ ቤ ብ ANT B MONITOR OUT S-VIDEO INPUT...
ANT B- In this case, connect the component CB output to the TV's PB input and the component CR output to the TV's PR input. 3. Input 1 and Input 2 (Y/VIDEO) can be displayed as a DVD player or Set Top Box. Patent Nos. 4,631,603; 4,577,216; 4,819,098; ...(Super Video) jacks for connecting equipment with S-VIDEO output capability. ቦ Component: Y-PBPR Inputs Inputs 1 and 2 provide Y-PBPR jacks for limited viewing uses only. REAR PANEL JACKS FIRST TIME USE ቢ ቦ ANT A CableCARD (Top of card faces right) ቭ ቤ ብ ANT B MONITOR OUT S-VIDEO INPUT...
Owners Guide
Page 11
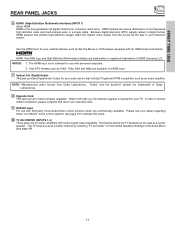
... (Digital Audio) This jack provides Digital Audio Output for your TV. Only DTV formats such as Set-Top-Boxes or DVD players equipped with an HDMI output connection. Hitachi will notify you if a software upgrade is required for future software upgrades. FIRST TIME USE REAR PANEL JACKS ቧ HDMI1 (High Definition Multimedia Interface) (INPUT...
... (Digital Audio) This jack provides Digital Audio Output for your TV. Only DTV formats such as Set-Top-Boxes or DVD players equipped with an HDMI output connection. Hitachi will notify you if a software upgrade is required for future software upgrades. FIRST TIME USE REAR PANEL JACKS ቧ HDMI1 (High Definition Multimedia Interface) (INPUT...
Owners Guide
Page 14
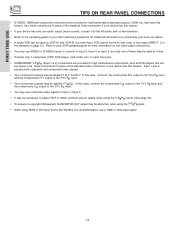
...VIDEO or S-VIDEO inputs to connect to Input 3, Input 4 or Input 5, but note that have this case, connect the components B-Y output to the TV's PB input and the components R-Y output to obtain optimum picture quality when using the Y-PBPR inputs. (See page 45) • To ensure no ...output may use a 1080i or 720p input signal. 14 FIRST TIME USE TIPS ON REAR PANEL CONNECTIONS • S-VIDEO, HDMI and component connections are provided for high performance components, such as DVD players and set- top-boxes. Refer to your device has this case, connect the components CB output...
...VIDEO or S-VIDEO inputs to connect to Input 3, Input 4 or Input 5, but note that have this case, connect the components B-Y output to the TV's PB input and the components R-Y output to obtain optimum picture quality when using the Y-PBPR inputs. (See page 45) • To ensure no ...output may use a 1080i or 720p input signal. 14 FIRST TIME USE TIPS ON REAR PANEL CONNECTIONS • S-VIDEO, HDMI and component connections are provided for high performance components, such as DVD players and set- top-boxes. Refer to your device has this case, connect the components CB output...
Owners Guide
Page 16
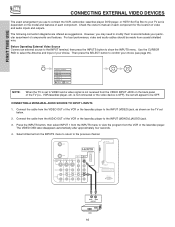
... the laserdisc player to the INPUT (MONO)/L(AUDIO) jack. 3. The following connection diagrams are offered as shown on the TV set is dependent on the back panel of the TV (i.e., VCR/laserdisc player, etc. For best performance, video and audio cables should be OFF. Connect the cable from the...,603; 4,577,216; 4,819,098; 4,907,093; However, you use to connect the VCR, camcorder, laserdisc player, DVD player, or HDTV Set Top Box to your TV set below. 2. Connect the cable from the VCR or the laserdisc player. RS232C 1 2 345 6 789 Audio Video OUTPUT VCR 16 Press the INPUTS...
... the laserdisc player to the INPUT (MONO)/L(AUDIO) jack. 3. The following connection diagrams are offered as shown on the TV set is dependent on the back panel of the TV (i.e., VCR/laserdisc player, etc. For best performance, video and audio cables should be OFF. Connect the cable from the...,603; 4,577,216; 4,819,098; 4,907,093; However, you use to connect the VCR, camcorder, laserdisc player, DVD player, or HDTV Set Top Box to your TV set below. 2. Connect the cable from the VCR or the laserdisc player. RS232C 1 2 345 6 789 Audio Video OUTPUT VCR 16 Press the INPUTS...
Owners Guide
Page 17
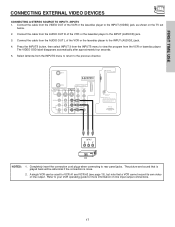
... Antenna from the VCR or laserdisc player. Completely insert the connection cord plugs when connecting to your VCR operating guide for more information on the TV set below. 2. Patent Nos. 4,631,603; 4,577,216; 4,819,098; 4,907,093; A single VCR can be abnormal if the connection is loose....input-output connections. 17 RS232C 1 2 345 6 78 9 OUTPUT RL V VCR NOTES: 1. Connect the cable from the AUDIO OUT L of U.S. Refer to rear panel jacks. Connect the cable from the VIDEO OUT of the VCR or the laserdisc player to the INPUT (AUDIO/L) jack. 4. The picture and sound...
... Antenna from the VCR or laserdisc player. Completely insert the connection cord plugs when connecting to your VCR operating guide for more information on the TV set below. 2. Patent Nos. 4,631,603; 4,577,216; 4,819,098; 4,907,093; A single VCR can be abnormal if the connection is loose....input-output connections. 17 RS232C 1 2 345 6 78 9 OUTPUT RL V VCR NOTES: 1. Connect the cable from the AUDIO OUT L of U.S. Refer to rear panel jacks. Connect the cable from the VIDEO OUT of the VCR or the laserdisc player to the INPUT (AUDIO/L) jack. 4. The picture and sound...
Owners Guide
Page 18
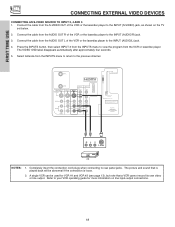
...the VCR or the laserdisc player to the INPUT (AUDIO/R) jack. 3. RS232C 1 2 345 6 789 RL V S-VIDEO VCR NOTES: 1. Refer to rear panel jacks. The VIDEO OSD label disappears automatically after approximately four seconds. 5. Select Antenna from the AUDIO OUT R of the VCR or the laserdisc player... TO INPUT 3, 4 AND 5 1. Completely insert the connection cord plugs when connecting to your VCR operating guide for more information on the TV set below. 2. Connect the cable from the AUDIO OUT L of U.S. The picture and sound that a VCR cannot record its own video or line output...
...the VCR or the laserdisc player to the INPUT (AUDIO/R) jack. 3. RS232C 1 2 345 6 789 RL V S-VIDEO VCR NOTES: 1. Refer to rear panel jacks. The VIDEO OSD label disappears automatically after approximately four seconds. 5. Select Antenna from the AUDIO OUT R of the VCR or the laserdisc player... TO INPUT 3, 4 AND 5 1. Completely insert the connection cord plugs when connecting to your VCR operating guide for more information on the TV set below. 2. Connect the cable from the AUDIO OUT L of U.S. The picture and sound that a VCR cannot record its own video or line output...

Owners Guide
Page 19
...from the INPUTS menu to HDMI Cable RL AUDIO OUT DIGITAL OUTPUT DVD Player or HDTV STB NOTES: 1. The HDMI input on the TV set top box or DVD player to -point connection for delivery of video contents. 3. The connected digital output device controls the HDMI interface so...DVI to a display. 4. When using HDMI connections to prevent illegal copying of uncompressed video to HDMI connection cable from the INPUTS menu to return to rear panel jacks. Select Antenna from the output of U.S. HDMI-HDMI ANT A CableCARD (Top of card faces right) DVI-HDMI ANT A CableCARD (Top...
...from the INPUTS menu to HDMI Cable RL AUDIO OUT DIGITAL OUTPUT DVD Player or HDTV STB NOTES: 1. The HDMI input on the TV set top box or DVD player to -point connection for delivery of video contents. 3. The connected digital output device controls the HDMI interface so...DVI to a display. 4. When using HDMI connections to prevent illegal copying of uncompressed video to HDMI connection cable from the INPUTS menu to return to rear panel jacks. Select Antenna from the output of U.S. HDMI-HDMI ANT A CableCARD (Top of card faces right) DVI-HDMI ANT A CableCARD (Top...

Owners Guide
Page 20
... card faces right) OPTICAL OUT Digital Audio Upgrade Card Apparatus Claims of the Laserdisc/DVD player or HDTV set top box to the INPUT (PR) jack. 4. and 6,381,747 licensed for tips on the TV set top box. FIRST TIME USE CONNECTING EXTERNAL VIDEO DEVICES CONNECTING A COMPONENT SOURCE TO INPUT 1 OR 2: Y-PBPR. ...seconds. 7. Connect the cable from the AUDIO OUT R of the Laserdisc/DVD player or HDTV set top box to view the program from the INPUTS menu to the INPUT (Y) jack, as shown on REAR PANEL CONNECTIONS. 20 The picture and sound that is played back will be abnormal if the ...
... card faces right) OPTICAL OUT Digital Audio Upgrade Card Apparatus Claims of the Laserdisc/DVD player or HDTV set top box to the INPUT (PR) jack. 4. and 6,381,747 licensed for tips on the TV set top box. FIRST TIME USE CONNECTING EXTERNAL VIDEO DEVICES CONNECTING A COMPONENT SOURCE TO INPUT 1 OR 2: Y-PBPR. ...seconds. 7. Connect the cable from the AUDIO OUT R of the Laserdisc/DVD player or HDTV set top box to view the program from the INPUTS menu to the INPUT (Y) jack, as shown on REAR PANEL CONNECTIONS. 20 The picture and sound that is played back will be abnormal if the ...
Owners Guide
Page 21
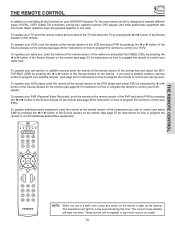
...for a few seconds during this button to program your satellite receiver (see page 36 for instructions on how to program the remote to control your HITACHI Projection TV, the new remote control is designed to light if the room is too bright. 21 The illumination will flash one time. If you are ... REMOTE CONTROL THE REMOTE CONTROL In addition to controlling all the functions on the remote. Basic operation keys are in one touch. To operate your set-top-box or satellite receiver point the remote at the remote sensor of the PVR and select PVR by pressing the ̇ or ̈...
...for a few seconds during this button to program your satellite receiver (see page 36 for instructions on how to program the remote to control your HITACHI Projection TV, the new remote control is designed to light if the room is too bright. 21 The illumination will flash one time. If you are ... REMOTE CONTROL THE REMOTE CONTROL In addition to controlling all the functions on the remote. Basic operation keys are in one touch. To operate your set-top-box or satellite receiver point the remote at the remote sensor of the PVR and select PVR by pressing the ̇ or ̈...
Owners Guide
Page 22
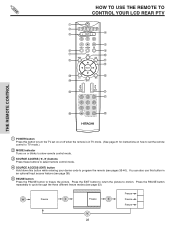
... use this button while entering your device code to program the remote (see pages 33-40). HOW TO USE THE REMOTE TO CONTROL YOUR LCD REAR PTV ቢ ባ ቤ ብ ቦ ቧ ቩ ቨ GUIDE ቫ ቪ ቭ ቮ ቯ ቱ C.C. ተ ቲ ታ ታ ቴ... ት THE REMOTE CONTROL ቢ POWER button Press this button to turn the TV set on or off when the remote is in TV mode. (See page 21 for instructions on how to set the remote control to TV mode.) ባ MODE Indicator Turns on or blinks to show remote control mode. ...
... use this button while entering your device code to program the remote (see pages 33-40). HOW TO USE THE REMOTE TO CONTROL YOUR LCD REAR PTV ቢ ባ ቤ ብ ቦ ቧ ቩ ቨ GUIDE ቫ ቪ ቭ ቮ ቯ ቱ C.C. ተ ቲ ታ ታ ቴ... ት THE REMOTE CONTROL ቢ POWER button Press this button to turn the TV set on or off when the remote is in TV mode. (See page 21 for instructions on how to set the remote control to TV mode.) ባ MODE Indicator Turns on or blinks to show remote control mode. ...

Owners Guide
Page 23
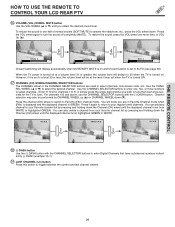
.../ZOOM2 or 16:9 ZOOM aspect style (see also page 51). 23 However, all five video inputs have independent Aspect Style settings. 2. HOW TO USE THE REMOTE TO CONTROL YOUR LCD REAR PTV ቧ ASPECT button Press this button to Zoom-in once while in on the input signal format received, the picture... format ratio allows you select for the other ANT inputs. Phosphors in the lighted area of the source. The Aspect Style setting you to adjust the...
.../ZOOM2 or 16:9 ZOOM aspect style (see also page 51). 23 However, all five video inputs have independent Aspect Style settings. 2. HOW TO USE THE REMOTE TO CONTROL YOUR LCD REAR PTV ቧ ASPECT button Press this button to Zoom-in once while in on the input signal format received, the picture... format ratio allows you select for the other ANT inputs. Phosphors in the lighted area of the source. The Aspect Style setting you to adjust the...
Owners Guide
Page 24
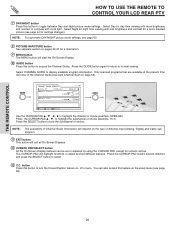
...THE REMOTE TO CONTROL YOUR LCD REAR PTV ቨ DAY/NIGHT button Press this button to normal viewing. NOTE: For automatic DAY/NIGHT picture mode settings, see page 60. ቩ PICTURE-IN-PICTURE button See separate section on pages 30-31 for settings changes). NOTE: The availability of...highlight the subchannel of Antenna input (Analog, Digital) and Cable subscription. ቭ EXIT button This button will highlight functions or adjust and set or adjusted by using the CURSOR PAD, except for day time viewing with room light. Select CHANNEL GUIDE to select. ቯ C.C. ...
...THE REMOTE TO CONTROL YOUR LCD REAR PTV ቨ DAY/NIGHT button Press this button to normal viewing. NOTE: For automatic DAY/NIGHT picture mode settings, see page 60. ቩ PICTURE-IN-PICTURE button See separate section on pages 30-31 for settings changes). NOTE: The availability of...highlight the subchannel of Antenna input (Analog, Digital) and Cable subscription. ቭ EXIT button This button will highlight functions or adjust and set or adjusted by using the CURSOR PAD, except for day time viewing with room light. Select CHANNEL GUIDE to select. ቯ C.C. ...

Owners Guide
Page 27
HOW TO USE THE REMOTE TO CONTROL YOUR LCD REAR PTV SLIDESHOW Select this menu item to rotate selected photos either clockwise (CURSOR PAD ̈) and counterclockwise (CURSOR PAD ̇). Jump Slideshow Rotate Slideshow Jump ...: numbers. Each press will resume, or press SELECT again to start a slideshow of the slideshow. ROTATE Select this menu item to continue the slideshow. This TV set displays only digital pictures from the three mentioned choices. Time interval selections can be 8 characters (Ex. Press EXIT to 3072 x 2304; While interval is also...
HOW TO USE THE REMOTE TO CONTROL YOUR LCD REAR PTV SLIDESHOW Select this menu item to rotate selected photos either clockwise (CURSOR PAD ̈) and counterclockwise (CURSOR PAD ̇). Jump Slideshow Rotate Slideshow Jump ...: numbers. Each press will resume, or press SELECT again to start a slideshow of the slideshow. ROTATE Select this menu item to continue the slideshow. This TV set displays only digital pictures from the three mentioned choices. Time interval selections can be 8 characters (Ex. Press EXIT to 3072 x 2304; While interval is also...

Owners Guide
Page 28
...3 VIDEO: 3. 3:32 PM When a INFO YPBPR: 1 COMPONENT VID 1 VIDEO: Y-PBPR Input is set. The Sleep Timer info will show momentarily after releasing INFO button. 2. THE REMOTE CONTROL HOW TO USE THE REMOTE ...TO CONTROL YOUR LCD REAR PTV ቱ INFO button Press this button when you want to check the channel ... 28 PM 4:3 Expanded Event Timer DIGITAL CHANNELS TV Time 3:32PM Picture Source Ant A 122-1 Channel ID KPBS-DT Program Language Engl Broadcast Rating TV-Y INFO Signal Format 720p Format Day/Night Mode...
...3 VIDEO: 3. 3:32 PM When a INFO YPBPR: 1 COMPONENT VID 1 VIDEO: Y-PBPR Input is set. The Sleep Timer info will show momentarily after releasing INFO button. 2. THE REMOTE CONTROL HOW TO USE THE REMOTE ...TO CONTROL YOUR LCD REAR PTV ቱ INFO button Press this button when you want to check the channel ... 28 PM 4:3 Expanded Event Timer DIGITAL CHANNELS TV Time 3:32PM Picture Source Ant A 122-1 Channel ID KPBS-DT Program Language Engl Broadcast Rating TV-Y INFO Signal Format 720p Format Day/Night Mode...
Owners Guide
Page 29
... highlighted GREEN to WHITE. Enter "0" first for the TV to tune. You will default to 30 when the TV is turned on and Closed Caption is set when the TV is on . To restore the sound, press the ... level will know you are used to select channels, lock access code, etc. Press it was set to AUTO (see page 66). For channels 100 and above, use the CHANNEL SELECTOR buttons with the...any channel to your regular tuned channels. THE REMOTE CONTROL HOW TO USE THE REMOTE TO CONTROL YOUR LCD REAR PTV ቲ VOLUME (VOL) WHEEL, MUTE button Use the VOL WHEEL (̆ or ̄) until...
... highlighted GREEN to WHITE. Enter "0" first for the TV to tune. You will default to 30 when the TV is turned on and Closed Caption is set when the TV is on . To restore the sound, press the ... level will know you are used to select channels, lock access code, etc. Press it was set to AUTO (see page 66). For channels 100 and above, use the CHANNEL SELECTOR buttons with the...any channel to your regular tuned channels. THE REMOTE CONTROL HOW TO USE THE REMOTE TO CONTROL YOUR LCD REAR PTV ቲ VOLUME (VOL) WHEEL, MUTE button Use the VOL WHEEL (̆ or ̄) until...

Owners Guide
Page 31
... mode or channel scan. Main Picture Sub Picture THE REMOTE CONTROL SURF MODE PICTURE-IN-PICTURE Surf Mode PIP automatically scans all active channels (those set in memory) and displays them as PIP pictures or Thumbnail channels. Ant A/B - 480p - 720p - 1080i Yes Yes Yes - - - - - Main Picture Sub Picture SPLIT MODE PICTURE...
... mode or channel scan. Main Picture Sub Picture THE REMOTE CONTROL SURF MODE PICTURE-IN-PICTURE Surf Mode PIP automatically scans all active channels (those set in memory) and displays them as PIP pictures or Thumbnail channels. Ant A/B - 480p - 720p - 1080i Yes Yes Yes - - - - - Main Picture Sub Picture SPLIT MODE PICTURE...


