Owners Guide
Page 2
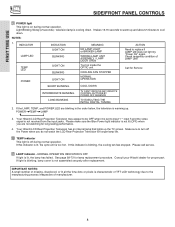
... NOT USE THE TELEVISION'S (POLARIZED) PLUG WITH AN EXTENSION CORD, RECEPTACLE, OR OTHER OUTLET UNLESS THE BLADES AND GROUND TERMINAL CAN BE FULLY INSERTED TO PREVENT BLADE EXPOSURE. CAUTION: Never remove the back cover of the television as improper changes or modifications not expressly approved by Hitachi America, Ltd. NOTE: • There are no user serviceable parts inside the television. • Model and serial numbers...
... NOT USE THE TELEVISION'S (POLARIZED) PLUG WITH AN EXTENSION CORD, RECEPTACLE, OR OTHER OUTLET UNLESS THE BLADES AND GROUND TERMINAL CAN BE FULLY INSERTED TO PREVENT BLADE EXPOSURE. CAUTION: Never remove the back cover of the television as improper changes or modifications not expressly approved by Hitachi America, Ltd. NOTE: • There are no user serviceable parts inside the television. • Model and serial numbers...
Owners Guide
Page 3
... antenna discharge unit, size of grounding connectors, location of receiving analog basic, digital basic and digital premium cable television programming by direct connection to grounding electrodes and requirements for wall, shelf or ceiling mounting as radiators, heat registers, stoves, or other sources, may require prior authorization from the broadcaster or owner of the video program material. • This digital television is capable of antenna-discharge unit, connection...
... antenna discharge unit, size of grounding connectors, location of receiving analog basic, digital basic and digital premium cable television programming by direct connection to grounding electrodes and requirements for wall, shelf or ceiling mounting as radiators, heat registers, stoves, or other sources, may require prior authorization from the broadcaster or owner of the video program material. • This digital television is capable of antenna-discharge unit, connection...
Owners Guide
Page 5
... a heating appliance, etc. For best stereo separation, place the external speakers at least four feet from the perforated back cover of the picture screen center. After extended use, the picture may darken, the color may hear a "pop" sound when the lamp "goes out." Since LCD Rear PTV incorporates a high pressure lamp to the height of the set failure, do not place the TV where temperatures can be obtained...
... a heating appliance, etc. For best stereo separation, place the external speakers at least four feet from the perforated back cover of the picture screen center. After extended use, the picture may darken, the color may hear a "pop" sound when the lamp "goes out." Since LCD Rear PTV incorporates a high pressure lamp to the height of the set failure, do not place the TV where temperatures can be obtained...

Owners Guide
Page 6
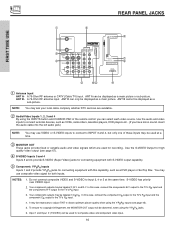
... antenna cable must be connected to an antenna adapter (300-Ohm to 75-Ohm). USB Cable This cable is used to connect your dealer or service store for the best sound quality. Consult your external devices such as SetTop-Boxes or DVD players equipped with shielded video and audio cables that sell audio/video products. Phono Connector Used on the rear panel so you have phono connectors. ANTENNA CONNECTIONS TO REAR JACK PANEL VHF (75-Ohm) antenna/CATV (Cable TV...
... antenna cable must be connected to an antenna adapter (300-Ohm to 75-Ohm). USB Cable This cable is used to connect your dealer or service store for the best sound quality. Consult your external devices such as SetTop-Boxes or DVD players equipped with shielded video and audio cables that sell audio/video products. Phono Connector Used on the rear panel so you have phono connectors. ANTENNA CONNECTIONS TO REAR JACK PANEL VHF (75-Ohm) antenna/CATV (Cable TV...
Owners Guide
Page 8
... performance. 4. POWER TEMP LAMP 3. INDICATOR LAMP LED TEMP LED POWER INDICATION LIGHT ON BLINKING LIGHT ON BLINKING LIGHT ON SHORT BLINKING MEANING NO LAMP LIGHT or BROKEN LAMP WRONG LAMP UNIT ASSEMBLY / LAMP DOOR OPEN Too hot inside the OPTIC unit COOLING FAN STOPPED NORMAL OPERATION COOL DOWN ACTION Need to input 1 ~ input 5 and the video signal is not received from the input jacks. Your Hitachi LCD Rear Projection Television has an internal lamp that lights up and about 2 minutes to warm up the TV screen. Please call service. ቭ LAMP indicator - Check assembly...
... performance. 4. POWER TEMP LAMP 3. INDICATOR LAMP LED TEMP LED POWER INDICATION LIGHT ON BLINKING LIGHT ON BLINKING LIGHT ON SHORT BLINKING MEANING NO LAMP LIGHT or BROKEN LAMP WRONG LAMP UNIT ASSEMBLY / LAMP DOOR OPEN Too hot inside the OPTIC unit COOLING FAN STOPPED NORMAL OPERATION COOL DOWN ACTION Need to input 1 ~ input 5 and the video signal is not received from the input jacks. Your Hitachi LCD Rear Projection Television has an internal lamp that lights up and about 2 minutes to warm up the TV screen. Please call service. ቭ LAMP indicator - Check assembly...
Owners Guide
Page 10
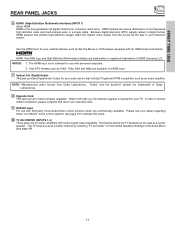
... CR output to Input 3, 4 or 5 at a time. ቤ MONITOR OUT These jacks provide fixed or variable audio and video signals which are available. ባ Audio/Video Inputs 1, 2, 3 and 4 By using the Y-PBPR jacks. 6. To ensure no copyright infringement, the MONITOR OUT output will be displayed as a DVD player or Set Top Box. ANT B cannot be abnormal, when using the INPUTS button and CURSOR PAD of the remote control you have mono sound, insert the audio cable into...
... CR output to Input 3, 4 or 5 at a time. ቤ MONITOR OUT These jacks provide fixed or variable audio and video signals which are available. ባ Audio/Video Inputs 1, 2, 3 and 4 By using the Y-PBPR jacks. 6. To ensure no copyright infringement, the MONITOR OUT output will be displayed as a DVD player or Set Top Box. ANT B cannot be abnormal, when using the INPUTS button and CURSOR PAD of the remote control you have mono sound, insert the audio cable into...
Owners Guide
Page 11
... you if a software upgrade is not intended for use with an HDMI output connection. Please see page 49). 11 Because digital television (DTV) signals remain in a single cable. The TV must be used as Set-Top-Boxes or DVD players equipped with third party home Audio/Video control systems which are commercially available. HDMI, the HDMI logo and High-Definition Multimedia Interface are available for HDMI input. ቨ Optical Out (Digital Audio) This jack provides Digital Audio Output for your...
... you if a software upgrade is not intended for use with an HDMI output connection. Please see page 49). 11 Because digital television (DTV) signals remain in a single cable. The TV must be used as Set-Top-Boxes or DVD players equipped with third party home Audio/Video control systems which are commercially available. HDMI, the HDMI logo and High-Definition Multimedia Interface are available for HDMI input. ቨ Optical Out (Digital Audio) This jack provides Digital Audio Output for your...

Owners Guide
Page 12
... digital and high definition cable channels. Press the EXIT button to your cable service. A digital cable subscription is installed, wait until the second screen below will allow you will be available when CableCARD is inserted. 3. Digital Cable ANT A CableCARD (Top of card faces right) ANT B MONITOR OUT S-VIDEO INPUT 4 INPUT 3 INPUT 2 Y/ VIDEO PB INPUT 1 Y/ VIDEO PB VIDEO L AUDIO R AUDIO TO HI-FI (MONO) PR PR (MONO) (MONO) (MONO) TV AS CENTER CableCARD HDMIIN1SERT THIS END OPTICAL OUT Digital Audio Upgrade Card...
... digital and high definition cable channels. Press the EXIT button to your cable service. A digital cable subscription is installed, wait until the second screen below will allow you will be available when CableCARD is inserted. 3. Digital Cable ANT A CableCARD (Top of card faces right) ANT B MONITOR OUT S-VIDEO INPUT 4 INPUT 3 INPUT 2 Y/ VIDEO PB INPUT 1 Y/ VIDEO PB VIDEO L AUDIO R AUDIO TO HI-FI (MONO) PR PR (MONO) (MONO) (MONO) TV AS CENTER CableCARD HDMIIN1SERT THIS END OPTICAL OUT Digital Audio Upgrade Card...
Owners Guide
Page 14
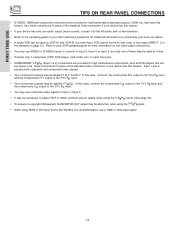
... component video signals. • Your component outputs may be labeled Y-CBCR. In this feature. top-boxes. In this feature. FIRST TIME USE TIPS ON REAR PANEL CONNECTIONS • S-VIDEO, HDMI and component connections are provided for Input 1~Input 5. • It may be necessary to adjust TINT to obtain optimum picture quality when using HDMI or DVI input from a Set-Top-Box, it to the left audio jack on the television. • Refer to the operating guide...
... component video signals. • Your component outputs may be labeled Y-CBCR. In this feature. top-boxes. In this feature. FIRST TIME USE TIPS ON REAR PANEL CONNECTIONS • S-VIDEO, HDMI and component connections are provided for Input 1~Input 5. • It may be necessary to adjust TINT to obtain optimum picture quality when using HDMI or DVI input from a Set-Top-Box, it to the left audio jack on the television. • Refer to the operating guide...
Owners Guide
Page 16
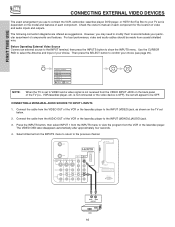
... player, DVD player, or HDTV Set Top Box to your TV set will appear to be made from the INPUTS menu to return to the previous channel. Use the CURSOR PAD to select the Antenna and Input of your choice (see page 25). CONNECTING A MONAURAL AUDIO SOURCE TO INPUT1~INPUT5 1. Connect the cable from the AUDIO OUT of the VCR or the laserdisc player to the INPUT (MONO)/L(AUDIO) jack. 3. FIRST TIME USE CONNECTING EXTERNAL VIDEO DEVICES...
... player, DVD player, or HDTV Set Top Box to your TV set will appear to be made from the INPUTS menu to return to the previous channel. Use the CURSOR PAD to select the Antenna and Input of your choice (see page 25). CONNECTING A MONAURAL AUDIO SOURCE TO INPUT1~INPUT5 1. Connect the cable from the AUDIO OUT of the VCR or the laserdisc player to the INPUT (MONO)/L(AUDIO) jack. 3. FIRST TIME USE CONNECTING EXTERNAL VIDEO DEVICES...
Owners Guide
Page 17
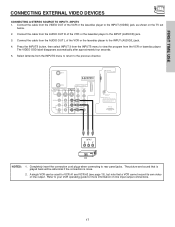
... B MONITOR OUT S-VIDEO INPUT 4 INPUT 3 INPUT 2 Y/ VIDEO PB INPUT 1 Y/ VIDEO PB HDMI 1 VIDEO L AUDIO R AUDIO TO HI-FI PR PR (MONO) (MONO) (MONO) (MONO) TV AS CENTER CableCARD (Top of card faces right) OPTICAL OUT Digital Audio Upgrade Card Apparatus Claims of the VCR or the laserdisc player to the previous channel. Press the INPUTS button, then select INPUT 3 from the INPUTS menu to view the program from the AUDIO OUT L of the VCR or the laserdisc player to rear panel jacks...
... B MONITOR OUT S-VIDEO INPUT 4 INPUT 3 INPUT 2 Y/ VIDEO PB INPUT 1 Y/ VIDEO PB HDMI 1 VIDEO L AUDIO R AUDIO TO HI-FI PR PR (MONO) (MONO) (MONO) (MONO) TV AS CENTER CableCARD (Top of card faces right) OPTICAL OUT Digital Audio Upgrade Card Apparatus Claims of the VCR or the laserdisc player to the previous channel. Press the INPUTS button, then select INPUT 3 from the INPUTS menu to view the program from the AUDIO OUT L of the VCR or the laserdisc player to rear panel jacks...

Owners Guide
Page 19
...; RS232C 1 2 345 6 789 HDMI Cable HDMI Output DVD Player or HDTV STB ANT B MONITOR OUT S-VIDEO INPUT 4 INPUT 3 INPUT 2 Y/ VIDEO PB INPUT 1 Y/ VIDEO PB HDMI 1 VIDEO L AUDIO R AUDIO TO HI-FI PR PR (MONO) (MONO) (MONO) (MONO) TV AS CENTER OPTICAL OUT Digital Audio Upgrade Card Apparatus Claims of device user settings determines final video appearance. 19 RS232C 1 2 345 6 789 DVI to the previous channel. The picture and sound that encrypts video signals when using a component with DVI output, you also have to connect the AUDIO OUT (R/L) of the...
...; RS232C 1 2 345 6 789 HDMI Cable HDMI Output DVD Player or HDTV STB ANT B MONITOR OUT S-VIDEO INPUT 4 INPUT 3 INPUT 2 Y/ VIDEO PB INPUT 1 Y/ VIDEO PB HDMI 1 VIDEO L AUDIO R AUDIO TO HI-FI PR PR (MONO) (MONO) (MONO) (MONO) TV AS CENTER OPTICAL OUT Digital Audio Upgrade Card Apparatus Claims of device user settings determines final video appearance. 19 RS232C 1 2 345 6 789 DVI to the previous channel. The picture and sound that encrypts video signals when using a component with DVI output, you also have to connect the AUDIO OUT (R/L) of the...
Owners Guide
Page 21
... instructions on the remote to control your set-top-box or satellite receiver point the remote at the remote sensor of the DVD player and select DVD by pressing the ̇ or ̈ button of VCRs, CATV (Cable TV) converters, set -top-box). To operate your VCR). To operate your PVR). NOTE: When you are grouped together in a dark room, press any button on how to program the remote to light up the buttons. GUIDE C.C. To operate...
... instructions on the remote to control your set-top-box or satellite receiver point the remote at the remote sensor of the DVD player and select DVD by pressing the ̇ or ̈ button of VCRs, CATV (Cable TV) converters, set -top-box). To operate your VCR). To operate your PVR). NOTE: When you are grouped together in a dark room, press any button on how to program the remote to light up the buttons. GUIDE C.C. To operate...
Owners Guide
Page 24
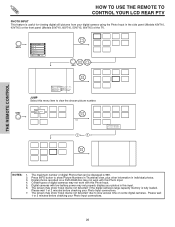
... Closed Caption feature on pages 30-31 for a more detailed picture (see Auto Channel Scan on page 52). Select CHANNEL GUIDE to display available program information. THE REMOTE CONTROL HOW TO USE THE REMOTE TO CONTROL YOUR LCD REAR PTV ቨ DAY/NIGHT button Press this button to access the Channel Guide. NOTE: The availability of Channel Guide Information will highlight functions or adjust and set or adjusted by using the CURSOR PAD, except for night time viewing with room light...
... Closed Caption feature on pages 30-31 for a more detailed picture (see Auto Channel Scan on page 52). Select CHANNEL GUIDE to display available program information. THE REMOTE CONTROL HOW TO USE THE REMOTE TO CONTROL YOUR LCD REAR PTV ቨ DAY/NIGHT button Press this button to access the Channel Guide. NOTE: The availability of Channel Guide Information will highlight functions or adjust and set or adjusted by using the CURSOR PAD, except for night time viewing with room light...
Owners Guide
Page 26
... button to view the chosen picture number. Certain types of digital Photos that can be displayed is 999. 2. Please wait 1 or 2 minutes before checking your photos in the side panel (Models 42V710, 42V715) or the front panel (Models 50V710, 60V710, 50V715, 60V715) of the TV. HOW TO USE THE REMOTE TO CONTROL YOUR LCD REAR PTV PHOTO INPUT This feature is useful for viewing digital still pictures from your Photo Input connections. 7. Photo Input Ant B Ant A Input 1 Input...
... button to view the chosen picture number. Certain types of digital Photos that can be displayed is 999. 2. Please wait 1 or 2 minutes before checking your photos in the side panel (Models 42V710, 42V715) or the front panel (Models 50V710, 60V710, 50V715, 60V715) of the TV. HOW TO USE THE REMOTE TO CONTROL YOUR LCD REAR PTV PHOTO INPUT This feature is useful for viewing digital still pictures from your Photo Input connections. 7. Photo Input Ant B Ant A Input 1 Input...

Owners Guide
Page 30
...-PICTURE (PIP) Your HITACHI LCD Rear PTV incorporates Two Tuner technology designed for each. and 6,381,747 licensed for limited viewing uses only. ANT A ANT B MONITOR OUT S-VIDEO INPUT 4 INPUT 3 INPUT 2 Y/ VIDEO PB INPUT 1 Y/ VIDEO PB HDMI 1 VIDEO L AUDIO R AUDIO TO HI-FI PR PR (MONO) (MONO) (MONO) (MONO) TV AS CENTER CableCARD (Top of card faces right) OPTICAL OUT Digital Audio Upgrade Card Apparatus Claims of the four different modes (POP, PIP, SPLIT or SURF), depending on the channel list...
...-PICTURE (PIP) Your HITACHI LCD Rear PTV incorporates Two Tuner technology designed for each. and 6,381,747 licensed for limited viewing uses only. ANT A ANT B MONITOR OUT S-VIDEO INPUT 4 INPUT 3 INPUT 2 Y/ VIDEO PB INPUT 1 Y/ VIDEO PB HDMI 1 VIDEO L AUDIO R AUDIO TO HI-FI PR PR (MONO) (MONO) (MONO) (MONO) TV AS CENTER CableCARD (Top of card faces right) OPTICAL OUT Digital Audio Upgrade Card Apparatus Claims of the four different modes (POP, PIP, SPLIT or SURF), depending on the channel list...
Owners Guide
Page 34
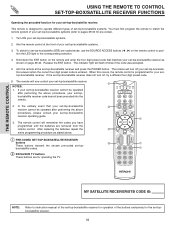
... four digit preset code is designed to operate different types of set -topbox/satellite codes. ባ EXCLUSIVE TV buttons These buttons are removed from the remote control. The remote will remember the codes you have programmed until the batteries are for operating the TV. ባ GUIDE ቢ ባ C.C. ባ ቢ ቢ THE REMOTE CONTROL MY SATELLITE RECEIVER/STB CODE IS: NOTE: Refer to instruction manual of the set-top-box/satellite receiver for operation of your set-top-box...
... four digit preset code is designed to operate different types of set -topbox/satellite codes. ባ EXCLUSIVE TV buttons These buttons are removed from the remote control. The remote will remember the codes you have programmed until the batteries are for operating the TV. ባ GUIDE ቢ ባ C.C. ባ ቢ ቢ THE REMOTE CONTROL MY SATELLITE RECEIVER/STB CODE IS: NOTE: Refer to instruction manual of the set-top-box/satellite receiver for operation of your set-top-box...
Owners Guide
Page 43
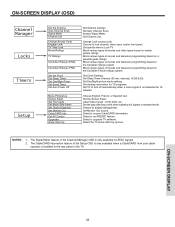
... input, and/or front panel. Set Channel List. Set Day/Night picture mode settings. Set the Screen Saver. Feature to upgrade TV software. ON-SCREEN DISPLAY (OSD) Channel Manager Locks Timers Setup Set the Antenna Auto Channel Scan Signal Meter Channel List Change Access Code Engage Lock TV Time Lock Movie Ratings TV Ratings Canadian Ratings (ENG) Canadian Ratings (FRN) Set the Clock Set Sleep Timer Set Day/Night Timer Set Event Timer Set Auto Power Off Menu Preference Screen Saver Set The Inputs Set Black Side Panel Set Closed Captions Set Monitor Out CableCARD Info Set AV Control Upgrades...
... input, and/or front panel. Set Channel List. Set Day/Night picture mode settings. Set the Screen Saver. Feature to upgrade TV software. ON-SCREEN DISPLAY (OSD) Channel Manager Locks Timers Setup Set the Antenna Auto Channel Scan Signal Meter Channel List Change Access Code Engage Lock TV Time Lock Movie Ratings TV Ratings Canadian Ratings (ENG) Canadian Ratings (FRN) Set the Clock Set Sleep Timer Set Day/Night Timer Set Event Timer Set Auto Power Off Menu Preference Screen Saver Set The Inputs Set Black Side Panel Set Closed Captions Set Monitor Out CableCARD Info Set AV Control Upgrades...

Owners Guide
Page 46
.... Video Picture Mode Contrast Brightness Color Tint Sharpness Color Temperature Black Enhancement Contrast Mode Reset Video Settings Move SEL Select ANT A/B Day 100% 50% 50% 50% High High Dynamic Night Video Color Management Color Decoding Auto Color Noise Reduction Auto Movie Mode Move SEL Select Off Low Off ON-SCREEN DISPLAY Color Management Use this function to adjust and balance the listed individual colors to make them either deeper or more pure depending on this input to the original factory settings. Adjust...
.... Video Picture Mode Contrast Brightness Color Tint Sharpness Color Temperature Black Enhancement Contrast Mode Reset Video Settings Move SEL Select ANT A/B Day 100% 50% 50% 50% High High Dynamic Night Video Color Management Color Decoding Auto Color Noise Reduction Auto Movie Mode Move SEL Select Off Low Off ON-SCREEN DISPLAY Color Management Use this function to adjust and balance the listed individual colors to make them either deeper or more pure depending on this input to the original factory settings. Adjust...
Owners Guide
Page 54
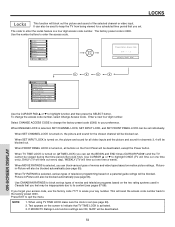
... channel or video input. Enter a new four digit number. NOTE: 1. If MOVIE/TV Ratings Lock function settings are ON, SURF will be blocked out. LOCKS Locks This function will be deactivated. 54 ON-SCREEN DISPLAY It can set . The code to highlight function and then press the SELECT button. Video Audio Aspect Chan. To change the factory preset code (0000) to enter the access code. When ENGAGE LOCK is turned on, the picture and sound for all buttons...
... channel or video input. Enter a new four digit number. NOTE: 1. If MOVIE/TV Ratings Lock function settings are ON, SURF will be blocked out. LOCKS Locks This function will be deactivated. 54 ON-SCREEN DISPLAY It can set . The code to highlight function and then press the SELECT button. Video Audio Aspect Chan. To change the factory preset code (0000) to enter the access code. When ENGAGE LOCK is turned on, the picture and sound for all buttons...


