Owners Guide
Page 2
... warranty card and mail it to very high voltages and other hazards. CAUTION: Never remove the back cover of benefit to HITACHI. NOTE: • There are no user serviceable parts inside the color television. • Model and serial numbers are covered in the design of these products properly, this can expose you obtain from it to you promptly in your product model. CAUTION: Adjust only those controls...
... warranty card and mail it to very high voltages and other hazards. CAUTION: Never remove the back cover of benefit to HITACHI. NOTE: • There are no user serviceable parts inside the color television. • Model and serial numbers are covered in the design of these products properly, this can expose you obtain from it to you promptly in your product model. CAUTION: Adjust only those controls...

Owners Guide
Page 3
.... Projection TV's are NOT COVERED by TV stations and cable companies, as well as programs from the apparatus. 11. PUBLIC VIEWING OF COPYRIGHTED MATERIAL Public viewing of overhead power lines or other electrical circuits. 18. Do not install near water. 6. Disposal of time. 14. Such "SCREEN BURNS" constitute misuse and are heavy and can cause permanent damage to comply with the manufacturer's instructions. 8. Read...
.... Projection TV's are NOT COVERED by TV stations and cable companies, as well as programs from the apparatus. 11. PUBLIC VIEWING OF COPYRIGHTED MATERIAL Public viewing of overhead power lines or other electrical circuits. 18. Do not install near water. 6. Disposal of time. 14. Such "SCREEN BURNS" constitute misuse and are heavy and can cause permanent damage to comply with the manufacturer's instructions. 8. Read...

Owners Guide
Page 10
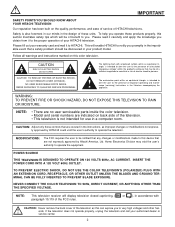
... DVI-HDTV input is also for future use standard video signal for INPUT:2. The digital input terminal is NOT compatible as a Set-Top-Box. Only DTV format such as a DVD player or Set Top Box. In this connection, your external components (VCR, Cable box, DVD player, etc.). NOTES: 1. When connecting a Set-Top-Box with a copy-protect digital out terminal, a high definition picture can automatically be abnormal, when using the Y-PBPR inputs. (See page 41) 5. REAR PANEL JACKS ቨ Component: Y-PBPR Inputs Inputs 1 and...
... DVI-HDTV input is also for future use standard video signal for INPUT:2. The digital input terminal is NOT compatible as a Set-Top-Box. Only DTV format such as a DVD player or Set Top Box. In this connection, your external components (VCR, Cable box, DVD player, etc.). NOTES: 1. When connecting a Set-Top-Box with a copy-protect digital out terminal, a high definition picture can automatically be abnormal, when using the Y-PBPR inputs. (See page 41) 5. REAR PANEL JACKS ቨ Component: Y-PBPR Inputs Inputs 1 and...
Owners Guide
Page 12
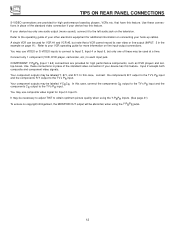
... one audio output (mono sound), connect it to the TV's PR input. Use these connections in place of your other electronic equipment for additional information on connecting your VCR operating guide for more information on line input-output connections. Input 2 accepts both composite and component video signals. Use these connections in place of these may be labeled Y, B-Y, and R-Y. TIPS ON REAR PANEL CONNECTIONS S-VIDEO connections are provided for high performance components, such as DVD players and settop-boxes. If...
... one audio output (mono sound), connect it to the TV's PR input. Use these connections in place of your other electronic equipment for additional information on connecting your VCR operating guide for more information on line input-output connections. Input 2 accepts both composite and component video signals. Use these connections in place of these may be labeled Y, B-Y, and R-Y. TIPS ON REAR PANEL CONNECTIONS S-VIDEO connections are provided for high performance components, such as DVD players and settop-boxes. If...
Owners Guide
Page 14
... Box to your particular assortment of each component. Connect an external source to the INPUT terminal, then press the VID1~VID5 button as necessary to the previous channel. ANT A TO CONVERTER ANT B AUDIO TO HI-FI CENTER IN IR BLASTER L R INPUT 1 INPUT 2 DVI-HDTV PR PB Y R (MONO)/L AUDIO PR PB Y/VIDEO R (MONO)/L AUDIO INPUT 3 R (MONO)/L VIDEO INPUT 4 R (MONO)/L VIDEO MONITOR OUT R L VIDEO AUDIO S-VIDEO S-VIDEO S-VIDEO Audio Video OUTPUT VCR 14 For best performance, video and audio cables should be OFF. Check the owner's manual...
... Box to your particular assortment of each component. Connect an external source to the INPUT terminal, then press the VID1~VID5 button as necessary to the previous channel. ANT A TO CONVERTER ANT B AUDIO TO HI-FI CENTER IN IR BLASTER L R INPUT 1 INPUT 2 DVI-HDTV PR PB Y R (MONO)/L AUDIO PR PB Y/VIDEO R (MONO)/L AUDIO INPUT 3 R (MONO)/L VIDEO INPUT 4 R (MONO)/L VIDEO MONITOR OUT R L VIDEO AUDIO S-VIDEO S-VIDEO S-VIDEO Audio Video OUTPUT VCR 14 For best performance, video and audio cables should be OFF. Check the owner's manual...

Owners Guide
Page 15
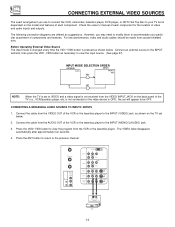
... button to the previous channel. CONNECTING EXTERNAL VIDEO SOURCES CONNECTING A STEREO SOURCE TO INPUT2~INPUT5 1. Press the ANT button to return to view the program from the AUDIO OUT R of the VCR or the laserdisc player to rear panel jacks. Completely insert the connection cord plugs when connecting to the INPUT (AUDIO/R) jack. 3. Connect the cable from the VCR or laserdisc player. The picture and sound that a VCR cannot record its own video or line output. (INPUT...
... button to the previous channel. CONNECTING EXTERNAL VIDEO SOURCES CONNECTING A STEREO SOURCE TO INPUT2~INPUT5 1. Press the ANT button to return to view the program from the AUDIO OUT R of the VCR or the laserdisc player to rear panel jacks. Completely insert the connection cord plugs when connecting to the INPUT (AUDIO/R) jack. 3. Connect the cable from the VCR or laserdisc player. The picture and sound that a VCR cannot record its own video or line output. (INPUT...

Owners Guide
Page 16
... line input-output connections. 16 The picture and sound that a VCR cannot record its own video or line output. (INPUT: 1 in example on page 11) Refer to the INPUT (AUDIO/L) jack. 4. ANT A TO CONVERTER ANT B AUDIO TO HI-FI CENTER IN IR BLASTER L R INPUT 1 INPUT 2 INPUT 3 DVI-HDTV PR PB Y R (MONO)/L AUDIO PR PB Y/VIDEO R (MONO)/L AUDIO R (MONO)/L VIDEO INPUT 4 R (MONO)/L VIDEO MONITOR OUT R L AUDIO VIDEO S-VIDEO S-VIDEO S-VIDEO OUTPUT RL V S-VIDEO VCR NOTES: 1. Completely insert the connection cord plugs when connecting to the previous channel. Connect the cable...
... line input-output connections. 16 The picture and sound that a VCR cannot record its own video or line output. (INPUT: 1 in example on page 11) Refer to the INPUT (AUDIO/L) jack. 4. ANT A TO CONVERTER ANT B AUDIO TO HI-FI CENTER IN IR BLASTER L R INPUT 1 INPUT 2 INPUT 3 DVI-HDTV PR PB Y R (MONO)/L AUDIO PR PB Y/VIDEO R (MONO)/L AUDIO R (MONO)/L VIDEO INPUT 4 R (MONO)/L VIDEO MONITOR OUT R L AUDIO VIDEO S-VIDEO S-VIDEO S-VIDEO OUTPUT RL V S-VIDEO VCR NOTES: 1. Completely insert the connection cord plugs when connecting to the previous channel. Connect the cable...

Owners Guide
Page 17
... player or HDTV set top box. Press the ANT button to return to the INPUT (AUDIO/R) jack. 5. DVD Player OUTPUT PR PB Y L R ANT A TO CONVERTER ANT B AUDIO TO HI-FI CENTER IN IR BLASTER L R INPUT 1 DVI-HDTV PR PB Y R (MONO)/L INPUT 2 PR PB Y/VIDEO R (MONO)/L AUDIO INPUT 3 R (MONO)/L VIDEO INPUT 4 R (MONO)/L VIDEO MONITOR OUT R L AUDIO VIDEO S-VIDEO S-VIDEO S-VIDEO NOTE: 1. The VIDEO label disappears automatically after approximately four seconds. 7. Connect the cable from the Laserdisc/DVD player or HDTV set top box to the previous channel. CONNECTING EXTERNAL...
... player or HDTV set top box. Press the ANT button to return to the INPUT (AUDIO/R) jack. 5. DVD Player OUTPUT PR PB Y L R ANT A TO CONVERTER ANT B AUDIO TO HI-FI CENTER IN IR BLASTER L R INPUT 1 DVI-HDTV PR PB Y R (MONO)/L INPUT 2 PR PB Y/VIDEO R (MONO)/L AUDIO INPUT 3 R (MONO)/L VIDEO INPUT 4 R (MONO)/L VIDEO MONITOR OUT R L AUDIO VIDEO S-VIDEO S-VIDEO S-VIDEO NOTE: 1. The VIDEO label disappears automatically after approximately four seconds. 7. Connect the cable from the Laserdisc/DVD player or HDTV set top box to the previous channel. CONNECTING EXTERNAL...

Owners Guide
Page 19
... 4-digit manufacturers code and enter it here - - - (Enter Code "9999" to setup your equipment receiver operating guide. 19 Press DONE to finish this procedure. You can access the Setup Menu Wizard again in the diagrams. BACK NEXT HITACHI AV NET Wizard (step 3 of the 3 function keys below to uninstall) BACK NEXT Proper Code Entered from your A/V Network. 7. Would you like to trouble shoot settings. If connections are...
... 4-digit manufacturers code and enter it here - - - (Enter Code "9999" to setup your equipment receiver operating guide. 19 Press DONE to finish this procedure. You can access the Setup Menu Wizard again in the diagrams. BACK NEXT HITACHI AV NET Wizard (step 3 of the 3 function keys below to uninstall) BACK NEXT Proper Code Entered from your A/V Network. 7. Would you like to trouble shoot settings. If connections are...

Owners Guide
Page 21
... instruction on how to program the remote to control your television. The STB button will blink, indicating that the remote will now control your TV, VCR, cable box, satellite receiver, DVD player, or other audio/video equipment with one area. This button will blink, indicating that the remote will now control the desired component. (See page 35 for instructions on how to program the remote to control your set -top-box. ANT 0 INFO A/V NET ASPECT VIRTUAL HD ቤ MENU...
... instruction on how to program the remote to control your television. The STB button will blink, indicating that the remote will now control your TV, VCR, cable box, satellite receiver, DVD player, or other audio/video equipment with one area. This button will blink, indicating that the remote will now control the desired component. (See page 35 for instructions on how to program the remote to control your set -top-box. ANT 0 INFO A/V NET ASPECT VIRTUAL HD ቤ MENU...

Owners Guide
Page 23
... connected to select channels. You can also access this button to a maximum of three hours. Enter one, two, or three numbers to VIDEO: 1. ቭ ANTENNA button The ANT button will select between Antenna A and Antenna B each of the screen. For channels 100 and above, press the "1" button, wait until two dashes appear next to VIDEO: 3. Signal Format Audio Selected Received Broadcast Rating Main Picture Source Audio Broadcast Wide Mode Virtual HD Picture Closed Mode Captioning Off Timer TV Time...
... connected to select channels. You can also access this button to a maximum of three hours. Enter one, two, or three numbers to VIDEO: 1. ቭ ANTENNA button The ANT button will select between Antenna A and Antenna B each of the screen. For channels 100 and above, press the "1" button, wait until two dashes appear next to VIDEO: 3. Signal Format Audio Selected Received Broadcast Rating Main Picture Source Audio Broadcast Wide Mode Virtual HD Picture Closed Mode Captioning Off Timer TV Time...
Owners Guide
Page 28
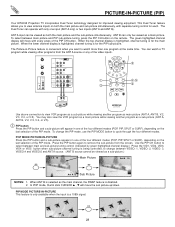
... PLUS+ LAST CH GUIDE/TV SCHD VID 5 VID 2 PIP VID 3 PIP CH VID 4 FREEZE PIP MODE PIP ACCESS SWAP VIDEO ብ,ቦ ባ REC Audio Video OUTPUT CLU-5722TSI VCR Use above connection to cycle through the four different modes. PIP MODE PICTURE-IN-PICTURE This feature is only available when the input is being controlled, to change the PIP mode, use the PIP MODE button to view VCR program as a sub-picture while viewing another program as a main picture. This Dual Tuner feature allows you...
... PLUS+ LAST CH GUIDE/TV SCHD VID 5 VID 2 PIP VID 3 PIP CH VID 4 FREEZE PIP MODE PIP ACCESS SWAP VIDEO ብ,ቦ ባ REC Audio Video OUTPUT CLU-5722TSI VCR Use above connection to cycle through the four different modes. PIP MODE PICTURE-IN-PICTURE This feature is only available when the input is being controlled, to change the PIP mode, use the PIP MODE button to view VCR program as a sub-picture while viewing another program as a main picture. This Dual Tuner feature allows you...
Owners Guide
Page 32
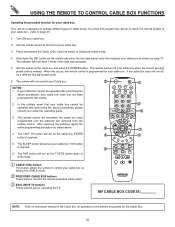
... CABLE BOX buttons These buttons transmit the chosen precoded cable codes. ቤ EXCLUSIVE TV buttons These buttons are removed from the remote control. After replacing the batteries repeat the entire programming procedure as shown on page 37. Press and release the Cable (CBL) button to switch to instruction manual of the Cable Box for operation of your cable box as stated above procedures, your cable box. In the unlikely event that matches your cable box. 3. The SLEEP button will flash 3 times...
... CABLE BOX buttons These buttons transmit the chosen precoded cable codes. ቤ EXCLUSIVE TV buttons These buttons are removed from the remote control. After replacing the batteries repeat the entire programming procedure as shown on page 37. Press and release the Cable (CBL) button to switch to instruction manual of the Cable Box for operation of your cable box as stated above procedures, your cable box. In the unlikely event that matches your cable box. 3. The SLEEP button will flash 3 times...
Owners Guide
Page 33
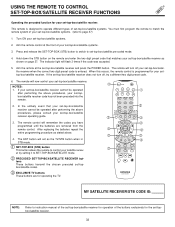
... switch to control your set-top-box/satellite systems. 2. After replacing the batteries repeat the entire programming procedure as the TV/STB button when in STB mode. ቢ SET-TOP-BOX (STB) button This button allows the remote to set -top-box/satellite receiver does not turn off , try a different two digit preset code. 6. Turn ON your satellite receiver by setting it to instruction manual of the set-top-box/satellite receiver for operation of your set-top-box/satellite receiver. The remote control...
... switch to control your set-top-box/satellite systems. 2. After replacing the batteries repeat the entire programming procedure as the TV/STB button when in STB mode. ቢ SET-TOP-BOX (STB) button This button allows the remote to set -top-box/satellite receiver does not turn off , try a different two digit preset code. 6. Turn ON your satellite receiver by setting it to instruction manual of the set-top-box/satellite receiver for operation of your set-top-box/satellite receiver. The remote control...

Owners Guide
Page 39
...) Change Lock access code. Menu Preference Set The Clock Set The Channels Set The Inputs Set Event Timer Set Closed Captions About Your TV Choose English, French, or Spanish text. Adjust contrast. Improve sound performance. View/edit Channel ID, Scan, and Lock settings in antenna A. Block various types of movies and television programming based on and off once, daily, or weekly. Adjust brightness. Adjust tint. Centering top and bottom of movies and video types based on motion picture ratings. Set specific time to make white...
...) Change Lock access code. Menu Preference Set The Clock Set The Channels Set The Inputs Set Event Timer Set Closed Captions About Your TV Choose English, French, or Spanish text. Adjust contrast. Improve sound performance. View/edit Channel ID, Scan, and Lock settings in antenna A. Block various types of movies and television programming based on and off once, daily, or weekly. Adjust brightness. Adjust tint. Centering top and bottom of movies and video types based on motion picture ratings. Set specific time to make white...
Owners Guide
Page 43
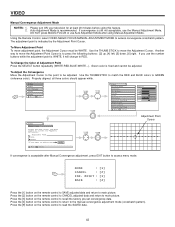
... number buttons while the adjustment point is fixed and cannot be adjusted. If you want to access menu mode. Manager Locks Setup MENU Move SEL Sel Video Magic Focus Aligns the Red, Green, and Blue colors to read the SAVED data. 43 Press the [9] button on the remote control to CANCEL adjusted data and return to GREEN (reference color). Please turn ON your television for Magnetic Influences. Use the THUMB STICK to main picture. Adjustment Mode Auto Manual If you use Auto Adjustment Mode after Manual Convergence adjustment...
... number buttons while the adjustment point is fixed and cannot be adjusted. If you want to access menu mode. Manager Locks Setup MENU Move SEL Sel Video Magic Focus Aligns the Red, Green, and Blue colors to read the SAVED data. 43 Press the [9] button on the remote control to CANCEL adjusted data and return to GREEN (reference color). Please turn ON your television for Magnetic Influences. Use the THUMB STICK to main picture. Adjustment Mode Auto Manual If you use Auto Adjustment Mode after Manual Convergence adjustment...
Owners Guide
Page 44
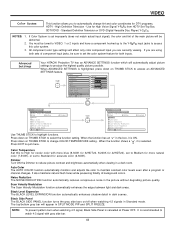
... input you to reduce picture contrast and brightness automatically when viewing in SPLIT MODE PIP and SPLIT FREEZE. SDTV/DVD - Auto Color The AUTO COLOR function automatically monitors and adjusts the color to quit menu. High Definition Television - Press down on /off when watching 4:3 signals in the picture without degrading picture quality. VIDEO Color System This function allows you are using both inputs. Press EXIT to maintain constant color levels even after a program or channel changes. When ADVANCED SETTINGS...
... input you to reduce picture contrast and brightness automatically when viewing in SPLIT MODE PIP and SPLIT FREEZE. SDTV/DVD - Auto Color The AUTO COLOR function automatically monitors and adjusts the color to quit menu. High Definition Television - Press down on /off when watching 4:3 signals in the picture without degrading picture quality. VIDEO Color System This function allows you are using both inputs. Press EXIT to maintain constant color levels even after a program or channel changes. When ADVANCED SETTINGS...

Owners Guide
Page 50
... viewed during that you can also be used in the same signal source mode (see page 56). 3. Use the number buttons to highlight function and then press SELECT button. Select CHANGE ACCESS CODE to change the access code number, select Change Access Code. If MOVIE/TV Ratings Lock and Closed Caption settings are in Canada that time pe✔riod (Set clock first). NOTE: 1. Manager Locks Setup Move SEL Sel THUMB STICK SELECT Please Enter Access Code [ - - - - ] [# Keys] Enter Code Locks Change Access Code...
... viewed during that you can also be used in the same signal source mode (see page 56). 3. Use the number buttons to highlight function and then press SELECT button. Select CHANGE ACCESS CODE to change the access code number, select Change Access Code. If MOVIE/TV Ratings Lock and Closed Caption settings are in Canada that time pe✔riod (Set clock first). NOTE: 1. Manager Locks Setup Move SEL Sel THUMB STICK SELECT Please Enter Access Code [ - - - - ] [# Keys] Enter Code Locks Change Access Code...

Owners Guide
Page 60
... Move SEL Return Setup Set The Inputs Video2 Auto Link Auto Input Signal Sensor Remote Control Sensor Off Move SEL Select Use THUMB STICK ̆ or ̄, then press down on and tune to Video2 when it must be reset before AUTO LINK is for your TV as described above. 2. Once the TV has been turned on using REMOTE CONTROL SENSOR mode, any remote control button will automatically turn off after three hours. 60
... Move SEL Return Setup Set The Inputs Video2 Auto Link Auto Input Signal Sensor Remote Control Sensor Off Move SEL Select Use THUMB STICK ̆ or ̄, then press down on and tune to Video2 when it must be reset before AUTO LINK is for your TV as described above. 2. Once the TV has been turned on using REMOTE CONTROL SENSOR mode, any remote control button will automatically turn off after three hours. 60

Owners Guide
Page 66
... subject to change without notice. 66 Refer to 4 components with one remote. (2 IR Mouse cables included.) • Full Set of Input Jacks, including S-VIDEO • COMPONENT VIDEO: Y-PB/PR • Velocity Modulation • Closed Caption Decoder • 2-Tuner Picture in Picture • Magic Focus (Auto Digital Convergence and Manual Adjustment) • Dual Antenna Inputs • Video Input Sensor • 3 Dimensional Y/C Comb Filter • Full 1080i HDTV capable when used with a Set-Top Box. • High bandwidth Digital Content...
... subject to change without notice. 66 Refer to 4 components with one remote. (2 IR Mouse cables included.) • Full Set of Input Jacks, including S-VIDEO • COMPONENT VIDEO: Y-PB/PR • Velocity Modulation • Closed Caption Decoder • 2-Tuner Picture in Picture • Magic Focus (Auto Digital Convergence and Manual Adjustment) • Dual Antenna Inputs • Video Input Sensor • 3 Dimensional Y/C Comb Filter • Full 1080i HDTV capable when used with a Set-Top Box. • High bandwidth Digital Content...


