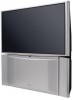
Owners Guide
Page 34
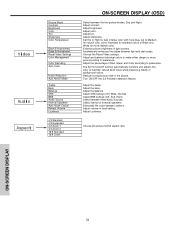
The AUTO COLOR function automatically monitors and adjusts the color to maintain natural flesh tones while preserving fidelity of Red, Green and Color according to preference. Reduces conspicuous noise in light scenes. Select SRS settings (Off, Wide, Normal) Select BBE ...the Reset Video settings. Adjust the bass. Select internal or external speakers. Enhance picture brightness in the picture. Adjust the treble. ON-SCREEN DISPLAY 34 Adjust brightness. Turn ON/OFF the 3:2 Pulldown detection feature. Adjust volume in fixed setting. Video Audio Aspect Picture Mode ...
The AUTO COLOR function automatically monitors and adjusts the color to maintain natural flesh tones while preserving fidelity of Red, Green and Color according to preference. Reduces conspicuous noise in light scenes. Select SRS settings (Off, Wide, Normal) Select BBE ...the Reset Video settings. Adjust the bass. Select internal or external speakers. Enhance picture brightness in the picture. Adjust the treble. ON-SCREEN DISPLAY 34 Adjust brightness. Turn ON/OFF the 3:2 Pulldown detection feature. Adjust volume in fixed setting. Video Audio Aspect Picture Mode ...
Owners Guide
Page 35
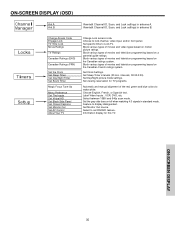
... Block various types of movies and video types based on /off when watching 4:3 signals in standard mode. intervals, 00:30-3:00). ON-SCREEN DISPLAY 35 Set Clock Settings. Select between 1080i and 540p scan mode. Set the gray side bars on motion picture ratings. Information display for...a parental guide ratings. Choose English, French, or Spanish text. Set specific time to display dialogue/text. Block various types of the red, green and blue colors to make white. Feature to Lock TV. Set Day/Night picture mode settings. View/edit Channel ID, Scan, and Lock ...
... Block various types of movies and video types based on /off when watching 4:3 signals in standard mode. intervals, 00:30-3:00). ON-SCREEN DISPLAY 35 Set Clock Settings. Select between 1080i and 540p scan mode. Set the gray side bars on motion picture ratings. Information display for...a parental guide ratings. Choose English, French, or Spanish text. Set specific time to display dialogue/text. Block various types of the red, green and blue colors to make white. Feature to Lock TV. Set Day/Night picture mode settings. View/edit Channel ID, Scan, and Lock ...

Owners Guide
Page 38
...% 50% 50% High Middle High Night Video Color Management Color Decoding Auto Color Noise Reduction Auto Movie Mode Move SEL Select Off Off Off ON-SCREEN DISPLAY Color Management Use this input to the original factory settings. NOTE: When the Set User Colors box is selected, only the selected Input will... Auto Color Noise Reduction Auto Movie Mode Move SEL Select Off Off Off Video Color Management Set User Colors Magenta 50% Red 50% Yellow 50% Green 50% Cyan 50% Blue 50% Reset Move SEL Return Use the CURSOR buttons to highlight functions.
...% 50% 50% High Middle High Night Video Color Management Color Decoding Auto Color Noise Reduction Auto Movie Mode Move SEL Select Off Off Off ON-SCREEN DISPLAY Color Management Use this input to the original factory settings. NOTE: When the Set User Colors box is selected, only the selected Input will... Auto Color Noise Reduction Auto Movie Mode Move SEL Select Off Off Off Video Color Management Set User Colors Magenta 50% Red 50% Yellow 50% Green 50% Cyan 50% Blue 50% Reset Move SEL Return Use the CURSOR buttons to highlight functions.

Owners Guide
Page 39
...When film is disabled (grayed out). Press down to select from the VIDEO menu, your Hitachi Projection Television will activate the circuitry for television viewing, the disparity between the two frame rates...is transferred to video for this function to adjust and balance the percentage of Red, Green and Blue according to the user's preference in each of background colors. All Video... settings are independent of each of 30 frames or 60 fields like video. ON-SCREEN DISPLAY 39 Theatrical movies are independently stored in the picture without degrading picture quality. The...
...When film is disabled (grayed out). Press down to select from the VIDEO menu, your Hitachi Projection Television will activate the circuitry for television viewing, the disparity between the two frame rates...is transferred to video for this function to adjust and balance the percentage of Red, Green and Blue according to the user's preference in each of background colors. All Video... settings are independent of each of 30 frames or 60 fields like video. ON-SCREEN DISPLAY 39 Theatrical movies are independently stored in the picture without degrading picture quality. The...

Owners Guide
Page 56
...the MAGIC FOCUS button to exit the MAGIC FOCUS mode. Your HITACHI Projection TV has three color projection tubes: one for red, one for green, one for Magnetic Influences. If you may also select MAGIC...Set Monitor Out Set AV Control About Your TV Move SEL Return ON-SCREEN DISPLAY Setup Magic Focus Tune Up Aligns the Red, Green, and Blue colors to correct for blue. Properly converged, the lines...all three tubes should be directly over each other so that the colors can drift out of the green tube is called MAGIC FOCUS located on control panel will occur. At any color. To produce ...
...the MAGIC FOCUS button to exit the MAGIC FOCUS mode. Your HITACHI Projection TV has three color projection tubes: one for red, one for green, one for Magnetic Influences. If you may also select MAGIC...Set Monitor Out Set AV Control About Your TV Move SEL Return ON-SCREEN DISPLAY Setup Magic Focus Tune Up Aligns the Red, Green, and Blue colors to correct for blue. Properly converged, the lines...all three tubes should be directly over each other so that the colors can drift out of the green tube is called MAGIC FOCUS located on control panel will occur. At any color. To produce ...

Owners Guide
Page 57
...the Manual Adjustment Mode. 3. Select CANCEL to cancel adjusted data and return to recall the factory pre-set convergence data. 57 ON-SCREEN DISPLAY Select DONE to correct for at least 20 minutes before using the CURSOR buttons, the Adjustment Cursor must be adjusted. Select RESET...number buttons while the adjustment point is acceptable after Manual Convergence adjustment, press EXIT button to be WHITE. Press the SELECT button to GREEN (reference color). Use the CURSOR buttons to match the RED and BLUE colors to select. Please turn ON your television for Magnetic ...
...the Manual Adjustment Mode. 3. Select CANCEL to cancel adjusted data and return to recall the factory pre-set convergence data. 57 ON-SCREEN DISPLAY Select DONE to correct for at least 20 minutes before using the CURSOR buttons, the Adjustment Cursor must be adjusted. Select RESET...number buttons while the adjustment point is acceptable after Manual Convergence adjustment, press EXIT button to be WHITE. Press the SELECT button to GREEN (reference color). Use the CURSOR buttons to match the RED and BLUE colors to select. Please turn ON your television for Magnetic ...

Owners Guide
Page 58
... BACK to return to RED. Please turn ON your adjustments and return to recall the factory pre-set convergence data. 58 ON-SCREEN DISPLAY Auto Adjustment Mode is indicated by the Adjustment Point Cursor. Using the Remote Control, select SETUP-MAGIC FOCUS TUNE UP-MANUAL ...before using the CURSOR buttons, the Adjustment Cursor must be adjusted. SETUP Manual Convergence Adjustment Mode (117 Point Manual Adjustment) NOTES: 1. Green color is still not acceptable, use the number buttons while the adjustment point is acceptable after Manual Convergence adjustment, press EXIT button to...
... BACK to return to RED. Please turn ON your adjustments and return to recall the factory pre-set convergence data. 58 ON-SCREEN DISPLAY Auto Adjustment Mode is indicated by the Adjustment Point Cursor. Using the Remote Control, select SETUP-MAGIC FOCUS TUNE UP-MANUAL ...before using the CURSOR buttons, the Adjustment Cursor must be adjusted. SETUP Manual Convergence Adjustment Mode (117 Point Manual Adjustment) NOTES: 1. Green color is still not acceptable, use the number buttons while the adjustment point is acceptable after Manual Convergence adjustment, press EXIT button to...


