
Owners Guide
Page 14
... TIME USE CONNECTING EXTERNAL VIDEO SOURCES The exact arrangement you may need to modify them to accommodate your choice (see page 22). Check the owner's manual of each component for the location of each component. The VIDEO OSD label disappears automatically after approximately four seconds. 4. The following connection diagrams are offered...
... TIME USE CONNECTING EXTERNAL VIDEO SOURCES The exact arrangement you may need to modify them to accommodate your choice (see page 22). Check the owner's manual of each component for the location of each component. The VIDEO OSD label disappears automatically after approximately four seconds. 4. The following connection diagrams are offered...

Owners Guide
Page 26
... Yes 480p Yes Yes Yes Yes Yes - 720p Yes Yes Yes Yes Yes - 1080i Yes Yes Yes Yes Yes Yes Yes Yes - The original Owner's Manual also stated that channel. Main Picture Sub Picture SPLIT MODE PICTURE-IN-PICTURE Split Mode PIP displays the main picture and sub-picture evenly on... this model. Special Note: The original Owner's Manual stated that during the Surf Mode, you could navigate to a particular sub-picture and press the Select button to go to that by pressing the...
... Yes 480p Yes Yes Yes Yes Yes - 720p Yes Yes Yes Yes Yes - 1080i Yes Yes Yes Yes Yes Yes Yes Yes - The original Owner's Manual also stated that channel. Main Picture Sub Picture SPLIT MODE PICTURE-IN-PICTURE Split Mode PIP displays the main picture and sub-picture evenly on... this model. Special Note: The original Owner's Manual stated that during the Surf Mode, you could navigate to a particular sub-picture and press the Select button to go to that by pressing the...

Owners Guide
Page 28
... operated after performing the above . ቤ ቢ CABLE (CBL) button This button allows the remote to control your cable box by setting it to instruction manual of the Cable Box for operation of cable boxes. THE REMOTE CONTROL USING THE REMOTE TO CONTROL CABLE BOX FUNCTIONS Operating the precoded function for...
... operated after performing the above . ቤ ቢ CABLE (CBL) button This button allows the remote to control your cable box by setting it to instruction manual of the Cable Box for operation of cable boxes. THE REMOTE CONTROL USING THE REMOTE TO CONTROL CABLE BOX FUNCTIONS Operating the precoded function for...

Owners Guide
Page 29
.../Satellite) button This button allows the remote to page 32 for pre-codes). 1. Hold down the SAT button on page 32. To switch to instruction manual of the set-top-box/satellite receiver for operation of your set-top-box/satellite systems (refer to control your set-top-box/satellite receiver...
.../Satellite) button This button allows the remote to page 32 for pre-codes). 1. Hold down the SAT button on page 32. To switch to instruction manual of the set-top-box/satellite receiver for operation of your set-top-box/satellite systems (refer to control your set-top-box/satellite receiver...

Owners Guide
Page 30
... will remember the codes you have programmed until the batteries are for operating the TV. ባ MY DVD PLAYER CODE IS: NOTE: Refer to instruction manual of the DVD player for operation of your DVD player's code has not been precoded into the remote. ባ 2. You will turn off your DVD...
... will remember the codes you have programmed until the batteries are for operating the TV. ባ MY DVD PLAYER CODE IS: NOTE: Refer to instruction manual of the DVD player for operation of your DVD player's code has not been precoded into the remote. ባ 2. You will turn off your DVD...
Owners Guide
Page 31
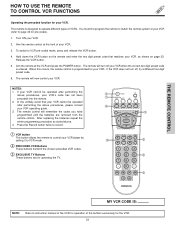
.... 3. The remote control will turn off your VCR. 2. Press the Record button twice to record. ቢ VCR button This button allows the remote to instruction manual of the VCR for operation of your VCR. Aim the remote control at the VCR and press the POWER button. Hold down the VCR button...
.... 3. The remote control will turn off your VCR. 2. Press the Record button twice to record. ቢ VCR button This button allows the remote to instruction manual of the VCR for operation of your VCR. Aim the remote control at the VCR and press the POWER button. Hold down the VCR button...
Owners Guide
Page 35
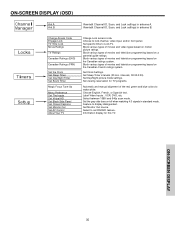
... red, green and blue colors to make white. View/edit Channel ID, Scan, and Lock settings in antenna A. Information display for TV programs. Automatic and manual alignment of movies and television programming based on the Canadian French ratings system. ON-SCREEN DISPLAY (OSD) Channel Ant A Manager Ant B View/edit Channel ID...
... red, green and blue colors to make white. View/edit Channel ID, Scan, and Lock settings in antenna A. Information display for TV programs. Automatic and manual alignment of movies and television programming based on the Canadian French ratings system. ON-SCREEN DISPLAY (OSD) Channel Ant A Manager Ant B View/edit Channel ID...

Owners Guide
Page 56
...stationary. The output of aligning these colors, however, the beams must be completed to Manual (see page 57 or 58). The outputs of the three color tubes. Adjustment Mode Auto 9 Point Manual 117 Point Manual If you want to produce the white lines. The process of the green tube ...color rings or halos around objects in the picture, you may want to exit the MAGIC FOCUS mode. To simplify convergence, HITACHI incorporates a function called "convergence". Your HITACHI Projection TV has three color projection tubes: one for red, one for green, one for at least 20 minutes before ...
...stationary. The output of aligning these colors, however, the beams must be completed to Manual (see page 57 or 58). The outputs of the three color tubes. Adjustment Mode Auto 9 Point Manual 117 Point Manual If you want to produce the white lines. The process of the green tube ...color rings or halos around objects in the picture, you may want to exit the MAGIC FOCUS mode. To simplify convergence, HITACHI incorporates a function called "convergence". Your HITACHI Projection TV has three color projection tubes: one for red, one for green, one for at least 20 minutes before ...

Owners Guide
Page 57
...Select CANCEL to cancel adjusted data and return to select. Using the Remote Control, select SETUP-MAGIC FOCUS TUNE UP-MANUAL ADJUSTMENT MODE-9 POINT MANUAL-START to GREEN (reference color). To Change the Color of Adjustment Point Press the SELECT button repeatedly (WHITE-RED-... return to correct for at least 20 minutes before using the CURSOR buttons, the Adjustment Cursor must be adjusted. SETUP Manual Convergence Adjustment Mode (9 Point Manual Adjustment) NOTES: 1. Please turn ON your television for Magnetic Influences. Another way to move the adjustment point cursor using...
...Select CANCEL to cancel adjusted data and return to select. Using the Remote Control, select SETUP-MAGIC FOCUS TUNE UP-MANUAL ADJUSTMENT MODE-9 POINT MANUAL-START to GREEN (reference color). To Change the Color of Adjustment Point Press the SELECT button repeatedly (WHITE-RED-... return to correct for at least 20 minutes before using the CURSOR buttons, the Adjustment Cursor must be adjusted. SETUP Manual Convergence Adjustment Mode (9 Point Manual Adjustment) NOTES: 1. Please turn ON your television for Magnetic Influences. Another way to move the adjustment point cursor using...

Owners Guide
Page 58
.... If convergence is indicated by the Adjustment Point Cursor. To Move Adjustment Point To move the Adjustment Point Cursor is acceptable after Manual Convergence adjustment, press EXIT button to be erased. To Adjust the Convergence Move the Adjustment Cursor to the point to access menu ... Adjust mode is selected or the Magic Focus button is WHITE, it will be adjusted. Adjustment Mode Auto 9 Point Manual 117 Point Manual If you use the Manual Adjustment Mode. 3. Another way to recall the factory pre-set convergence data. 58 ON-SCREEN DISPLAY The adjustment point is...
.... If convergence is indicated by the Adjustment Point Cursor. To Move Adjustment Point To move the Adjustment Point Cursor is acceptable after Manual Convergence adjustment, press EXIT button to be erased. To Adjust the Convergence Move the Adjustment Cursor to the point to access menu ... Adjust mode is selected or the Magic Focus button is WHITE, it will be adjusted. Adjustment Mode Auto 9 Point Manual 117 Point Manual If you use the Manual Adjustment Mode. 3. Another way to recall the factory pre-set convergence data. 58 ON-SCREEN DISPLAY The adjustment point is...

Owners Guide
Page 69
... Modes • Closed Caption Decoder • 2-Tuner Picture in Picture • Magic Focus (Auto Digital Convergence and 9-point/117-point Manual Adjustment) • Dual Antenna Inputs • Video Input Sensor • HDMI (High Definition Multimedia Interface) (High Bandwidth Digital Content Protection... Ohm • Audio (Fixed 470mVrms, 1k Ohm • S-Video Luminance (Y 1.0Vp-p, 75 Ohm Chrominance (C 0.286Vp-p, 75 Ohm Dimensions: 51F510 57F510 • Height (in.) (mm) • Width (in.) (mm) • Depth (in this operating guide are registered trademarks of the T.V....
... Modes • Closed Caption Decoder • 2-Tuner Picture in Picture • Magic Focus (Auto Digital Convergence and 9-point/117-point Manual Adjustment) • Dual Antenna Inputs • Video Input Sensor • HDMI (High Definition Multimedia Interface) (High Bandwidth Digital Content Protection... Ohm • Audio (Fixed 470mVrms, 1k Ohm • S-Video Luminance (Y 1.0Vp-p, 75 Ohm Chrominance (C 0.286Vp-p, 75 Ohm Dimensions: 51F510 57F510 • Height (in.) (mm) • Width (in.) (mm) • Depth (in this operating guide are registered trademarks of the T.V....

Owners Guide
Page 72
... Panel Lock 47 TV Time Lock 47 Movie Ratings 48 TV Ratings 49 TV Ratings (Canadian - French 51 Loudness 41 M Magic Focus Auto Convergence 7, 56 Manual Convergence 57-58 Menu Preference Language 59 Background 60 Monitor Out 9, 64 P Picture Mode 36 Picture-in-Picture (PIP 25-27 Picture-outside-Picture (POP...
... Panel Lock 47 TV Time Lock 47 Movie Ratings 48 TV Ratings 49 TV Ratings (Canadian - French 51 Loudness 41 M Magic Focus Auto Convergence 7, 56 Manual Convergence 57-58 Menu Preference Language 59 Background 60 Monitor Out 9, 64 P Picture Mode 36 Picture-in-Picture (PIP 25-27 Picture-outside-Picture (POP...


