Owners Guide
Page 34
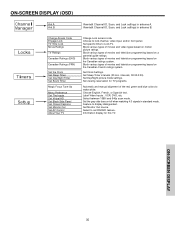
... The AUTO COLOR function automatically monitors and adjusts the color to maintain natural flesh tones while preserving fidelity of Red, Green and Color according to preference. Turn ON/OFF the 3:2 Pulldown detection feature. Adjust the balance. Select internal or ...Source Internal Speakers Auto Noise Cancel Perfect Volume Loudness 4:3 Standard 4:3 Expanded 4:3 Zoom 1 4:3 Zoom 2 16:9 Standard 16:9 Zoom ON-SCREEN DISPLAY (OSD) Select between three Audio Sources. Enhance picture brightness in light scenes. Eliminates the noise between light and dark areas. Adjust ...
... The AUTO COLOR function automatically monitors and adjusts the color to maintain natural flesh tones while preserving fidelity of Red, Green and Color according to preference. Turn ON/OFF the 3:2 Pulldown detection feature. Adjust the balance. Select internal or ...Source Internal Speakers Auto Noise Cancel Perfect Volume Loudness 4:3 Standard 4:3 Expanded 4:3 Zoom 1 4:3 Zoom 2 16:9 Standard 16:9 Zoom ON-SCREEN DISPLAY (OSD) Select between three Audio Sources. Enhance picture brightness in light scenes. Eliminates the noise between light and dark areas. Adjust ...
Owners Guide
Page 35
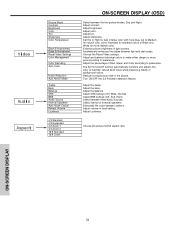
ON-SCREEN DISPLAY (OSD) Channel Ant A Manager Ant B View/edit Channel ID, Scan, and Lock settings in standard mode. Set specific time to set RS232C feature. intervals, ..., DVD, etc. Information display for TV programs. Automatic and manual alignment of the red, green and blue colors to make white. Choose to display dialogue/text. Set Clock Settings. Set Sleep Timer intervals (30 min. ON-SCREEN DISPLAY 35 Select between 1080i and 540p scan mode. Set Monitor Out source. Locks Timers...
ON-SCREEN DISPLAY (OSD) Channel Ant A Manager Ant B View/edit Channel ID, Scan, and Lock settings in standard mode. Set specific time to set RS232C feature. intervals, ..., DVD, etc. Information display for TV programs. Automatic and manual alignment of the red, green and blue colors to make white. Choose to display dialogue/text. Set Clock Settings. Set Sleep Timer intervals (30 min. ON-SCREEN DISPLAY 35 Select between 1080i and 540p scan mode. Set Monitor Out source. Locks Timers...

Owners Guide
Page 38
...50% High Middle High Night Video Color Management Color Decoding Auto Color Noise Reduction Auto Movie Mode Move SEL Select Off Off Off ON-SCREEN DISPLAY Color Management Use this input to the original factory settings. Press the SELECT button to make them either deeper or more pure depending... Noise Reduction Auto Movie Mode Move SEL Select Off Off Off Video Color Management Set User Colors Magenta 50% Red 50% Yellow 50% Green 50% Cyan 50% Blue 50% Reset Move SEL Return Use the CURSOR buttons to highlight and adjust individual colors. Press the SELECT button...
...50% High Middle High Night Video Color Management Color Decoding Auto Color Noise Reduction Auto Movie Mode Move SEL Select Off Off Off ON-SCREEN DISPLAY Color Management Use this input to the original factory settings. Press the SELECT button to make them either deeper or more pure depending... Noise Reduction Auto Movie Mode Move SEL Select Off Off Off Video Color Management Set User Colors Magenta 50% Red 50% Yellow 50% Green 50% Cyan 50% Blue 50% Reset Move SEL Return Use the CURSOR buttons to highlight and adjust individual colors. Press the SELECT button...

Owners Guide
Page 39
...to video for this function to adjust and balance the percentage of Red, Green and Blue according to maintain natural flesh tones while preserving fidelity of the four color temperature settings. ON-SCREEN DISPLAY 39 NOTE: Color Decoding settings are independently stored in the picture without... Reduction is ON, Sharpness function is turned ON from 4 menu items. Press the CURSOR buttons to select from the VIDEO menu, your Hitachi Projection Television will not be reconciled. Use TINT to OFF if the TV experiences picture blocking. When Auto Movie Mode is disabled (grayed out...
...to video for this function to adjust and balance the percentage of Red, Green and Blue according to maintain natural flesh tones while preserving fidelity of the four color temperature settings. ON-SCREEN DISPLAY 39 NOTE: Color Decoding settings are independently stored in the picture without... Reduction is ON, Sharpness function is turned ON from 4 menu items. Press the CURSOR buttons to select from the VIDEO menu, your Hitachi Projection Television will not be reconciled. Use TINT to OFF if the TV experiences picture blocking. When Auto Movie Mode is disabled (grayed out...

Owners Guide
Page 56
...HD Set Black Side Panel Set Closed Captions Set Monitor Out Set AV Control About Your TV Move SEL Return ON-SCREEN DISPLAY Setup Magic Focus Tune Up Aligns the Red, Green, and Blue colors to adjust now Start Move SEL Return 56 MAGIC FOCUS Adjustment Mode Auto 9 Point Manual 117 Point... Manual If you may want to correct for at least 20 minutes before using this feature. Your HITACHI Projection TV has three color projection tubes: one for red, one for green, one for blue. If you move the TV during this convergence correction process, you may also select MAGIC ...
...HD Set Black Side Panel Set Closed Captions Set Monitor Out Set AV Control About Your TV Move SEL Return ON-SCREEN DISPLAY Setup Magic Focus Tune Up Aligns the Red, Green, and Blue colors to adjust now Start Move SEL Return 56 MAGIC FOCUS Adjustment Mode Auto 9 Point Manual 117 Point... Manual If you may want to correct for at least 20 minutes before using this feature. Your HITACHI Projection TV has three color projection tubes: one for red, one for green, one for blue. If you move the TV during this convergence correction process, you may also select MAGIC ...

Owners Guide
Page 57
... If convergence is to save your chosen option. If Auto Adjust mode is selected or the Magic Focus button is WHITE, it will be WHITE. Green color is indicated by the Adjustment Point Cursor. Select DONE to press the following buttons: [2] up, [4] left, [5] down, [6] right. Setup Magic ...mode. Use the CURSOR buttons to match the RED and BLUE colors to recall the factory pre-set convergence data. 57 ON-SCREEN DISPLAY Select RESET to GREEN (reference color). The adjustment point is fixed and cannot be adjusted. To Change the Color of Adjustment Point Press the SELECT ...
... If convergence is to save your chosen option. If Auto Adjust mode is selected or the Magic Focus button is WHITE, it will be WHITE. Green color is indicated by the Adjustment Point Cursor. Select DONE to press the following buttons: [2] up, [4] left, [5] down, [6] right. Setup Magic ...mode. Use the CURSOR buttons to match the RED and BLUE colors to recall the factory pre-set convergence data. 57 ON-SCREEN DISPLAY Select RESET to GREEN (reference color). The adjustment point is fixed and cannot be adjusted. To Change the Color of Adjustment Point Press the SELECT ...

Owners Guide
Page 58
...Magnetic Influences. Video Audio Aspect Chan. Press the SELECT button to recall the factory pre-set convergence data. 58 ON-SCREEN DISPLAY The adjustment point is to adjust now Start Move SEL Return Adjustment Point Cursor If convergence is recommended. Select BACK ...to return to GREEN (reference color). Green color is pressed, all three colors should appear white. SETUP Manual Convergence Adjustment Mode (117 Point Manual Adjustment) NOTES: ...
...Magnetic Influences. Video Audio Aspect Chan. Press the SELECT button to recall the factory pre-set convergence data. 58 ON-SCREEN DISPLAY The adjustment point is to adjust now Start Move SEL Return Adjustment Point Cursor If convergence is recommended. Select BACK ...to return to GREEN (reference color). Green color is pressed, all three colors should appear white. SETUP Manual Convergence Adjustment Mode (117 Point Manual Adjustment) NOTES: ...


