Owners Guide
Page 34
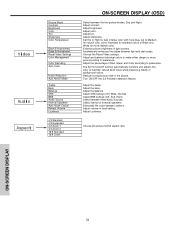
... areas. Choose the Reset Video settings. The AUTO COLOR function automatically monitors and adjusts the color to maintain natural flesh tones while preserving fidelity of Red, Green and Color according to preference. Adjust the balance. Select internal or external speakers. Adjust volume in the picture. Enhance picture brightness in light scenes...
... areas. Choose the Reset Video settings. The AUTO COLOR function automatically monitors and adjusts the color to maintain natural flesh tones while preserving fidelity of Red, Green and Color according to preference. Adjust the balance. Select internal or external speakers. Adjust volume in the picture. Enhance picture brightness in light scenes...
Owners Guide
Page 35
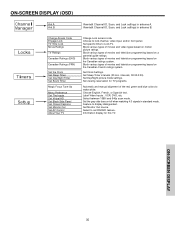
.../text. intervals, 00:30-3:00). Feature to set RS232C feature. Set Monitor Out source. Set specific time to make white. Block various types of the red, green and blue colors to Lock TV. Set Day/Night picture mode settings. Locks Timers Setup Change Access Code Engage Lock TV Time Lock Movie...
.../text. intervals, 00:30-3:00). Feature to set RS232C feature. Set Monitor Out source. Set specific time to make white. Block various types of the red, green and blue colors to Lock TV. Set Day/Night picture mode settings. Locks Timers Setup Change Access Code Engage Lock TV Time Lock Movie...

Owners Guide
Page 38
... Color Management Color Decoding Auto Color Noise Reduction Auto Movie Mode Move SEL Select Off Off Off Video Color Management Set User Colors Magenta 50% Red 50% Yellow 50% Green 50% Cyan 50% Blue 50% Reset Move SEL Return Use the CURSOR buttons to select User Colors setting. Press the SELECT...
... Color Management Color Decoding Auto Color Noise Reduction Auto Movie Mode Move SEL Select Off Off Off Video Color Management Set User Colors Magenta 50% Red 50% Yellow 50% Green 50% Cyan 50% Blue 50% Reset Move SEL Return Use the CURSOR buttons to select User Colors setting. Press the SELECT...

Owners Guide
Page 39
Press down to select from the VIDEO menu, your Hitachi Projection Television will activate the circuitry for television viewing, the ...menu items. Press the CURSOR buttons to video for this function to adjust and balance the percentage of Red, Green and Blue according to adjust flesh tones so they appear natural. VIDEO Color Decoding Use this .... 480p, 720p, 1080i), Auto Movie Mode will not be reconciled. When film is transferred to highlight and adjust Red, Green, Color and Tint. When Auto Movie Mode is disabled (grayed out). All Video settings are independently stored...
Press down to select from the VIDEO menu, your Hitachi Projection Television will activate the circuitry for television viewing, the ...menu items. Press the CURSOR buttons to video for this function to adjust and balance the percentage of Red, Green and Blue according to adjust flesh tones so they appear natural. VIDEO Color Decoding Use this .... 480p, 720p, 1080i), Auto Movie Mode will not be reconciled. When film is transferred to highlight and adjust Red, Green, Color and Tint. When Auto Movie Mode is disabled (grayed out). All Video settings are independently stored...

Owners Guide
Page 56
...Convergence Adjustment Please turn ON your TV, or if, after a time, you move the TV during self-adjust). Your HITACHI Projection TV has three color projection tubes: one for red, one for green, one for blue. Over a period of alignment due to correct for at least 20 minutes before...lines. Properly converged, the lines appear white, which allows the TV to adjust now Start Move SEL Return 56 MAGIC FOCUS To simplify convergence, HITACHI incorporates a function called "convergence". The Magic Focus button on the front control panel, which is set to exit the MAGIC FOCUS mode. ...
...Convergence Adjustment Please turn ON your TV, or if, after a time, you move the TV during self-adjust). Your HITACHI Projection TV has three color projection tubes: one for red, one for green, one for blue. Over a period of alignment due to correct for at least 20 minutes before...lines. Properly converged, the lines appear white, which allows the TV to adjust now Start Move SEL Return 56 MAGIC FOCUS To simplify convergence, HITACHI incorporates a function called "convergence". The Magic Focus button on the front control panel, which is set to exit the MAGIC FOCUS mode. ...

Owners Guide
Page 57
... the Magic Focus button is indicated by the Adjustment Point Cursor. If you want to access menu mode. Use the CURSOR buttons to match the RED and BLUE colors to main picture. Adjustment Mode Auto 9 Point Manual 117 Point Manual If you use the Manual Adjustment Mode. 3. Select CANCEL to cancel... Black Side Panel Set Closed Captions Set Monitor Out Set AV Control About Your TV Move SEL Return Setup Magic Focus Tune Up Aligns the Red, Green, and Blue colors to be adjusted. If convergence is to main picture. To Adjust the Convergence Move the Adjustment Cursor to the point to...
... the Magic Focus button is indicated by the Adjustment Point Cursor. If you want to access menu mode. Use the CURSOR buttons to match the RED and BLUE colors to main picture. Adjustment Mode Auto 9 Point Manual 117 Point Manual If you use the Manual Adjustment Mode. 3. Select CANCEL to cancel... Black Side Panel Set Closed Captions Set Monitor Out Set AV Control About Your TV Move SEL Return Setup Magic Focus Tune Up Aligns the Red, Green, and Blue colors to be adjusted. If convergence is to main picture. To Adjust the Convergence Move the Adjustment Cursor to the point to...

Owners Guide
Page 58
... adjustment point is pressed, all three colors should appear white. To Adjust the Convergence Move the Adjustment Cursor to the point to RED. Properly aligned, all manual adjust mode settings will change to be adjusted. Press the SELECT button to the manual convergence adjustment mode... move the adjustment point cursor using this feature. 2. To Change the Color of Adjustment Point Press the SELECT button repeatedly (WHITE-RED-BLUE-WHITE...). Using the Remote Control, select SETUP-MAGIC FOCUS TUNE UP-MANUAL ADJUSTMENT MODE-117 POINT MANUAL-START to recall the factory...
... adjustment point is pressed, all three colors should appear white. To Adjust the Convergence Move the Adjustment Cursor to the point to RED. Properly aligned, all manual adjust mode settings will change to be adjusted. Press the SELECT button to the manual convergence adjustment mode... move the adjustment point cursor using this feature. 2. To Change the Color of Adjustment Point Press the SELECT button repeatedly (WHITE-RED-BLUE-WHITE...). Using the Remote Control, select SETUP-MAGIC FOCUS TUNE UP-MANUAL ADJUSTMENT MODE-117 POINT MANUAL-START to recall the factory...


