
Owners Guide
Page 2
...and instructions marked on this discharge unit, connection to radiators, heat registers, stoves, or other apparatus Article 820-44 of overhead power lines or other . NO USER SERVICEABLE PARTS INSIDE. Keep these instructions. 2. Only use Please fill out your product model....Unplug this television. Important Safety Instructions SAFETY POINTS YOU SHOULD KNOW ABOUT type plug has two blades and a third grounding YOUR HITACHI LCD REAR PROJECTION prong. replacement of time. 14. The lightning flash with one wider than the other electrical circuits. 18. Clean only with...
...and instructions marked on this discharge unit, connection to radiators, heat registers, stoves, or other apparatus Article 820-44 of overhead power lines or other . NO USER SERVICEABLE PARTS INSIDE. Keep these instructions. 2. Only use Please fill out your product model....Unplug this television. Important Safety Instructions SAFETY POINTS YOU SHOULD KNOW ABOUT type plug has two blades and a third grounding YOUR HITACHI LCD REAR PROJECTION prong. replacement of time. 14. The lightning flash with one wider than the other electrical circuits. 18. Clean only with...

Owners Guide
Page 3
... contact your cable operator is required to view encrypted digital programming. Important Safety Instructions Power source This television is designed to operate on back side of the television. Certain ... direct connection to operate the equipment. A CableCARD provided by U.S. FOR MORE INFORMATION, CALL 1-800-HITACHI. Note This television receiver will display television closed captioning, ( or ), in Canada). Never connect ... intended for home and other limited consumer uses only unless otherwise authorized by TV stations and cable companies, as well as video-on-demand, a cable ...
... contact your cable operator is required to view encrypted digital programming. Important Safety Instructions Power source This television is designed to operate on back side of the television. Certain ... direct connection to operate the equipment. A CableCARD provided by U.S. FOR MORE INFORMATION, CALL 1-800-HITACHI. Note This television receiver will display television closed captioning, ( or ), in Canada). Never connect ... intended for home and other limited consumer uses only unless otherwise authorized by TV stations and cable companies, as well as video-on-demand, a cable ...

Owners Guide
Page 5
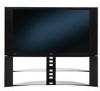
...set . The sound of the lamp, and should not be considered defective. 2. After extended use How to set up your new HITACHI Projection Television ANTENNA Unless your LCD Rear PTV against a wall, keep it at its large viewing screen. If you hear a "cracking" sound from the wall. However... with speaker placement for best performance. VIEWING The major benefit of the set failure, do not place the TV where temperatures can become stable, after the power has been turned on. Picture brightness decreases as possible to the height of the receiver. Differences in front of...
...set . The sound of the lamp, and should not be considered defective. 2. After extended use How to set up your new HITACHI Projection Television ANTENNA Unless your LCD Rear PTV against a wall, keep it at its large viewing screen. If you hear a "cracking" sound from the wall. However... with speaker placement for best performance. VIEWING The major benefit of the set failure, do not place the TV where temperatures can become stable, after the power has been turned on. Picture brightness decreases as possible to the height of the receiver. Differences in front of...

Owners Guide
Page 7
POWER BUTTON (TV, DVD, CBL, STB, PVR/VCR, AMP/CD) Turns the selected device on the right bottom portion of the OSD, INPUTS or AV NET menu systems if their menu is in Set-Top-Box (STB) mode or when the TV...The remote control must be used to control the chosen device. Please see page 55) of the TV or the program guide of devices, such as a cursor to navigate through the OSD, ... of the TV. DVD/VCR CONTROL BUTTONS (DVD, PVR/VCR, AMP/CD) Controls the functions of your HITACHI LCD Rear Projection TV, the new remote control is only available for TV mode.) LIGHT BUTTON (TV, CBL, STB...
POWER BUTTON (TV, DVD, CBL, STB, PVR/VCR, AMP/CD) Turns the selected device on the right bottom portion of the OSD, INPUTS or AV NET menu systems if their menu is in Set-Top-Box (STB) mode or when the TV...The remote control must be used to control the chosen device. Please see page 55) of the TV or the program guide of devices, such as a cursor to navigate through the OSD, ... of the TV. DVD/VCR CONTROL BUTTONS (DVD, PVR/VCR, AMP/CD) Controls the functions of your HITACHI LCD Rear Projection TV, the new remote control is only available for TV mode.) LIGHT BUTTON (TV, CBL, STB...

Owners Guide
Page 8
...these buttons until the desired channel appears in the top right corner of the TV screen. The volume level will default to 30 when the TV is turned ON. ´ POWER button Press this button to turn the TV on the TV screen. However, if it possible to set to instantly view your equipment's ... button allows you have mono sound, insert the audio cable into the left (̇) and right (̈) buttons when in MENU mode. When the TV power is turned OFF at this area when selecting channels, adjusting volume, etc. These buttons also serve as the EXIT button when in MENU mode. »...
...these buttons until the desired channel appears in the top right corner of the TV screen. The volume level will default to 30 when the TV is turned ON. ´ POWER button Press this button to turn the TV on the TV screen. However, if it possible to set to instantly view your equipment's ... button allows you have mono sound, insert the audio cable into the left (̇) and right (̈) buttons when in MENU mode. When the TV power is turned OFF at this area when selecting channels, adjusting volume, etc. These buttons also serve as the EXIT button when in MENU mode. »...

Owners Guide
Page 9
...for proper part. NORMAL OPERATION BEGINNING OF COOL DOWN (FOR 20 SEC.) (TV CANNOT ACCEPT ANY CODE IN THIS PERIOD EXCEPT WITHIN THE BEGINNING 5 SEC.) ACTION Need to warm up the TV screen. POWER TEMP LAMP 3. Light Blinking Slowly (2 seconds): television lamp is blinking, the... call service. First time use Front Panel Controls ¾ POWER Light This light is on during normal operation. The ternal termperature will increse which will turn off during normal operation. Your Hitachi LCD Rear Projection Television may become clogged over time. Check assembly condition of LAMP...
...for proper part. NORMAL OPERATION BEGINNING OF COOL DOWN (FOR 20 SEC.) (TV CANNOT ACCEPT ANY CODE IN THIS PERIOD EXCEPT WITHIN THE BEGINNING 5 SEC.) ACTION Need to warm up the TV screen. POWER TEMP LAMP 3. Light Blinking Slowly (2 seconds): television lamp is blinking, the... call service. First time use Front Panel Controls ¾ POWER Light This light is on during normal operation. The ternal termperature will increse which will turn off during normal operation. Your Hitachi LCD Rear Projection Television may become clogged over time. Check assembly condition of LAMP...

Owners Guide
Page 12
...third screen below will appear if a channel is properly installed or not installed, the TV will be provided by the A/V network OR feature. IMPORTANT: Please read the "Lamp Power Control" feature on page 100 for 12 additional CableCARD information. Digital Cable CABLE Apparatus Claims...until the second screen below ). NOTE: 1. CableCARD slot. Rear Panel Connections First time use ¾ TV AS CENTER (INPUTS 1-4) These jacks are for stereo amplifiers with your cable service. This feature allows the TV speakers to tune digital and high definition cable channels. CableCARD is...
...third screen below will appear if a channel is properly installed or not installed, the TV will be provided by the A/V network OR feature. IMPORTANT: Please read the "Lamp Power Control" feature on page 100 for 12 additional CableCARD information. Digital Cable CABLE Apparatus Claims...until the second screen below ). NOTE: 1. CableCARD slot. Rear Panel Connections First time use ¾ TV AS CENTER (INPUTS 1-4) These jacks are for stereo amplifiers with your cable service. This feature allows the TV speakers to tune digital and high definition cable channels. CableCARD is...

Owners Guide
Page 19
...the IR BLASTER output of the external components you can use Connecting External Video Sources Your HITACHI LCD Rear Projection Television is setup, it allows your IR Mouse connector to control your equipment using your HITACHI LCD Rear PTV Remote Control. CableCARD™ (Top of U.S. Use the CURSOR PAD ̄... and 6,381,747 licensed for the AV Network to function properly. 19 Video Audio TV Guide On Screen Channel Manager Locks Timers Setup Move SEL Select Setup Menu Preference Lamp Power Control Set The Inputs Set AV NET Set Closed Captions Set Monitor Out Upgrades Quick Start...
...the IR BLASTER output of the external components you can use Connecting External Video Sources Your HITACHI LCD Rear Projection Television is setup, it allows your IR Mouse connector to control your equipment using your HITACHI LCD Rear PTV Remote Control. CableCARD™ (Top of U.S. Use the CURSOR PAD ̄... and 6,381,747 licensed for the AV Network to function properly. 19 Video Audio TV Guide On Screen Channel Manager Locks Timers Setup Move SEL Select Setup Menu Preference Lamp Power Control Set The Inputs Set AV NET Set Closed Captions Set Monitor Out Upgrades Quick Start...

Owners Guide
Page 22
... the PAUSE button to freeze the picture. The Remote Control How to Use the Remote to Control Your TV ቢ POWER button Press this button to turn the TV set on or off when the remote is in TV mode. (See page 21 for ቢ instructions on how to set the remote control to... TV mode.) ባ ቤ ብ ባ MODE Indicator Turns on or blinks to show remote control mode. ቤ SOURCE ACCESS...
... the PAUSE button to freeze the picture. The Remote Control How to Use the Remote to Control Your TV ቢ POWER button Press this button to turn the TV set on or off when the remote is in TV mode. (See page 21 for ቢ instructions on how to set the remote control to... TV mode.) ባ ቤ ብ ባ MODE Indicator Turns on or blinks to show remote control mode. ቤ SOURCE ACCESS...

Owners Guide
Page 25
...digital cameras may not work with this Photo Input. 4. Certain types of slow access time on a DVD-RAM disc may not work with low battery power may show Picture Numbers in Thumbnail view, plus other information in individual photos. 3. Digital cameras with this input. 6. Press the INPUTS button to ...checking your digital camera, USB Drive or memory cards USB drive using the Photo Input in this Photo Input. 5. The maximum number of the TV. 1. The screen may not properly display your photos in the right side panel of digital Photos that can be displayed is selected. Use the...
...digital cameras may not work with this Photo Input. 4. Certain types of slow access time on a DVD-RAM disc may not work with low battery power may show Picture Numbers in Thumbnail view, plus other information in individual photos. 3. Digital cameras with this input. 6. Press the INPUTS button to ...checking your digital camera, USB Drive or memory cards USB drive using the Photo Input in this Photo Input. 5. The maximum number of the TV. 1. The screen may not properly display your photos in the right side panel of digital Photos that can be displayed is selected. Use the...

Owners Guide
Page 27
When the TV power is turned off completely (MUTE). However, if it is set to a level 30 or less, the volume level will default to 30 when the TV is turned ON. ቴ (-) DASH button Use the (-) DASH button with the (-) DASH button. How to Use the Remote to Control Your TV ቱ... that have subchannel numbers indicated by pressing and holding down the Channel (CH) wheel until you wish to tune then wait a few seconds for the TV to WHITE. Enter "0" first for channels 1 to 9, or simply press the single digit channel you obtain the desired sound level. For Digital Channels,...
When the TV power is turned off completely (MUTE). However, if it is set to a level 30 or less, the volume level will default to 30 when the TV is turned ON. ቴ (-) DASH button Use the (-) DASH button with the (-) DASH button. How to Use the Remote to Control Your TV ቱ... that have subchannel numbers indicated by pressing and holding down the Channel (CH) wheel until you wish to tune then wait a few seconds for the TV to WHITE. Enter "0" first for channels 1 to 9, or simply press the single digit channel you obtain the desired sound level. For Digital Channels,...
Owners Guide
Page 31
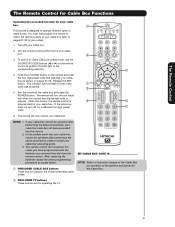
...box when the correct four digit preset code is designed to operate different types of the buttons exclusively for the Cable Box. ባ EXCLUSIVE TV buttons These buttons are removed from the from the remote control. If your cable box cannot be operated after performing the above procedures, your ...your cable box. ባ 3. Aim the remote control at the cable box and press the POWER button. The remote will remember the codes you have programmed until the batteries are for operating the TV. 31 Hold down the ENT button on the remote and enter the four digit preset code ...
...box when the correct four digit preset code is designed to operate different types of the buttons exclusively for the Cable Box. ባ EXCLUSIVE TV buttons These buttons are removed from the from the remote control. If your cable box cannot be operated after performing the above procedures, your ...your cable box. ባ 3. Aim the remote control at the cable box and press the POWER button. The remote will remember the codes you have programmed until the batteries are for operating the TV. 31 Hold down the ENT button on the remote and enter the four digit preset code ...

Owners Guide
Page 32
... -top-box/ satellite receiver code has not been precoded into the remote. 2. If the set -top-box/satellite receiver and press the POWER button. If your set-top-box/satellite receiver cannot be operated after performing the above . The remote will remember the codes you have programmed... until the batteries are for operating the TV. 32 Hold down the ENT button on the remote and enter the four digit preset code that your set -top-box/satellite systems. ...
... -top-box/ satellite receiver code has not been precoded into the remote. 2. If the set -top-box/satellite receiver and press the POWER button. If your set-top-box/satellite receiver cannot be operated after performing the above . The remote will remember the codes you have programmed... until the batteries are for operating the TV. 32 Hold down the ENT button on the remote and enter the four digit preset code that your set -top-box/satellite systems. ...

Owners Guide
Page 33
...the remote control to position the LED light to the corresponding selection. ቢ 4. Aim the remote control at the DVD player and press the POWER button. To switch to set the display type of DVD players. If the DVD player does not turn off , try a different four digit ...remote system of the buttons exclusively for the DVD Player. ቢ PRECODED DVD Buttons These buttons transmit the chosen precoded DVD codes. ባ EXCLUSIVE TV Buttons These buttons are removed from the from the remote control. Aim the remote at the front of your DVD player. ቢ 2. If ...
...the remote control to position the LED light to the corresponding selection. ቢ 4. Aim the remote control at the DVD player and press the POWER button. To switch to set the display type of DVD players. If the DVD player does not turn off , try a different four digit ...remote system of the buttons exclusively for the DVD Player. ቢ PRECODED DVD Buttons These buttons transmit the chosen precoded DVD codes. ባ EXCLUSIVE TV Buttons These buttons are removed from the from the remote control. Aim the remote at the front of your DVD player. ቢ 2. If ...

Owners Guide
Page 34
... Recorder). ቢ This remote is entered. The indicator light will remember the codes you have programmed until the batteries are for operating the TV. 34 The Remote Control The Remote Control for VCR/PVR Functions Operating the precoded function for your VCR/PVR. MY VCR/PVR CODE IS:...2. The remote control will flash 3 times if ቢ the code was accepted. 5. Aim the remote control at the VCR/PVR and press the ባ POWER button. Hold down the ENT button on the remote control to position the LED light to instruction manual of the VCR/PVR for operation of...
... Recorder). ቢ This remote is entered. The indicator light will remember the codes you have programmed until the batteries are for operating the TV. 34 The Remote Control The Remote Control for VCR/PVR Functions Operating the precoded function for your VCR/PVR. MY VCR/PVR CODE IS:...2. The remote control will flash 3 times if ቢ the code was accepted. 5. Aim the remote control at the VCR/PVR and press the ባ POWER button. Hold down the ENT button on the remote control to position the LED light to instruction manual of the VCR/PVR for operation of...

Owners Guide
Page 35
... operation of the buttons exclusively for the VCR/PVR. ቢ PRECODED AUDIO Buttons These buttons transmit the chosen precoded Audio component codes. ባ EXCLUSIVE TV Buttons These buttons are removed from the from the remote control. Aim the remote control at the Audio component and press the... POWER button. The remote will flash 3 times if the code was accepted. 5. In the unlikely event that matches your Audio component operating guide. 3. Aim the ...
... operation of the buttons exclusively for the VCR/PVR. ቢ PRECODED AUDIO Buttons These buttons transmit the chosen precoded Audio component codes. ባ EXCLUSIVE TV Buttons These buttons are removed from the from the remote control. Aim the remote control at the Audio component and press the... POWER button. The remote will flash 3 times if the code was accepted. 5. In the unlikely event that matches your Audio component operating guide. 3. Aim the ...

Owners Guide
Page 37
...HP 1972 Harley Davidson 0000 Harman/Kardon ......0038, 0081 Harwood 0072 Headquarter 0046 Hewlett Packard 1972 Hitachi 0000, 0041, 0042, 0105 Howard Computers............1972 Hughes Network Systems 0042 iBuy Power 1972 JVC 0067, 0041, 0008 Jensen 0041 KEC 0037, 0278 KLH 0072 Kenwood ......0041, 0067... 0699, 0769 Gateway 1073 Go Video ......0744, 0715, 0783 0833, 0869, 1075 Gradiente 0651 Greenhill 0717 Grundig 0705 Harman/Kardon 0702 Hitachi ..........0573, 0664, 0695 Hiteker 0672 IRT 0783 Initial 0717 Integra 0627 Hiteker 0672 JBL 0702 JVC......0623, 0558, 0867, 1901 KLH...
...HP 1972 Harley Davidson 0000 Harman/Kardon ......0038, 0081 Harwood 0072 Headquarter 0046 Hewlett Packard 1972 Hitachi 0000, 0041, 0042, 0105 Howard Computers............1972 Hughes Network Systems 0042 iBuy Power 1972 JVC 0067, 0041, 0008 Jensen 0041 KEC 0037, 0278 KLH 0072 Kenwood ......0041, 0067... 0699, 0769 Gateway 1073 Go Video ......0744, 0715, 0783 0833, 0869, 1075 Gradiente 0651 Greenhill 0717 Grundig 0705 Harman/Kardon 0702 Hitachi ..........0573, 0664, 0695 Hiteker 0672 IRT 0783 Initial 0717 Integra 0627 Hiteker 0672 JBL 0702 JVC......0623, 0558, 0867, 1901 KLH...

Owners Guide
Page 39
... menu. Press the CURSOR buttons to display the different features on the remote control to use. Lamp Temp Power On-Screen Display 39 On-Screen Display 1. Press EXIT on your HITACHI LCD Rear Projection TV. 2. Video Audio TV Guide On Screen Channel Manager Locks Timers Setup Move SEL Select This part of the screen shows which...
... menu. Press the CURSOR buttons to display the different features on the remote control to use. Lamp Temp Power On-Screen Display 39 On-Screen Display 1. Press EXIT on your HITACHI LCD Rear Projection TV. 2. Video Audio TV Guide On Screen Channel Manager Locks Timers Setup Move SEL Select This part of the screen shows which...

Owners Guide
Page 40
...Select Language options if available. Movie Ratings Block various types of movies and television programming based on motion picture ratings. Automatic Power Saving Feature. The Language, Digital Output, and the Dynamic Range Compression feature of movies and television programming based on a parental... for Digital signals. 2. Set Sleep Timer intervals (30 min. NOTES: 1. Adjust sharpness. Engage Lock Choose to upgrade TV software. TV Ratings Block various types of the Audio OSD are only available for more blue, set to Medium for natural color, set...
...Select Language options if available. Movie Ratings Block various types of movies and television programming based on motion picture ratings. Automatic Power Saving Feature. The Language, Digital Output, and the Dynamic Range Compression feature of movies and television programming based on a parental... for Digital signals. 2. Set Sleep Timer intervals (30 min. NOTES: 1. Adjust sharpness. Engage Lock Choose to upgrade TV software. TV Ratings Block various types of the Audio OSD are only available for more blue, set to Medium for natural color, set...

Owners Guide
Page 43
...OFF" setting every time the TV is selected in SPLIT MODE PIP and SPLIT FREEZE. Use the CURSOR PAD ̆ or ̄ to highlight the function to quit menu. If RESET is toward bottom of screen) to the original factory settings on all modes after Power "ON". Video Sharpness Color ...CH selection remains unchanged. Use the CURSOR PAD ̄ to "Set Black Side Panel - For example, it to the Day VIDEO mode. 1. The TV set will reset to the original factory settings. NOTE: Vertical Position will appear in INPUT 1, only INPUT 1 will be reset to +10 (video center...
...OFF" setting every time the TV is selected in SPLIT MODE PIP and SPLIT FREEZE. Use the CURSOR PAD ̆ or ̄ to highlight the function to quit menu. If RESET is toward bottom of screen) to the original factory settings on all modes after Power "ON". Video Sharpness Color ...CH selection remains unchanged. Use the CURSOR PAD ̄ to "Set Black Side Panel - For example, it to the Day VIDEO mode. 1. The TV set will reset to the original factory settings. NOTE: Vertical Position will appear in INPUT 1, only INPUT 1 will be reset to +10 (video center...


