
Owners Guide
Page 2
... vicinity of overhead power lines or other electrical circuits. 18. Keep these instructions. 2. Clean only with the CAUTION: TO REDUCE THE RISK OF ELECTRIC SHOCK, DO NOT REMOVE COVER (OR BACK). Do not install near water. 6. replacement of cable entry as practical. Please read it carefully and apply the knowledge you operate these units. When a cart is 8. Televisions are TELEVISION provided for tilt...
... vicinity of overhead power lines or other electrical circuits. 18. Keep these instructions. 2. Clean only with the CAUTION: TO REDUCE THE RISK OF ELECTRIC SHOCK, DO NOT REMOVE COVER (OR BACK). Do not install near water. 6. replacement of cable entry as practical. Please read it carefully and apply the knowledge you operate these units. When a cart is 8. Televisions are TELEVISION provided for tilt...

Owners Guide
Page 3
... may void the user's authority to this product and its lamp in the instructions, as video-on-demand, a cable operator's enhanced program guide and data-enhanced television services may require prior authorization from the broadcaster or owner of receiving analog basic, digital basic and digital premium cable television programming by Macrovision. FOR MORE INFORMATION, CALL 1-800-HITACHI. Caution Adjust only those controls that contains mercury. For lamp recycling and disposal information...
... may void the user's authority to this product and its lamp in the instructions, as video-on-demand, a cable operator's enhanced program guide and data-enhanced television services may require prior authorization from the broadcaster or owner of receiving analog basic, digital basic and digital premium cable television programming by Macrovision. FOR MORE INFORMATION, CALL 1-800-HITACHI. Caution Adjust only those controls that contains mercury. For lamp recycling and disposal information...

Owners Guide
Page 5
... VIEWING ANGLE L S IMPORTANT NOTES: 1. After extended use How to set up your new HITACHI Projection Television ANTENNA Unless your LCD Rear PTV against a wall, keep it at least 10cm (4 inches) from the side of the TV, place the surround speakers to cool the processor. These are located in an exceptionally good signal area that the location selected allows a free flow of air to place it on the picture screen. LOCATION Select...
... VIEWING ANGLE L S IMPORTANT NOTES: 1. After extended use How to set up your new HITACHI Projection Television ANTENNA Unless your LCD Rear PTV against a wall, keep it at least 10cm (4 inches) from the side of the TV, place the surround speakers to cool the processor. These are located in an exceptionally good signal area that the location selected allows a free flow of air to place it on the picture screen. LOCATION Select...

Owners Guide
Page 7
... OSD and INPUT menu systems. The Select button is in -Picture mode. Video Cassette Recorder/Player DVD - Please see page 55) of the TV or the program guide of your VCR, DVD and audio devices. DAY/NIGHT (TV) Toggles picture mode settings between the current and last channel viewed. CURSOR PAD/SELECT BUTTON (TV, DVD, CBL, STB, PVR/VCR) The Cursor Pad is used as , DVD Players, CBL (Cable Boxes), set-top-boxes, satellite receivers, and VCRs. PIP CONTROL BUTTONS (TV) Press to control the chosen...
... OSD and INPUT menu systems. The Select button is in -Picture mode. Video Cassette Recorder/Player DVD - Please see page 55) of the TV or the program guide of your VCR, DVD and audio devices. DAY/NIGHT (TV) Toggles picture mode settings between the current and last channel viewed. CURSOR PAD/SELECT BUTTON (TV, DVD, CBL, STB, PVR/VCR) The Cursor Pad is used as , DVD Players, CBL (Cable Boxes), set-top-boxes, satellite receivers, and VCRs. PIP CONTROL BUTTONS (TV) Press to control the chosen...

Owners Guide
Page 9
... sure to input 1 ~ input 5 and the video signal is off during normal operation. If light is blinking, lamp cover is on during normal operation. First time use Front Panel Controls ¾ POWER Light This light is not assembled securely after replacement. The ternal termperature will increse which will turn off with the TEMP LED On. ¸ LAMP Indicator This light is not received from your digital camera, USB memory or memory card USB drive to cool down...
... sure to input 1 ~ input 5 and the video signal is off during normal operation. If light is blinking, lamp cover is on during normal operation. First time use Front Panel Controls ¾ POWER Light This light is not assembled securely after replacement. The ternal termperature will increse which will turn off with the TEMP LED On. ¸ LAMP Indicator This light is not received from your digital camera, USB memory or memory card USB drive to cool down...

Owners Guide
Page 11
... each video source. Use the HDMI input for your warranty card. 11 "DOLBY" and the DOUBLE-D symbol are used for composite video and component video input. ³ ¸ CABLE Apparatus Claims of these inputs may use Rear Panel Connections ³ Antenna Input CABLE - In this case, connect the component CB output to the TV's PB input and the component CR output to INPUT 1, 2 or 5 at a time. » Monitor Out These jacks provide fixed or variable audio and video signals which...
... each video source. Use the HDMI input for your warranty card. 11 "DOLBY" and the DOUBLE-D symbol are used for composite video and component video input. ³ ¸ CABLE Apparatus Claims of these inputs may use Rear Panel Connections ³ Antenna Input CABLE - In this case, connect the component CB output to the TV's PB input and the component CR output to INPUT 1, 2 or 5 at a time. » Monitor Out These jacks provide fixed or variable audio and video signals which...

Owners Guide
Page 12
... a channel is installed, wait until the second screen below will display the following respective screens. With this connection, your local cable operator to gain access to start your external components (VCR, Cable box, DVD player, etc.). The third screen below appears. IMPORTANT: Please read the "Lamp Power Control" feature on page 100 for viewing. The G-LINK connection will provide this service is required. 2. Please wait. CableCARD slot. Rear Panel Connections First time use ¾ TV AS CENTER (INPUTS...
... a channel is installed, wait until the second screen below will display the following respective screens. With this connection, your local cable operator to gain access to start your external components (VCR, Cable box, DVD player, etc.). The third screen below appears. IMPORTANT: Please read the "Lamp Power Control" feature on page 100 for viewing. The G-LINK connection will provide this service is required. 2. Please wait. CableCARD slot. Rear Panel Connections First time use ¾ TV AS CENTER (INPUTS...

Owners Guide
Page 13
... each input jack. 2. Connecting the television directly to the Audio /Video output of a Set-Top-Box will be necessary to adjust TINT to obtain optimum picture quality when using an HDMI input from a Set-Top-Box, it to the left audio jack on the television. • Refer to the TV's PR input. Outside Antenna or Digital Cable CABLE Apparatus Claims of this case, connect the components B-Y output to the TV's PB input and the components R-Y output to the operating guide...
... each input jack. 2. Connecting the television directly to the Audio /Video output of a Set-Top-Box will be necessary to adjust TINT to obtain optimum picture quality when using an HDMI input from a Set-Top-Box, it to the left audio jack on the television. • Refer to the TV's PR input. Outside Antenna or Digital Cable CABLE Apparatus Claims of this case, connect the components B-Y output to the TV's PB input and the components R-Y output to the operating guide...
Owners Guide
Page 15
... viewing uses only. However, you use to connect the VCR, camcorder, laserdisc player, DVD player, or HDTV Set Top Box to your TV set is dependent on the model and features of card faces right) Top faces AIR MONITOR OUT S I V I D E O V I D E O (MONO) (MONO) Y/ VIDEO PB PR (MONO) Y/ VIDEO PB PR (MONO) A L U D TV AS CENTER I O R AUDIO TO HI-FI INPUT 1 INPUT 2 INPUT 3 INPUT 4 OPTICAL OUT Digital Audio / G-LINK Upgrade Card HDMI INPUT 1 HDMI INPUT 2 CAUTION Audio Video OUTPUT VCR 15 is not connected or the video device is not received...
... viewing uses only. However, you use to connect the VCR, camcorder, laserdisc player, DVD player, or HDTV Set Top Box to your TV set is dependent on the model and features of card faces right) Top faces AIR MONITOR OUT S I V I D E O V I D E O (MONO) (MONO) Y/ VIDEO PB PR (MONO) Y/ VIDEO PB PR (MONO) A L U D TV AS CENTER I O R AUDIO TO HI-FI INPUT 1 INPUT 2 INPUT 3 INPUT 4 OPTICAL OUT Digital Audio / G-LINK Upgrade Card HDMI INPUT 1 HDMI INPUT 2 CAUTION Audio Video OUTPUT VCR 15 is not connected or the video device is not received...
Owners Guide
Page 17
...HDMI Upgrade Card HDMI INPUT 1 OR HDMI INPUT 2 CAUTION HDMI OUT DVD Player or HDTV STB CABLE Apparatus Claims of card faces right) Top faces AIR MONITOR OUT S I V I D E O V I D E O (MONO) (MONO) Y/ VIDEO PB PR (MONO) Y/ VIDEO PB PR (MONO) A L U D TV AS CENTER I O R AUDIO TO HI-FI INPUT 1 INPUT 2 INPUT 3 INPUT 4 OPTICAL OUT Digital Audio / G-LINK HDMI - Press the INPUTS button, then select INPUT 1 or INPUT 2 from the HDTV set top box or DVD player. Completely insert the connection cord plugs when connecting to view the program from the INPUTS menu to rear panel...
...HDMI Upgrade Card HDMI INPUT 1 OR HDMI INPUT 2 CAUTION HDMI OUT DVD Player or HDTV STB CABLE Apparatus Claims of card faces right) Top faces AIR MONITOR OUT S I V I D E O V I D E O (MONO) (MONO) Y/ VIDEO PB PR (MONO) Y/ VIDEO PB PR (MONO) A L U D TV AS CENTER I O R AUDIO TO HI-FI INPUT 1 INPUT 2 INPUT 3 INPUT 4 OPTICAL OUT Digital Audio / G-LINK HDMI - Press the INPUTS button, then select INPUT 1 or INPUT 2 from the HDTV set top box or DVD player. Completely insert the connection cord plugs when connecting to view the program from the INPUTS menu to rear panel...

Owners Guide
Page 19
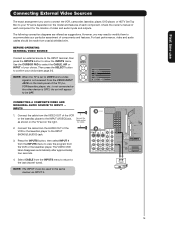
... of the external components you can use Connecting External Video Sources Your HITACHI LCD Rear Projection Television is setup, it allows your IR Mouse connector to four components. CONNECTING EXTERNAL AUDIO/VIDEO COMPONENTS TO IR BLASTER FOR AV NETWORK 1. Place the IR Mouse in place. 3. Video Audio TV Guide On Screen Channel Manager Locks Timers Setup Move SEL Select Setup Menu Preference Lamp Power Control Set The Inputs Set AV NET Set Closed Captions Set Monitor Out Upgrades Quick Start Up Move SEL Set NOTE: 1. The LCD Rear PTV Rear Panel has 2 IR...
... of the external components you can use Connecting External Video Sources Your HITACHI LCD Rear Projection Television is setup, it allows your IR Mouse connector to four components. CONNECTING EXTERNAL AUDIO/VIDEO COMPONENTS TO IR BLASTER FOR AV NETWORK 1. Place the IR Mouse in place. 3. Video Audio TV Guide On Screen Channel Manager Locks Timers Setup Move SEL Select Setup Menu Preference Lamp Power Control Set The Inputs Set AV NET Set Closed Captions Set Monitor Out Upgrades Quick Start Up Move SEL Set NOTE: 1. The LCD Rear PTV Rear Panel has 2 IR...

Owners Guide
Page 20
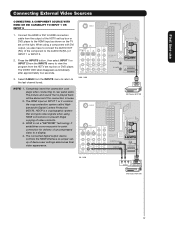
... cable can use Connecting External Video Sources Your HITACHI LCD Rear Projection Television is necessary for the TV Guide On ScreenTM system to work . 20 Connect the IR Mouse cable to the IR BLASTER/G-LINK output of card faces right) Top faces AIR MONITOR OUT S I V I D E O V I D E O (MONO) (MONO) Y/ VIDEO PB PR (MONO) Y/ VIDEO PB PR (MONO) A L U D TV AS CENTER I O R AUDIO TO HI-FI INPUT 1 INPUT 2 INPUT 3 INPUT 4 OPTICAL OUT Digital Audio / G-LINK Upgrade Card HDMI INPUT 1 HDMI INPUT 2 CAUTION Infrared Sensor IR Mouse Infrared Sensor VCR V L R OUTPUT Cable Box...
... cable can use Connecting External Video Sources Your HITACHI LCD Rear Projection Television is necessary for the TV Guide On ScreenTM system to work . 20 Connect the IR Mouse cable to the IR BLASTER/G-LINK output of card faces right) Top faces AIR MONITOR OUT S I V I D E O V I D E O (MONO) (MONO) Y/ VIDEO PB PR (MONO) Y/ VIDEO PB PR (MONO) A L U D TV AS CENTER I O R AUDIO TO HI-FI INPUT 1 INPUT 2 INPUT 3 INPUT 4 OPTICAL OUT Digital Audio / G-LINK Upgrade Card HDMI INPUT 1 HDMI INPUT 2 CAUTION Infrared Sensor IR Mouse Infrared Sensor VCR V L R OUTPUT Cable Box...
Owners Guide
Page 21
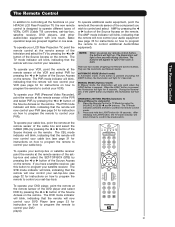
... receiver, use this time. NOTE: When you wish to light if the room is dark. To operate your cable box, point the remote at the remote sensor of the television and select the TV by pressing the ̇ or ̈ button of the Source Access on the remote. The DVD mode indicator will blink, indicating that the remote will blink 3 times to confirm the mode switch. To operate your LCD Rear Projection TV, point the remote control at the remote sensor...
... receiver, use this time. NOTE: When you wish to light if the room is dark. To operate your cable box, point the remote at the remote sensor of the television and select the TV by pressing the ̇ or ̈ button of the Source Access on the remote. The DVD mode indicator will blink, indicating that the remote will blink 3 times to confirm the mode switch. To operate your LCD Rear Projection TV, point the remote control at the remote sensor...

Owners Guide
Page 28
... with a 1080i signal. The Picture-in the sub picture. You may also view the VCR program (from Input 1-5) as a sub-picture while viewing another program as main picture (CABLE, AIR). POP MODE PICTURE-IN-PICTURE POP Mode PIP displays the sub-picture outside of card faces right) Top faces AIR MONITOR OUT S I V I D E O V I D E O (MONO) (MONO) Y/ VIDEO PB PR (MONO) Y/ VIDEO PB PR (MONO) A L U D TV AS CENTER I O R AUDIO TO HI-FI INPUT 1 INPUT 2 INPUT 3 INPUT 4 OPTICAL OUT Digital Audio / G-LINK Upgrade Card HDMI INPUT 1 HDMI INPUT 2 CAUTION Audio Video OUTPUT VCR ባ...
... with a 1080i signal. The Picture-in the sub picture. You may also view the VCR program (from Input 1-5) as a sub-picture while viewing another program as main picture (CABLE, AIR). POP MODE PICTURE-IN-PICTURE POP Mode PIP displays the sub-picture outside of card faces right) Top faces AIR MONITOR OUT S I V I D E O V I D E O (MONO) (MONO) Y/ VIDEO PB PR (MONO) Y/ VIDEO PB PR (MONO) A L U D TV AS CENTER I O R AUDIO TO HI-FI INPUT 1 INPUT 2 INPUT 3 INPUT 4 OPTICAL OUT Digital Audio / G-LINK Upgrade Card HDMI INPUT 1 HDMI INPUT 2 CAUTION Audio Video OUTPUT VCR ባ...

Owners Guide
Page 40
... Video Inputs, VCR, DVD, etc. Select to ON or OFF. Adjust color. Adjust tint. Choose Automatic Contrast settings. TV Guide On Screen TV Guide On Screen Set, Control and navigate the system. Set this to Standard for standard colors or Black and White for Digital signals. 2. Turn ON/OFFthe 3:2 Pulldown detection feature. Audio Treble Bass Balance SRS BBE Audio Source Internal Speakers Auto Noise Cancel Perfect Volume Loudness Language Digital Output DRC Adjust the treble. Select internal or external speakers. Set Channel List. Engage Lock Choose to display...
... Video Inputs, VCR, DVD, etc. Select to ON or OFF. Adjust color. Adjust tint. Choose Automatic Contrast settings. TV Guide On Screen TV Guide On Screen Set, Control and navigate the system. Set this to Standard for standard colors or Black and White for Digital signals. 2. Turn ON/OFFthe 3:2 Pulldown detection feature. Audio Treble Bass Balance SRS BBE Audio Source Internal Speakers Auto Noise Cancel Perfect Volume Loudness Language Digital Output DRC Adjust the treble. Select internal or external speakers. Set Channel List. Engage Lock Choose to display...
Owners Guide
Page 77
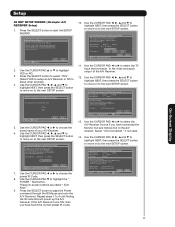
... SELECT button to move on to the video and audio output of your A/V Receiver. 6. AV Net Setup Wizard Welcome to 9 until finding the IR code that will power up the A/V Receiver. TV Input Not Connected Move Change Input Back SEL Select Next 13. Select " Not Connected " if not used. 14. On-Screen Display Setup AV NET SETUP WIZARD ( Example: A/V RECEIVER Setup) 1. Move SEL Return Back Start 2. Brand Name Hitachi (1/54) Learning Mode Move Change Brand...
... SELECT button to move on to the video and audio output of your A/V Receiver. 6. AV Net Setup Wizard Welcome to 9 until finding the IR code that will power up the A/V Receiver. TV Input Not Connected Move Change Input Back SEL Select Next 13. Select " Not Connected " if not used. 14. On-Screen Display Setup AV NET SETUP WIZARD ( Example: A/V RECEIVER Setup) 1. Move SEL Return Back Start 2. Brand Name Hitachi (1/54) Learning Mode Move Change Brand...
Owners Guide
Page 80
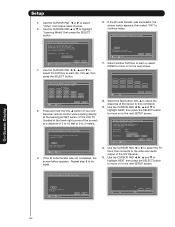
... connect the video or audio output of your A/V Receiver. Move SEL Select Cancel OK Move Change Brand Name Back Next 11. AV Net Setup Wizard : Custom Settings Select the A/V Receiver softkey to check the response of the A/V Receiver. 15. Select the Test button VOL ̆ to learn (Ex. If device responds to this TV, please select a TV Input. Brand Name IR Code Set Test Button Other Other Learning Mode POWER...
... connect the video or audio output of your A/V Receiver. Move SEL Select Cancel OK Move Change Brand Name Back Next 11. AV Net Setup Wizard : Custom Settings Select the A/V Receiver softkey to check the response of the A/V Receiver. 15. Select the Test button VOL ̆ to learn (Ex. If device responds to this TV, please select a TV Input. Brand Name IR Code Set Test Button Other Other Learning Mode POWER...

Owners Guide
Page 87
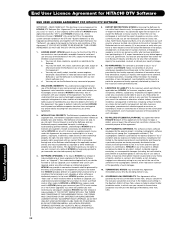
... the TV tuners circuits when the TV is in "standby mode" which is commonly referred to save electricity Off On Move SEL Return On-Screen Display 87 Press the SELECT button to have the TV tune channels (both Analog and Digital) quickly when first turning the TV on . If a future software upgrade is used to continually monitor signals when this feature to OFF to as "off". Setup Menu Preference Lamp Power Control Set The Inputs Set...
... the TV tuners circuits when the TV is in "standby mode" which is commonly referred to save electricity Off On Move SEL Return On-Screen Display 87 Press the SELECT button to have the TV tune channels (both Analog and Digital) quickly when first turning the TV on . If a future software upgrade is used to continually monitor signals when this feature to OFF to as "off". Setup Menu Preference Lamp Power Control Set The Inputs Set...
Owners Guide
Page 98
... HITACHI as defined below, and together with a "flash card" or other media to effect or facilitate an Upgrade, you understand and acknowledge that accompany such Upgrade or other media to the Software and any intellectual property associated therewith, including any copyright infringement or other intellectual property. TERMINATION. By using the DTV or the operating system software installed on a "No Further Upgrades" list...
... HITACHI as defined below, and together with a "flash card" or other media to effect or facilitate an Upgrade, you understand and acknowledge that accompany such Upgrade or other media to the Software and any intellectual property associated therewith, including any copyright infringement or other intellectual property. TERMINATION. By using the DTV or the operating system software installed on a "No Further Upgrades" list...

Owners Guide
Page 101
... 44 Black Enhancement 42 Brightness 41 C CableCARD 12 Channel Manager 65 Auto Channel Scan 66 Channel List 66 Signal Meter 65 Clock Time 72 Time Zone 72 Date 72 Closed Captions Analog Captions 84 Digital Captions 84 Color Temperature 42 Color 41 Contrast 41 Contrast Mode 42 D Date 72 Daylight Saving Correction 72 G Guide Button 7, 24 H HDMI 11, 13, 17 I Input button 7, 24 L Lamp Replacement 88-91 Language Menu Language 74 Audio Language 46 Locks Change Access Code 67 Channel Lock 67 Front Panel Lock 67...
... 44 Black Enhancement 42 Brightness 41 C CableCARD 12 Channel Manager 65 Auto Channel Scan 66 Channel List 66 Signal Meter 65 Clock Time 72 Time Zone 72 Date 72 Closed Captions Analog Captions 84 Digital Captions 84 Color Temperature 42 Color 41 Contrast 41 Contrast Mode 42 D Date 72 Daylight Saving Correction 72 G Guide Button 7, 24 H HDMI 11, 13, 17 I Input button 7, 24 L Lamp Replacement 88-91 Language Menu Language 74 Audio Language 46 Locks Change Access Code 67 Channel Lock 67 Front Panel Lock 67...


