
Owners Guide
Page 1
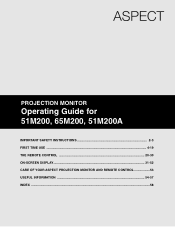
PROJECTION MONITOR Operating Guide for 51M200, 65M200, 51M200A IMPORTANT SAFETY INSTRUCTIONS 2-3 FIRST TIME USE ...4-19 THE REMOTE CONTROL 20-30 ON-SCREEN DISPLAY...31-52 CARE OF YOUR ASPECT PROJECTION MONITOR AND REMOTE CONTROL 53 USEFUL INFORMATION ...54-57 INDEX ...58
PROJECTION MONITOR Operating Guide for 51M200, 65M200, 51M200A IMPORTANT SAFETY INSTRUCTIONS 2-3 FIRST TIME USE ...4-19 THE REMOTE CONTROL 20-30 ON-SCREEN DISPLAY...31-52 CARE OF YOUR ASPECT PROJECTION MONITOR AND REMOTE CONTROL 53 USEFUL INFORMATION ...54-57 INDEX ...58
Owners Guide
Page 2
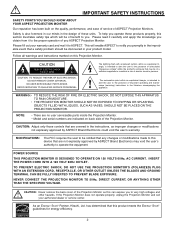
... inside the Projection Monitor. • Model and serial numbers are not expressly approved by ASPECT Brand Electronics could void the user's warranty. As an ENERGY STAR® Partner, Hitachi, Ltd. Please fill out your warranty card and mail it to the presence of important...be of a sufficient magnitude to constitute a risk of the Projection Monitor. IMPORTANT SAFETY INSTRUCTIONS SAFETY POINTS YOU SHOULD KNOW ABOUT YOUR ASPECT PROJECTION MONITOR Our reputation has been built on the quality, performance, and ease of service of uninsulated "dangerous voltage" within the product...
... inside the Projection Monitor. • Model and serial numbers are not expressly approved by ASPECT Brand Electronics could void the user's warranty. As an ENERGY STAR® Partner, Hitachi, Ltd. Please fill out your warranty card and mail it to the presence of important...be of a sufficient magnitude to constitute a risk of the Projection Monitor. IMPORTANT SAFETY INSTRUCTIONS SAFETY POINTS YOU SHOULD KNOW ABOUT YOUR ASPECT PROJECTION MONITOR Our reputation has been built on the quality, performance, and ease of service of uninsulated "dangerous voltage" within the product...
Owners Guide
Page 3
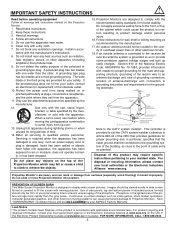
... Follow all warnings and instructions marked on or pinched particularly at www.epsc.ca (in Canada). If the provided plug does not fit into your ASPECT Factory Warranty. Do not use the attachments/accessories specified by your outlet, consult an electrician for proper grounding and, in particular, specifies that produce heat...
... Follow all warnings and instructions marked on or pinched particularly at www.epsc.ca (in Canada). If the provided plug does not fit into your ASPECT Factory Warranty. Do not use the attachments/accessories specified by your outlet, consult an electrician for proper grounding and, in particular, specifies that produce heat...

Owners Guide
Page 5
... if they are placed too close as possible to the height of the picture screen center. FIRST TIME USE HOW TO SET UP YOUR NEW HITACHI PROJECTION MONITOR LOCATION Select an area where sunlight or bright indoor illumination will be located in front of the Projection Monitor and about 10 to... cabinet and as close to the Projection Monitor. Differences in the room to find the optimum spot for viewing. VIEWING The major benefit of the ASPECT Projection Monitor is no picture distortion. 5 If so, drapes or screens can be used to the side or behind the viewing area. BEST VERTICAL ...
... if they are placed too close as possible to the height of the picture screen center. FIRST TIME USE HOW TO SET UP YOUR NEW HITACHI PROJECTION MONITOR LOCATION Select an area where sunlight or bright indoor illumination will be located in front of the Projection Monitor and about 10 to... cabinet and as close to the Projection Monitor. Differences in the room to find the optimum spot for viewing. VIEWING The major benefit of the ASPECT Projection Monitor is no picture distortion. 5 If so, drapes or screens can be used to the side or behind the viewing area. BEST VERTICAL ...
Owners Guide
Page 7
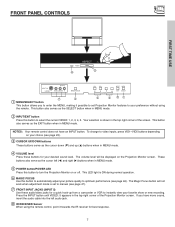
... cable into the left (̇) and right (̈) buttons when in the top right corner of the screen. FRONT PANEL CONTROLS FIRST TIME USE ASPECT ̆ PULL POWER ASPECT ̆ PULL POWER ቩ ቦ INPUT 5 S-VIDEO AUDIO VIDEO L/MONO R MAGIC FOCUS VOL- If you to enter the MENU, making it towards the...
... cable into the left (̇) and right (̈) buttons when in the top right corner of the screen. FRONT PANEL CONTROLS FIRST TIME USE ASPECT ̆ PULL POWER ASPECT ̆ PULL POWER ቩ ቦ INPUT 5 S-VIDEO AUDIO VIDEO L/MONO R MAGIC FOCUS VOL- If you to enter the MENU, making it towards the...
Owners Guide
Page 20
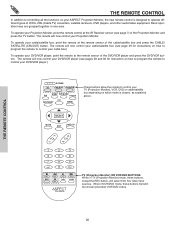
... the remote to operate different types of the cable/satellite box and press the CABLE/ SATELLITE (CBL/SAT) button. The remote will now control your ASPECT Projection Monitor, the new remote control is chosen, as explained above. Basic operation keys are grouped together in TV (Projection Monitor) mode, these buttons transmit...
... the remote to operate different types of the cable/satellite box and press the CABLE/ SATELLITE (CBL/SAT) button. The remote will now control your ASPECT Projection Monitor, the new remote control is chosen, as explained above. Basic operation keys are grouped together in TV (Projection Monitor) mode, these buttons transmit...

Owners Guide
Page 23
... display conventional (4:3) images. Depending on conventional (4:3) sources. 16:9 Standard Use this size mode to display 16:9 sources like HDTV and DVD's preserving the original 16:9 aspect ratio. 16:9 Zoom Use this size mode to preserve the original size ratio of the phosphors. Note: Use this size mode to quickly change the...
... display conventional (4:3) images. Depending on conventional (4:3) sources. 16:9 Standard Use this size mode to display 16:9 sources like HDTV and DVD's preserving the original 16:9 aspect ratio. 16:9 Zoom Use this size mode to preserve the original size ratio of the phosphors. Note: Use this size mode to quickly change the...
Owners Guide
Page 24
... intervals. THE REMOTE CONTROL 24 Closed Captioning Sleep Timer S - Zzzz --:-- ቭ INFO button Press this button will start the On-Screen Display. Day/Night Mode Aspect Mode Vitual HD Day CC On 4:3 Expanded HD1080i Zzzz -:-- Use this button to set your SLEEP timer for up to 3 hours in MENU mode, this...
... intervals. THE REMOTE CONTROL 24 Closed Captioning Sleep Timer S - Zzzz --:-- ቭ INFO button Press this button will start the On-Screen Display. Day/Night Mode Aspect Mode Vitual HD Day CC On 4:3 Expanded HD1080i Zzzz -:-- Use this button to set your SLEEP timer for up to 3 hours in MENU mode, this...
Owners Guide
Page 31
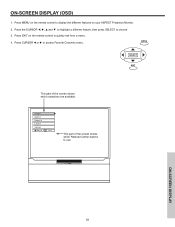
...control to display the different features on the remote control to use. MENU SELECT EXIT This part of the screen shows which selections are available. ASPECT ̆ PULL POWER ON-SCREEN DISPLAY 31 Press the CURSOR ̇, ̈, ̆ and ̄ to highlight a different feature, then... press SELECT to access Favorite Channels menu. Video Audio Aspect Locks Setup Move SEL Sel This part of the screen shows which Remote Control buttons to quickly exit from a menu. 4. Press CURSOR ̇ or...
...control to display the different features on the remote control to use. MENU SELECT EXIT This part of the screen shows which selections are available. ASPECT ̆ PULL POWER ON-SCREEN DISPLAY 31 Press the CURSOR ̇, ̈, ̆ and ̄ to highlight a different feature, then... press SELECT to access Favorite Channels menu. Video Audio Aspect Locks Setup Move SEL Sel This part of the screen shows which Remote Control buttons to quickly exit from a menu. 4. Press CURSOR ̇ or...
Owners Guide
Page 32
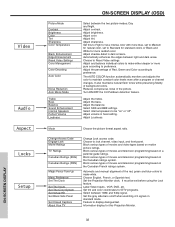
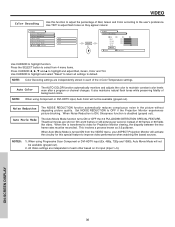
... the gray side bars on a parental guide ratings. Automatic and manual alignment of movies and television programming based on /off ". ON-SCREEN DISPLAY Video Audio Aspect Locks Setup Picture Mode Contrast Brightness Color Tint Sharpness Color Temperature Black Enhancement Edge Enhancement Reset Video Settings Color Management Color Decoding Auto Color Noise... Treble Bass Balance Sound Enhancement Internal Speakers Perfect Volume Loudness ON-SCREEN DISPLAY (OSD) Select between the two picture modes; Mode Choose the picture format aspect ratio.
... the gray side bars on a parental guide ratings. Automatic and manual alignment of movies and television programming based on /off ". ON-SCREEN DISPLAY Video Audio Aspect Locks Setup Picture Mode Contrast Brightness Color Tint Sharpness Color Temperature Black Enhancement Edge Enhancement Reset Video Settings Color Management Color Decoding Auto Color Noise... Treble Bass Balance Sound Enhancement Internal Speakers Perfect Volume Loudness ON-SCREEN DISPLAY (OSD) Select between the two picture modes; Mode Choose the picture format aspect ratio.

Owners Guide
Page 33
... Day Mode. ON-SCREEN DISPLAY 33 You can independently customize each of the Video Inputs to highlight and select Picture Mode settings. MENU Video Audio Aspect Locks Setup Move SEL Sel Video Picture Mode Contrast Brightness Color Tint Sharpness Color Temperature Black Enhancement Edge Enhancement Reset Video Settings Move SEL Return...
... Day Mode. ON-SCREEN DISPLAY 33 You can independently customize each of the Video Inputs to highlight and select Picture Mode settings. MENU Video Audio Aspect Locks Setup Move SEL Sel Video Picture Mode Contrast Brightness Color Tint Sharpness Color Temperature Black Enhancement Edge Enhancement Reset Video Settings Move SEL Return...
Owners Guide
Page 34
... the SELECT button to main menu. Press EXIT to adjust the function. Press the CURSOR ̇ or ̈ to quit menu. VIDEO MENU Video Audio Aspect Locks Setup Move SEL Sel SELECT or Video Picture Mode Contrast Brightness Color Tint Sharpness Color Temperature Black Enhancement Edge Enhancement Reset Video Settings Move...
... the SELECT button to main menu. Press EXIT to adjust the function. Press the CURSOR ̇ or ̈ to quit menu. VIDEO MENU Video Audio Aspect Locks Setup Move SEL Sel SELECT or Video Picture Mode Contrast Brightness Color Tint Sharpness Color Temperature Black Enhancement Edge Enhancement Reset Video Settings Move...
Owners Guide
Page 36
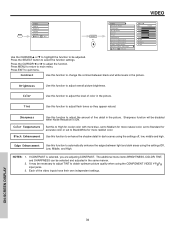
Press the SELECT button to select from the VIDEO menu, your ASPECT Projection Monitor will not be reconciled. Use CURSOR to highlight and select "Reset" to return all settings to highlight and adjust Red, Green, Color and ...
Press the SELECT button to select from the VIDEO menu, your ASPECT Projection Monitor will not be reconciled. Use CURSOR to highlight and select "Reset" to return all settings to highlight and adjust Red, Green, Color and ...

Owners Guide
Page 37
... only speakers from a separate stereo system. Treble This function controls the high frequency audio to adjust the function. ON - Video Audio Audio Treble 45% MENU Aspect Locks Setup Move SEL Sel Bass 50% Balance L R Sound Enhancement Off SELECT Internal Speakers On Perfect Volume On or Loudness On Move SEL Return Press...
... only speakers from a separate stereo system. Treble This function controls the high frequency audio to adjust the function. ON - Video Audio Audio Treble 45% MENU Aspect Locks Setup Move SEL Sel Bass 50% Balance L R Sound Enhancement Off SELECT Internal Speakers On Perfect Volume On or Loudness On Move SEL Return Press...

Owners Guide
Page 38
...system, SRS technology delivers and exciting and realistic 3D Sound experience from SRS Technology Sound reproduction quality enhancement system. If your ASPECT Projection Monitor. SRS technology is connected to an external audio system, SRS will also create an incredible 3D sound experience from ... create an incredible crisp sound experience from two speakers and even enhance a complete multi-speaker surround sound system. MENU Video Audio Aspect Locks Setup Move SEL Sel Audio Treble 45% Bass 50% Balance L R Sound Enhancement SRS SELECT Internal Speakers Perfect Volume Off...
...system, SRS technology delivers and exciting and realistic 3D Sound experience from SRS Technology Sound reproduction quality enhancement system. If your ASPECT Projection Monitor. SRS technology is connected to an external audio system, SRS will also create an incredible 3D sound experience from ... create an incredible crisp sound experience from two speakers and even enhance a complete multi-speaker surround sound system. MENU Video Audio Aspect Locks Setup Move SEL Sel Audio Treble 45% Bass 50% Balance L R Sound Enhancement SRS SELECT Internal Speakers Perfect Volume Off...

Owners Guide
Page 39
... or ̄ to adjust the function. MENU Video Audio Aspect Locks Setup Move SEL Sel SELECT or Aspect Mode 16:9 Standard 4:3 Standard 4:3 Zoom1 Auto Aspect Vertical Position 16:9 Zoom 4:3 Expanded 4:3 Zoom2 0 Move SEL Return Auto Aspect Automatically adjust the Aspect Ratio depending on an input signal with VIDEO ID. 2....center is toward top of the picture with these modes. NOTE: Vertical Position will be changed with 480i/480P signal. The Auto Aspect function is recommended on the input signal to +10 (video center is either 4:3 EXPANDED/ZOOM1/ZOOM2 or 16:9 ZOOM. See page...
... or ̄ to adjust the function. MENU Video Audio Aspect Locks Setup Move SEL Sel SELECT or Aspect Mode 16:9 Standard 4:3 Standard 4:3 Zoom1 Auto Aspect Vertical Position 16:9 Zoom 4:3 Expanded 4:3 Zoom2 0 Move SEL Return Auto Aspect Automatically adjust the Aspect Ratio depending on an input signal with VIDEO ID. 2....center is toward top of the picture with these modes. NOTE: Vertical Position will be changed with 480i/480P signal. The Auto Aspect function is recommended on the input signal to +10 (video center is either 4:3 EXPANDED/ZOOM1/ZOOM2 or 16:9 ZOOM. See page...
Owners Guide
Page 40
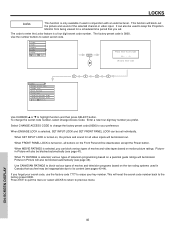
Video Audio Aspect Locks Setup Move SEL Sel SELECT or Please Enter Access Code [ - - - - ] [# Keys] Enter Code Locks Change Access Code Engage Lock Movie Ratings TV Ratings Canadian ...
Video Audio Aspect Locks Setup Move SEL Sel SELECT or Please Enter Access Code [ - - - - ] [# Keys] Enter Code Locks Change Access Code Engage Lock Movie Ratings TV Ratings Canadian ...
Owners Guide
Page 45
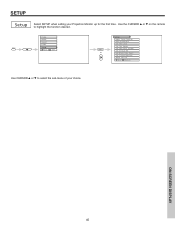
Use the CURSOR ̆ or ̄ on the remote to select the sub-menu of your Projection Monitor up for the first time. MENU Video Audio Aspect Locks Setup Move SEL Sel SELECT or Setup Magic Focus Tune Up Menu Preference Set The Clock Set The Inputs Set The Color System Set Virtual HD Set Black Side Panel Set Closed Captions About Your TV Move SEL Return Use CURSOR ̆ or ̄ to highlight the function desired. ON-SCREEN DISPLAY 45 SETUP Setup Select SETUP when setting your choice.
Use the CURSOR ̆ or ̄ on the remote to select the sub-menu of your Projection Monitor up for the first time. MENU Video Audio Aspect Locks Setup Move SEL Sel SELECT or Setup Magic Focus Tune Up Menu Preference Set The Clock Set The Inputs Set The Color System Set Virtual HD Set Black Side Panel Set Closed Captions About Your TV Move SEL Return Use CURSOR ̆ or ̄ to highlight the function desired. ON-SCREEN DISPLAY 45 SETUP Setup Select SETUP when setting your choice.
Owners Guide
Page 46
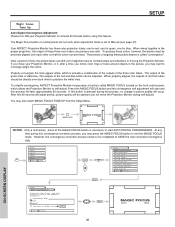
...Select Setup Magic Focus Tune Up Aligns the Red, Green, and Blue colors to converge (align) the colors. To simplify convergence, ASPECT Projection Monitor incorporates a function called "convergence". Press this MAGIC FOCUS button and the convergence self adjustment will start AUTO DIGITAL CONVERGENCE. At... Mode Auto Manual If you may press the MAGIC FOCUS button to normal bumps and vibrations or moving the Projection Monitor. Your ASPECT Projection Monitor has three color projection tubes: one for red, one for green, one for Magnetic Influences. Properly converged, the ...
...Select Setup Magic Focus Tune Up Aligns the Red, Green, and Blue colors to converge (align) the colors. To simplify convergence, ASPECT Projection Monitor incorporates a function called "convergence". Press this MAGIC FOCUS button and the convergence self adjustment will start AUTO DIGITAL CONVERGENCE. At... Mode Auto Manual If you may press the MAGIC FOCUS button to normal bumps and vibrations or moving the Projection Monitor. Your ASPECT Projection Monitor has three color projection tubes: one for red, one for green, one for Magnetic Influences. Properly converged, the ...
Owners Guide
Page 47
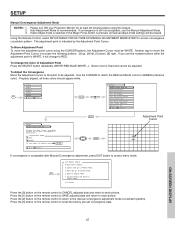
... you want to adjust now Start Move SEL Return SELECT SELECT Adjustment Point Cursor If convergence is fixed and cannot be WHITE. MENU Video Audio Aspect Locks Setup Move SEL Sel SELECT Setup Magic Focus Tune Up Menu Preference Set The Clock Set The Inputs Set The Color System Set Virtual...
... you want to adjust now Start Move SEL Return SELECT SELECT Adjustment Point Cursor If convergence is fixed and cannot be WHITE. MENU Video Audio Aspect Locks Setup Move SEL Sel SELECT Setup Magic Focus Tune Up Menu Preference Set The Clock Set The Inputs Set The Color System Set Virtual...


