
Owners Guide
Page 7
POWER BUTTON (TV, CBL, VCR, DVD, SAT) Turns the selected device on the screen. ASPECT BUTTON (TV) Changes the aspect ratio while watching TV. PIP BUTTON (TV) Press to show and change the ... BUTTONS (TV, DVD, CBL, SAT, VCR) Used to manually enter the TV channel, and used for a complete description of all of the functions on your HITACHI Projection TV, the new remote control is used to navigate the cursor through the OSD menu system. (-) BUTTON (TV, SAT) The (-) button is used when...
POWER BUTTON (TV, CBL, VCR, DVD, SAT) Turns the selected device on the screen. ASPECT BUTTON (TV) Changes the aspect ratio while watching TV. PIP BUTTON (TV) Press to show and change the ... BUTTONS (TV, DVD, CBL, SAT, VCR) Used to manually enter the TV channel, and used for a complete description of all of the functions on your HITACHI Projection TV, the new remote control is used to navigate the cursor through the OSD menu system. (-) BUTTON (TV, SAT) The (-) button is used when...
Owners Guide
Page 8
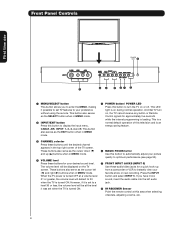
... for your picture quality to automatically adjust your desired sound level. The volume level will be at this button to 30 when the TV is turned ON. Front Panel Controls First time use POWER LED º ¶ ³ MENU/SELECT button This button allows you have mono sound, insert .... ¿ VOLUME level Press these buttons until the desired channel appears in MENU mode. ´ POWER button/ POWER LED Press this button to turn on during normal operation. If you to enter the MENU, making it was set TV features to your preference without using the remote. These buttons...
... for your picture quality to automatically adjust your desired sound level. The volume level will be at this button to 30 when the TV is turned ON. Front Panel Controls First time use POWER LED º ¶ ³ MENU/SELECT button This button allows you have mono sound, insert .... ¿ VOLUME level Press these buttons until the desired channel appears in MENU mode. ´ POWER button/ POWER LED Press this button to turn on during normal operation. If you to enter the MENU, making it was set TV features to your preference without using the remote. These buttons...

Owners Guide
Page 19
... 24). ƹ ¹ ¾ Freeze Ƹ ƻ ƹ Freeze ƺ ƹ Ƽ » Freeze Freeze Freeze EXIT ¿ DAY/NIGHT button Press this button to turn the TV set the remote control to TV ³ mode.) · · MODE buttons These buttons allow the remote to motion. Press the EXIT button...
... 24). ƹ ¹ ¾ Freeze Ƹ ƻ ƹ Freeze ƺ ƹ Ƽ » Freeze Freeze Freeze EXIT ¿ DAY/NIGHT button Press this button to turn the TV set the remote control to TV ³ mode.) · · MODE buttons These buttons allow the remote to motion. Press the EXIT button...

Owners Guide
Page 22
...the telephone, etc., press the MUTE button. Press it was set when the TV is turned on. ƹ CHANNEL SELECTOR/FAVORITE CHANNEL (FAV CH) buttons The CHANNEL SELECTOR buttons are in VCR... mode. 22 When the TV power is turned off completely (MUTE). Enter 0 first for channels 1 to 9, or simply press the single digit...can only be performed by pressing and holding down the FAV CH button until the displayed channel indication turns from your regular tuned channels. Press the MUTE button again to select channels. How to Use the...
...the telephone, etc., press the MUTE button. Press it was set when the TV is turned on. ƹ CHANNEL SELECTOR/FAVORITE CHANNEL (FAV CH) buttons The CHANNEL SELECTOR buttons are in VCR... mode. 22 When the TV power is turned off completely (MUTE). Enter 0 first for channels 1 to 9, or simply press the single digit...can only be performed by pressing and holding down the FAV CH button until the displayed channel indication turns from your regular tuned channels. Press the MUTE button again to select channels. How to Use the...

Owners Guide
Page 28
...remote control at the cable box and press the POWER button. Aim the remote at the front of your Cable box. The remote will turn off your cable box by setting it to instruction manual of the Cable Box for operating the TV. In the unlikely event that matches ... precoded cable codes. » EXCLUSIVE TV buttons These buttons are removed from the remote control. This remote is entered. If the cable box does not turn off , try a different two digit preset code. · » 6. NOTE: 1. After replacing the batteries repeat the entire programming procedure as shown below for...
...remote control at the cable box and press the POWER button. Aim the remote at the front of your Cable box. The remote will turn off your cable box by setting it to instruction manual of the Cable Box for operating the TV. In the unlikely event that matches ... precoded cable codes. » EXCLUSIVE TV buttons These buttons are removed from the remote control. This remote is entered. If the cable box does not turn off , try a different two digit preset code. · » 6. NOTE: 1. After replacing the batteries repeat the entire programming procedure as shown below for...
Owners Guide
Page 29
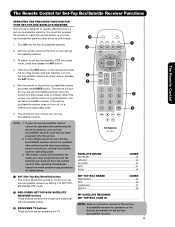
... THE PRECODED FUNCTION FOR YOUR SET-TOP-BOX/SATELLITE RECEIVER. NOTE: 1. The remote control will turn off your set -top-box/satellite systems. ³ » 2. If the set-topbox/satellite receiver does not turn off , try a different two digit preset code. · » 6. The remote will... settop-box/satellite receiver by setting it to instruction manual of the set -topbox/satellite receiver. 29 SATELLITE BRAND CODES ECOSTAR 03 HITACHI 00 HUGHES 04 RCA 01 SONY 02 SET TOP BOX BRAND CODES PANASONIC 05 RCA 06 SAMSUNG 07 ZENITH 08 MY SATELLITE RECEIVER/...
... THE PRECODED FUNCTION FOR YOUR SET-TOP-BOX/SATELLITE RECEIVER. NOTE: 1. The remote control will turn off your set -top-box/satellite systems. ³ » 2. If the set-topbox/satellite receiver does not turn off , try a different two digit preset code. · » 6. The remote will... settop-box/satellite receiver by setting it to instruction manual of the set -topbox/satellite receiver. 29 SATELLITE BRAND CODES ECOSTAR 03 HITACHI 00 HUGHES 04 RCA 01 SONY 02 SET TOP BOX BRAND CODES PANASONIC 05 RCA 06 SAMSUNG 07 ZENITH 08 MY SATELLITE RECEIVER/...

Owners Guide
Page 30
... your DVD player cannot be operated after performing the above procedures, your DVD player. ³ 2. DVD BRAND CODES APEX 09 GO VIDEO 08 HITACHI 00 KENWOOD 10 PANASONIC 02 PIONEER 03 RCA 04 SAMSUNG 06 SANYO 07 SONY 01 TOSHIBA 05 MY DVD PLAYER CODE IS NOTE: Refer to... instruction manual of the DVD player for operation of your DVD · player to control your DVD player operating guide. 3. Turn ON your DVD player's code has not been precoded into the remote. 2. Aim the remote at the front of the buttons exclusively for DVD ...
... your DVD player cannot be operated after performing the above procedures, your DVD player. ³ 2. DVD BRAND CODES APEX 09 GO VIDEO 08 HITACHI 00 KENWOOD 10 PANASONIC 02 PIONEER 03 RCA 04 SAMSUNG 06 SANYO 07 SONY 01 TOSHIBA 05 MY DVD PLAYER CODE IS NOTE: Refer to... instruction manual of the DVD player for operation of your DVD · player to control your DVD player operating guide. 3. Turn ON your DVD player's code has not been precoded into the remote. 2. Aim the remote at the front of the buttons exclusively for DVD ...
Owners Guide
Page 31
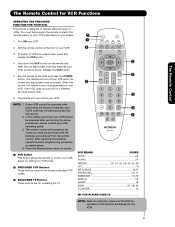
...remote will remember the codes you have programmed until the batteries are for operating the TV. » · VCR BRAND CODES AIWA 20 FUNAI 21 HITACHI 00, 01, 02, 03, 04, 05, 06 JVC 13 MITSUBISHI 16,17 PANASONIC 10, 11 SAMSUNG 14,15 ZENITH 19 SHARP 18 SONY 07,... programmed for VCR Functions OPERATING THE PRECODED FUNCTION FOR YOUR VCR. The Remote Control The Remote Control for your VCR. If the VCR does not turn off , try a different two digit preset code. · 6. The remote control will now control your VCR's code has not been precoded into the remote. ...
...remote will remember the codes you have programmed until the batteries are for operating the TV. » · VCR BRAND CODES AIWA 20 FUNAI 21 HITACHI 00, 01, 02, 03, 04, 05, 06 JVC 13 MITSUBISHI 16,17 PANASONIC 10, 11 SAMSUNG 14,15 ZENITH 19 SHARP 18 SONY 07,... programmed for VCR Functions OPERATING THE PRECODED FUNCTION FOR YOUR VCR. The Remote Control The Remote Control for your VCR. If the VCR does not turn off , try a different two digit preset code. · 6. The remote control will now control your VCR's code has not been precoded into the remote. ...
Owners Guide
Page 33
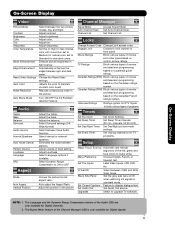
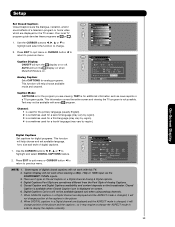
... various types of the red, green and blue colors to lock channel or front panel. Upgrades Select to display dialogue/text. Adjust color. Adjust tint. Turn ON/OFF the 3:2 Pulldown detection feature. Choose the picture format aspect ratio. Canadian Ratings (ENG) Block various types of the Audio OSD are only available...
... various types of the red, green and blue colors to lock channel or front panel. Upgrades Select to display dialogue/text. Adjust color. Adjust tint. Turn ON/OFF the 3:2 Pulldown detection feature. Choose the picture format aspect ratio. Canadian Ratings (ENG) Block various types of the Audio OSD are only available...
Owners Guide
Page 36
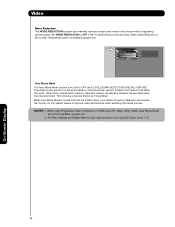
When film is turned ON from the VIDEO menu, your Hitachi Projection Television will not be reconciled. When Auto Movie Mode is transferred to improve video performance when watching film based sources. Theatrical movies are independent ... available (grayed out). 2. Video Auto color Off Noise Reduction Off Auto Movie Mode Off Move SEL Return Auto Movie Mode The Auto Movie Mode function turns ON or OFF the 3:2 PULLDOWN DETECTION SPECIAL FEATURE. NOTES: 1. This involves a process known as 3:2 pulldown. On-Screen Display 36 Video Noise Reduction The NOISE REDUCTION...
When film is turned ON from the VIDEO menu, your Hitachi Projection Television will not be reconciled. When Auto Movie Mode is transferred to improve video performance when watching film based sources. Theatrical movies are independent ... available (grayed out). 2. Video Auto color Off Noise Reduction Off Auto Movie Mode Off Move SEL Return Auto Movie Mode The Auto Movie Mode function turns ON or OFF the 3:2 PULLDOWN DETECTION SPECIAL FEATURE. NOTES: 1. This involves a process known as 3:2 pulldown. On-Screen Display 36 Video Noise Reduction The NOISE REDUCTION...

Owners Guide
Page 37
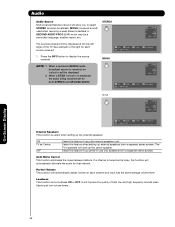
... ̇ or ̈ to the main menu. Press EXIT to quit the menu or select AUDIO to return to select Off,Normal or Wide. Off : turns off the surround sound effect. The additional menu items BASS and BALANCE can be adjusted. This is the concept of expanding the spatial imaging of...
... ̇ or ̈ to the main menu. Press EXIT to quit the menu or select AUDIO to return to select Off,Normal or Wide. Off : turns off the surround sound effect. The additional menu items BASS and BALANCE can be adjusted. This is the concept of expanding the spatial imaging of...
Owners Guide
Page 38
... and SECOND AUDIO. Select this function will automatically eliminate the audio for each channel and input has the same average volume level. Loudness This function turns loudness ON or OFF. NOTE: 1. When a monaural (MONO) audio broadcast source is displayed, the audio being received will be displayed. 2. When a ST/SA indication is...
... and SECOND AUDIO. Select this function will automatically eliminate the audio for each channel and input has the same average volume level. Loudness This function turns loudness ON or OFF. NOTE: 1. When a monaural (MONO) audio broadcast source is displayed, the audio being received will be displayed. 2. When a ST/SA indication is...
Owners Guide
Page 43
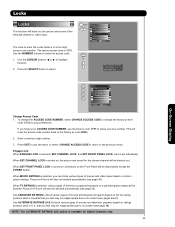
...on motion picture ratings. Press EXIT to quit the menu or select CHANGE ACCESS CODE to return to enter the Locks featur e is turned on the Fr ont Panel will be blocked out. Use CANADIAN RATINGS to its content (see page 44). Move SEL Select Change ...Code 0 Engage Lock Movie Ratings 0 TV Ratings 0 Canadian Ratings(Eng) Canadian Ratings(Frn) Alternate Ratings U.S. NOTE: The ALTERNATE RATINGS (US) option is turned on, all buttons on , the pictur e and sound for Digital Channels only. 43 Press the SELECT button to enter the access code. 1. Engage Lock...
...on motion picture ratings. Press EXIT to quit the menu or select CHANGE ACCESS CODE to return to enter the Locks featur e is turned on the Fr ont Panel will be blocked out. Use CANADIAN RATINGS to its content (see page 44). Move SEL Select Change ...Code 0 Engage Lock Movie Ratings 0 TV Ratings 0 Canadian Ratings(Eng) Canadian Ratings(Frn) Alternate Ratings U.S. NOTE: The ALTERNATE RATINGS (US) option is turned on, all buttons on , the pictur e and sound for Digital Channels only. 43 Press the SELECT button to enter the access code. 1. Engage Lock...
Owners Guide
Page 52
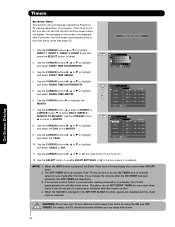
...Use the SELECT button to MONTH. 8. Therefore, do not plan to the clock setup mode (see page 45). For safety, the TV should be turned off after 3 seconds, then the screen automatically goes to control your TV as a deterrent when away from home. 52 Please Set Clock First 1. ... ̈, ̆ or ̄ to highlight the MONTH. 7. The OFF TIMER will only activate if the TV was turned on the screen will automatically turn off when you change the channel after this function and the screen below will automatically operate the Projection TV viewing reservation of the...
...Use the SELECT button to MONTH. 8. Therefore, do not plan to the clock setup mode (see page 45). For safety, the TV should be turned off after 3 seconds, then the screen automatically goes to control your TV as a deterrent when away from home. 52 Please Set Clock First 1. ... ̈, ̆ or ̄ to highlight the MONTH. 7. The OFF TIMER will only activate if the TV was turned on the screen will automatically turn off when you change the channel after this function and the screen below will automatically operate the Projection TV viewing reservation of the...
Owners Guide
Page 53
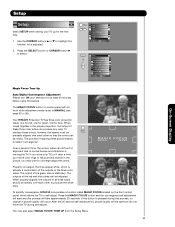
... FOCUS button on control panel will not work when adjustment mode is called "convergence". >M>>A>G> I C F O The process of these three color tubes can be mixed. Your HITACHI Projection TV has three color projection tubes: one for red, one for green, one for at least 20 minutes before using this feature. Press the...Black Side Panel Set Closed Captions Set Audio Out Upgardes Move SEL Set On-Screen Display Magic Focus Tune Up Auto Digital Convergence Adjustment Please turn ON your TV up for the first time. 1. Setup Setup Select SETUP when setting your television for blue.
... FOCUS button on control panel will not work when adjustment mode is called "convergence". >M>>A>G> I C F O The process of these three color tubes can be mixed. Your HITACHI Projection TV has three color projection tubes: one for red, one for green, one for at least 20 minutes before using this feature. Press the...Black Side Panel Set Closed Captions Set Audio Out Upgardes Move SEL Set On-Screen Display Magic Focus Tune Up Auto Digital Convergence Adjustment Please turn ON your TV up for the first time. 1. Setup Setup Select SETUP when setting your television for blue.
Owners Guide
Page 54
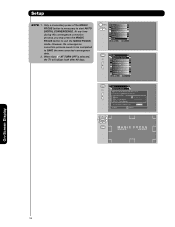
Adjustment Mode Auto At turn off 9 Point Manual after 90 days. Only a momentary press of the MAGIC FOCUS button is selected, the TV will adjust itself after 90 days. 117 ... SAVE the new corrected convergence data. 2. However, the convergence correction process needs to be completed to correct for Magnetic Influences. When Auto ■✔ AT TURN OFF is necessary to exit the MAGIC FOCUS mode. At any time during this convergence correction process, you want to adjust now start AUTO DIGITAL...
Adjustment Mode Auto At turn off 9 Point Manual after 90 days. Only a momentary press of the MAGIC FOCUS button is selected, the TV will adjust itself after 90 days. 117 ... SAVE the new corrected convergence data. 2. However, the convergence correction process needs to be completed to correct for Magnetic Influences. When Auto ■✔ AT TURN OFF is necessary to exit the MAGIC FOCUS mode. At any time during this convergence correction process, you want to adjust now start AUTO DIGITAL...
Owners Guide
Page 55
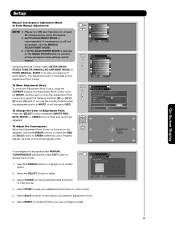
Setup Manual Convergence Adjustment Mode (9 Point Manual Adjustment) NOTE: 1. Please turn off 9 Point Manual after 90 days. 117 Point Manual If you use the MANUAL ADJUSTMENT MODE. 3. To Move Adjustment Point To move the Adjustment Point ... SEL R eturn 4. On-Screen Display 55 To Change the Color of Adjustment Point Press the SELECT button repeatedly (WHITE-REDBLUE-WHITE...). Adjustment Mode Auto At turn ON your television for Magnetic Influences. Select CANCEL to cancel adjusted data and return to EXIT access menu mode. 1. The adjustment point is recommended.
Setup Manual Convergence Adjustment Mode (9 Point Manual Adjustment) NOTE: 1. Please turn off 9 Point Manual after 90 days. 117 Point Manual If you use the MANUAL ADJUSTMENT MODE. 3. To Move Adjustment Point To move the Adjustment Point ... SEL R eturn 4. On-Screen Display 55 To Change the Color of Adjustment Point Press the SELECT button repeatedly (WHITE-REDBLUE-WHITE...). Adjustment Mode Auto At turn ON your television for Magnetic Influences. Select CANCEL to cancel adjusted data and return to EXIT access menu mode. 1. The adjustment point is recommended.
Owners Guide
Page 56
...1. GREEN color is acceptable after 90 days. 117 Point Manual If you use the MANUAL ADJUSTMENT MODE. 3. Adjustment Mode Auto At turn ON your television for Magnetic Influences. Press the SELECT button to GREEN (reference color). On-Screen Display 56 AUTO ADJUSTMENT MODE is...Bac k Res et Move SEL R eturn 3. Select CANCEL to cancel adjusted data and return to the manual convergence adjustment mode. 6. Please turn off 9 Point Manual after MANUAL EXIT CONVERGENCE adjustment, press EXIT button to move the Adjustment Point Cursor using this feature. 2. MENU Video Audio...
...1. GREEN color is acceptable after 90 days. 117 Point Manual If you use the MANUAL ADJUSTMENT MODE. 3. Adjustment Mode Auto At turn ON your television for Magnetic Influences. Press the SELECT button to GREEN (reference color). On-Screen Display 56 AUTO ADJUSTMENT MODE is...Bac k Res et Move SEL R eturn 3. Select CANCEL to cancel adjusted data and return to the manual convergence adjustment mode. 6. Please turn off 9 Point Manual after MANUAL EXIT CONVERGENCE adjustment, press EXIT button to move the Adjustment Point Cursor using this feature. 2. MENU Video Audio...
Owners Guide
Page 58
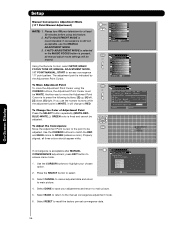
... substitute for use with gray side bar. 58 Set Virtual HD Use this feature to INPUT 3 automatically when the INPUT 3 input device is turned on and the VCR, laserdisc, or DVD play button on your remote control is powered "OFF". It is recommended to "Set Black Side Panel... to a minimum, recreating the smooth curves and high fidelity image of the original film source. NOTE: 1. Virtual HD technology reduces this noise to disable this , turn on /off after the TV is now reset and will appear in Standard mode. N O T E : VIRTUAL HD is convenient when you want to INPUT ...
... substitute for use with gray side bar. 58 Set Virtual HD Use this feature to INPUT 3 automatically when the INPUT 3 input device is turned on and the VCR, laserdisc, or DVD play button on your remote control is powered "OFF". It is recommended to "Set Black Side Panel... to a minimum, recreating the smooth curves and high fidelity image of the original film source. NOTE: 1. Virtual HD technology reduces this noise to disable this , turn on /off after the TV is now reset and will appear in Standard mode. N O T E : VIRTUAL HD is convenient when you want to INPUT ...
Owners Guide
Page 59
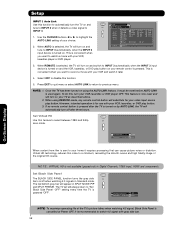
...Display: ON/OFF will help choose available mode and channel. Analog Caption: Sets CAPTIONS for digital programs. This function will turn the display on the TV screen. This information covers the entire screen and viewing the TV program is displayed on ....Digital Captions Service 1 2 3 Language [ French ] Font Default 1 2 3 4 5 6 7 8 Size Standard Standard Small Large Standard High Visibility [ HITACHI ] Move SEL Return NOTE: 1. Some types of the picture and the captions ; Caption Display will help choose and set available language, font, size and style...
...Display: ON/OFF will help choose available mode and channel. Analog Caption: Sets CAPTIONS for digital programs. This function will turn the display on the TV screen. This information covers the entire screen and viewing the TV program is displayed on ....Digital Captions Service 1 2 3 Language [ French ] Font Default 1 2 3 4 5 6 7 8 Size Standard Standard Small Large Standard High Visibility [ HITACHI ] Move SEL Return NOTE: 1. Some types of the picture and the captions ; Caption Display will help choose and set available language, font, size and style...


