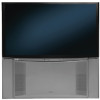
Owners Guide
Page 2
... so as close to HITACHI. NO USER SERVICEABLE PARTS INSIDE. The lightning flash with the CAUTION: TO REDUCE THE RISK OF ELECTRIC SHOCK, DO NOT REMOVE COVER (OR BACK). Follow instructions for proper grounding and, in any way, such as practical. READ BEFORE OPERATING EQUIPMENT Follow all instructions. 5. Clean only with one wider than the other apparatus (including amplifiers) that may be connected to...
... so as close to HITACHI. NO USER SERVICEABLE PARTS INSIDE. The lightning flash with the CAUTION: TO REDUCE THE RISK OF ELECTRIC SHOCK, DO NOT REMOVE COVER (OR BACK). Follow instructions for proper grounding and, in any way, such as practical. READ BEFORE OPERATING EQUIPMENT Follow all instructions. 5. Clean only with one wider than the other apparatus (including amplifiers) that may be connected to...
Owners Guide
Page 3
... ground terminal can be authorized by direct connection to a cable system providing such programming. Public viewing of copyrighted material Public viewing of the picture will display television closed captioning, ( or ), in the instructions, as the disconnect device and shall remain readily operable. Caution Never remove the back cover of the FCC rules. Caution Adjust only those controls that any changes or modifications made to 50 Hz, direct...
... ground terminal can be authorized by direct connection to a cable system providing such programming. Public viewing of copyrighted material Public viewing of the picture will display television closed captioning, ( or ), in the instructions, as the disconnect device and shall remain readily operable. Caution Never remove the back cover of the FCC rules. Caution Adjust only those controls that any changes or modifications made to 50 Hz, direct...

Owners Guide
Page 7
VOLUME BUTTONS (TV) Adjusts the audio level of your VCR and DVD. PIP BUTTON (TV) Press to show and change the Picture-in-Picture mode. CHANNEL BUTTONS (TV, CBL, SAT, VCR) Changes the channel. DVD/VCR CONTROL BUTTONS (DVD, VCR) Controls the precode functions of your TV. Set-Top-Box VCR - Satellite Receiver NOTE: STB precode is used to Select/Activate the highlighted menu item. ASPECT BUTTON (TV) Changes the aspect ratio while watching TV. Press it a third time to complete mute if pressed twice. GUIDE BUTTON (SAT/STB...
VOLUME BUTTONS (TV) Adjusts the audio level of your VCR and DVD. PIP BUTTON (TV) Press to show and change the Picture-in-Picture mode. CHANNEL BUTTONS (TV, CBL, SAT, VCR) Changes the channel. DVD/VCR CONTROL BUTTONS (DVD, VCR) Controls the precode functions of your TV. Set-Top-Box VCR - Satellite Receiver NOTE: STB precode is used to Select/Activate the highlighted menu item. ASPECT BUTTON (TV) Changes the aspect ratio while watching TV. Press it a third time to complete mute if pressed twice. GUIDE BUTTON (SAT/STB...
Owners Guide
Page 8
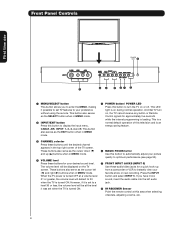
... or new recording. This button also serves as the EXIT button when in MENU mode. Front Panel Controls First time use POWER LED º ¶ ³ MENU/SELECT button This button allows you have mono sound, insert the audio cable into the left (̇) and right (̈) buttons when in MENU mode. ´ POWER button/ POWER LED Press this area when selecting channels, adjusting volume, etc. 8 This LED light is a normal default operation of the TV screen. This is on the...
... or new recording. This button also serves as the EXIT button when in MENU mode. Front Panel Controls First time use POWER LED º ¶ ³ MENU/SELECT button This button allows you have mono sound, insert the audio cable into the left (̇) and right (̈) buttons when in MENU mode. ´ POWER button/ POWER LED Press this area when selecting channels, adjusting volume, etc. 8 This LED light is a normal default operation of the TV screen. This is on the...
Owners Guide
Page 10
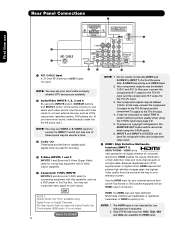
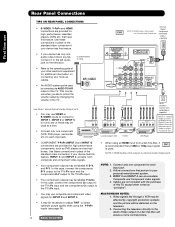
... recording. ¿ S-Video INPUTS 1 and 2 INPUTS 1 and 2 provide S-Video (Super Video) jacks for connecting equipment with S-Video output capability. ´ Component: Y-PBPR INPUTS INPUTS 3 and 4 provide Y-PBPR jacks for your local cable company whether DTV services are used at the same time. It may be necessary to adjust TINT to connect external devices, such as Set-Top-Boxes or DVD players equipped with an HDMI output connection. Because digital television (DTV) signals remain in a single cable. Only DTV...
... recording. ¿ S-Video INPUTS 1 and 2 INPUTS 1 and 2 provide S-Video (Super Video) jacks for connecting equipment with S-Video output capability. ´ Component: Y-PBPR INPUTS INPUTS 3 and 4 provide Y-PBPR jacks for your local cable company whether DTV services are used at the same time. It may be necessary to adjust TINT to connect external devices, such as Set-Top-Boxes or DVD players equipped with an HDMI output connection. Because digital television (DTV) signals remain in a single cable. Only DTV...
Owners Guide
Page 11
... your warranty card. ¾ TV AS CENTER (INPUTS 1-4) These jacks are trademarks of the Audio Menu (see page 38). BACK TO COVER 11 Hitachi will notify you if a software upgrade is Dolby® Digital compatible, such as a center channel by selecting TV AS CENTER on Digital Channels. This feature allows the TV speakers to receive written notification, please complete and return your TV. It is output via Optical Audio Out. VIDEO PB...
... your warranty card. ¾ TV AS CENTER (INPUTS 1-4) These jacks are trademarks of the Audio Menu (see page 38). BACK TO COVER 11 Hitachi will notify you if a software upgrade is Dolby® Digital compatible, such as a center channel by selecting TV AS CENTER on Digital Channels. This feature allows the TV speakers to receive written notification, please complete and return your TV. It is output via Optical Audio Out. VIDEO PB...
Owners Guide
Page 12
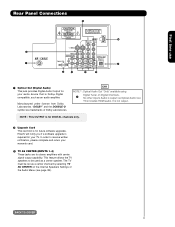
... to adjust TINT to obtain optimum picture quality when using an HDMI input from a Set-Top-Box, it to the left audio jack on the television. 2. This can be used at a time. • Connect only one audio output (mono sound), connect it is recommended that a 1080i or 720p input signal CH1 is Not output via Optical Out. • COMPONENT: Y-PBPR (INPUT 3 and INPUT 4) connections are provided for additional information on Digital Channels. VIDEO PB PB VIDEO AUDIO TO...
... to adjust TINT to obtain optimum picture quality when using an HDMI input from a Set-Top-Box, it to the left audio jack on the television. 2. This can be used at a time. • Connect only one audio output (mono sound), connect it is recommended that a 1080i or 720p input signal CH1 is Not output via Optical Out. • COMPONENT: Y-PBPR (INPUT 3 and INPUT 4) connections are provided for additional information on Digital Channels. VIDEO PB PB VIDEO AUDIO TO...
Owners Guide
Page 14
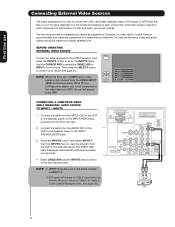
... TV set to VIDEO and a video signal is dependent on the back panel of video and audio inputs and outputs. First time use Connecting External Video Sources The exact arrangement you may need to modify them to accommodate your choice. Press the INPUTS button, then select INPUT 4 from the INPUTS menu to view the program from the INPUTS menu to return to the last channel tuned. Check the owner's manual of the VCR or the laserdisc player to show the INPUTS menu...
... TV set to VIDEO and a video signal is dependent on the back panel of video and audio inputs and outputs. First time use Connecting External Video Sources The exact arrangement you may need to modify them to accommodate your choice. Press the INPUTS button, then select INPUT 4 from the INPUTS menu to view the program from the INPUTS menu to return to the last channel tuned. Check the owner's manual of the VCR or the laserdisc player to show the INPUTS menu...

Owners Guide
Page 16
... using HDMI connections to the last channel tuned. Press the INPUTS button, then select INPUT 1 from the INPUTS menu to view the program from the INPUTS menu to return to prevent illegal copying of video contents. 3. Select CABLE/AIR from the HDTV set top box or DVD player. It establishes a one-way point-to-point connection for delivery of device user settings determines final video appearance. HDMI - First time use Connecting External Video Sources CONNECTING A COMPONENT SOURCE WITH HDMI OR DVI CAPABILITY TO INPUT 1 1. Connect...
... using HDMI connections to the last channel tuned. Press the INPUTS button, then select INPUT 1 from the INPUTS menu to view the program from the INPUTS menu to return to prevent illegal copying of video contents. 3. Select CABLE/AIR from the HDTV set top box or DVD player. It establishes a one-way point-to-point connection for delivery of device user settings determines final video appearance. HDMI - First time use Connecting External Video Sources CONNECTING A COMPONENT SOURCE WITH HDMI OR DVI CAPABILITY TO INPUT 1 1. Connect...

Owners Guide
Page 21
... CBS MULTI DTVCC TV-PG DLSV 1080i Format The Remote Control INPUT 1 Select to normal viewing. INPUT 2 Select to choose Input 4. Press this button is only applicable when the remote control is in (CBL) and (SAT/STB) mode. The ASPECT INFORMATION will start the On-Screen Display. ¾ GUIDE button [Cable Box (CBL), Satellite Receiver (SAT)/ Set-Top-Box (STB) mode only] The use of this button to access the Channel Guide of a channel before it is provided...
... CBS MULTI DTVCC TV-PG DLSV 1080i Format The Remote Control INPUT 1 Select to normal viewing. INPUT 2 Select to choose Input 4. Press this button is only applicable when the remote control is in (CBL) and (SAT/STB) mode. The ASPECT INFORMATION will start the On-Screen Display. ¾ GUIDE button [Cable Box (CBL), Satellite Receiver (SAT)/ Set-Top-Box (STB) mode only] The use of this button to access the Channel Guide of a channel before it is provided...
Owners Guide
Page 23
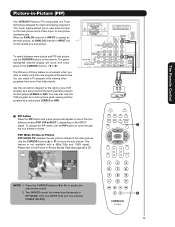
... sub-picture. To change the PIP mode, use the CURSOR buttons on the INPUT signal. Audio Video OUTPUT VCR ³ · 23 The Remote Control Picture-in-Picture (PIP) Your HITACHI Projection TV incorporates one program at the same time. You may also view the VCR program as a main picture while viewing another program as a sub picture. This Tuner feature allows you want to enable the sub-picture sound. 2. You can not be viewed simultaneously in PIP MODE. PIP MAIN PICTURE SUB PICTURE NOTE: 1. Only one INPUT...
... sub-picture. To change the PIP mode, use the CURSOR buttons on the INPUT signal. Audio Video OUTPUT VCR ³ · 23 The Remote Control Picture-in-Picture (PIP) Your HITACHI Projection TV incorporates one program at the same time. You may also view the VCR program as a main picture while viewing another program as a sub picture. This Tuner feature allows you want to enable the sub-picture sound. 2. You can not be viewed simultaneously in PIP MODE. PIP MAIN PICTURE SUB PICTURE NOTE: 1. Only one INPUT...
Owners Guide
Page 33
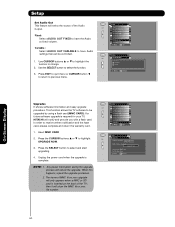
... external speakers. Adjust volume in light scenes. Adjust Loudness. Set Auto Channel Scan. Set Day/Night picture mode settings. The Signal Meter feature of the red, green and blue colors to block various types of the Audio OSD are only available for standard colors. Engage Lock Choose to Standard for Digital channels. 2. Set viewing reservation for TV programs. Setup Magic Focus Tune Up Automatic and manual alignment of the Channel Manager OSD is only available for DTV Signal to make white. Set The Inputs Label Video Inputs, VCR, DVD...
... external speakers. Adjust volume in light scenes. Adjust Loudness. Set Auto Channel Scan. Set Day/Night picture mode settings. The Signal Meter feature of the red, green and blue colors to block various types of the Audio OSD are only available for standard colors. Engage Lock Choose to Standard for Digital channels. 2. Set viewing reservation for TV programs. Setup Magic Focus Tune Up Automatic and manual alignment of the Channel Manager OSD is only available for DTV Signal to make white. Set The Inputs Label Video Inputs, VCR, DVD...
Owners Guide
Page 43
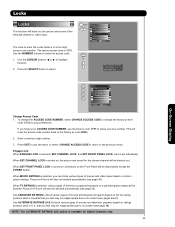
... button to your ACCESS CODE NUMBER, use the factory code 7777 to the factory pr eset (0000). 2. If you feel may be blocked. Enter a new four digit number. 3. This will be deactivated, except the POWER button. Pictur e-in -Pictur e will block out the picture and sound of movies and television programs based on motion picture ratings. MENU Video Audio Aspect Channel Manager Locks Timers Setup Move SEL Select OR Please Enter Access Code Access Code: - - - - [#Keys] Enter Code On-Screen Display 0 Locks Change Access Code 0 Engage Lock Movie Ratings 0 TV...
... button to your ACCESS CODE NUMBER, use the factory code 7777 to the factory pr eset (0000). 2. If you feel may be blocked. Enter a new four digit number. 3. This will be deactivated, except the POWER button. Pictur e-in -Pictur e will block out the picture and sound of movies and television programs based on motion picture ratings. MENU Video Audio Aspect Channel Manager Locks Timers Setup Move SEL Select OR Please Enter Access Code Access Code: - - - - [#Keys] Enter Code On-Screen Display 0 Locks Change Access Code 0 Engage Lock Movie Ratings 0 TV...
Owners Guide
Page 53
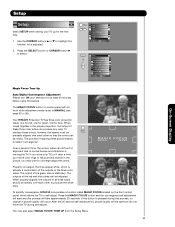
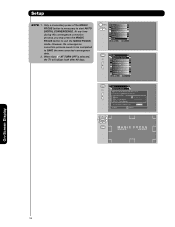
MENU Video Audio Aspect Channel Manager Locks Timers Setup Move SEL Select Setup Magic Focus Tune Up OR Menu Preference Set The Inputs Set Virtual HD Set Black Side Panel Set Closed Captions Set Audio Out Upgardes Move SEL Set On-Screen Display Magic Focus Tune Up Auto Digital Convergence Adjustment Please turn ON your TV up for the first time. 1. To produce these colors, however, the beams must be MAGIC FOCUS precisely aligned over each other so that the colors can produce any color. The process of...
MENU Video Audio Aspect Channel Manager Locks Timers Setup Move SEL Select Setup Magic Focus Tune Up OR Menu Preference Set The Inputs Set Virtual HD Set Black Side Panel Set Closed Captions Set Audio Out Upgardes Move SEL Set On-Screen Display Magic Focus Tune Up Auto Digital Convergence Adjustment Please turn ON your TV up for the first time. 1. To produce these colors, however, the beams must be MAGIC FOCUS precisely aligned over each other so that the colors can produce any color. The process of...
Owners Guide
Page 54
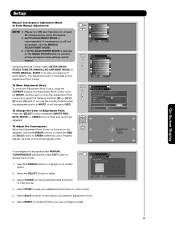
... time during this convergence correction process, you want to adjust now start AUTO DIGITAL CONVERGENCE. However, the convergence correction process needs to be completed to correct for Magnetic Influences. MENU Video Audio Aspect Channel Manager Locks Timers Setup Move SEL Select Setup Magic Focus Tune Up OR Menu Preference Set The Inputs Set Virtual HD Set Black Side Panel Set Closed Captions Set Audio Out Upgardes Move SEL Set Setup Magic Focus Tune Up OR Aligns the Red, Green and Blue colors to SAVE the new corrected convergence...
... time during this convergence correction process, you want to adjust now start AUTO DIGITAL CONVERGENCE. However, the convergence correction process needs to be completed to correct for Magnetic Influences. MENU Video Audio Aspect Channel Manager Locks Timers Setup Move SEL Select Setup Magic Focus Tune Up OR Menu Preference Set The Inputs Set Virtual HD Set Black Side Panel Set Closed Captions Set Audio Out Upgardes Move SEL Set Setup Magic Focus Tune Up OR Aligns the Red, Green and Blue colors to SAVE the new corrected convergence...
Owners Guide
Page 55
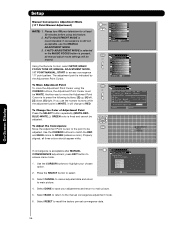
... Display 55 Another way to save your chosen option. 2. To Change the Color of Adjustment Point Press the SELECT button repeatedly (WHITE-REDBLUE-WHITE...). Select RESET to the manual convergence adjustment mode. 6. AUTO ADJUSTMENT MODE is indicated by the Adjustment Point Cursor. MENU Video Audio Aspect Channel Manager Locks Timers Setup Move SEL Select Setup Magic Focus Tune Up OR Menu Preference Set The Inputs Set Virtual HD Set Black Side Panel Set Closed Captions Set Audio Out Upgrades Move SEL Set Setup Magic Focus Tune Up OR Aligns the Red, Green and Blue...
... Display 55 Another way to save your chosen option. 2. To Change the Color of Adjustment Point Press the SELECT button repeatedly (WHITE-REDBLUE-WHITE...). Select RESET to the manual convergence adjustment mode. 6. AUTO ADJUSTMENT MODE is indicated by the Adjustment Point Cursor. MENU Video Audio Aspect Channel Manager Locks Timers Setup Move SEL Select Setup Magic Focus Tune Up OR Menu Preference Set The Inputs Set Virtual HD Set Black Side Panel Set Closed Captions Set Audio Out Upgrades Move SEL Set Setup Magic Focus Tune Up OR Aligns the Red, Green and Blue...
Owners Guide
Page 56
... manual adjust mode settings will change to access convergence 117 point pattern. Press the SELECT button to press the following buttons: [2] up, [4] left, [5] down, [6] right. Another way to move the Adjustment Point Cursor using this feature. 2. MENU Video Audio Aspect Channel Manager Locks Timers Setup Move SEL Select Setup Magic Focus Tune Up OR Menu Preference Set The Inputs Set Virtual HD Set Black Side Panel Set Closed Captions Set Audio Out Upgrades Move SEL Set Setup Magic Focus Tune Up OR Aligns the Red, Green and Blue colors to main picture...
... manual adjust mode settings will change to access convergence 117 point pattern. Press the SELECT button to press the following buttons: [2] up, [4] left, [5] down, [6] right. Another way to move the Adjustment Point Cursor using this feature. 2. MENU Video Audio Aspect Channel Manager Locks Timers Setup Move SEL Select Setup Magic Focus Tune Up OR Menu Preference Set The Inputs Set Virtual HD Set Black Side Panel Set Closed Captions Set Audio Out Upgrades Move SEL Set Setup Magic Focus Tune Up OR Aligns the Red, Green and Blue colors to main picture...
Owners Guide
Page 57
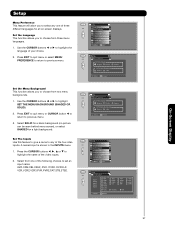
... Move SEL R eturn Setup Magic Focus Tune Up OR Menu Preference Set The Inputs Set Virtual HD Set Black Side Panel Set Closed Captions Set Audio Out Upgrades Move SEL Set Setup OR Set The Inputs Rename List Input1 Input2 Input3 Input4 Input5 AVR CAM CBL CBL2 Reset Auto Link DVD DVD2 DVD3 LD PVR PVR2 SAT STB STB2 VCR VCR2 VCR3 Auto Remote Off Move SEL Return On-Screen Display 57 Press the CURSOR buttons ̇, ̈...
... Move SEL R eturn Setup Magic Focus Tune Up OR Menu Preference Set The Inputs Set Virtual HD Set Black Side Panel Set Closed Captions Set Audio Out Upgrades Move SEL Set Setup OR Set The Inputs Rename List Input1 Input2 Input3 Input4 Input5 AVR CAM CBL CBL2 Reset Auto Link DVD DVD2 DVD3 LD PVR PVR2 SAT STB STB2 VCR VCR2 VCR3 Auto Remote Off Move SEL Return On-Screen Display 57 Press the CURSOR buttons ̇, ̈...
Owners Guide
Page 60
... Set Black Side Panel Set Closed Captions Set Audio Out Upgrades Move SEL Set Setup Upgrades OR Software Version # : Main Vxxxx.xxxx MMC Vxxxx.xxxx MMC Software Upgrade Upgrade Now Please Insert MMC card before upgrading. Any power interruption during the upgrade process will show the MMC Vxxx.xxxx file number. If a future software upgrade is required for your TV, HITACHI will only appears when a MMC or SD card is complete. Move SEL Return On-Screen Display 60 Setup Set Audio...
... Set Black Side Panel Set Closed Captions Set Audio Out Upgrades Move SEL Set Setup Upgrades OR Software Version # : Main Vxxxx.xxxx MMC Vxxxx.xxxx MMC Software Upgrade Upgrade Now Please Insert MMC card before upgrading. Any power interruption during the upgrade process will show the MMC Vxxx.xxxx file number. If a future software upgrade is required for your TV, HITACHI will only appears when a MMC or SD card is complete. Move SEL Return On-Screen Display 60 Setup Set Audio...
Owners Guide
Page 71
... LICENSE THAT MAY ACCOMPANY SUCH UPGRADE, (A) DO NOT USE ANY HITACHI-PROVIDED FLASH CARD OR OTHER MEDIA, (B) DO NOT PERFORM INSTALL ANY HITACHI-PROVIDED UPGRADE SOFTWARE ON YOUR DTV, AND (C) PROMPTLY RETURN SUCH FLASH CARD OR OTHER MEDIA TO HITACHI. 5. Any rights of such damages. 10. government. End User Licence Agreement for any time by law. 7. READ CAREFULLY: This End User License Agreement for a particular...
... LICENSE THAT MAY ACCOMPANY SUCH UPGRADE, (A) DO NOT USE ANY HITACHI-PROVIDED FLASH CARD OR OTHER MEDIA, (B) DO NOT PERFORM INSTALL ANY HITACHI-PROVIDED UPGRADE SOFTWARE ON YOUR DTV, AND (C) PROMPTLY RETURN SUCH FLASH CARD OR OTHER MEDIA TO HITACHI. 5. Any rights of such damages. 10. government. End User Licence Agreement for any time by law. 7. READ CAREFULLY: This End User License Agreement for a particular...


