Owners Guide
Page 3
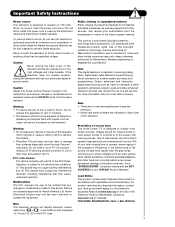
...can cause permanent damage to television receivers. patents and other fixed (non-moving pictures. FOR MORE INFORMATION, CALL 1-800-HITACHI. 3 Caution Never remove the back cover of the television as video-on the top of the television which may require prior authorization from the ...on -demand, a cable operator's enhanced program guide and data-enhanced television services may void the user's authority to display wide screen pictures. For product recycling and disposal information, contact your local government agency or the Electronic Industries Alliance at www.eiae.org ...
...can cause permanent damage to television receivers. patents and other fixed (non-moving pictures. FOR MORE INFORMATION, CALL 1-800-HITACHI. 3 Caution Never remove the back cover of the television as video-on the top of the television which may require prior authorization from the ...on -demand, a cable operator's enhanced program guide and data-enhanced television services may void the user's authority to display wide screen pictures. For product recycling and disposal information, contact your local government agency or the Electronic Industries Alliance at www.eiae.org ...

Owners Guide
Page 42
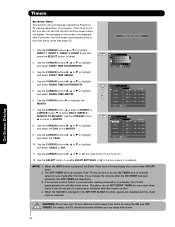
... source. When changing cable sources from CABLE (1) to CABLE (2), the AUTO CHANNEL SCAN needs to be repeated for the Channel List to set or remove the FAVORITES settings. 5. Channel Manager Signal Meter Auto Channel Scan Channel List Move SEL Return 2. Press the FAV button to be updated. Press the... SELECT button to select ON or OFF on the SCAN and LOCK Columns. 3. Press the SELECT button to select. On-Screen Display 42 Press the CURSOR buttons ̇ or ̈ to CHANNEL MEMORY (SCAN), which are protected by LOCK and which are your FAVORITE (FAV...
... source. When changing cable sources from CABLE (1) to CABLE (2), the AUTO CHANNEL SCAN needs to be repeated for the Channel List to set or remove the FAVORITES settings. 5. Channel Manager Signal Meter Auto Channel Scan Channel List Move SEL Return 2. Press the FAV button to be updated. Press the... SELECT button to select ON or OFF on the SCAN and LOCK Columns. 3. Press the SELECT button to select. On-Screen Display 42 Press the CURSOR buttons ̇ or ̈ to CHANNEL MEMORY (SCAN), which are protected by LOCK and which are your FAVORITE (FAV...
Owners Guide
Page 52
...viewing reservation is activated, the TV will appear. Therefore, do not plan to set , you change the channel after 3 seconds, then the screen automatically goes to highlight and select FINISH TIME HOUR/MINUTE. 5. Please Set Clock First 1. Use the CURSOR button ̆ to select a ... ❑ Event3 : ❑ Event4 : -- : -- AM AM Jan. 1 2006 Air ------- ❑ Event2 : -- : -- When the CLOCK is changed in the box means it is removed CAUTION: Do not use this time. If the clock is pressed, the Event Timer Icon will disappear after the ON TIMER has been activated, the...
...viewing reservation is activated, the TV will appear. Therefore, do not plan to set , you change the channel after 3 seconds, then the screen automatically goes to highlight and select FINISH TIME HOUR/MINUTE. 5. Please Set Clock First 1. Use the CURSOR button ̆ to select a ... ❑ Event3 : ❑ Event4 : -- : -- AM AM Jan. 1 2006 Air ------- ❑ Event2 : -- : -- When the CLOCK is changed in the box means it is removed CAUTION: Do not use this time. If the clock is pressed, the Event Timer Icon will disappear after the ON TIMER has been activated, the...
Owners Guide
Page 61
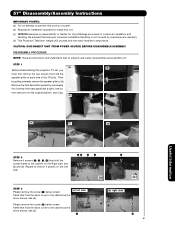
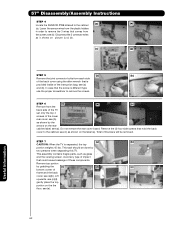
...(b) Before disassembling this unit. (c) HITACHI assumes no responsibility or liability for injury/damage as the arrow shows, see (a) and (b). Repeat to remove 4 screws on each panel (left side Please remove the screw (·) below screen frame that hold the (a) (b) screen frame to the cabinet on the Right...an installation specialist to install this projection TV set, you must first remove the two screws that hold the speaker grille on the Left side. (a) (b) STEP 3 Please remove the screw (³) below screen frame that hold the back cover to the cabinet as the arrow ...
...(b) Before disassembling this unit. (c) HITACHI assumes no responsibility or liability for injury/damage as the arrow shows, see (a) and (b). Repeat to remove 4 screws on each panel (left side Please remove the screw (·) below screen frame that hold the (a) (b) screen frame to the cabinet on the Right...an installation specialist to install this projection TV set, you must first remove the two screws that hold the speaker grille on the Left side. (a) (b) STEP 3 Please remove the screw (³) below screen frame that hold the back cover to the cabinet as the arrow ...
Owners Guide
Page 62
... screws of the lower rear cover, see (b), as glass and the viewing screen. This task should be removed. Useful Information 62 Remove top portion by grabbing the (c) (d) (e) bottom corner of these components. Do not remove the rear cover board. In case that the screw is different type use the... proper screwdriver to remove the 3 wires that comes from the screen, see (b). Total of the instruction bag, see (a) and (b). This assembly contains fragile parts, such as shown by the arrows on ...
... screws of the lower rear cover, see (b), as glass and the viewing screen. This task should be removed. Useful Information 62 Remove top portion by grabbing the (c) (d) (e) bottom corner of these components. Do not remove the rear cover board. In case that the screw is different type use the... proper screwdriver to remove the 3 wires that comes from the screen, see (b). Total of the instruction bag, see (a) and (b). This assembly contains fragile parts, such as shown by the arrows on ...
Owners Guide
Page 63
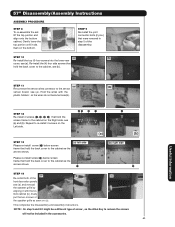
...do not become losse(b). ¿» · ³ ¿ STEP 12 (a) (b) Re-install 4 screws that hold the back cover to remove the screws will not be a different type of the disassembly. Repeat to re-install 4 screws on the Right side, see (a) and reinstall the speaker... (b) Re-connect the sensor wires connector to the cabinet on the Left side. (a) (b) STEP 13 Please re-install screw (³) below screen frame that were removed in the accessories. 63 ttom cabinet (b), finally put the two screws of the front decoration panels see (a) and (b). NOTE : On step...
...do not become losse(b). ¿» · ³ ¿ STEP 12 (a) (b) Re-install 4 screws that hold the back cover to remove the screws will not be a different type of the disassembly. Repeat to re-install 4 screws on the Right side, see (a) and reinstall the speaker... (b) Re-connect the sensor wires connector to the cabinet on the Left side. (a) (b) STEP 13 Please re-install screw (³) below screen frame that were removed in the accessories. 63 ttom cabinet (b), finally put the two screws of the front decoration panels see (a) and (b). NOTE : On step...
Owners Guide
Page 64
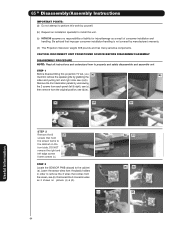
... by yourself. (b) Request an installation specialist to install this unit. (c) HITACHI assumes no responsibility or liability for injury/damage as it shows on the front side. DO NOT remove the right and left and right side see (b). Disconnect the 3 connector ...panel (left & right), see (c), then remove from the original position, see (d)(e). (c) (d) (e) Useful Information STEP 2 Remove the 8 (a) screws that comes from the plastic holders in order to remove the 3 wires that hold the screen frame to the cabinet (a). Remove the front decoration panels by grabbing the ...
... by yourself. (b) Request an installation specialist to install this unit. (c) HITACHI assumes no responsibility or liability for injury/damage as it shows on the front side. DO NOT remove the right and left and right side see (b). Disconnect the 3 connector ...panel (left & right), see (c), then remove from the original position, see (d)(e). (c) (d) (e) Useful Information STEP 2 Remove the 8 (a) screws that comes from the plastic holders in order to remove the 3 wires that hold the screen frame to the cabinet (a). Remove the front decoration panels by grabbing the ...
Owners Guide
Page 65
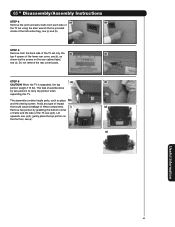
...see (a). STEP 6 (a) (b) CAUTION: When the TV is provided inside of the instruction bag, see (a)(b). 65 " Disassembly/Assembly Instructions STEP 4 (a) (b) Remove the joint connector bolts from the back side of the TV set using the allen wrench that could cause breakage of impact that is separated... TV. STEP 5 Remove from each side of the TV set only the (a) (b) top 4 screws of the lower rear cover, see (e). (e) Useful Information 65 This assembly contains fragile parts, such as shown by the arrows on the the floor, see (b), as glass and the viewing screen.
...see (a). STEP 6 (a) (b) CAUTION: When the TV is provided inside of the instruction bag, see (a)(b). 65 " Disassembly/Assembly Instructions STEP 4 (a) (b) Remove the joint connector bolts from the back side of the TV set using the allen wrench that could cause breakage of impact that is separated... TV. STEP 5 Remove from each side of the TV set only the (a) (b) top 4 screws of the lower rear cover, see (e). (e) Useful Information 65 This assembly contains fragile parts, such as shown by the arrows on the the floor, see (b), as glass and the viewing screen.
Owners Guide
Page 67
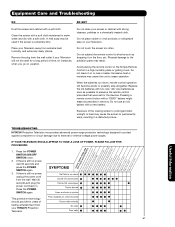
... not subject the remote control to external or internal voltage power surges. Remove the plug from your Television will become erratic or possibly stop altogether. Do not touch the screen too often. This protective technology should provide for years of lasting entertainment ...for the devices. Press the POWER SWITCH (ON/OFF SWITCH) once. 2. Press the POWER SWITCH again. Useful Information TROUBLESHOOTING HITACHI Projection Television incorporates advanced power surge protection technology designed to protect against component or circuit damage due to shocks such as possible to...
... not subject the remote control to external or internal voltage power surges. Remove the plug from your Television will become erratic or possibly stop altogether. Do not touch the screen too often. This protective technology should provide for years of lasting entertainment ...for the devices. Press the POWER SWITCH (ON/OFF SWITCH) once. 2. Press the POWER SWITCH again. Useful Information TROUBLESHOOTING HITACHI Projection Television incorporates advanced power surge protection technology designed to protect against component or circuit damage due to shocks such as possible to...


