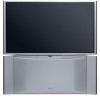
Owners Guide
Page 1
has determined that this product meets the ENERGY STAR® guidelines for 51F520, 57F520 IMPORTANT SAFETY INSTRUCTIONS 2-3 FIRST TIME USE ...4-18 THE REMOTE CONTROL 19-32 ON-SCREEN DISPLAY...33-65 CARE OF YOUR HITACHI TELEVISION 66 RECEPTION PROBLEMS...67 USEFUL INFORMATION / INDEX 68-71 57" DISASSEMBLY/ASSEMBLY INSTRUCTIONS 72-74 INDEX ...75 As an ENERGY STAR® Partner, Hitachi, Ltd. PROJECTION COLOR TV Operating Guide for energy efficiency.
has determined that this product meets the ENERGY STAR® guidelines for 51F520, 57F520 IMPORTANT SAFETY INSTRUCTIONS 2-3 FIRST TIME USE ...4-18 THE REMOTE CONTROL 19-32 ON-SCREEN DISPLAY...33-65 CARE OF YOUR HITACHI TELEVISION 66 RECEPTION PROBLEMS...67 USEFUL INFORMATION / INDEX 68-71 57" DISASSEMBLY/ASSEMBLY INSTRUCTIONS 72-74 INDEX ...75 As an ENERGY STAR® Partner, Hitachi, Ltd. PROJECTION COLOR TV Operating Guide for energy efficiency.
Owners Guide
Page 3
... instructions for proper grounding and, in accordance with the cart, stand, tripod, brack- For product recycling and disposal information, contact your HITACHI Factory Warranty. • PUBLIC VIEWING OF COPYRIGHTED MATERIAL Public viewing of programs broadcast by U.S. Install in particular, specifies that the cable ... force to the front, or top, of the television which could cause the product to retrieve the objects. • Projection TV's are NOT COVERED by the manufacturer. 17. ANTENNA LEAD IN WIRE GROUND CLAMP ELECTRIC SERVICE EQUIPMENT NEC NATIONAL ELECTRICAL CODE ANTENNA...
... instructions for proper grounding and, in accordance with the cart, stand, tripod, brack- For product recycling and disposal information, contact your HITACHI Factory Warranty. • PUBLIC VIEWING OF COPYRIGHTED MATERIAL Public viewing of programs broadcast by U.S. Install in particular, specifies that the cable ... force to the front, or top, of the television which could cause the product to retrieve the objects. • Projection TV's are NOT COVERED by the manufacturer. 17. ANTENNA LEAD IN WIRE GROUND CLAMP ELECTRIC SERVICE EQUIPMENT NEC NATIONAL ELECTRICAL CODE ANTENNA...
Owners Guide
Page 4
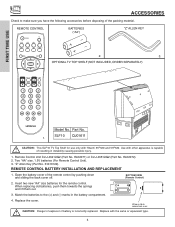
...or CLU-4351UG2 (Part No. Open the battery cover of the packing material. Match the batteries to remove back cover. Replace with Hitachi 51F520 and 57F520. OPTIONAL TV TOP SHELF (NOT INCLUDED, ORDER SEPARATELY) Model No. "Z" Allen Key (Part No. 61010122). REMOTE CONTROL BATTERY INSTALLATION AND REPLACEMENT...the battery compartment. 4. When replacing old batteries, push them towards the springs and lift them out. 3. CAUTION: This SLF10 TV Top Shelf for the remote control. FIRST TIME USE ACCESSORIES Check to make sure you have the following accessories before disposing of ...
...or CLU-4351UG2 (Part No. Open the battery cover of the packing material. Match the batteries to remove back cover. Replace with Hitachi 51F520 and 57F520. OPTIONAL TV TOP SHELF (NOT INCLUDED, ORDER SEPARATELY) Model No. "Z" Allen Key (Part No. 61010122). REMOTE CONTROL BATTERY INSTALLATION AND REPLACEMENT...the battery compartment. 4. When replacing old batteries, push them towards the springs and lift them out. 3. CAUTION: This SLF10 TV Top Shelf for the remote control. FIRST TIME USE ACCESSORIES Check to make sure you have the following accessories before disposing of ...

Owners Guide
Page 5
...away from the screen. FIRST TIME USE HOW TO SET UP YOUR NEW HITACHI PROJECTION TV ANTENNA Unless your TV is connected to a cable TV system or to a centralized antenna system, a good outdoor TV antenna is no picture distortion. 5 If the TV's audio output will be connected to a Hi-Fi system's external speakers,... to the height of the picture screen center. The best picture is its best, test various locations in front of the HITACHI Projection Television is seen by placing the speakers equidistant from the perforated back cover of the room. VIEWING The major benefit of the...
...away from the screen. FIRST TIME USE HOW TO SET UP YOUR NEW HITACHI PROJECTION TV ANTENNA Unless your TV is connected to a cable TV system or to a centralized antenna system, a good outdoor TV antenna is no picture distortion. 5 If the TV's audio output will be connected to a Hi-Fi system's external speakers,... to the height of the picture screen center. The best picture is its best, test various locations in front of the HITACHI Projection Television is seen by placing the speakers equidistant from the perforated back cover of the room. VIEWING The major benefit of the...
Owners Guide
Page 6
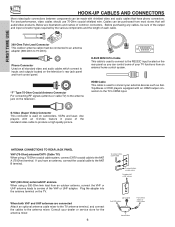
...-Ohm coaxial shielded wire. ANTENNA CONNECTIONS TO REAR JACK PANEL VHF (75-Ohm) antenna/CATV (Cable TV) When using a 300-Ohm twin lead from an outdoor antenna, connect the VHF or UHF antenna ...the VHF or UHF adapter. When both VHF and UHF antennas are illustrations and names of your TV functions from most stores that have an antenna, connect the coaxial cable to 75-Ohm). disc ... a 75-Ohm coaxial cable system, connect CATV coaxial cable to inputs and outputs located on the TV. FIRST TIME USE HOOK-UP CABLES AND CONNECTORS Most video/audio connections between components can be made ...
...-Ohm coaxial shielded wire. ANTENNA CONNECTIONS TO REAR JACK PANEL VHF (75-Ohm) antenna/CATV (Cable TV) When using a 300-Ohm twin lead from an outdoor antenna, connect the VHF or UHF antenna ...the VHF or UHF adapter. When both VHF and UHF antennas are illustrations and names of your TV functions from most stores that have an antenna, connect the coaxial cable to 75-Ohm). disc ... a 75-Ohm coaxial cable system, connect CATV coaxial cable to inputs and outputs located on the TV. FIRST TIME USE HOOK-UP CABLES AND CONNECTORS Most video/audio connections between components can be made ...
Owners Guide
Page 7
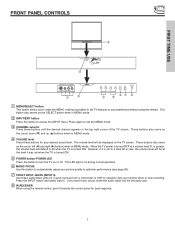
...MENU mode. ቤ CHANNEL selector Press these audio/video jacks for a quick hook-up (̆) buttons when in MENU mode. When the TV power is on the TV screen. These buttons also serve as the cursor left audio jack. ቩ IR RECEIVER When using the remote. VOL+ CH- This LED ... is turned OFF at the level it towards the control panel for your preference without using the remote control, point it was set when the TV is turned ON. Press again to your desired sound level. CH+ INPUT MENU MAGIC FOCUS ̇ ̈ ̄ ̆ EXIT SELECT CURSOR ባቢ...
...MENU mode. ቤ CHANNEL selector Press these audio/video jacks for a quick hook-up (̆) buttons when in MENU mode. When the TV power is on the TV screen. These buttons also serve as the cursor left audio jack. ቩ IR RECEIVER When using the remote. VOL+ CH- This LED ... is turned OFF at the level it towards the control panel for your preference without using the remote control, point it was set when the TV is turned ON. Press again to your desired sound level. CH+ INPUT MENU MAGIC FOCUS ̇ ̈ ̄ ̆ EXIT SELECT CURSOR ባቢ...

Owners Guide
Page 8
... played back picture may be abnormal. 2. Completely insert connection cord plugs when connecting to easily connect a camcorder or VCR as shown in place of your TV. 8 FRONT PANEL JACKS AND CONNECTORS The front panel jacks are provided as a convenience to allow you have a mono VCR, insert the audio cable into the...
... played back picture may be abnormal. 2. Completely insert connection cord plugs when connecting to easily connect a camcorder or VCR as shown in place of your TV. 8 FRONT PANEL JACKS AND CONNECTORS The front panel jacks are provided as a convenience to allow you have a mono VCR, insert the audio cable into the...

Owners Guide
Page 9
...NOTE: You may use composite video signal for connecting equipment with this case, connect the components B-Y output to the TV's PB input and the components R-Y output to the TV's PB 4. S-VIDEO has priority over VIDEO input. 2. Your input componentanoduttphuetscommapyobneenlat bCeRledouYtp-CuBt tCoRth. To ensure no ... and 4, but only one of these inputs may be used for composite video and component video input. 9 nnect the component CB output to the TV's PR input. 3. ANT B can only be displayed as a main picture. (ANT B cannot be displayed as a DVD player or Set Top...
...NOTE: You may use composite video signal for connecting equipment with this case, connect the components B-Y output to the TV's PB input and the components R-Y output to the TV's PB 4. S-VIDEO has priority over VIDEO input. 2. Your input componentanoduttphuetscommapyobneenlat bCeRledouYtp-CuBt tCoRth. To ensure no ... and 4, but only one of these inputs may be used for composite video and component video input. 9 nnect the component CB output to the TV's PR input. 3. ANT B can only be displayed as a main picture. (ANT B cannot be displayed as a DVD player or Set Top...

Owners Guide
Page 11
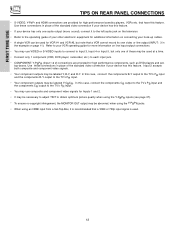
REAR PANEL CONNECTIONS TYPICAL FULL-FEATURE SETUP FIRST TIME USE DVD Player OUTPUT Y PB/CB PR/CR L R Outside antenna or digital cable INPUT OUTPUT Cable TV Box ANT A To Converter ANT B MONITOR OUT S-VIDEO INPUT 4 INPUT 3 INPUT 2 Y/ VIDEO PB INPUT 1 Y/ VIDEO PB HDMI 1 VIDEO L ...AUDIO R PR PR (MONO) (MONO) (MONO) (MONO) RS232C 1 2 345 6 789 External Digital Component with the purchase of this TV, except when noted as "provided". 11 Inputs 1 and 2 can accommodate Composite and Component video signals. 4. Cables are not included with HDMI output capability HDMI...
REAR PANEL CONNECTIONS TYPICAL FULL-FEATURE SETUP FIRST TIME USE DVD Player OUTPUT Y PB/CB PR/CR L R Outside antenna or digital cable INPUT OUTPUT Cable TV Box ANT A To Converter ANT B MONITOR OUT S-VIDEO INPUT 4 INPUT 3 INPUT 2 Y/ VIDEO PB INPUT 1 Y/ VIDEO PB HDMI 1 VIDEO L ...AUDIO R PR PR (MONO) (MONO) (MONO) (MONO) RS232C 1 2 345 6 789 External Digital Component with the purchase of this TV, except when noted as "provided". 11 Inputs 1 and 2 can accommodate Composite and Component video signals. 4. Cables are not included with HDMI output capability HDMI...
Owners Guide
Page 12
...input-output connections. • You may use composite and component video signals for Inputs 1 and 2. • It may be necessary to adjust TINT to the TV's PR input. • Your component outputs may use VIDEO or S-VIDEO inputs to connect to Input 3, Input 4 or Input 5, but note that a ... for high performance laserdisc players, VCRs etc. Refer to your device has this case, connect the components CB output to the TV's PB input and the components CR output to the TV's PR input. • You may be labeled Y, B-Y, and R-Y. Use these may be labeled Y-CBCR. In this feature. &#...
...input-output connections. • You may use composite and component video signals for Inputs 1 and 2. • It may be necessary to adjust TINT to the TV's PR input. • Your component outputs may use VIDEO or S-VIDEO inputs to connect to Input 3, Input 4 or Input 5, but note that a ... for high performance laserdisc players, VCRs etc. Refer to your device has this case, connect the components CB output to the TV's PB input and the components CR output to the TV's PR input. • You may be labeled Y, B-Y, and R-Y. Use these may be labeled Y-CBCR. In this feature. &#...

Owners Guide
Page 14
...INPUT terminal, then press the INPUTS button to the previous channel. Input 5 Ant B Ant A Input 1 Input 2 Move SEL Select NOTE: When the TV is OFF), the set to INPUT 1 to the INPUT (MONO)/L(AUDIO) jack. 3. CONNECTING A MONAURAL AUDIO SOURCE TO INPUT1~INPUT5 1. Connect the cable from... the VIDEO INPUT JACK on the back panel of the TV (i.e., VCR/laserdisc player, etc. FIRST TIME USE CONNECTING EXTERNAL VIDEO SOURCES The exact arrangement you may need to modify them to view the program...
...INPUT terminal, then press the INPUTS button to the previous channel. Input 5 Ant B Ant A Input 1 Input 2 Move SEL Select NOTE: When the TV is OFF), the set to INPUT 1 to the INPUT (MONO)/L(AUDIO) jack. 3. CONNECTING A MONAURAL AUDIO SOURCE TO INPUT1~INPUT5 1. Connect the cable from... the VIDEO INPUT JACK on the back panel of the TV (i.e., VCR/laserdisc player, etc. FIRST TIME USE CONNECTING EXTERNAL VIDEO SOURCES The exact arrangement you may need to modify them to view the program...

Owners Guide
Page 15
... disappears automatically after approximately four seconds. 5. A single VCR can be abnormal if the connection is played back will be used for more information on the TV set below. 2. ANT A To Converter ANT B MONITOR OUT S-VIDEO INPUT 4 INPUT 3 INPUT 2 Y/ VIDEO PB INPUT 1 Y/ VIDEO PB HDMI 1 VIDEO L AUDIO R AUDIO TO HI-FI PR...
... disappears automatically after approximately four seconds. 5. A single VCR can be abnormal if the connection is played back will be used for more information on the TV set below. 2. ANT A To Converter ANT B MONITOR OUT S-VIDEO INPUT 4 INPUT 3 INPUT 2 Y/ VIDEO PB INPUT 1 Y/ VIDEO PB HDMI 1 VIDEO L AUDIO R AUDIO TO HI-FI PR...

Owners Guide
Page 16
... connections. 16 Press the INPUTS button, then select INPUT 3 from the VCR or laserdisc player. A single VCR can be used for more information on the TV set below. 2. Connect the cable from the AUDIO OUT L of the VCR or the laserdisc player to rear panel jacks. Connect the cable from the...
... connections. 16 Press the INPUTS button, then select INPUT 3 from the VCR or laserdisc player. A single VCR can be used for more information on the TV set below. 2. Connect the cable from the AUDIO OUT L of the VCR or the laserdisc player to rear panel jacks. Connect the cable from the...

Owners Guide
Page 17
... PB HDMI 1 VIDEO L AUDIO R AUDIO TO HI-FI PR PR (MONO) (MONO) (MONO) (MONO) RS232C 1 2 345 6 789 DVI to a display. 4. The HDMI input on the TV set top box or DVD player. HDMI is a cryptographic system that is played back will be abnormal if the connection is loose. 2. Press the INPUTS...
... PB HDMI 1 VIDEO L AUDIO R AUDIO TO HI-FI PR PR (MONO) (MONO) (MONO) (MONO) RS232C 1 2 345 6 789 DVI to a display. 4. The HDMI input on the TV set top box or DVD player. HDMI is a cryptographic system that is played back will be abnormal if the connection is loose. 2. Press the INPUTS...

Owners Guide
Page 18
... view the program from the Laserdisc/DVD player or HDTV set top box to the INPUT (AUDIO/L) jack. 6. See page 12 for tips on the TV set top box to the INPUT (PB) jack. 3. Connect the cable from the INPUTS menu to return to rear panel jacks. Completely insert the connection...
... view the program from the Laserdisc/DVD player or HDTV set top box to the INPUT (AUDIO/L) jack. 6. See page 12 for tips on the TV set top box to the INPUT (PB) jack. 3. Connect the cable from the INPUTS menu to return to rear panel jacks. Completely insert the connection...

Owners Guide
Page 19
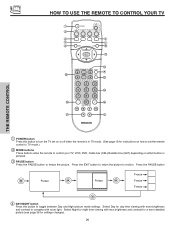
... to control your cable box). To operate your set-top-box or satellite receiver, point the remote at the remote sensor of the TV and press the TV button. If you have a satellite receiver, use this button to program your satellite receiver (see page 28 for instruction on how to...DVD button. The remote will now control your television. THE REMOTE CONTROL THE REMOTE CONTROL In addition to controlling all the functions on your HITACHI Projection TV, the new remote control is designed to operate different types of the VCR and press the VCR button. To operate your cable box, point...
... to control your cable box). To operate your set-top-box or satellite receiver, point the remote at the remote sensor of the TV and press the TV button. If you have a satellite receiver, use this button to program your satellite receiver (see page 28 for instruction on how to...DVD button. The remote will now control your television. THE REMOTE CONTROL THE REMOTE CONTROL In addition to controlling all the functions on your HITACHI Projection TV, the new remote control is designed to operate different types of the VCR and press the VCR button. To operate your cable box, point...
Owners Guide
Page 20
... and contrast to compete with more detailed picture (see page 36 for instructions on how to set on or off when the remote is in TV mode. (See page 19 for settings changes). 20 Select Day for day time viewing with room light. HOW TO USE THE REMOTE TO CONTROL ...YOUR TV ቢ ባ ቧ ብ ቦ ቨ ቩ ቫ ቭ ተ ቱ ቲ ታ ቤ THE REMOTE CONTROL ቢ POWER button Press this button to toggle...
... and contrast to compete with more detailed picture (see page 36 for instructions on how to set on or off when the remote is in TV mode. (See page 19 for settings changes). 20 Select Day for day time viewing with room light. HOW TO USE THE REMOTE TO CONTROL ...YOUR TV ቢ ባ ቧ ብ ቦ ቨ ቩ ቫ ቭ ተ ቱ ቲ ታ ቤ THE REMOTE CONTROL ቢ POWER button Press this button to toggle...

Owners Guide
Page 21
... original 16:9 aspect ratio. 16:9 Zoom Use this button to quickly change the picture format ASPECT ratio. HOW TO USE THE REMOTE TO CONTROL YOUR TV ቦ ASPECT button Press this aspect to display conventional (4:3) images.
... original 16:9 aspect ratio. 16:9 Zoom Use this button to quickly change the picture format ASPECT ratio. HOW TO USE THE REMOTE TO CONTROL YOUR TV ቦ ASPECT button Press this aspect to display conventional (4:3) images.

Owners Guide
Page 22
... 2 for Video 2. Select to choose Antenna B. Use the CURSOR and SELECT buttons to access the INPUTS menu. HOW TO USE THE REMOTE TO CONTROL YOUR TV ቧ INPUTS button When the remote control is in TV mode, press this button to select the inputs that are being used.
... 2 for Video 2. Select to choose Antenna B. Use the CURSOR and SELECT buttons to access the INPUTS menu. HOW TO USE THE REMOTE TO CONTROL YOUR TV ቧ INPUTS button When the remote control is in TV mode, press this button to select the inputs that are being used.

Owners Guide
Page 23
.... ቭ CURSOR buttons/SELECT button All the On-Screen Display features can be set . THE REMOTE CONTROL HOW TO USE THE REMOTE TO CONTROL YOUR TV ቨ PICTURE-IN-PICTURE button See separate section on pages 25-27 for numeric entries. INFO Day/Night Mode Closed Captioning Day CC Off View...
.... ቭ CURSOR buttons/SELECT button All the On-Screen Display features can be set . THE REMOTE CONTROL HOW TO USE THE REMOTE TO CONTROL YOUR TV ቨ PICTURE-IN-PICTURE button See separate section on pages 25-27 for numeric entries. INFO Day/Night Mode Closed Captioning Day CC Off View...


