
Owners Guide
Page 2
...; There are no user serviceable parts inside the television. • Model and serial numbers are not expressly approved by HITACHI could void the user's authority to the presence of HITACHI televisions. INSERT THE POWER CORD INTO A 120 VOLT 60Hz OUTLET. NEVER CONNECT THE TELEVISION TO 50Hz, DIRECT CURRENT, OR ANYTHING OTHER THAN THE SPECIFIED VOLTAGE. NOTE: This television receiver will enable HITACHI to very high voltages and other hazards...
...; There are no user serviceable parts inside the television. • Model and serial numbers are not expressly approved by HITACHI could void the user's authority to the presence of HITACHI televisions. INSERT THE POWER CORD INTO A 120 VOLT 60Hz OUTLET. NEVER CONNECT THE TELEVISION TO 50Hz, DIRECT CURRENT, OR ANYTHING OTHER THAN THE SPECIFIED VOLTAGE. NOTE: This television receiver will enable HITACHI to very high voltages and other hazards...
Owners Guide
Page 3
... laws. Keep these instructions. 2. Heed all instructions. 5. Do not block any heat sources such as programs from other fixed (non-moving pictures. Do not install near water. 6. The wide blade or the third prong are NOT COVERED by your safety. ticularly at www.epsc.ca (in wide screen format or zoomed to fit the screen with respect to display wide screen pictures. ufacturer...
... laws. Keep these instructions. 2. Heed all instructions. 5. Do not block any heat sources such as programs from other fixed (non-moving pictures. Do not install near water. 6. The wide blade or the third prong are NOT COVERED by your safety. ticularly at www.epsc.ca (in wide screen format or zoomed to fit the screen with respect to display wide screen pictures. ufacturer...

Owners Guide
Page 5
... color changes, and increased chance of the picture screen center. Picture brightness decreases as those of the receiver. FIRST TIME USE HOW TO SET UP YOUR NEW HITACHI PROJECTION TV ANTENNA Unless your TV is connected to a cable TV system or to a centralized antenna system, a good outdoor TV antenna is recommended for best performance. Differences in an exceptionally good signal area that the location selected allows a free flow of air to and from the television until...
... color changes, and increased chance of the picture screen center. Picture brightness decreases as those of the receiver. FIRST TIME USE HOW TO SET UP YOUR NEW HITACHI PROJECTION TV ANTENNA Unless your TV is connected to a cable TV system or to a centralized antenna system, a good outdoor TV antenna is recommended for best performance. Differences in an exceptionally good signal area that the location selected allows a free flow of air to and from the television until...
Owners Guide
Page 6
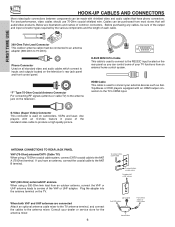
... SetTop-Boxes or DVD players equipped with an S-Video feature in place of common connectors. Cables can control some of your TV functions from an external home control system. Phono Connector Used on the television. 12345 6789 D-SUB MINI 9-Pin Cable This cable is used to connect to the TV's HDMI input. When both VHF and UHF antennas are illustrations and names of the standard video cable to produce a high quality picture. VHF...
... SetTop-Boxes or DVD players equipped with an S-Video feature in place of common connectors. Cables can control some of your TV functions from an external home control system. Phono Connector Used on the television. 12345 6789 D-SUB MINI 9-Pin Cable This cable is used to connect to the TV's HDMI input. When both VHF and UHF antennas are illustrations and names of the standard video cable to produce a high quality picture. VHF...
Owners Guide
Page 7
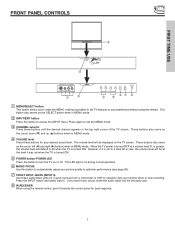
... the MENU mode. ቤ CHANNEL selector Press these buttons for a quick hook-up (̆) buttons when in MENU mode. ብ VOLUME level Press these buttons until the desired channel appears in the top right corner of the TV screen. This button also serves as the cursor down (̄) and up from a camcorder or VCR to turn the TV on the TV screen. VOL+ CH- FIRST TIME USE FRONT PANEL CONTROLS ቩ POWER ቦ INPUT 5 AUDIO S-VIDEO VIDEO...
... the MENU mode. ቤ CHANNEL selector Press these buttons for a quick hook-up (̆) buttons when in MENU mode. ብ VOLUME level Press these buttons until the desired channel appears in the top right corner of the TV screen. This button also serves as the cursor down (̄) and up from a camcorder or VCR to turn the TV on the TV screen. VOL+ CH- FIRST TIME USE FRONT PANEL CONTROLS ቩ POWER ቦ INPUT 5 AUDIO S-VIDEO VIDEO...
Owners Guide
Page 12
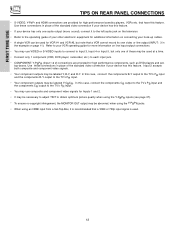
... for high performance laserdisc players, VCRs etc. FIRST TIME USE TIPS ON REAR PANEL CONNECTIONS • S-VIDEO, Y-PbPr and HDMI connections are provided for high performance components, such as DVD players and set- Refer to your VCR operating guide for more information on line input-output connections. • You may use composite and component video signals for Inputs 1 and 2. • It may be necessary to adjust TINT to obtain optimum picture quality when using the Y-PBPR inputs (see...
... for high performance laserdisc players, VCRs etc. FIRST TIME USE TIPS ON REAR PANEL CONNECTIONS • S-VIDEO, Y-PbPr and HDMI connections are provided for high performance components, such as DVD players and set- Refer to your VCR operating guide for more information on line input-output connections. • You may use composite and component video signals for Inputs 1 and 2. • It may be necessary to adjust TINT to obtain optimum picture quality when using the Y-PBPR inputs (see...

Owners Guide
Page 14
... Audio Video OUTPUT VCR 14 Then press the SELECT button to view the program from the INPUTS menu to confirm your choice. CONNECTING A MONAURAL AUDIO SOURCE TO INPUT1~INPUT5 1. Check the owner's manual of each component for the location of each component. However, you use to connect the VCR, camcorder, laserdisc player, DVD player, or HDTV Set Top Box to the previous channel. Before Operating External Video Source Connect an external source to the INPUT terminal, then press the INPUTS button...
... Audio Video OUTPUT VCR 14 Then press the SELECT button to view the program from the INPUTS menu to confirm your choice. CONNECTING A MONAURAL AUDIO SOURCE TO INPUT1~INPUT5 1. Check the owner's manual of each component for the location of each component. However, you use to connect the VCR, camcorder, laserdisc player, DVD player, or HDTV Set Top Box to the previous channel. Before Operating External Video Source Connect an external source to the INPUT terminal, then press the INPUTS button...

Owners Guide
Page 15
... connection cord plugs when connecting to the INPUT (AUDIO/L) jack. 4. Refer to the INPUT (VIDEO) jack, as shown on line input-output connections. 15 Connect the cable from the VCR or laserdisc player. Select Antenna from the AUDIO OUT L of the VCR or the laserdisc player to the previous channel. Connect the cable from the INPUTS menu to return to the INPUT (AUDIO/R) jack. 3. FIRST TIME USE CONNECTING EXTERNAL VIDEO SOURCES CONNECTING A STEREO SOURCE TO INPUT1~INPUT5 1. Connect the cable from the AUDIO...
... connection cord plugs when connecting to the INPUT (AUDIO/L) jack. 4. Refer to the INPUT (VIDEO) jack, as shown on line input-output connections. 15 Connect the cable from the VCR or laserdisc player. Select Antenna from the AUDIO OUT L of the VCR or the laserdisc player to the previous channel. Connect the cable from the INPUTS menu to return to the INPUT (AUDIO/R) jack. 3. FIRST TIME USE CONNECTING EXTERNAL VIDEO SOURCES CONNECTING A STEREO SOURCE TO INPUT1~INPUT5 1. Connect the cable from the AUDIO...

Owners Guide
Page 16
... INPUT (AUDIO/R) jack. 3. A single VCR can be abnormal if the connection is loose. 2. Connect the cable from the INPUTS menu to return to the INPUT (S-VIDEO) jack, as shown on line input-output connections. 16 Select Antenna from the AUDIO OUT R of the VCR or the laserdisc player to the previous channel. Connect the cable from the S-VIDEO OUT of the VCR or the laserdisc player to rear panel jacks. FIRST TIME USE CONNECTING EXTERNAL VIDEO SOURCES CONNECTING AN S-VIDEO...
... INPUT (AUDIO/R) jack. 3. A single VCR can be abnormal if the connection is loose. 2. Connect the cable from the INPUTS menu to return to the INPUT (S-VIDEO) jack, as shown on line input-output connections. 16 Select Antenna from the AUDIO OUT R of the VCR or the laserdisc player to the previous channel. Connect the cable from the S-VIDEO OUT of the VCR or the laserdisc player to rear panel jacks. FIRST TIME USE CONNECTING EXTERNAL VIDEO SOURCES CONNECTING AN S-VIDEO...

Owners Guide
Page 17
... High-bandwidth Digital Content Protection (HDCP). Press the INPUTS button, then select INPUT 1 from the INPUTS menu to view the program from the output of the HDTV set top box or DVD player to HDMI connection cable from the HDTV set top box or DVD player. HDMI-HDMI DVI-HDMI ANT A To Converter ANT B MONITOR OUT S-VIDEO INPUT 4 INPUT 3 INPUT 2 Y/ VIDEO PB INPUT 1 Y/ VIDEO PB HDMI 1 VIDEO L AUDIO R AUDIO TO HI-FI PR PR (MONO) (MONO) (MONO) (MONO) RS232C 1 2 345 6 789 HDMI Cable HDMI Output DVD Player or HDTV STB ANT A To Converter ANT B MONITOR OUT S-VIDEO INPUT 4 INPUT...
... High-bandwidth Digital Content Protection (HDCP). Press the INPUTS button, then select INPUT 1 from the INPUTS menu to view the program from the output of the HDTV set top box or DVD player to HDMI connection cable from the HDTV set top box or DVD player. HDMI-HDMI DVI-HDMI ANT A To Converter ANT B MONITOR OUT S-VIDEO INPUT 4 INPUT 3 INPUT 2 Y/ VIDEO PB INPUT 1 Y/ VIDEO PB HDMI 1 VIDEO L AUDIO R AUDIO TO HI-FI PR PR (MONO) (MONO) (MONO) (MONO) RS232C 1 2 345 6 789 HDMI Cable HDMI Output DVD Player or HDTV STB ANT A To Converter ANT B MONITOR OUT S-VIDEO INPUT 4 INPUT...
Owners Guide
Page 25
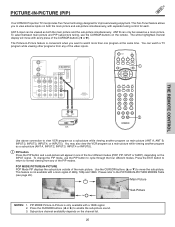
...-picture while viewing another program as main picture (ANT A, ANT B, INPUT:2, INPUT:3, INPUT:4, or INPUT:5). PIP MODE Picture-in one program at the same time. PICTURE-IN-PICTURE (PIP) Your HITACHI Projection TV incorporates Two Tuner technology designed for each. You can watch more than one of the main picture. ANT B can be viewed as both the main picture and sub-picture simultaneously, with every press of the video inputs. ANT A To Converter ANT B MONITOR OUT S-VIDEO INPUT 4 INPUT 3 INPUT 2 Y/ VIDEO PB INPUT 1 Y/ VIDEO PB HDMI 1 VIDEO L AUDIO R AUDIO...
...-picture while viewing another program as main picture (ANT A, ANT B, INPUT:2, INPUT:3, INPUT:4, or INPUT:5). PIP MODE Picture-in one program at the same time. PICTURE-IN-PICTURE (PIP) Your HITACHI Projection TV incorporates Two Tuner technology designed for each. You can watch more than one of the main picture. ANT B can be viewed as both the main picture and sub-picture simultaneously, with every press of the video inputs. ANT A To Converter ANT B MONITOR OUT S-VIDEO INPUT 4 INPUT 3 INPUT 2 Y/ VIDEO PB INPUT 1 Y/ VIDEO PB HDMI 1 VIDEO L AUDIO R AUDIO...
Owners Guide
Page 29
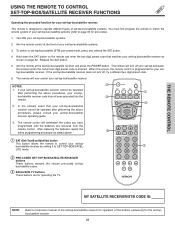
... codes. ቤ EXCLUSIVE TV buttons These buttons are removed from the remote control. MY SATELLITE RECEIVER/STB CODE IS: NOTE: Refer to instruction manual of the set-top-box/satellite receiver for operation of your set-top-box/satellite systems (refer to page 32 for pre-codes). 1. Aim the remote control at the set-top-box/satellite receiver and press the POWER button. The remote will turn off your set-top-box/satellite receiver. THE REMOTE CONTROL USING THE REMOTE TO CONTROL SET-TOP-BOX/SATELLITE RECEIVER FUNCTIONS Operating...
... codes. ቤ EXCLUSIVE TV buttons These buttons are removed from the remote control. MY SATELLITE RECEIVER/STB CODE IS: NOTE: Refer to instruction manual of the set-top-box/satellite receiver for operation of your set-top-box/satellite systems (refer to page 32 for pre-codes). 1. Aim the remote control at the set-top-box/satellite receiver and press the POWER button. The remote will turn off your set-top-box/satellite receiver. THE REMOTE CONTROL USING THE REMOTE TO CONTROL SET-TOP-BOX/SATELLITE RECEIVER FUNCTIONS Operating...
Owners Guide
Page 35
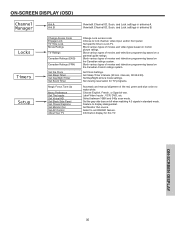
... movies and television programming based on a parental guide ratings. Set Day/Night picture mode settings. Select between 1080i and 540p scan mode. Select to lock channel, video input, and/or front panel. Locks Timers Setup Change Access Code Engage Lock TV Time Lock Movie Ratings TV Ratings Canadian Ratings (ENG) Canadian Ratings (FRN) Set the Clock Set Sleep Timer Set Day/Night Timer Set Event Timer Magic Focus Tune Up Menu Preference Set The Inputs Set Virtual HD Set Black Side Panel Set Closed Captions Set Monitor Out Set AV Control About Your TV Change Lock access code. Set the...
... movies and television programming based on a parental guide ratings. Set Day/Night picture mode settings. Select between 1080i and 540p scan mode. Select to lock channel, video input, and/or front panel. Locks Timers Setup Change Access Code Engage Lock TV Time Lock Movie Ratings TV Ratings Canadian Ratings (ENG) Canadian Ratings (FRN) Set the Clock Set Sleep Timer Set Day/Night Timer Set Event Timer Magic Focus Tune Up Menu Preference Set The Inputs Set Virtual HD Set Black Side Panel Set Closed Captions Set Monitor Out Set AV Control About Your TV Change Lock access code. Set the...

Owners Guide
Page 38
... adjust and balance the listed individual colors to make them either deeper or more pure depending on the user's preference. ON-SCREEN DISPLAY Video Picture Mode Contrast Brightness Color Tint Sharpness Color Temperature Black Enhancement Edge Enhancement Reset Video Settings Move SEL Select ANT A/B Day 100% 50% 50% 50% High Middle High Night Video Color Management Color Decoding Auto Color Noise Reduction Auto Movie Mode Move SEL Select Off Off Off Color Management Use this input to the original factory settings...
... adjust and balance the listed individual colors to make them either deeper or more pure depending on the user's preference. ON-SCREEN DISPLAY Video Picture Mode Contrast Brightness Color Tint Sharpness Color Temperature Black Enhancement Edge Enhancement Reset Video Settings Move SEL Select ANT A/B Day 100% 50% 50% 50% High Middle High Night Video Color Management Color Decoding Auto Color Noise Reduction Auto Movie Mode Move SEL Select Off Off Off Color Management Use this input to the original factory settings...
Owners Guide
Page 47
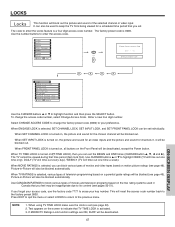
... blocked automatically. When ENGAGE LOCK is activated. 3. NOTE: 1. It can block various types of the selected channel or video input. Select CHANGE ACCESS CODE to change the access code number, select Change Access Code. Use CANADIAN RATINGS to block various types of television programming based on the screen to its content (see page 52). 2. Video Audio Aspect Chan. When MOVIE RATINGS is 0000. Picture-in Canada that TV TIME LOCK is selected, SET CHANNEL LOCK, SET INPUT LOCK, and SET FRONT PANEL LOCK can set .
... blocked automatically. When ENGAGE LOCK is activated. 3. NOTE: 1. It can block various types of the selected channel or video input. Select CHANGE ACCESS CODE to change the access code number, select Change Access Code. Use CANADIAN RATINGS to block various types of television programming based on the screen to its content (see page 52). 2. Video Audio Aspect Chan. When MOVIE RATINGS is 0000. Picture-in Canada that TV TIME LOCK is selected, SET CHANNEL LOCK, SET INPUT LOCK, and SET FRONT PANEL LOCK can set .
Owners Guide
Page 56
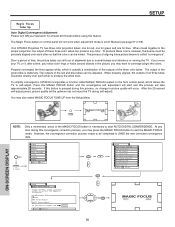
... FOCUS button to SAVE the new corrected convergence data. 6 times Video Audio Aspect Chan. Manager Locks Timers Setup Move SEL Sel Setup Magic Focus Tune Up Menu Preference Set The Inputs Set Virtual HD Set Black Side Panel Set Closed Captions or Set Monitor Out Set AV Control About Your TV Move SEL Select Setup Magic Focus Tune Up Aligns the Red, Green, and Blue colors to start and this process, no change in picture quality will occur. Your HITACHI Projection TV has three color projection tubes: one for red, one for green...
... FOCUS button to SAVE the new corrected convergence data. 6 times Video Audio Aspect Chan. Manager Locks Timers Setup Move SEL Sel Setup Magic Focus Tune Up Menu Preference Set The Inputs Set Virtual HD Set Black Side Panel Set Closed Captions or Set Monitor Out Set AV Control About Your TV Move SEL Select Setup Magic Focus Tune Up Aligns the Red, Green, and Blue colors to start and this process, no change in picture quality will occur. Your HITACHI Projection TV has three color projection tubes: one for red, one for green...
Owners Guide
Page 57
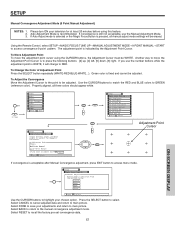
.... 2. If Auto Adjust mode is selected or the Magic Focus button is fixed and cannot be adjusted. Use the CURSOR buttons to match the RED and BLUE colors to access convergence 9 point pattern. Manager Locks Timers Setup Move SEL Sel Setup Magic Focus Tune Up Aligns the Red, Green, and Blue colors to recall the factory pre-set convergence data. 57 ON-SCREEN DISPLAY Using the Remote Control, select SETUPǞMAGIC FOCUS TUNE UPǞMANUAL ADJUSTMENT MODEǞ9 POINT MANUALǞSTART to GREEN (reference color). Select RESET to...
.... 2. If Auto Adjust mode is selected or the Magic Focus button is fixed and cannot be adjusted. Use the CURSOR buttons to match the RED and BLUE colors to access convergence 9 point pattern. Manager Locks Timers Setup Move SEL Sel Setup Magic Focus Tune Up Aligns the Red, Green, and Blue colors to recall the factory pre-set convergence data. 57 ON-SCREEN DISPLAY Using the Remote Control, select SETUPǞMAGIC FOCUS TUNE UPǞMANUAL ADJUSTMENT MODEǞ9 POINT MANUALǞSTART to GREEN (reference color). Select RESET to...
Owners Guide
Page 58
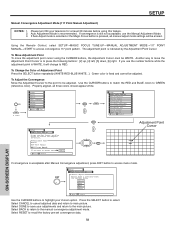
... white. 6 times Video Audio Aspect Chan. Properly aligned, all manual adjust mode settings will change to save your chosen option. Select DONE to RED. Select RESET to select. If convergence is indicated by the Adjustment Point Cursor. Manager Locks Timers Setup Move SEL Sel Setup Magic Focus Tune Up Menu Preference Set The Inputs Set Virtual HD Set Black Side Panel Set Closed Captions or Set Monitor Out Set AV Control About Your TV Move SEL Select or Setup Magic Focus Tune Up Aligns the Red, Green, and Blue colors...
... white. 6 times Video Audio Aspect Chan. Properly aligned, all manual adjust mode settings will change to save your chosen option. Select DONE to RED. Select RESET to select. If convergence is indicated by the Adjustment Point Cursor. Manager Locks Timers Setup Move SEL Sel Setup Magic Focus Tune Up Menu Preference Set The Inputs Set Virtual HD Set Black Side Panel Set Closed Captions or Set Monitor Out Set AV Control About Your TV Move SEL Select or Setup Magic Focus Tune Up Aligns the Red, Green, and Blue colors...
Owners Guide
Page 69
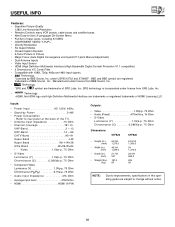
..., cable boxes and satellite boxes. • New Easy-to-Use (3-Language) On-Screen Menu • Full Set of Input Jacks, including S-VIDEO • COMPONENT VIDEO: Y-PB/PR • Velocity Modulation • Six Aspect Modes • Closed Caption Decoder • 2-Tuner Picture in this operating guide are subject to change without notice. 69 Manufactured under USP5510752 and 5736897. Refer to improvements, specifications in Picture • Magic Focus (Auto Digital Convergence and 9-point/117-point Manual Adjustment) • Dual Antenna Inputs...
..., cable boxes and satellite boxes. • New Easy-to-Use (3-Language) On-Screen Menu • Full Set of Input Jacks, including S-VIDEO • COMPONENT VIDEO: Y-PB/PR • Velocity Modulation • Six Aspect Modes • Closed Caption Decoder • 2-Tuner Picture in this operating guide are subject to change without notice. 69 Manufactured under USP5510752 and 5736897. Refer to improvements, specifications in Picture • Magic Focus (Auto Digital Convergence and 9-point/117-point Manual Adjustment) • Dual Antenna Inputs...

Owners Guide
Page 75
... Locks Change Access Code 47 Channel Lock 47 Input Lock 47 Front Panel Lock 47 TV Time Lock 47 Movie Ratings 48 TV Ratings 49 TV Ratings (Canadian - English 50 TV Ratings (Canadian - French 51 Loudness 41 M Magic Focus Auto Convergence 7, 56 Manual Convergence 57-58 Menu Preference Language 59 Background 60 Monitor Out 9, 64 P Picture Mode 36 Picture-in-Picture (PIP 25-27 Picture-outside-Picture (POP 25 R Remote Control Functions 19-32 Programming Codes 28-32 Installing Batteries 4 S Sharpness 36-37 Speakers 41 Connecting External Speakers 5, 13 T Timers...
... Locks Change Access Code 47 Channel Lock 47 Input Lock 47 Front Panel Lock 47 TV Time Lock 47 Movie Ratings 48 TV Ratings 49 TV Ratings (Canadian - English 50 TV Ratings (Canadian - French 51 Loudness 41 M Magic Focus Auto Convergence 7, 56 Manual Convergence 57-58 Menu Preference Language 59 Background 60 Monitor Out 9, 64 P Picture Mode 36 Picture-in-Picture (PIP 25-27 Picture-outside-Picture (POP 25 R Remote Control Functions 19-32 Programming Codes 28-32 Installing Batteries 4 S Sharpness 36-37 Speakers 41 Connecting External Speakers 5, 13 T Timers...


