
Owners Guide
Page 5
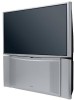
... separation, place the external speakers at its large viewing screen. FIRST TIME USE HOW TO SET UP YOUR NEW HITACHI PROJECTION TV ANTENNA Unless your TV is connected to a cable TV system or to and ...from the perforated back cover of the set failure, do not place the TV where temperatures can... indoor antenna may cause the picture to distort if they are placed too close as those of set . To avoid cabinet warping, cabinet color changes, and increased chance of external speakers, may be...
... separation, place the external speakers at its large viewing screen. FIRST TIME USE HOW TO SET UP YOUR NEW HITACHI PROJECTION TV ANTENNA Unless your TV is connected to a cable TV system or to and ...from the perforated back cover of the set failure, do not place the TV where temperatures can... indoor antenna may cause the picture to distort if they are placed too close as those of set . To avoid cabinet warping, cabinet color changes, and increased chance of external speakers, may be...
Owners Guide
Page 7
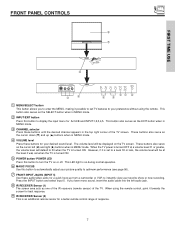
... Sensor (2) This is turned ON. When the TV power is turned OFF at the level it possible to set TV features to 30 when the TV is an additional remote sensor for Ant A/B and INPUT:1,2,3,4,5. This LED ...menu for a better remote control range of the TV screen. If you to enter the MENU, making it was set to a level 30 or less, the volume level will default to your desired sound level. FRONT PANEL CONTROLS ...;) and up from a camcorder or VCR to turn the TV on or off. However, if it is set when the TV is on the TV screen. This button also serves as the cursor left audio jack. &#...
... Sensor (2) This is turned ON. When the TV power is turned OFF at the level it possible to set TV features to 30 when the TV is an additional remote sensor for Ant A/B and INPUT:1,2,3,4,5. This LED ...menu for a better remote control range of the TV screen. If you to enter the MENU, making it was set to a level 30 or less, the volume level will default to your desired sound level. FRONT PANEL CONTROLS ...;) and up from a camcorder or VCR to turn the TV on or off. However, if it is set when the TV is on the TV screen. This button also serves as the cursor left audio jack. &#...
Owners Guide
Page 9
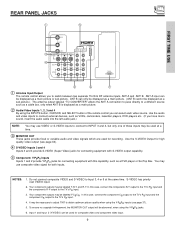
... "TO CONVERTER" allows the ANT A connection to pass directly to a different source such as a cable box, only when ANT B is displayed as a DVD player or Set Top Box. Use the S-VIDEO Output for high quality video output (see page 37). 5. S-VIDEO has priority over VIDEO input. 2. It may be used for...
... "TO CONVERTER" allows the ANT A connection to pass directly to a different source such as a cable box, only when ANT B is displayed as a DVD player or Set Top Box. Use the S-VIDEO Output for high quality video output (see page 37). 5. S-VIDEO has priority over VIDEO input. 2. It may be used for...
Owners Guide
Page 10
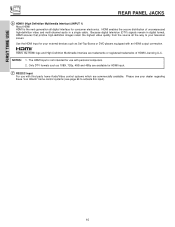
... Multimedia Interface) (INPUT 1) About HDMI HDMI is not intended for consumer electronics. Please see your dealer regarding these "non Hitachi" home control systems (see page 64 to your external devices such as Set-Top-Boxes or DVD players equipped with third party home Audio/Video control systems which are trademarks or registered...
... Multimedia Interface) (INPUT 1) About HDMI HDMI is not intended for consumer electronics. Please see your dealer regarding these "non Hitachi" home control systems (see page 64 to your external devices such as Set-Top-Boxes or DVD players equipped with third party home Audio/Video control systems which are trademarks or registered...

Owners Guide
Page 12
...Refer to the TV's PR input. • Your component outputs may be abnormal, when using the Y-PBPR jacks. • When using an HDMI input from a Set-Top-Box, it is used for VCR #1 and VCR #2, but note that a VCR cannot record its own video or line output (INPUT: 3 in place of... TIME USE TIPS ON REAR PANEL CONNECTIONS • S-VIDEO, Y-PbPr and HDMI connections are provided for high performance components, such as DVD players and set- Use these connections in place of these connections in the example on connecting your device has only one of the standard video connection if your...
...Refer to the TV's PR input. • Your component outputs may be abnormal, when using the Y-PBPR jacks. • When using an HDMI input from a Set-Top-Box, it is used for VCR #1 and VCR #2, but note that a VCR cannot record its own video or line output (INPUT: 3 in place of... TIME USE TIPS ON REAR PANEL CONNECTIONS • S-VIDEO, Y-PbPr and HDMI connections are provided for high performance components, such as DVD players and set- Use these connections in place of these connections in the example on connecting your device has only one of the standard video connection if your...

Owners Guide
Page 14
... OUT of each component for the location of video and audio inputs and outputs. Connect the cable from the VIDEO INPUT JACK on the TV set will appear to select the Antenna and Input of the TV (i.e., VCR/laserdisc player, etc. Press the INPUTS button, then select INPUT 1 from the INPUTS... B Ant A Input 1 Input 2 Move SEL Select NOTE: When the TV is set to VIDEO and a video signal is OFF), the set below. 2. However, you use to connect the VCR, camcorder, laserdisc player, DVD player, or HDTV Set Top Box to your TV set is dependent on the model and features of the VCR or...
... OUT of each component for the location of video and audio inputs and outputs. Connect the cable from the VIDEO INPUT JACK on the TV set will appear to select the Antenna and Input of the TV (i.e., VCR/laserdisc player, etc. Press the INPUTS button, then select INPUT 1 from the INPUTS... B Ant A Input 1 Input 2 Move SEL Select NOTE: When the TV is set to VIDEO and a video signal is OFF), the set below. 2. However, you use to connect the VCR, camcorder, laserdisc player, DVD player, or HDTV Set Top Box to your TV set is dependent on the model and features of the VCR or...

Owners Guide
Page 15
... player to the INPUT (VIDEO) jack, as shown on line input-output connections. 15 A single VCR can be used for more information on the TV set below. 2. Connect the cable from the VCR or laserdisc player. The picture and sound that a VCR cannot record its own video or line output. FIRST...
... player to the INPUT (VIDEO) jack, as shown on line input-output connections. 15 A single VCR can be used for more information on the TV set below. 2. Connect the cable from the VCR or laserdisc player. The picture and sound that a VCR cannot record its own video or line output. FIRST...

Owners Guide
Page 16
... 6 789 RL V S-VIDEO VCR NOTES: 1. A single VCR can be abnormal if the connection is played back will be used for more information on the TV set below. 2. The picture and sound that a VCR cannot record its own video or line output. FIRST TIME USE CONNECTING EXTERNAL VIDEO SOURCES CONNECTING AN S-VIDEO...
... 6 789 RL V S-VIDEO VCR NOTES: 1. A single VCR can be abnormal if the connection is played back will be used for more information on the TV set below. 2. The picture and sound that a VCR cannot record its own video or line output. FIRST TIME USE CONNECTING EXTERNAL VIDEO SOURCES CONNECTING AN S-VIDEO...

Owners Guide
Page 17
... also have to connect the AUDIO OUT (R/L) of the component to prevent illegal copying of INPUT 1. 2. The HDMI input on the TV set -up of uncompressed video to the previous channel. HDMI is loose. 2. The VIDEO OSD label disappears automatically after approximately four seconds. 3. Completely...program from the INPUTS menu to return to a display. 4. The connected digital output device controls the HDMI interface so proper set below. FIRST TIME USE CONNECTING EXTERNAL VIDEO SOURCES CONNECTING A COMPONENT SOURCE WITH HDMI or DVI CAPABILITY TO INPUT 1 1. Select Antenna from ...
... also have to connect the AUDIO OUT (R/L) of the component to prevent illegal copying of INPUT 1. 2. The HDMI input on the TV set -up of uncompressed video to the previous channel. HDMI is loose. 2. The VIDEO OSD label disappears automatically after approximately four seconds. 3. Completely...program from the INPUTS menu to return to a display. 4. The connected digital output device controls the HDMI interface so proper set below. FIRST TIME USE CONNECTING EXTERNAL VIDEO SOURCES CONNECTING A COMPONENT SOURCE WITH HDMI or DVI CAPABILITY TO INPUT 1 1. Select Antenna from ...

Owners Guide
Page 18
... be abnormal if the connection is loose. 2. Connect the cable from the CB/PB OUT or B-Y OUT of the laserdisc/DVD player or HDTV set top box to the INPUT (PR) jack. 4. The VIDEO OSD label disappears automatically after approximately four seconds. 7. Completely insert the connection cord plugs... the INPUTS button, then select INPUT 2 from the INPUTS menu to view the program from the AUDIO OUT L of the Laserdisc/DVD player or HDTV set top box to the INPUT (Y) jack, as shown on REAR PANEL CONNECTIONS. 18 CONNECTING EXTERNAL VIDEO SOURCES CONNECTING A COMPONENT SOURCE TO INPUT 1 OR 2: Y-...
... be abnormal if the connection is loose. 2. Connect the cable from the CB/PB OUT or B-Y OUT of the laserdisc/DVD player or HDTV set top box to the INPUT (PR) jack. 4. The VIDEO OSD label disappears automatically after approximately four seconds. 7. Completely insert the connection cord plugs... the INPUTS button, then select INPUT 2 from the INPUTS menu to view the program from the AUDIO OUT L of the Laserdisc/DVD player or HDTV set top box to the INPUT (Y) jack, as shown on REAR PANEL CONNECTIONS. 18 CONNECTING EXTERNAL VIDEO SOURCES CONNECTING A COMPONENT SOURCE TO INPUT 1 OR 2: Y-...

Owners Guide
Page 19
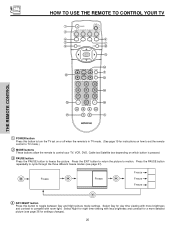
...operate your VCR, point the remote at the remote sensor of the DVD player and press the DVD button. The remote will now control your set-top-box or satellite receiver. To operate your DVD player, point the remote at the remote sensor of the VCR and press the VCR button... box). THE REMOTE CONTROL THE REMOTE CONTROL In addition to controlling all the functions on your HITACHI Projection TV, the new remote control is designed to operate different types of VCRs, CATV (Cable TV) converters, set-top-box, satellite receiver (SAT) and DVD players with one area. The remote will now control...
...operate your VCR, point the remote at the remote sensor of the DVD player and press the DVD button. The remote will now control your set-top-box or satellite receiver. To operate your DVD player, point the remote at the remote sensor of the VCR and press the VCR button... box). THE REMOTE CONTROL THE REMOTE CONTROL In addition to controlling all the functions on your HITACHI Projection TV, the new remote control is designed to operate different types of VCRs, CATV (Cable TV) converters, set-top-box, satellite receiver (SAT) and DVD players with one area. The remote will now control...
Owners Guide
Page 20
Press the PAUSE button repeatedly to cycle through the three different freeze modes (see page 36 for instructions on how to set on or off when the remote is pressed. ቤ PAUSE button Press the PAUSE button to freeze the picture. Select Night for night ...; ቫ ቭ ተ ቱ ቲ ታ ቤ THE REMOTE CONTROL ቢ POWER button Press this button to toggle between Day and Night picture mode settings. Select Day for day time viewing with more brightness and contrast to compete with less brightness and contrast for a more detailed picture (see page 27...
Press the PAUSE button repeatedly to cycle through the three different freeze modes (see page 36 for instructions on how to set on or off when the remote is pressed. ቤ PAUSE button Press the PAUSE button to freeze the picture. Select Night for night ...; ቫ ቭ ተ ቱ ቲ ታ ቤ THE REMOTE CONTROL ቢ POWER button Press this button to toggle between Day and Night picture mode settings. Select Day for day time viewing with more brightness and contrast to compete with less brightness and contrast for a more detailed picture (see page 27...
Owners Guide
Page 21
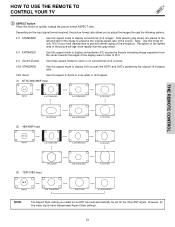
... 4:3 ZOOM2 4:3 ZOOM1 16:9 ZOOM (3) 720P/1080i Input 16:9 INPUT 16:9 STANDARD 16:9 STANDARD 16:9 ZOOM 4:3 ZOOM2 4:3 EXPANDED NOTE: The Aspect Style setting you to adjust the images through the following options. 4:3 STANDARD Use this button to quickly change the picture format ASPECT ratio. Note: Use this aspect...image expansion from the center towards the edges of the source. However, all five video inputs have independent Aspect Style settings. 21 HOW TO USE THE REMOTE TO CONTROL YOUR TV ቦ ASPECT button Press this aspect mode to display conventional (4:3) images.
... 4:3 ZOOM2 4:3 ZOOM1 16:9 ZOOM (3) 720P/1080i Input 16:9 INPUT 16:9 STANDARD 16:9 STANDARD 16:9 ZOOM 4:3 ZOOM2 4:3 EXPANDED NOTE: The Aspect Style setting you to adjust the images through the following options. 4:3 STANDARD Use this button to quickly change the picture format ASPECT ratio. Note: Use this aspect...image expansion from the center towards the edges of the source. However, all five video inputs have independent Aspect Style settings. 21 HOW TO USE THE REMOTE TO CONTROL YOUR TV ቦ ASPECT button Press this aspect mode to display conventional (4:3) images.

Owners Guide
Page 23
... direction and press the SELECT button to INFO VID 3 VIDEO: 3. 3:32 PM When a INFO YPBPR: 1 COMPONENT VID: 1 VIDEO: Y-PBPR Input is set or adjusted by using the CURSOR buttons and the SELECT button, except for a description. ቩ MENU button The MENU button will start the On-Screen... Display. ቪ GUIDE button [Cable Box (CBL), Satellite Receiver (SAT)/Set-Top-Box (STB) mode only] The use of the (CBL), and (SAT/STB). ቫ EXIT button This button will show momentarily after releasing INFO...
... direction and press the SELECT button to INFO VID 3 VIDEO: 3. 3:32 PM When a INFO YPBPR: 1 COMPONENT VID: 1 VIDEO: Y-PBPR Input is set or adjusted by using the CURSOR buttons and the SELECT button, except for a description. ቩ MENU button The MENU button will start the On-Screen... Display. ቪ GUIDE button [Cable Box (CBL), Satellite Receiver (SAT)/Set-Top-Box (STB) mode only] The use of the (CBL), and (SAT/STB). ቫ EXIT button This button will show momentarily after releasing INFO...

Owners Guide
Page 24
...Press the MUTE button again to turn the sound off at the level it was set to WHITE. Volume 8 Soft Mute 8 Mute 8 Closed Captioning will display automatically ...button The (-) DASH button can add any channel to 30 when the TV is turned on and Closed Caption is set when the TV is turned ON. ተ CHANNEL SELECTOR/FAVORITE CHANNEL (FAV CH) buttons The CHANNEL SELECTOR buttons are...4723; RECORD button Press twice (2 times) to highlighted GREEN. You can only be used when the remote control is set to a level 30 or less, the volume level will be performed by CHANNEL (CH) up (̆) or ...
...Press the MUTE button again to turn the sound off at the level it was set to WHITE. Volume 8 Soft Mute 8 Mute 8 Closed Captioning will display automatically ...button The (-) DASH button can add any channel to 30 when the TV is turned on and Closed Caption is set when the TV is turned ON. ተ CHANNEL SELECTOR/FAVORITE CHANNEL (FAV CH) buttons The CHANNEL SELECTOR buttons are...4723; RECORD button Press twice (2 times) to highlighted GREEN. You can only be used when the remote control is set to a level 30 or less, the volume level will be performed by CHANNEL (CH) up (̆) or ...

Owners Guide
Page 26
... using the CURSOR buttons. Main Picture Sub Picture THE REMOTE CONTROL SURF MODE PICTURE-IN-PICTURE Surf Mode PIP automatically scans all active channels (those set in memory) and displays them as PIP Pictures or Thumbnail channels. 6 Main Picture 4 8 Sub-picture 12 NOTE: Selecting individual sub-pictures while in Surf mode...
... using the CURSOR buttons. Main Picture Sub Picture THE REMOTE CONTROL SURF MODE PICTURE-IN-PICTURE Surf Mode PIP automatically scans all active channels (those set in memory) and displays them as PIP Pictures or Thumbnail channels. 6 Main Picture 4 8 Sub-picture 12 NOTE: Selecting individual sub-pictures while in Surf mode...

Owners Guide
Page 28
... CONTROL USING THE REMOTE TO CONTROL CABLE BOX FUNCTIONS Operating the precoded function for your cable box operating guide. 3. Turn ON your cable box by setting it to operate different types of your cable box code has not been ቤ precoded into the remote. ባ 2.
... CONTROL USING THE REMOTE TO CONTROL CABLE BOX FUNCTIONS Operating the precoded function for your cable box operating guide. 3. Turn ON your cable box by setting it to operate different types of your cable box code has not been ቤ precoded into the remote. ባ 2.

Owners Guide
Page 29
...-box/satellite receiver when the correct two digit preset code is programmed for your settop-box/satellite receiver. If the set -top-box/satellite systems (refer to control your set -top- ቢ box/satellite receiver code has not been precoded into the ቤ remote. ባ 2. The remote will... codes you have programmed until the batteries are for operating the TV. The remote control will now control your set -top-box/satellite receiver as stated above. ቢ SAT (Set-Top-Box/Satellite) button This button allows the remote to page 32 for pre-codes). 1. Hold down the...
...-box/satellite receiver when the correct two digit preset code is programmed for your settop-box/satellite receiver. If the set -top-box/satellite systems (refer to control your set -top- ቢ box/satellite receiver code has not been precoded into the ቤ remote. ባ 2. The remote will... codes you have programmed until the batteries are for operating the TV. The remote control will now control your set -top-box/satellite receiver as stated above. ቢ SAT (Set-Top-Box/Satellite) button This button allows the remote to page 32 for pre-codes). 1. Hold down the...

Owners Guide
Page 30
...DVD button on page 32. If the DVD player does not turn off , try a different two digit preset code. 6. The remote will need to set the display type of the buttons exclusively for the DVD player. 30 After replacing the batteries repeat the entire programming procedure as shown on the... button This button allows the remote to DVD pre-coded mode, press and release the DVD button. 4. You will now control your DVD player by setting it to DVD mode. ባ PRECODED DVD Buttons ባ These buttons transmit the chosen precoded DVD codes. ቤ EXCLUSIVE TV Buttons These buttons ...
...DVD button on page 32. If the DVD player does not turn off , try a different two digit preset code. 6. The remote will need to set the display type of the buttons exclusively for the DVD player. 30 After replacing the batteries repeat the entire programming procedure as shown on the... button This button allows the remote to DVD pre-coded mode, press and release the DVD button. 4. You will now control your DVD player by setting it to DVD mode. ባ PRECODED DVD Buttons ባ These buttons transmit the chosen precoded DVD codes. ቤ EXCLUSIVE TV Buttons These buttons ...
Owners Guide
Page 31
.... 31 Release the VCR button. 5. The remote control will remember the codes you have ባ programmed until the batteries are for your VCR player by setting it to VCR mode. ቤ ባ ባ PRECODED VCR Buttons These buttons transmit the chosen precoded VCR codes. ቤ EXCLUSIVE TV Buttons ባ These buttons...
.... 31 Release the VCR button. 5. The remote control will remember the codes you have ባ programmed until the batteries are for your VCR player by setting it to VCR mode. ቤ ባ ባ PRECODED VCR Buttons These buttons transmit the chosen precoded VCR codes. ቤ EXCLUSIVE TV Buttons ባ These buttons...

