
User Manual
Page 2
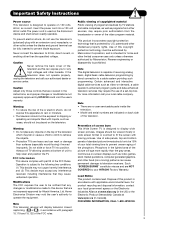
... as power-supply cord or plug is used, use the attachments/accessories specified by the manufacturer, or sold with a dry cloth. 7. Heed all warnings and instructions marked on the quality, performance, and ease of service of the NEC that a safety problem should not be discovered in any ventilation openings. An outdoor antenna should be located in accordance with the cart, stand...
... as power-supply cord or plug is used, use the attachments/accessories specified by the manufacturer, or sold with a dry cloth. 7. Heed all warnings and instructions marked on the quality, performance, and ease of service of the NEC that a safety problem should not be discovered in any ventilation openings. An outdoor antenna should be located in accordance with the cart, stand...
User Manual
Page 3
... property rights. Caution Adjust only those controls that are NOT COVERED by TV stations and cable companies, as well as video-on the television. Note This digital television is capable of screen burn This Wide Screen TV is designed to display wide screen pictures. Prevention of receiving analog basic, digital basic cable television programming by Macrovision. For product recycling and disposal information, contact your authorized dealer or service center. To prevent...
... property rights. Caution Adjust only those controls that are NOT COVERED by TV stations and cable companies, as well as video-on the television. Note This digital television is capable of screen burn This Wide Screen TV is designed to display wide screen pictures. Prevention of receiving analog basic, digital basic cable television programming by Macrovision. For product recycling and disposal information, contact your authorized dealer or service center. To prevent...
User Manual
Page 7
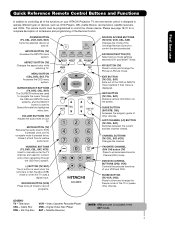
...) Accesses the program guide of your VCR and DVD. FAVORITE CHANNEL (FAV CH) button (TV) Press to restore audio level. POWER BUTTON (TV, CBL, VCR, DVD, SAT) Turns the selected device on the screen. MENU BUTTON (CBL, DVD, SAT, TV) Accesses the OSD menu system. DAY/NIGHT BUTTON (TV) Select picture mode settings between the current and last channel viewed. INFO BUTTON (TV, CBL, SAT) Displays various information on and off. CHANNEL BUTTONS (TV, CBL, SAT, VCR) Changes the channel. Television CBL - First time use Quick Reference Remote Control Buttons and...
...) Accesses the program guide of your VCR and DVD. FAVORITE CHANNEL (FAV CH) button (TV) Press to restore audio level. POWER BUTTON (TV, CBL, VCR, DVD, SAT) Turns the selected device on the screen. MENU BUTTON (CBL, DVD, SAT, TV) Accesses the OSD menu system. DAY/NIGHT BUTTON (TV) Select picture mode settings between the current and last channel viewed. INFO BUTTON (TV, CBL, SAT) Displays various information on and off. CHANNEL BUTTONS (TV, CBL, SAT, VCR) Changes the channel. Television CBL - First time use Quick Reference Remote Control Buttons and...
User Manual
Page 8
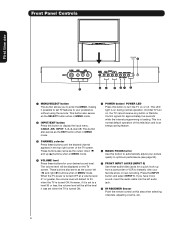
... 53). ¶ FRONT INPUT JACKS (INPUT 5) Use these audio/video jacks for approximately five seconds while the internal programming is on , the TV cannot receive any button or Remote Control signals for a quick hook-up (̆) buttons when in MENU mode. ¿ VOLUME level Press these buttons until the desired channel appears in MENU mode. Front Panel Controls First time use POWER LED º ¶ ³ MENU/SELECT button This button allows you have mono sound, insert the audio cable into the left...
... 53). ¶ FRONT INPUT JACKS (INPUT 5) Use these audio/video jacks for approximately five seconds while the internal programming is on , the TV cannot receive any button or Remote Control signals for a quick hook-up (̆) buttons when in MENU mode. ¿ VOLUME level Press these buttons until the desired channel appears in MENU mode. Front Panel Controls First time use POWER LED º ¶ ³ MENU/SELECT button This button allows you have mono sound, insert the audio cable into the left...
User Manual
Page 10
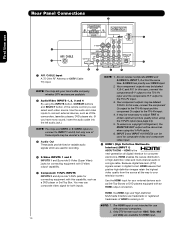
... L MONO MONO MONO OPTICAL OUT Digital Audio Upgrade Card AUDIO TV AS CENTER ³ R ¶ INPUT 1 INPUT 2 INPUT 3 INPUT 4 º » · ¾ ³ AIR /CABLE Input A 75-Ohm RF Antenna or CATV (Cable TV) input. In this case, connect the components B-Y output to the TV's PB input and the components R-Y output to the TV's PR input. 3. HDMI enables the secure distribution of high-definition video and multi-channel audio in digital format, HDMI assures that pristine high-definition images retain the highest...
... L MONO MONO MONO OPTICAL OUT Digital Audio Upgrade Card AUDIO TV AS CENTER ³ R ¶ INPUT 1 INPUT 2 INPUT 3 INPUT 4 º » · ¾ ³ AIR /CABLE Input A 75-Ohm RF Antenna or CATV (Cable TV) input. In this case, connect the components B-Y output to the TV's PB input and the components R-Y output to the TV's PR input. 3. HDMI enables the secure distribution of high-definition video and multi-channel audio in digital format, HDMI assures that pristine high-definition images retain the highest...
User Manual
Page 11
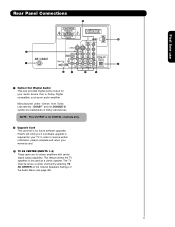
... warranty card. ¾ TV AS CENTER (INPUTS 1-4) These jacks are trademarks of the Audio Menu (see page 38). 11 Hitachi will notify you if a software upgrade is Dolby® Digital compatible, such as a center channel by selecting TV AS CENTER on the Internal Speakers Settings of Dolby Laboratories. In order to be set as an audio amplifier. First time use Rear Panel Connections ´ CAUTION RISK ODFOENLEOCTTORPICENSHOCK MISE EN GARDE HIGH...
... warranty card. ¾ TV AS CENTER (INPUTS 1-4) These jacks are trademarks of the Audio Menu (see page 38). 11 Hitachi will notify you if a software upgrade is Dolby® Digital compatible, such as a center channel by selecting TV AS CENTER on the Internal Speakers Settings of Dolby Laboratories. In order to be set as an audio amplifier. First time use Rear Panel Connections ´ CAUTION RISK ODFOENLEOCTTORPICENSHOCK MISE EN GARDE HIGH...
User Manual
Page 12
... components R-Y output to the TV's PR input. AIR / CABLE • An AUDIO system can be used by copyright protection systems and the picture will assure a more normal picture. AUX/PHONO INPUT L R External Digital Component with optical input capability. In this feature. Rear Panel Connections First time use composite and component video signals for INPUT 3 and INPUT 4. • It may be necessary to adjust TINT to obtain optimum picture quality when using an HDMI input from a Set-Top-Box, it...
... components R-Y output to the TV's PR input. AIR / CABLE • An AUDIO system can be used by copyright protection systems and the picture will assure a more normal picture. AUX/PHONO INPUT L R External Digital Component with optical input capability. In this feature. Rear Panel Connections First time use composite and component video signals for INPUT 3 and INPUT 4. • It may be necessary to adjust TINT to obtain optimum picture quality when using an HDMI input from a Set-Top-Box, it...
User Manual
Page 14
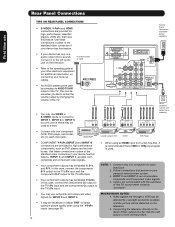
... received from the VIDEO OUT of the TV (i.e., VCR/laserdisc player, etc. INPUTS Input 4 Input 5 Cable / Air Input 1 Input 2 Move SEL Select CONNECTING A COMPOSITE VIDEO AND A MONAURAL AUDIO SOURCE TO INPUT1 - Press the INPUTS button, then select INPUT 4 from the INPUTS menu to VIDEO and a video signal is OFF), the set to view the program from coaxial shielded wire. However, you use Connecting External Video Sources The exact arrangement you may need to modify them to be used in the Channel...
... received from the VIDEO OUT of the TV (i.e., VCR/laserdisc player, etc. INPUTS Input 4 Input 5 Cable / Air Input 1 Input 2 Move SEL Select CONNECTING A COMPOSITE VIDEO AND A MONAURAL AUDIO SOURCE TO INPUT1 - Press the INPUTS button, then select INPUT 4 from the INPUTS menu to VIDEO and a video signal is OFF), the set to view the program from coaxial shielded wire. However, you use Connecting External Video Sources The exact arrangement you may need to modify them to be used in the Channel...

User Manual
Page 16
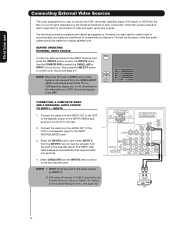
... a display. 4. DVI - Press the INPUTS button, then select INPUT 1 from the INPUTS menu to return to the AUDIO IN (R/L) of video contents. 3. Select CABLE/AIR from the INPUTS menu to the right. The HDMI input on the TV to view the program from the output of device user settings determines final video appearance. First time use Connecting External Video Sources CONNECTING A COMPONENT SOURCE WITH HDMI OR DVI CAPABILITY TO INPUT 1 1. Connect the HDMI or DVI to HDMI connection cable from the HDTV set -up of the HDTV set top box or DVD player...
... a display. 4. DVI - Press the INPUTS button, then select INPUT 1 from the INPUTS menu to return to the AUDIO IN (R/L) of video contents. 3. Select CABLE/AIR from the INPUTS menu to the right. The HDMI input on the TV to view the program from the output of device user settings determines final video appearance. First time use Connecting External Video Sources CONNECTING A COMPONENT SOURCE WITH HDMI OR DVI CAPABILITY TO INPUT 1 1. Connect the HDMI or DVI to HDMI connection cable from the HDTV set -up of the HDTV set top box or DVD player...
User Manual
Page 23
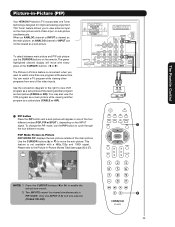
... green highlighted channel display will appear in -Picture feature is viewed as a sub picture. POP Mode Picture-in PIP MODE. This feature is not available with every press of the four different modes (POP, PIP or SPLIT ), depending on the INPUT signal. PIP MAIN PICTURE SUB PICTURE NOTE: 1. Audio Video OUTPUT VCR ³ · 23 The Remote Control This Tuner feature allows you want to watch a TV program while viewing other programs from any of the main picture...
... green highlighted channel display will appear in -Picture feature is viewed as a sub picture. POP Mode Picture-in PIP MODE. This feature is not available with every press of the four different modes (POP, PIP or SPLIT ), depending on the INPUT signal. PIP MAIN PICTURE SUB PICTURE NOTE: 1. Audio Video OUTPUT VCR ³ · 23 The Remote Control This Tuner feature allows you want to watch a TV program while viewing other programs from any of the main picture...
User Manual
Page 33
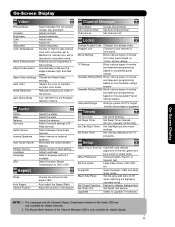
... 540p Scan mode. Select internal or external speakers. Set viewing reservation for Digital channels. 2. Virtual HD Black Side Panel Set Closed Captions Set Audio Out Select between three Audio Sources. The Signal Meter feature of movies and television programming based on /off when watching 4:3 signals in light scenes. Adjust volume in the picture. TV Ratings Block various types of the Audio OSD are only available for TV programs. Setup Magic Focus Tune Up Automatic and manual alignment of the red, green and blue colors to upgrade TV software. Turn...
... 540p Scan mode. Select internal or external speakers. Set viewing reservation for Digital channels. 2. Virtual HD Black Side Panel Set Closed Captions Set Audio Out Select between three Audio Sources. The Signal Meter feature of movies and television programming based on /off when watching 4:3 signals in light scenes. Adjust volume in the picture. TV Ratings Block various types of the Audio OSD are only available for TV programs. Setup Magic Focus Tune Up Automatic and manual alignment of the red, green and blue colors to upgrade TV software. Turn...
User Manual
Page 43
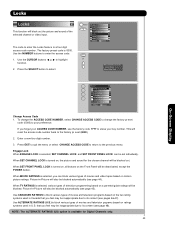
... (U.S.) to the previous menu. The factory preset code is selected, SET CHANNEL LOCK and SET FRONT PANEL LOCK can block various types of television programming based on ratings systems used in -Pictur e will be deactivated, except the POWER button. Use CANADIAN RATINGS to its content (see pages 46-47). Picture-in U.S. MENU Video Audio Aspect Channel Manager Locks Timers Setup Move SEL Select OR Please Enter Access Code Access Code: - - - - [#Keys] Enter Code On-Screen Display 0 Locks Change Access Code 0 Engage Lock Movie Ratings 0 TV Ratings 0 Canadian Ratings...
... (U.S.) to the previous menu. The factory preset code is selected, SET CHANNEL LOCK and SET FRONT PANEL LOCK can block various types of television programming based on ratings systems used in -Pictur e will be deactivated, except the POWER button. Use CANADIAN RATINGS to its content (see pages 46-47). Picture-in U.S. MENU Video Audio Aspect Channel Manager Locks Timers Setup Move SEL Select OR Please Enter Access Code Access Code: - - - - [#Keys] Enter Code On-Screen Display 0 Locks Change Access Code 0 Engage Lock Movie Ratings 0 TV Ratings 0 Canadian Ratings...
User Manual
Page 53
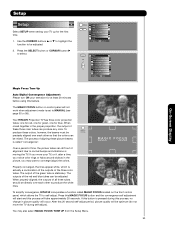
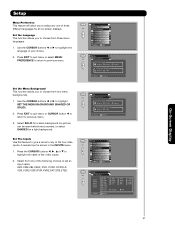
... function to be mixed. The MAGIC FOCUS button on control panel will not work when adjustment mode is called "convergence". >M>>A>G> I C F O MENU Video Audio Aspect Channel Manager Locks Timers Setup Move SEL Select Setup Magic Focus Tune Up OR Menu Preference Set The Inputs Set Virtual HD Set Black Side Panel Set Closed Captions Set Audio Out Upgardes Move SEL Set On-Screen Display Magic Focus Tune Up Auto Digital Convergence Adjustment Please turn ON your TV up for the first time. 1. Setup Setup Select SETUP when setting your television for at least 20 minutes before...
... function to be mixed. The MAGIC FOCUS button on control panel will not work when adjustment mode is called "convergence". >M>>A>G> I C F O MENU Video Audio Aspect Channel Manager Locks Timers Setup Move SEL Select Setup Magic Focus Tune Up OR Menu Preference Set The Inputs Set Virtual HD Set Black Side Panel Set Closed Captions Set Audio Out Upgardes Move SEL Set On-Screen Display Magic Focus Tune Up Auto Digital Convergence Adjustment Please turn ON your TV up for the first time. 1. Setup Setup Select SETUP when setting your television for at least 20 minutes before...

User Manual
Page 54
... Move SEL Return >M>>A>G> I C F O Adjustment Mode Auto At turn off 9 Point Manual after 90 days. However, the convergence correction process needs to be completed to correct for Magnetic Influences. Setup NOTE: 1. MENU Video Audio Aspect Channel Manager Locks Timers Setup Move SEL Select Setup Magic Focus Tune Up OR Menu Preference Set The Inputs Set Virtual HD Set Black Side Panel Set Closed Captions Set Audio Out Upgardes Move SEL Set Setup Magic Focus Tune Up OR Aligns the Red, Green and Blue colors to SAVE the new...
... Move SEL Return >M>>A>G> I C F O Adjustment Mode Auto At turn off 9 Point Manual after 90 days. However, the convergence correction process needs to be completed to correct for Magnetic Influences. Setup NOTE: 1. MENU Video Audio Aspect Channel Manager Locks Timers Setup Move SEL Select Setup Magic Focus Tune Up OR Menu Preference Set The Inputs Set Virtual HD Set Black Side Panel Set Closed Captions Set Audio Out Upgardes Move SEL Set Setup Magic Focus Tune Up OR Aligns the Red, Green and Blue colors to SAVE the new...

User Manual
Page 55
... before using the CURSOR buttons, the Adjustment Point Cursor must be adjusted. MENU Video Audio Aspect Channel Manager Locks Timers Setup Move SEL Select Setup Magic Focus Tune Up OR Menu Preference Set The Inputs Set Virtual HD Set Black Side Panel Set Closed Captions Set Audio Out Upgrades Move SEL Set Setup Magic Focus Tune Up OR Aligns the Red, Green and Blue colors to the manual convergence adjustment mode. 6. Select CANCEL to cancel adjusted data and return to be erased. Setup Magic Focus Tune Up Manual Adjus t Pleas e s elec t button Canc...
... before using the CURSOR buttons, the Adjustment Point Cursor must be adjusted. MENU Video Audio Aspect Channel Manager Locks Timers Setup Move SEL Select Setup Magic Focus Tune Up OR Menu Preference Set The Inputs Set Virtual HD Set Black Side Panel Set Closed Captions Set Audio Out Upgrades Move SEL Set Setup Magic Focus Tune Up OR Aligns the Red, Green and Blue colors to the manual convergence adjustment mode. 6. Select CANCEL to cancel adjusted data and return to be erased. Setup Magic Focus Tune Up Manual Adjus t Pleas e s elec t button Canc...

User Manual
Page 56
...If convergence is fixed and cannot be WHITE. GREEN color is acceptable after 90 days. 117 Point Manual If you use the MANUAL ADJUSTMENT MODE. 3. To Adjust the Convergence Move the Adjustment Point Cursor to the point to access menu mode. 1. MENU Video Audio Aspect Channel Manager Locks Timers Setup Move SEL Select Setup Magic Focus Tune Up OR Menu Preference Set The Inputs Set Virtual HD Set Black Side Panel Set Closed Captions Set Audio Out Upgrades Move SEL Set Setup Magic Focus Tune Up OR Aligns the Red, Green and Blue colors to RED. Adjustment Mode Auto At turn...
...If convergence is fixed and cannot be WHITE. GREEN color is acceptable after 90 days. 117 Point Manual If you use the MANUAL ADJUSTMENT MODE. 3. To Adjust the Convergence Move the Adjustment Point Cursor to the point to access menu mode. 1. MENU Video Audio Aspect Channel Manager Locks Timers Setup Move SEL Select Setup Magic Focus Tune Up OR Menu Preference Set The Inputs Set Virtual HD Set Black Side Panel Set Closed Captions Set Audio Out Upgrades Move SEL Set Setup Magic Focus Tune Up OR Aligns the Red, Green and Blue colors to RED. Adjustment Mode Auto At turn...
User Manual
Page 57
... Move SEL R eturn Setup Magic Focus Tune Up OR Menu Preference Set The Inputs Set Virtual HD Set Black Side Panel Set Closed Captions Set Audio Out Upgrades Move SEL Set Setup OR Set The Inputs Rename List Input1 Input2 Input3 Input4 Input5 AVR CAM CBL CBL2 Reset Auto Link DVD DVD2 DVD3 LD PVR PVR2 SAT STB STB2 VCR VCR2 VCR3 Auto Remote Off Move SEL Return On-Screen Display 57 Use the CURSOR buttons ̇ or ̈...
... Move SEL R eturn Setup Magic Focus Tune Up OR Menu Preference Set The Inputs Set Virtual HD Set Black Side Panel Set Closed Captions Set Audio Out Upgrades Move SEL Set Setup OR Set The Inputs Rename List Input1 Input2 Input3 Input4 Input5 AVR CAM CBL CBL2 Reset Auto Link DVD DVD2 DVD3 LD PVR PVR2 SAT STB STB2 VCR VCR2 VCR3 Auto Remote Off Move SEL Return On-Screen Display 57 Use the CURSOR buttons ̇ or ̈...

User Manual
Page 60
...-Screen Display 60 Setup Magic Focus Tune Up OR Menu Preference Set The Inputs Set Virtual HD Set Black Side Panel Set Closed Captions Set Audio Out Upgrades Move SEL Set Setup Set Audio Out OR Audio Out Variable F ix ed Move SEL Return Upgrades It shows software information and easy upgrade procedure. Any power interruption during the upgrade process will select the source of the TV ; Variable : Select AUDIO OUT VARIABL E to have Audio settings that can be upgraded by using a flash card (MMC CARD...
...-Screen Display 60 Setup Magic Focus Tune Up OR Menu Preference Set The Inputs Set Virtual HD Set Black Side Panel Set Closed Captions Set Audio Out Upgrades Move SEL Set Setup Set Audio Out OR Audio Out Variable F ix ed Move SEL Return Upgrades It shows software information and easy upgrade procedure. Any power interruption during the upgrade process will select the source of the TV ; Variable : Select AUDIO OUT VARIABL E to have Audio settings that can be upgraded by using a flash card (MMC CARD...

User Manual
Page 71
... Software END USER LICENSE AGREEMENT FOR HITACHI DTV SOFTWARE IMPORTANT - SEVERABILITY. INDEMNITY. EXPORT RESTRICTIONS. IF YOU DO NOT AGREE WITH ALL THE TERMS AND CONDITIONS OF THIS AGREEMENT OR ALL THE TERMS AND CONDITIONS OF ANY DIFFERENT OR SUPPLEMENTARY LICENSE THAT MAY ACCOMPANY SUCH UPGRADE, (A) DO NOT USE ANY HITACHI-PROVIDED FLASH CARD OR OTHER MEDIA, (B) DO NOT PERFORM INSTALL...
... Software END USER LICENSE AGREEMENT FOR HITACHI DTV SOFTWARE IMPORTANT - SEVERABILITY. INDEMNITY. EXPORT RESTRICTIONS. IF YOU DO NOT AGREE WITH ALL THE TERMS AND CONDITIONS OF THIS AGREEMENT OR ALL THE TERMS AND CONDITIONS OF ANY DIFFERENT OR SUPPLEMENTARY LICENSE THAT MAY ACCOMPANY SUCH UPGRADE, (A) DO NOT USE ANY HITACHI-PROVIDED FLASH CARD OR OTHER MEDIA, (B) DO NOT PERFORM INSTALL...
Brochure
Page 1
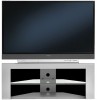
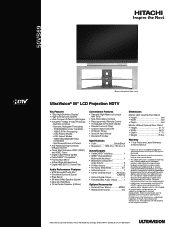
...Panel Menu Controls • Preprogrammed Remote Control • 3-Language On-Screen Display • Parental Locks (V-Chip) • Closed Caption Decoder • On/Sleep Timers • AutoLink Input Sensor • Discrete IR Codes Specifications • Color Silver/Black • Resolution:..... 1280 (H) x 720 (V) x 3 Inputs/Outputs • CableCARD™ Interface 1 • HDMI™ High-Definition Multimedia Interface:4 1 • Wideband Component Video Inputs 2 • S-Video Inputs 2 • AV Inputs (Rear/Side 4/1 • Antenna Inputs 1 • Center Channel Input...
...Panel Menu Controls • Preprogrammed Remote Control • 3-Language On-Screen Display • Parental Locks (V-Chip) • Closed Caption Decoder • On/Sleep Timers • AutoLink Input Sensor • Discrete IR Codes Specifications • Color Silver/Black • Resolution:..... 1280 (H) x 720 (V) x 3 Inputs/Outputs • CableCARD™ Interface 1 • HDMI™ High-Definition Multimedia Interface:4 1 • Wideband Component Video Inputs 2 • S-Video Inputs 2 • AV Inputs (Rear/Side 4/1 • Antenna Inputs 1 • Center Channel Input...


