Owners Guide
Page 1
has determined that this product meets the ENERGY STAR® guidelines for 42V710, 50V710, 60V710 42V715, 50V715, 60V715 IMPORTANT SAFETY INSTRUCTIONS 2-3 FIRST TIME USE ...4-20 THE REMOTE CONTROL 21-40 ON-SCREEN DISPLAY...41-68 LAMP REPLACEMENT ...69-72 CARE OF YOUR HITACHI TV & REMOTE CONTROL 73 RECEPTION PROBLEMS ...74 USEFUL INFORMATION / INDEX 75-83 As an ENERGY STAR® Partner, Hitachi, Ltd. LCD REAR PROJECTION TELEVISION Operating Guide for energy efficiency.
has determined that this product meets the ENERGY STAR® guidelines for 42V710, 50V710, 60V710 42V715, 50V715, 60V715 IMPORTANT SAFETY INSTRUCTIONS 2-3 FIRST TIME USE ...4-20 THE REMOTE CONTROL 21-40 ON-SCREEN DISPLAY...41-68 LAMP REPLACEMENT ...69-72 CARE OF YOUR HITACHI TV & REMOTE CONTROL 73 RECEPTION PROBLEMS ...74 USEFUL INFORMATION / INDEX 75-83 As an ENERGY STAR® Partner, Hitachi, Ltd. LCD REAR PROJECTION TELEVISION Operating Guide for energy efficiency.
Owners Guide
Page 2
... user to the presence of benefit to constitute a risk of the television as improper changes or modifications not expressly approved by Hitachi America, Ltd. MODIFICATIONS: The FCC requires the user to be of a sufficient magnitude to you promptly in the instructions, as... operate the equipment. IMPORTANT SAFETY INSTRUCTIONS SAFETY POINTS YOU SHOULD KNOW ABOUT YOUR HITACHI LCD REAR PROJECTION TELEVISION Our reputation has been built on the quality, performance, and ease of service of your HITACHI television. TO PREVENT ELECTRIC SHOCK, DO NOT USE THE TELEVISION'S (POLARIZED) PLUG...
... user to the presence of benefit to constitute a risk of the television as improper changes or modifications not expressly approved by Hitachi America, Ltd. MODIFICATIONS: The FCC requires the user to be of a sufficient magnitude to you promptly in the instructions, as... operate the equipment. IMPORTANT SAFETY INSTRUCTIONS SAFETY POINTS YOU SHOULD KNOW ABOUT YOUR HITACHI LCD REAR PROJECTION TELEVISION Our reputation has been built on the quality, performance, and ease of service of your HITACHI television. TO PREVENT ELECTRIC SHOCK, DO NOT USE THE TELEVISION'S (POLARIZED) PLUG...
Owners Guide
Page 4
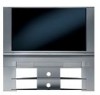
... ("AA") OPTIONAL LCD REAR PTV STAND (NOT INCLUDED, ORDER SEPARATELY) FIRST TIME USE GUIDE C.C. 1. When replacing old batteries, push them towards the springs and lift them out. 3. LCD TV MODEL LCD STAND/PART NO. 42V710 SP42W / H520449 42V715 SPX42W / QJ01541 50V710 SP50WS / QJ01601 50V715 SPX50WT / QJ01603 60V710 SP60WS / QJ01602 60V715 SPX60WT / QJ01604 CUSTOM HITACHI TELEVISION STAND 2. CAUTION...
... ("AA") OPTIONAL LCD REAR PTV STAND (NOT INCLUDED, ORDER SEPARATELY) FIRST TIME USE GUIDE C.C. 1. When replacing old batteries, push them towards the springs and lift them out. 3. LCD TV MODEL LCD STAND/PART NO. 42V710 SP42W / H520449 42V715 SPX42W / QJ01541 50V710 SP50WS / QJ01601 50V715 SPX50WT / QJ01603 60V710 SP60WS / QJ01602 60V715 SPX60WT / QJ01604 CUSTOM HITACHI TELEVISION STAND 2. CAUTION...
Owners Guide
Page 5
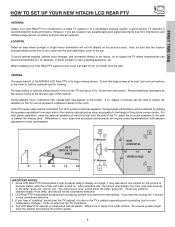
...in the room to become excessively hot, for best performance. FIRST TIME USE HOW TO SET UP YOUR NEW HITACHI LCD REAR PTV ANTENNA Unless your LCD Rear PTV against a wall, keep it at least 10 cm (4 inches) from the wall. To avoid cabinet warping...moves to prevent from the TV cabinet, it on the TV's functions. 4. If so, drapes or screens can be considered defective. 2. BE ST VERTIC AL VIEWING 20 A NGLE 3' 0' 5' 1 0' 1 5' 2 0' R 4" Minimum 4" Minimum L S 50 BEST HORIZONTAL 5' 1 0' 1 5' 2 0' VIEWING A NGLE 50 S IMPORTANT NOTES: 1. LCD Rear PTV incorporates an advanced ...
...in the room to become excessively hot, for best performance. FIRST TIME USE HOW TO SET UP YOUR NEW HITACHI LCD REAR PTV ANTENNA Unless your LCD Rear PTV against a wall, keep it at least 10 cm (4 inches) from the wall. To avoid cabinet warping...moves to prevent from the TV cabinet, it on the TV's functions. 4. If so, drapes or screens can be considered defective. 2. BE ST VERTIC AL VIEWING 20 A NGLE 3' 0' 5' 1 0' 1 5' 2 0' R 4" Minimum 4" Minimum L S 50 BEST HORIZONTAL 5' 1 0' 1 5' 2 0' VIEWING A NGLE 50 S IMPORTANT NOTES: 1. LCD Rear PTV incorporates an advanced ...
Owners Guide
Page 8
... blinking in the order below, the television is characteristic of TFT LCD technology due to the manufacturing process irrespective of manufacturer. 8 NOTES: 1. Your Hitachi LCD Rear Projection Television has an internal lamp that lights up and about 2 minutes to warm up the TV screen. Consult your Hitachi dealer for long lasting performance. 4. IMPORTANT NOTES: A small number of...
... blinking in the order below, the television is characteristic of TFT LCD technology due to the manufacturing process irrespective of manufacturer. 8 NOTES: 1. Your Hitachi LCD Rear Projection Television has an internal lamp that lights up and about 2 minutes to warm up the TV screen. Consult your Hitachi dealer for long lasting performance. 4. IMPORTANT NOTES: A small number of...
Owners Guide
Page 22
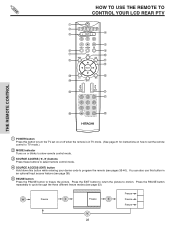
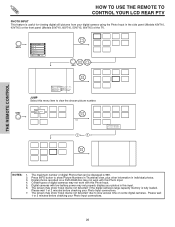
... different freeze modes (see page 38). ቦ PAUSE button Press the PAUSE button to freeze the picture. HOW TO USE THE REMOTE TO CONTROL YOUR LCD REAR PTV ቢ ባ ቤ ብ ቦ ቧ ቩ ቨ GUIDE ቫ ቪ ቭ ቮ ቯ ቱ C.C. ተ ቲ ታ ታ &#...THE REMOTE CONTROL ቢ POWER button Press this button to turn the TV set on or off when the remote is in TV mode. (See page 21 for instructions on how to set the remote control to TV mode.) ባ MODE Indicator Turns on or blinks to show remote ...
... different freeze modes (see page 38). ቦ PAUSE button Press the PAUSE button to freeze the picture. HOW TO USE THE REMOTE TO CONTROL YOUR LCD REAR PTV ቢ ባ ቤ ብ ቦ ቧ ቩ ቨ GUIDE ቫ ቪ ቭ ቮ ቯ ቱ C.C. ተ ቲ ታ ታ &#...THE REMOTE CONTROL ቢ POWER button Press this button to turn the TV set on or off when the remote is in TV mode. (See page 21 for instructions on how to set the remote control to TV mode.) ባ MODE Indicator Turns on or blinks to show remote ...

Owners Guide
Page 23
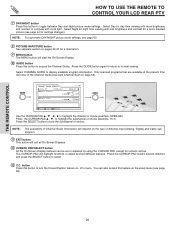
... are placed to the left and right of the image to prevent uneven aging of the source. HOW TO USE THE REMOTE TO CONTROL YOUR LCD REAR PTV ቧ ASPECT button Press this mode for the other ANT inputs. Side panels (gray areas) are directly available when you to adjust the images...
... are placed to the left and right of the image to prevent uneven aging of the source. HOW TO USE THE REMOTE TO CONTROL YOUR LCD REAR PTV ቧ ASPECT button Press this mode for the other ANT inputs. Side panels (gray areas) are directly available when you to adjust the images...
Owners Guide
Page 24
... (see page 60. ቩ PICTURE-IN-PICTURE button See separate section on page 52). THE REMOTE CONTROL HOW TO USE THE REMOTE TO CONTROL YOUR LCD REAR PTV ቨ DAY/NIGHT button Press this button to highlight the channel of choice (example: KPBS-HD). Press the SELECT button to display available program...
... (see page 60. ቩ PICTURE-IN-PICTURE button See separate section on page 52). THE REMOTE CONTROL HOW TO USE THE REMOTE TO CONTROL YOUR LCD REAR PTV ቨ DAY/NIGHT button Press this button to highlight the channel of choice (example: KPBS-HD). Press the SELECT button to display available program...

Owners Guide
Page 25
... SELECT button to select the inputs that are being used. HOW TO USE THE REMOTE TO CONTROL YOUR LCD REAR PTV ተ INPUTS button When the remote control is in the front panel of the TV (see page 26). Photo Input Ant B Ant A Input 1 Input 2 Input 3 Input 4 Input 5 Photo Input Ant B Ant ...A Input 1 Input 2 Move SEL Sel Select to access your pictures from a digital camera connected to the Photo Input in TV mode, press this button to choose ...
... SELECT button to select the inputs that are being used. HOW TO USE THE REMOTE TO CONTROL YOUR LCD REAR PTV ተ INPUTS button When the remote control is in the front panel of the TV (see page 26). Photo Input Ant B Ant A Input 1 Input 2 Input 3 Input 4 Input 5 Photo Input Ant B Ant ...A Input 1 Input 2 Move SEL Sel Select to access your pictures from a digital camera connected to the Photo Input in TV mode, press this button to choose ...
Owners Guide
Page 26
...not properly display your photos in the side panel (Models 42V710, 42V715) or the front panel (Models 50V710, 60V710, 50V715, 60V715) of digital Photos that can be displayed is 999. 2. Please wait 1 or... 2 minutes before checking your Photo Input connections. 7. The maximum number of the TV. Date Resolution File Name JUMP Select this menu item to slow access time on some digital ... not work with this Photo Input. 4. HOW TO USE THE REMOTE TO CONTROL YOUR LCD REAR PTV PHOTO INPUT This feature is useful for viewing digital still pictures from your digital camera using the...
...not properly display your photos in the side panel (Models 42V710, 42V715) or the front panel (Models 50V710, 60V710, 50V715, 60V715) of digital Photos that can be displayed is 999. 2. Please wait 1 or... 2 minutes before checking your Photo Input connections. 7. The maximum number of the TV. Date Resolution File Name JUMP Select this menu item to slow access time on some digital ... not work with this Photo Input. 4. HOW TO USE THE REMOTE TO CONTROL YOUR LCD REAR PTV PHOTO INPUT This feature is useful for viewing digital still pictures from your digital camera using the...

Owners Guide
Page 27
... ROTATE Select this menu item to start a slideshow of the slideshow. JPEG format should be first placed on the TV set from the three mentioned choices. This TV set displays only digital pictures from 5, 10 and 30 seconds. Time interval selections can be displayed on a sub ...which meet DCF Standard. Photo file names modified on a computer should be 8 characters (Ex. HOW TO USE THE REMOTE TO CONTROL YOUR LCD REAR PTV SLIDESHOW Select this menu item to rotate selected photos either clockwise (CURSOR PAD ̈) and counterclockwise (CURSOR PAD ̇). The sub directory...
... ROTATE Select this menu item to start a slideshow of the slideshow. JPEG format should be first placed on the TV set from the three mentioned choices. This TV set displays only digital pictures from 5, 10 and 30 seconds. Time interval selections can be displayed on a sub ...which meet DCF Standard. Photo file names modified on a computer should be 8 characters (Ex. HOW TO USE THE REMOTE TO CONTROL YOUR LCD REAR PTV SLIDESHOW Select this menu item to rotate selected photos either clockwise (CURSOR PAD ̈) and counterclockwise (CURSOR PAD ̇). The sub directory...

Owners Guide
Page 28
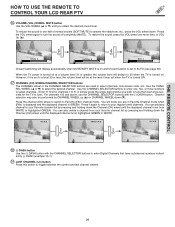
... 3:32PM Picture Source Ant A 122-1 Channel ID KPBS-DT Program Language Engl Broadcast Rating TV-Y INFO Signal Format 720p Format Day/Night Mode Closed Captioning Aspect Mode Day CC Off 4:3 Expanded View --:-- AM Event Timer Timer Recording Time Main Picture ... --:-- The Sleep Timer info will show momentarily after releasing INFO button. 2. NOTES: 1. AM REC --:-- THE REMOTE CONTROL HOW TO USE THE REMOTE TO CONTROL YOUR LCD REAR PTV ቱ INFO button Press this button when you want to check the channel being received, the picture source, if the channel has stereo (ST...
... 3:32PM Picture Source Ant A 122-1 Channel ID KPBS-DT Program Language Engl Broadcast Rating TV-Y INFO Signal Format 720p Format Day/Night Mode Closed Captioning Aspect Mode Day CC Off 4:3 Expanded View --:-- AM Event Timer Timer Recording Time Main Picture ... --:-- The Sleep Timer info will show momentarily after releasing INFO button. 2. NOTES: 1. AM REC --:-- THE REMOTE CONTROL HOW TO USE THE REMOTE TO CONTROL YOUR LCD REAR PTV ቱ INFO button Press this button when you want to check the channel being received, the picture source, if the channel has stereo (ST...
Owners Guide
Page 29
... to turn the sound off at the level it again to return to enter one more time, or VOL Up (̆). Enter "0" first for the TV to tune. To restore the sound, press the VOL wheel one , two, or three numbers to select channels. Use the CHANNEL WHEEL (̆ or ̄... set when the TV is turned ON. ታ CHANNEL (CH) WHEEL/CHANNEL SELECTOR buttons The CHANNEL wheel or the CHANNEL SELECTOR buttons are in Favorite Channel mode when (FAV) is displayed and the displayed channel is on . THE REMOTE CONTROL HOW TO USE THE REMOTE TO CONTROL YOUR LCD REAR PTV ቲ VOLUME...
... to turn the sound off at the level it again to return to enter one more time, or VOL Up (̆). Enter "0" first for the TV to tune. To restore the sound, press the VOL wheel one , two, or three numbers to select channels. Use the CHANNEL WHEEL (̆ or ̄... set when the TV is turned ON. ታ CHANNEL (CH) WHEEL/CHANNEL SELECTOR buttons The CHANNEL wheel or the CHANNEL SELECTOR buttons are in Favorite Channel mode when (FAV) is displayed and the displayed channel is on . THE REMOTE CONTROL HOW TO USE THE REMOTE TO CONTROL YOUR LCD REAR PTV ቲ VOLUME...

Owners Guide
Page 30
... INPUT 4 INPUT 3 INPUT 2 Y/ VIDEO PB INPUT 1 Y/ VIDEO PB HDMI 1 VIDEO L AUDIO R AUDIO TO HI-FI PR PR (MONO) (MONO) (MONO) (MONO) TV AS CENTER CableCARD (Top of card faces right) OPTICAL OUT Digital Audio Upgrade Card Apparatus Claims of the main picture. Audio Video OUTPUT VCR Use... another program as main picture (ANT A, ANT B, INPUT:2, INPUT:3, INPUT:4, or INPUT:5). THE REMOTE CONTROL PICTURE-IN-PICTURE (PIP) Your HITACHI LCD Rear PTV incorporates Two Tuner technology designed for limited viewing uses only. ANT A input can only be viewed as both the main picture and sub-...
... INPUT 4 INPUT 3 INPUT 2 Y/ VIDEO PB INPUT 1 Y/ VIDEO PB HDMI 1 VIDEO L AUDIO R AUDIO TO HI-FI PR PR (MONO) (MONO) (MONO) (MONO) TV AS CENTER CableCARD (Top of card faces right) OPTICAL OUT Digital Audio Upgrade Card Apparatus Claims of the main picture. Audio Video OUTPUT VCR Use... another program as main picture (ANT A, ANT B, INPUT:2, INPUT:3, INPUT:4, or INPUT:5). THE REMOTE CONTROL PICTURE-IN-PICTURE (PIP) Your HITACHI LCD Rear PTV incorporates Two Tuner technology designed for limited viewing uses only. ANT A input can only be viewed as both the main picture and sub-...

Owners Guide
Page 41
Video Audio Aspect Chan. Press MENU on your HITACHI LCD TV. 2. GUIDE This part of the screen shows which selections are available. Manager Locks Timers Setup Move SEL Sel This part of the screen shows which Remote Control buttons to highlight a different feature. 3. Press EXIT on the remote control to display the different features on the remote control to quickly exit from a menu. ON-SCREEN DISPLAY 41 Press the CURSOR PAD to use. ON-SCREEN DISPLAY (OSD) 1.
Video Audio Aspect Chan. Press MENU on your HITACHI LCD TV. 2. GUIDE This part of the screen shows which selections are available. Manager Locks Timers Setup Move SEL Sel This part of the screen shows which Remote Control buttons to highlight a different feature. 3. Press EXIT on the remote control to display the different features on the remote control to quickly exit from a menu. ON-SCREEN DISPLAY 41 Press the CURSOR PAD to use. ON-SCREEN DISPLAY (OSD) 1.

Owners Guide
Page 64
..., computer generated graphics, and other fixed (non-moving) patterns can be seen behind menu screen), or select Shaded for at least 10 minutes to the LCD Rear PTV. Setup Menu Preference Set The Language English French Spanish Set The Menu Background Shaded Solid Move SEL Select SETUP Use CURSOR PAD ̇ , ̈...
..., computer generated graphics, and other fixed (non-moving) patterns can be seen behind menu screen), or select Shaded for at least 10 minutes to the LCD Rear PTV. Setup Menu Preference Set The Language English French Spanish Set The Menu Background Shaded Solid Move SEL Select SETUP Use CURSOR PAD ̇ , ̈...
Owners Guide
Page 69
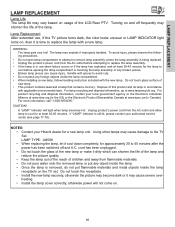
...the lamp cover correctly, otherwise power will light when lamp becomes hot. WARNING: The lamp gets very hot! Dispose of the LCD Rear PTV. For more information, call "1-800-HITACHI." Unplug product's power cord from the AC outlet and allow lamp to avoid cuts. • Do not place any foreign ...before opening the lamp compartment or touching the lamp assembly or any object inside the lamp receptacle on and off and A.C. Turning on the TV set. To avoid injury, please observe the following precautions. • Do not open lamp compartment or attempt to remove lamp assembly unless the...
...the lamp cover correctly, otherwise power will light when lamp becomes hot. WARNING: The lamp gets very hot! Dispose of the LCD Rear PTV. For more information, call "1-800-HITACHI." Unplug product's power cord from the AC outlet and allow lamp to avoid cuts. • Do not place any foreign ...before opening the lamp compartment or touching the lamp assembly or any object inside the lamp receptacle on and off and A.C. Turning on the TV set. To avoid injury, please observe the following precautions. • Do not open lamp compartment or attempt to remove lamp assembly unless the...


