
Owners Guide
Page 3
...the manufacturer. 12. Do not install near water. 6. Do not defeat the safety purpose of antenna-discharge unit, connection to your HITACHI Factory Warranty. A polarized plug has two blades with the recommended safety standards for proper grounding and, in particular, specifies that the cable...the cart/apparatus combination to the point of the television which could cause the product to television receivers. Use only with the cart, stand, tripod, bracket, or table specified by the manufacturer. 17. Follow instructions for replacement of the NEC that produce heat. 9. GROUND...
...the manufacturer. 12. Do not install near water. 6. Do not defeat the safety purpose of antenna-discharge unit, connection to your HITACHI Factory Warranty. A polarized plug has two blades with the recommended safety standards for proper grounding and, in particular, specifies that the cable...the cart/apparatus combination to the point of the television which could cause the product to television receivers. Use only with the cart, stand, tripod, bracket, or table specified by the manufacturer. 17. Follow instructions for replacement of the NEC that produce heat. 9. GROUND...
Owners Guide
Page 4
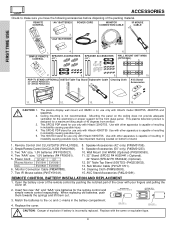
..." (SPD32 P#H520441) C 42" (SPD42 P#H520442) B A C« B« A« C B A C« B« A« Subwoofer Cable Cleaning Cloth AVC Stand Accessories 11. 12. 13. 14. 15. This SPD32 PDP stand for use only with Hitachi 42HDT55 Use with Hitachi 50HDT55. Two "AAA" size, 1.5V batteries (P# FR00061). 5. Lift up on bottom of 45 degrees from vertical. SPEAKER ACCESSORIES (42...
..." (SPD32 P#H520441) C 42" (SPD42 P#H520442) B A C« B« A« C B A C« B« A« Subwoofer Cable Cleaning Cloth AVC Stand Accessories 11. 12. 13. 14. 15. This SPD32 PDP stand for use only with Hitachi 42HDT55 Use with Hitachi 50HDT55. Two "AAA" size, 1.5V batteries (P# FR00061). 5. Lift up on bottom of 45 degrees from vertical. SPEAKER ACCESSORIES (42...
Owners Guide
Page 6
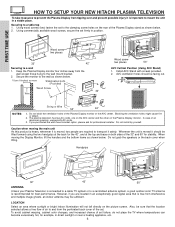
...position. Also, be lifted forward using the two handgrips at the back for stability. FIRST TIME USE HOW TO SETUP YOUR NEW HITACHI PLASMA TELEVISION To take measures to prevent the Plasma Display from the perforated back cover of the set. Using commercially available wood screws,... secure the set failure, do not place the TV where temperatures can become excessively hot, for professional installer. Install AVC Stand with screws provided. 2. POWER NOTES: String or Wire 50" 42" 1. Do not install by yourself. Caution when moving the Display Monitor, ...
...position. Also, be lifted forward using the two handgrips at the back for stability. FIRST TIME USE HOW TO SETUP YOUR NEW HITACHI PLASMA TELEVISION To take measures to prevent the Plasma Display from the perforated back cover of the set. Using commercially available wood screws,... secure the set failure, do not place the TV where temperatures can become excessively hot, for professional installer. Install AVC Stand with screws provided. 2. POWER NOTES: String or Wire 50" 42" 1. Do not install by yourself. Caution when moving the Display Monitor, ...
Owners Guide
Page 10
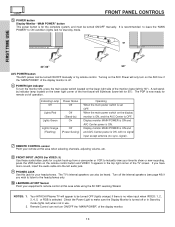
...and must be turned OFF (lights orange) if there is no sync. Your HITACHI Plasma TV will appear to ON condition (lights red) for stand-by ) On Lights Orange Off (Flashing) (Power Saving) Operating When the ...main power switch is off or in Stand-by remote control. FRONT PANEL CONTROLS ቦ POWER button Display Monitor "MAIN POWER" button...the display monitor is set OFF. Indicating Lamp Power Status Off Off Lights Red Lights Green Off (Stand-by mode. Display monitor MAIN POWER is ON and AVC Center power is now ready for remote ...
...and must be turned OFF (lights orange) if there is no sync. Your HITACHI Plasma TV will appear to ON condition (lights red) for stand-by ) On Lights Orange Off (Flashing) (Power Saving) Operating When the ...main power switch is off or in Stand-by remote control. FRONT PANEL CONTROLS ቦ POWER button Display Monitor "MAIN POWER" button...the display monitor is set OFF. Indicating Lamp Power Status Off Off Lights Red Lights Green Off (Stand-by mode. Display monitor MAIN POWER is ON and AVC Center power is now ready for remote ...

Owners Guide
Page 64
... the clock is not set the channel the TV will tune to set , you are away from home by Mode) when the Event is OFF (Stand-by using the On and Off Timers. Event 4 --:-- AM Ant A Ch -- AM Once Use THUMB STICK ̄ to change position of the week you want...
... the clock is not set the channel the TV will tune to set , you are away from home by Mode) when the Event is OFF (Stand-by using the On and Off Timers. Event 4 --:-- AM Ant A Ch -- AM Once Use THUMB STICK ̄ to change position of the week you want...
Owners Guide
Page 81
... Power Requirements 108-132V, 60Hz DIMENSIONS Monitor without prior notice. Optional Accessories: • 42" stand, 32" stand • Wall Mount Bracket INPUTS/OUTPUTS • Inputs RGB, VIDEO 1-5 • Wideband Component...(h), 50-85Hz (v) • Pixel Pitch(50HDT55) .....0.86(horiz.) x 0.81(vert.) mm • Pixel Pitch(42HDT55) .....0.90(horiz.) x 0.51(vert.) mm • Pixel Pitch(32HDT55) .....0.84(horiz.) x 0.39(vert.) ... rear panel at the back of Hitachi Home Electronics (America), Inc. W+28 Ultra Band W+29 - Please access www.hitachi.com/tv for detailed specifications and ...
... Power Requirements 108-132V, 60Hz DIMENSIONS Monitor without prior notice. Optional Accessories: • 42" stand, 32" stand • Wall Mount Bracket INPUTS/OUTPUTS • Inputs RGB, VIDEO 1-5 • Wideband Component...(h), 50-85Hz (v) • Pixel Pitch(50HDT55) .....0.86(horiz.) x 0.81(vert.) mm • Pixel Pitch(42HDT55) .....0.90(horiz.) x 0.51(vert.) mm • Pixel Pitch(32HDT55) .....0.84(horiz.) x 0.39(vert.) ... rear panel at the back of Hitachi Home Electronics (America), Inc. W+28 Ultra Band W+29 - Please access www.hitachi.com/tv for detailed specifications and ...

Owners Guide
Page 84
... Installing Batteries 4 R/G/B 30,66-75 S Screen Saver 60 Sharpness 45 Sound Enhancement 48 Speakers 48 Connecting External Speakers 7,11,22 Internal 48 Split Mode 32 Stand 4 Surf Button 31 I T Input Setup 62-63 Installation (Speakers/Monitor 5-6 L Language Menu Language 59 Locks Change Access Code 54 Channel Lock 54 Time 61 Tint...
... Installing Batteries 4 R/G/B 30,66-75 S Screen Saver 60 Sharpness 45 Sound Enhancement 48 Speakers 48 Connecting External Speakers 7,11,22 Internal 48 Split Mode 32 Stand 4 Surf Button 31 I T Input Setup 62-63 Installation (Speakers/Monitor 5-6 L Language Menu Language 59 Locks Change Access Code 54 Channel Lock 54 Time 61 Tint...


