

Owners Guide
Page 1
... (Audio Video Control Center) & Plasma Display Monitor 32HDT55 42HDT55 50HDT55 OPERATING GUIDE Video Audio Ch. Manager Locks Setup Move SEL Sel IMPORTANT SAFETY INSTRUCTIONS 2-3 FIRST TIME USE 4-23 THE REMOTE CONTROL 24-41 ON-SCREEN DISPLAY USING THE RGB INPUT OF THE PLASMA TV 42-65 66-75 USEFUL INFORMATION INDEX 76-84...
... (Audio Video Control Center) & Plasma Display Monitor 32HDT55 42HDT55 50HDT55 OPERATING GUIDE Video Audio Ch. Manager Locks Setup Move SEL Sel IMPORTANT SAFETY INSTRUCTIONS 2-3 FIRST TIME USE 4-23 THE REMOTE CONTROL 24-41 ON-SCREEN DISPLAY USING THE RGB INPUT OF THE PLASMA TV 42-65 66-75 USEFUL INFORMATION INDEX 76-84...

Owners Guide
Page 2
...may void the user's authority to operate the equipment. Home Electronics Division may be of HITACHI Plasma Televisions. NOTE: This Plasma Television will be of a sufficient magnitude to constitute a risk of your HITACHI Plasma Television. Please fill out your warranty card and mail it to the proper operation of ...THE AVC CENTER AND DISPLAY MONITOR POWER CORD INTO A 120 VOLT 60Hz OUTLET. IMPORTANT SAFETY POINTS YOU SHOULD KNOW ABOUT YOUR HITACHI PLASMA TELEVISION Our reputation has been built on the quality, performance, and ease of service of benefit to you. The lightning ...
...may void the user's authority to operate the equipment. Home Electronics Division may be of HITACHI Plasma Televisions. NOTE: This Plasma Television will be of a sufficient magnitude to constitute a risk of your HITACHI Plasma Television. Please fill out your warranty card and mail it to the proper operation of ...THE AVC CENTER AND DISPLAY MONITOR POWER CORD INTO A 120 VOLT 60Hz OUTLET. IMPORTANT SAFETY POINTS YOU SHOULD KNOW ABOUT YOUR HITACHI PLASMA TELEVISION Our reputation has been built on the quality, performance, and ease of service of benefit to you. The lightning ...
Owners Guide
Page 4
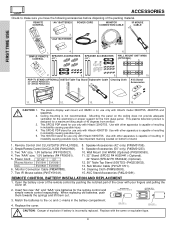
... ceiling does not provide adequate ventilation for the electronics or proper support for use only with Hitachi 42HDT55 Use with your fingers and pulling the cover off. 2. Power Cord: 32"/42" 50" Plasma Monitor EV01841 EV01861 AVC EV01841 EV01841 6. CAUTION: 1. 2. 3. 4. 5. Monitor Connection Cable...the springs and lift them out. Match the batteries to remove back cover. Replace with Hitachi model 32HDT55, 42HDT55 and 50HDT55. SPEAKER ACCESSORIES (50") 6. 7. The plasma display wall mount unit WM50 is for the front glass panel. Use with other apparatus...
... ceiling does not provide adequate ventilation for the electronics or proper support for use only with Hitachi 42HDT55 Use with your fingers and pulling the cover off. 2. Power Cord: 32"/42" 50" Plasma Monitor EV01841 EV01861 AVC EV01841 EV01841 6. CAUTION: 1. 2. 3. 4. 5. Monitor Connection Cable...the springs and lift them out. Match the batteries to remove back cover. Replace with Hitachi model 32HDT55, 42HDT55 and 50HDT55. SPEAKER ACCESSORIES (50") 6. 7. The plasma display wall mount unit WM50 is for the front glass panel. Use with other apparatus...

Owners Guide
Page 5
...(A) Screw x2 2. Speaker Holder Screw x2 (R) (L) (R) Speaker Holder Speaker Holder Screw x2 2. Screw in screws (C) Bottom View of the Plasma TV and an external amplifier. 5 Connect the speaker wires as shown below . (Make sure the core is toward the display monitor side.) Ferrite Core...Make sure the core is toward the display monitor side.) Core Screw in screw (C). 3. FIRST TIME USE HOW TO SETUP YOUR NEW HITACHI PLASMA TELEVISION SPEAKER INSTALLATION 42" 1. Hook the speaker holders to the Display Monitor with screws (B). 6. Screw the speaker holders to the loosened ...
...(A) Screw x2 2. Speaker Holder Screw x2 (R) (L) (R) Speaker Holder Speaker Holder Screw x2 2. Screw in screws (C) Bottom View of the Plasma TV and an external amplifier. 5 Connect the speaker wires as shown below . (Make sure the core is toward the display monitor side.) Ferrite Core...Make sure the core is toward the display monitor side.) Core Screw in screw (C). 3. FIRST TIME USE HOW TO SETUP YOUR NEW HITACHI PLASMA TELEVISION SPEAKER INSTALLATION 42" 1. Hook the speaker holders to the Display Monitor with screws (B). 6. Screw the speaker holders to the loosened ...
Owners Guide
Page 6
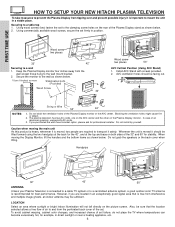
...example, in direct sunlight or near a heating appliance, etc. 6 FIRST TIME USE HOW TO SETUP YOUR NEW HITACHI PLASMA TELEVISION To take measures to prevent the Plasma Display from tipping over and prevent possible injury it is moved, two people are located in an exceptionally good ...wall mount bracket. 2. Blocking the ventilation holes might cause fire or defect. 2. In case of an abnormal symptom, unplug both sides of the Plasma Display monitor or the AVC center. If you are required to a table-top 1. Securing to transport it safely. POWER STANDBY (RED) ON...
...example, in direct sunlight or near a heating appliance, etc. 6 FIRST TIME USE HOW TO SETUP YOUR NEW HITACHI PLASMA TELEVISION To take measures to prevent the Plasma Display from tipping over and prevent possible injury it is moved, two people are located in an exceptionally good ...wall mount bracket. 2. Blocking the ventilation holes might cause fire or defect. 2. In case of an abnormal symptom, unplug both sides of the Plasma Display monitor or the AVC center. If you are required to a table-top 1. Securing to transport it safely. POWER STANDBY (RED) ON...
Owners Guide
Page 7
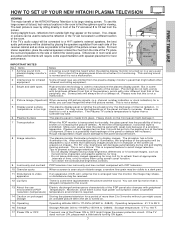
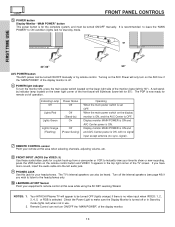
... will be located in a different section of the room. HOW TO SET UP YOUR NEW HITACHI PLASMA TELEVISION FIRST TIME USE VIEWING The major benefit of the HITACHI Plasma Television is its best, test various locations in the room to find the optimum spot for viewing...since there is also high power consumption value, a specified television (temperature) temperature environment is required. 14 Caution on prolonged storage Storing the plasma television for a period of a precision apparatus. Storage temperature: 5˚F to 140˚F. 17 Power ON or OFF Frequent use Electric...
... will be located in a different section of the room. HOW TO SET UP YOUR NEW HITACHI PLASMA TELEVISION FIRST TIME USE VIEWING The major benefit of the HITACHI Plasma Television is its best, test various locations in the room to find the optimum spot for viewing...since there is also high power consumption value, a specified television (temperature) temperature environment is required. 14 Caution on prolonged storage Storing the plasma television for a period of a precision apparatus. Storage temperature: 5˚F to 140˚F. 17 Power ON or OFF Frequent use Electric...
Owners Guide
Page 8
... Display Monitor. The resolution should use 75-Ohm coaxial shielded wire. If you have phono connectors. Plug the adapter into the antenna terminal on the Plasma Television. FIRST TIME USE 300-Ohm Twin Lead Connector This outdoor antenna cable must place the IR mouse in place of the standard video cable...
... Display Monitor. The resolution should use 75-Ohm coaxial shielded wire. If you have phono connectors. Plug the adapter into the antenna terminal on the Plasma Television. FIRST TIME USE 300-Ohm Twin Lead Connector This outdoor antenna cable must place the IR mouse in place of the standard video cable...
Owners Guide
Page 10
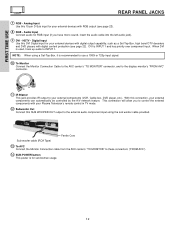
... to instantly view your remote at this jack for stand-by mode. signal). ቨ REMOTE CONTROL sensor Point your favorite show or new recording. Your HITACHI Plasma TV will illuminate (lower left for 50"). Remote Control can also be turned OFF (lights orange) if there is no sync. Turning on the AVC...
... to instantly view your remote at this jack for stand-by mode. signal). ቨ REMOTE CONTROL sensor Point your favorite show or new recording. Your HITACHI Plasma TV will illuminate (lower left for 50"). Remote Control can also be turned OFF (lights orange) if there is no sync. Turning on the AVC...
Owners Guide
Page 12
Audio Input Connect audio for your Plasma Television's remote control in TV mode. ቮ Subwoofer Out Connect this DVI Digital input for RGB input (if you to the external audio component input ...
Audio Input Connect audio for your Plasma Television's remote control in TV mode. ቮ Subwoofer Out Connect this DVI Digital input for RGB input (if you to the external audio component input ...
Owners Guide
Page 13
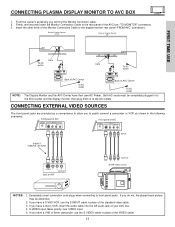
...the display monitor, then plug them in place of Display Monitor 50" NOTE: To AC outlet Core Core To AC outlet Please use HITACHI specified cable. Firmly, and securely insert the Monitor Connection Cable to the display monitor rear panel "FROM AVC" connectors. Completely insert ... your AVC box. 4. Both AC cords must be abnormal. 2. If you will find the Monitor Connector cable. 2. FIRST TIME USE CONNECTING PLASMA DISPLAY MONITOR TO AVC BOX 1. S-VIDEO input takes priority over VIDEO input. 5. CONNECTING EXTERNAL VIDEO SOURCES The front panel jacks are trademarks of...
...the display monitor, then plug them in place of Display Monitor 50" NOTE: To AC outlet Core Core To AC outlet Please use HITACHI specified cable. Firmly, and securely insert the Monitor Connection Cable to the display monitor rear panel "FROM AVC" connectors. Completely insert ... your AVC box. 4. Both AC cords must be abnormal. 2. If you will find the Monitor Connector cable. 2. FIRST TIME USE CONNECTING PLASMA DISPLAY MONITOR TO AVC BOX 1. S-VIDEO input takes priority over VIDEO input. 5. CONNECTING EXTERNAL VIDEO SOURCES The front panel jacks are trademarks of...
Owners Guide
Page 14
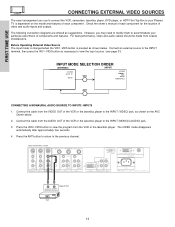
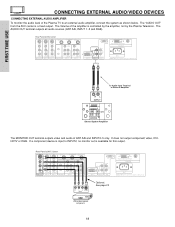
However, you use HITACHI specified cable. Connect an external source to the INPUT terminal, then press the VID1~VID5 button as shown below . 2. Connect the cable from coaxial shielded ... to the INPUT (MONO)/L(AUDIO) jack. 3. FIRST TIME USE CONNECTING EXTERNAL VIDEO SOURCES The exact arrangement you may need to modify them to accommodate your Plasma TV is pressed as necessary to view the input source (see page 31). For best performance, video and audio cables should be made from the...
However, you use HITACHI specified cable. Connect an external source to the INPUT terminal, then press the VID1~VID5 button as shown below . 2. Connect the cable from coaxial shielded ... to the INPUT (MONO)/L(AUDIO) jack. 3. FIRST TIME USE CONNECTING EXTERNAL VIDEO SOURCES The exact arrangement you may need to modify them to accommodate your Plasma TV is pressed as necessary to view the input source (see page 31). For best performance, video and audio cables should be made from the...
Owners Guide
Page 18
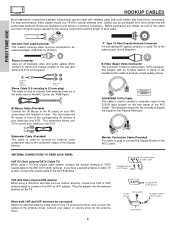
...L/(MONO) PB L/(MONO) R AUDIO INPUT 3 IR BLASTER PR R AUDIO INPUT 2 PR R AUDIO INPUT 1 ANALOG INPUT L AUDIO DVI-HDTV L/(MONO) AUDIO Please use HITACHI specified cable. The Volume of the amplifier is a fixed output. Rear Panel of AVC Center ANT B TO CONVERTER ANT A S-VIDEO S-VIDEO VIDEO L VIDEO L/(MONO) R... 23 VCR or other external components 18 The "AUDIO OUT" from the AVC center is controlled by the amplifier, not by the Plasma Television. If a component device is input to an external audio amplifier, connect the system as shown below. RL INPUT To Audio ...
...L/(MONO) PB L/(MONO) R AUDIO INPUT 3 IR BLASTER PR R AUDIO INPUT 2 PR R AUDIO INPUT 1 ANALOG INPUT L AUDIO DVI-HDTV L/(MONO) AUDIO Please use HITACHI specified cable. The Volume of the amplifier is a fixed output. Rear Panel of AVC Center ANT B TO CONVERTER ANT A S-VIDEO S-VIDEO VIDEO L VIDEO L/(MONO) R... 23 VCR or other external components 18 The "AUDIO OUT" from the AVC center is controlled by the amplifier, not by the Plasma Television. If a component device is input to an external audio amplifier, connect the system as shown below. RL INPUT To Audio ...
Owners Guide
Page 19
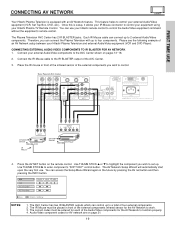
... is setup, it allows your IR Mouse connector to control your equipment using your Hitachi Plasma TV Remote Control. Therefore, you can use your Hitachi Plasma Television and external Audio/Video equipment (VCR and DVD Player). Place the IR mouse in front of the infrared sensor of four ...Wizard will automatically start upon the very first use HITACHI specified cable. The AVC Center has two IR BLASTER outputs which can control up to a total of the external components you wish to four components. You can connect the Plasma Television with an AV Network feature. Connect your...
... is setup, it allows your IR Mouse connector to control your equipment using your Hitachi Plasma TV Remote Control. Therefore, you can use your Hitachi Plasma Television and external Audio/Video equipment (VCR and DVD Player). Place the IR mouse in front of the infrared sensor of four ...Wizard will automatically start upon the very first use HITACHI specified cable. The AVC Center has two IR BLASTER outputs which can control up to a total of the external components you wish to four components. You can connect the Plasma Television with an AV Network feature. Connect your...

Owners Guide
Page 24
...and press the SET-TOPBOX (STB) button. The VCR button will blink, indicating that the remote will now control your television. To operate your Plasma TV, point the remote control at the remote sensor of the VCR and press the VCR button. To operate your DVD player, point the ... remote sensor of the component you have a satellite receiver, use this button to program your satellite receiver (see page 39 for instructions on your HITACHI Plasma TV, the new remote control is too bright. 24 The STB button will blink, indicating that the remote will now control the desired component (...
...and press the SET-TOPBOX (STB) button. The VCR button will blink, indicating that the remote will now control your television. To operate your Plasma TV, point the remote control at the remote sensor of the VCR and press the VCR button. To operate your DVD player, point the ... remote sensor of the component you have a satellite receiver, use this button to program your satellite receiver (see page 39 for instructions on your HITACHI Plasma TV, the new remote control is too bright. 24 The STB button will blink, indicating that the remote will now control the desired component (...
Owners Guide
Page 25
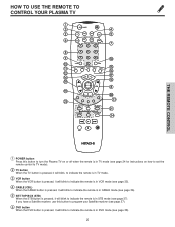
If you have a Satellite receiver, use this button to turn the Plasma TV on or off when the remote is in TV mode (see page 24 for instructions on how to set the remote control to TV ... button is pressed, it will blink to indicate the remote is in DVD mode (see page 37). HOW TO USE THE REMOTE TO CONTROL YOUR PLASMA TV ት POWER TV DVD VCR CBL SOURCE WIZARD CD PVR STB AMP 1 2 3 4 5 6 7 8 9 SLEEP 0 INFO ANT TV/RGB A/V NET ASPECT VIDEO MENU EXIT VOL SELECT...
If you have a Satellite receiver, use this button to turn the Plasma TV on or off when the remote is in TV mode (see page 24 for instructions on how to set the remote control to TV ... button is pressed, it will blink to indicate the remote is in DVD mode (see page 37). HOW TO USE THE REMOTE TO CONTROL YOUR PLASMA TV ት POWER TV DVD VCR CBL SOURCE WIZARD CD PVR STB AMP 1 2 3 4 5 6 7 8 9 SLEEP 0 INFO ANT TV/RGB A/V NET ASPECT VIDEO MENU EXIT VOL SELECT...
Owners Guide
Page 26
... -:-- Enter one, two, or three numbers to the channel display on your TV, then enter the remaining two numbers using the number buttons. NOTE: The Plasma TV may also be performed by pressing CH up to a maximum of three hours. THE REMOTE CONTROL MENU LAST CH GUIDE/TV SCHD VID 4 VID... PLUS+ VID 1 VID 2 PIP FREEZE VID 3 PIP CH PIP ACCESS VIDEO SWAP PIP MODE REC CLU-5723TSI HOW TO USE THE REMOTE TO CONTROL YOUR PLASMA TV ቨ CD, PVR, AMP buttons When pressed, each time the button is pressed. 3:32 PM Ant A 15 Stereo G ANT 3:32 PM Ant B 22 Stereo...
... -:-- Enter one, two, or three numbers to the channel display on your TV, then enter the remaining two numbers using the number buttons. NOTE: The Plasma TV may also be performed by pressing CH up to a maximum of three hours. THE REMOTE CONTROL MENU LAST CH GUIDE/TV SCHD VID 4 VID... PLUS+ VID 1 VID 2 PIP FREEZE VID 3 PIP CH PIP ACCESS VIDEO SWAP PIP MODE REC CLU-5723TSI HOW TO USE THE REMOTE TO CONTROL YOUR PLASMA TV ቨ CD, PVR, AMP buttons When pressed, each time the button is pressed. 3:32 PM Ant A 15 Stereo G ANT 3:32 PM Ant B 22 Stereo...
Owners Guide
Page 27
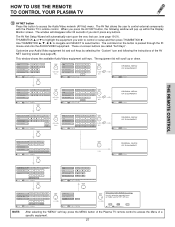
...up or down. THUMBSTICK ̆ or ̄ to highlight the equipment you press the AV NET button, the following the instructions of the Plasma TV remote control to select button. The window will automatically start upon the very first use. (see page 28). These on the button is... 6 9 MENU INFO GUIDE THUMB STICK Cable Box Set Top Box Custom SETUP Move INFO Device Setting THUMB STICK HITACHI AV NET WIZARD (Learning) Use this button to control external components with the Plasma TV's remote control. The AV Net allows the user to access the Audio/Video network (AV Net) menu...
...up or down. THUMBSTICK ̆ or ̄ to highlight the equipment you press the AV NET button, the following the instructions of the Plasma TV remote control to select button. The window will automatically start upon the very first use. (see page 28). These on the button is... 6 9 MENU INFO GUIDE THUMB STICK Cable Box Set Top Box Custom SETUP Move INFO Device Setting THUMB STICK HITACHI AV NET WIZARD (Learning) Use this button to control external components with the Plasma TV's remote control. The AV Net allows the user to access the Audio/Video network (AV Net) menu...
Owners Guide
Page 28
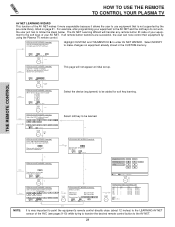
... Softkey SELECT EXIT Select soft key to AV NET. TV Softkeys POWER MENU Done Move Continue SEL Select SELECT EXIT No Done THUMB STICK SELECT HITACHI AV NET WIZARD (Learning) DVD2 (Custom) Video Input Audio Input No Connection No Connection Transmission Test POWER PLAY CH UP BACK Move OK SEL Select... This function of the AV NET makes it more expandable because it allows the user to use equipment that is not supported by using the Plasma TV remote control. For example, after programming your equipment to the AV NET and the soft keys do you want to add? (•) DVD2 ( ) ...
... Softkey SELECT EXIT Select soft key to AV NET. TV Softkeys POWER MENU Done Move Continue SEL Select SELECT EXIT No Done THUMB STICK SELECT HITACHI AV NET WIZARD (Learning) DVD2 (Custom) Video Input Audio Input No Connection No Connection Transmission Test POWER PLAY CH UP BACK Move OK SEL Select... This function of the AV NET makes it more expandable because it allows the user to use equipment that is not supported by using the Plasma TV remote control. For example, after programming your equipment to the AV NET and the soft keys do you want to add? (•) DVD2 ( ) ...
Owners Guide
Page 29
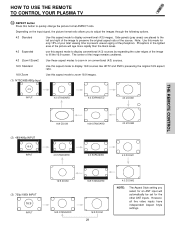
... change the picture format ASPECT ratio. THE REMOTE CONTROL MODE EXIT MUTE VCR PLUS+ SVCS VID 2 VID 1 HOW TO USE THE REMOTE TO CONTROL YOUR PLASMA TV VOL TV POWER SLEEP ANT TV/RGB MENU DVD 1 VCR CDSOURCE WIZARDCBL TAPE STB 4 7 2 5 AMP 3 8 6 0 9 A/V NET ASPECT INFO SELECT CH PIP PIP MODE PIP...
... change the picture format ASPECT ratio. THE REMOTE CONTROL MODE EXIT MUTE VCR PLUS+ SVCS VID 2 VID 1 HOW TO USE THE REMOTE TO CONTROL YOUR PLASMA TV VOL TV POWER SLEEP ANT TV/RGB MENU DVD 1 VCR CDSOURCE WIZARDCBL TAPE STB 4 7 2 5 AMP 3 8 6 0 9 A/V NET ASPECT INFO SELECT CH PIP PIP MODE PIP...
Owners Guide
Page 30
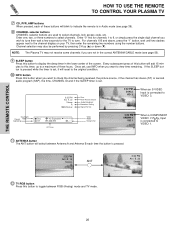
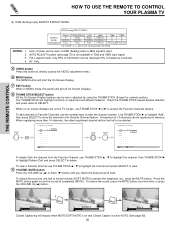
... PLUS+ VID 1 VID 2 PIP FREEZE VID 3 PIP CH PIP ACCESS VIDEO SWAP PIP MODE REC CLU-5723TSI HOW TO USE THE REMOTE TO CONTROL YOUR PLASMA TV (4) RGB (Analog Input) ASPECT DISPLAY MODE.
... PLUS+ VID 1 VID 2 PIP FREEZE VID 3 PIP CH PIP ACCESS VIDEO SWAP PIP MODE REC CLU-5723TSI HOW TO USE THE REMOTE TO CONTROL YOUR PLASMA TV (4) RGB (Analog Input) ASPECT DISPLAY MODE.


