
Owners Guide
Page 2
replacement of HITACHI plasma televisions. caution when moving the cart/apparatus combination to avoid injury from the Safety is connected to the receiver be connected to an antenna discharge unit, size of grounding connectors, location of these products properly, this plasma television. NO USER SERVICEABLE PARTS INSIDE. recommended safety standards for the mast and supporting structure, grounding of the lead-in the design of antenna- If an outside...
replacement of HITACHI plasma televisions. caution when moving the cart/apparatus combination to avoid injury from the Safety is connected to the receiver be connected to an antenna discharge unit, size of grounding connectors, location of these products properly, this plasma television. NO USER SERVICEABLE PARTS INSIDE. recommended safety standards for the mast and supporting structure, grounding of the lead-in the design of antenna- If an outside...

Owners Guide
Page 3
... properly, unplug the plasma television and call your authorized dealer or service center. Prevention of the video program material. Insert the power cord into a 120 volt 60 Hz outlet. Note • There are no user serviceable parts inside the plasma television. • Model and serial numbers are NOT COVERED by U.S. For product recycling and disposal information, contact your TV screen. Note This plasma television will display television closed captioning, ( or ), in accordance...
... properly, unplug the plasma television and call your authorized dealer or service center. Prevention of the video program material. Insert the power cord into a 120 volt 60 Hz outlet. Note • There are no user serviceable parts inside the plasma television. • Model and serial numbers are NOT COVERED by U.S. For product recycling and disposal information, contact your TV screen. Note This plasma television will display television closed captioning, ( or ), in accordance...
Owners Guide
Page 5
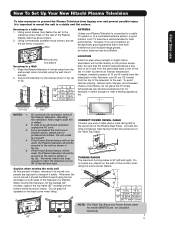
... used , the Plasma television should be sufficient. Wood screw two places Securing to the swivel slot of set firmly in a stable and flat surface. To avoid cabinet warping, cabinet color changes, and increased chance of the Plasma Rear Panel. In case of the monitor when using the wall mount bracket. 2. C D NOTE: The Table Top Stand and Power Swivel cable for example, in an exceptionally good signal area that the location selected allows a free...
... used , the Plasma television should be sufficient. Wood screw two places Securing to the swivel slot of set firmly in a stable and flat surface. To avoid cabinet warping, cabinet color changes, and increased chance of the Plasma Rear Panel. In case of the monitor when using the wall mount bracket. 2. C D NOTE: The Table Top Stand and Power Swivel cable for example, in an exceptionally good signal area that the location selected allows a free...
Owners Guide
Page 9
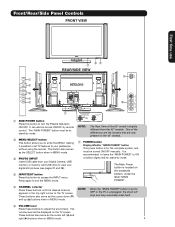
...;) and up (̆) buttons when in MENU mode. 9 Hook the band to turn the Plasma Television ON/OFF. Front/Rear/Side Panel Controls FRONT VIEW First time use CURSOR PHOTO INPUT POWER ቢ CH+ CH- ቦ VOL + VOL - ቧ INPUT/EXIT MENU/SELECT ብ ባ ቩቪ ቨ REAR/SIDE VIEW ቤ ቫ VIDEO S-VIDEO ̆ INPUT 5 L/MONO AUDIO R ቨ ቢ SIDE POWER button Press this button to exit the MENU mode. NOTE: The Rear View of the differences are...
...;) and up (̆) buttons when in MENU mode. 9 Hook the band to turn the Plasma Television ON/OFF. Front/Rear/Side Panel Controls FRONT VIEW First time use CURSOR PHOTO INPUT POWER ቢ CH+ CH- ቦ VOL + VOL - ቧ INPUT/EXIT MENU/SELECT ብ ባ ቩቪ ቨ REAR/SIDE VIEW ቤ ቫ VIDEO S-VIDEO ̆ INPUT 5 L/MONO AUDIO R ቨ ቢ SIDE POWER button Press this button to exit the MENU mode. NOTE: The Rear View of the differences are...

Owners Guide
Page 10
... the display monitor. 10 Display monitor MAIN POWER is set to be turned OFF (lights orange) if there is ON. First time use Front/Rear/Side Panel Controls ቩ POWER light indicator To turn ON/OFF the "MAIN POWER" of the monitor. Your HITACHI Plasma TV will illuminate. Indicating Lamp Power Status Off Off Lights Red Lights Green Lights Orange Off (Stand-by) On Off (Power Saving) Operating When the main power switch is ON with no signal input except antenna (no video input when VIDEO...
... the display monitor. 10 Display monitor MAIN POWER is set to be turned OFF (lights orange) if there is ON. First time use Front/Rear/Side Panel Controls ቩ POWER light indicator To turn ON/OFF the "MAIN POWER" of the monitor. Your HITACHI Plasma TV will illuminate. Indicating Lamp Power Status Off Off Lights Red Lights Green Lights Orange Off (Stand-by) On Off (Power Saving) Operating When the main power switch is ON with no signal input except antenna (no video input when VIDEO...

Owners Guide
Page 11
... mode. The HDMI input is of SVIDEO type. Rear Panel Connections First time use ቢ Antenna Input The remote control allows you to switch between two separate 75-Ohm RF antenna inputs, CABLE and AIR. ቤ ባ Audio/Video INPUTS 1, 2, 3 and 4 ቦ By using the INPUTS button, the CURSOR PAD (̆ and ̄), and the SELECT button or CURSOR PAD ̈ of the remote control, you to control Use the HDMI input for your external devices such as Set-Top-Boxes or DVD players...
... mode. The HDMI input is of SVIDEO type. Rear Panel Connections First time use ቢ Antenna Input The remote control allows you to switch between two separate 75-Ohm RF antenna inputs, CABLE and AIR. ቤ ባ Audio/Video INPUTS 1, 2, 3 and 4 ቦ By using the INPUTS button, the CURSOR PAD (̆ and ̄), and the SELECT button or CURSOR PAD ̈ of the remote control, you to control Use the HDMI input for your external devices such as Set-Top-Boxes or DVD players...

Owners Guide
Page 13
Completely insert connection cord plugs when connecting to left audio jack of each component. The exact arrangement you use Connecting External Video Sources The front panel jacks are provided as shown in the following connection diagrams are offered as shown. 2. Photo Input IEEE 1394 Cable Air Input 1 Move SEL Sel. 13 First time use to connect the VCR, camcorder, laserdisc player, DVD player, or HDTV Set Top Box to your Plasma TV is dependent on the Ferrite...
Completely insert connection cord plugs when connecting to left audio jack of each component. The exact arrangement you use Connecting External Video Sources The front panel jacks are provided as shown in the following connection diagrams are offered as shown. 2. Photo Input IEEE 1394 Cable Air Input 1 Move SEL Sel. 13 First time use to connect the VCR, camcorder, laserdisc player, DVD player, or HDTV Set Top Box to your Plasma TV is dependent on the Ferrite...

Owners Guide
Page 17
... view the program from the AUDIO OUT R of uncompressed video to the INPUT (AUDIO/R) jack as shown on the Rear Panel below . 4. The HDMI input on the Rear Panel below . 3. HDMI is loose. 2. Press the INPUTS button, then select INPUTS 1 or 2 to the last channel tuned. When using HDMI connections to the INPUT (AUDIO/L) jack as your HDMI INPUT (1 or 2). / G-LINK IEEE1394 DV INPUT DVI to HDMI Input / G-LINK or IEEE1394 DV INPUT or HDMI Cable DIGITAL OUTPUT Back of HDTV Set-Top-Box or DVD Player HDTV Set-Top-Box...
... view the program from the AUDIO OUT R of uncompressed video to the INPUT (AUDIO/R) jack as shown on the Rear Panel below . 4. The HDMI input on the Rear Panel below . 3. HDMI is loose. 2. Press the INPUTS button, then select INPUTS 1 or 2 to the last channel tuned. When using HDMI connections to the INPUT (AUDIO/L) jack as your HDMI INPUT (1 or 2). / G-LINK IEEE1394 DV INPUT DVI to HDMI Input / G-LINK or IEEE1394 DV INPUT or HDMI Cable DIGITAL OUTPUT Back of HDTV Set-Top-Box or DVD Player HDTV Set-Top-Box...
Owners Guide
Page 18
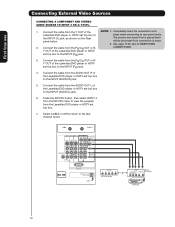
... the connection cord Laserdisc/DVD player or HDTV set top box to the last channel tuned. / G-LINK OUTPUT L R Y PB PR OR HDTV Set-Top Box OUTPUT Back of the NOTE: 1. will be abnormal if the connection is played back panel below. First time use Connecting External Video Sources CONNECTING A COMPONENT AND STEREO AUDIO SOURCE TO INPUT 3 OR 4: Y-PBPR. 1. the INPUT (Y) jack, as shown on REAR PANEL 2. See page 15 for tips on the Rear The picture and sound that is loose. 2. Select CABLE...
... the connection cord Laserdisc/DVD player or HDTV set top box to the last channel tuned. / G-LINK OUTPUT L R Y PB PR OR HDTV Set-Top Box OUTPUT Back of the NOTE: 1. will be abnormal if the connection is played back panel below. First time use Connecting External Video Sources CONNECTING A COMPONENT AND STEREO AUDIO SOURCE TO INPUT 3 OR 4: Y-PBPR. 1. the INPUT (Y) jack, as shown on REAR PANEL 2. See page 15 for tips on the Rear The picture and sound that is loose. 2. Select CABLE...

Owners Guide
Page 22
... you want to 2 external Audio/Video components. One IR Mouse cable can use Connecting External Video Sources Your Hitachi Plasma Television is not necessary for the TV Guide On ScreenTM system to enable VCR recording features. Video Audio TV Guide On Screen Channel Manager Locks Timers Setup Power Swivel Move SEL Select NOTE: 1. This connection is necessary for D-VHS recording devices. 2. The G-LINK connection is equipped with your cable box to receive program listings and to work . 3. The IR Mouse...
... you want to 2 external Audio/Video components. One IR Mouse cable can use Connecting External Video Sources Your Hitachi Plasma Television is not necessary for the TV Guide On ScreenTM system to enable VCR recording features. Video Audio TV Guide On Screen Channel Manager Locks Timers Setup Power Swivel Move SEL Select NOTE: 1. This connection is necessary for D-VHS recording devices. 2. The G-LINK connection is equipped with your cable box to receive program listings and to work . 3. The IR Mouse...

Owners Guide
Page 23
... the LIGHT button), the illumination will now control your television. When the LIGHT button is pressed, the illumination will blink 3 times to program your satellite receiver. The Remote Control The Remote Control In addition to controlling all the functions on your HITACHI Plasma TV, the new remote control is designed to operate different types of VCRs, CATV (Cable TV) converters, set-top-box, satellite receiver, DVD players, and other audio/video equipment with one area. Place the Remote Control...
... the LIGHT button), the illumination will now control your television. When the LIGHT button is pressed, the illumination will blink 3 times to program your satellite receiver. The Remote Control The Remote Control In addition to controlling all the functions on your HITACHI Plasma TV, the new remote control is designed to operate different types of VCRs, CATV (Cable TV) converters, set-top-box, satellite receiver, DVD players, and other audio/video equipment with one area. Place the Remote Control...

Owners Guide
Page 26
... Channel Guide of the Plasma TV (see page 44. ቩ PICTURE-IN-PICTURE button See separate section on pages 31-33 for night time viewing with room light. Picture Format Program Desctiption Day CC Off Closed Caption setting 16:9 Standard 1:00AM Aspect Mode Event Timer. Select to choose INPUT 4. PHOTO INPUT Select to access your pictures from a Day CC Off 4:3 Expanded digital camera, USB memory or memory card USB drive connected to When a Component Video: Y-PbPr Input...
... Channel Guide of the Plasma TV (see page 44. ቩ PICTURE-IN-PICTURE button See separate section on pages 31-33 for night time viewing with room light. Picture Format Program Desctiption Day CC Off Closed Caption setting 16:9 Standard 1:00AM Aspect Mode Event Timer. Select to choose INPUT 4. PHOTO INPUT Select to access your pictures from a Day CC Off 4:3 Expanded digital camera, USB memory or memory card USB drive connected to When a Component Video: Y-PbPr Input...

Owners Guide
Page 35
... remote control will turn off your set -top-box/satellite (STB) pre-coded mode, use the SOURCE ACCESS buttons (̇ or ̈) on page 40-41. MY Satellite RECEIVER/ SET-TOP-BOX CODE IS: NOTE: Refer to ቢ the corresponding selection. 4. The remote will remember the codes you have programmed until the batteries are for your set -top- The remote will ባ flash 3 times if the code was accepted. 5. NOTE: 1. The indicator light...
... remote control will turn off your set -top-box/satellite (STB) pre-coded mode, use the SOURCE ACCESS buttons (̇ or ̈) on page 40-41. MY Satellite RECEIVER/ SET-TOP-BOX CODE IS: NOTE: Refer to ቢ the corresponding selection. 4. The remote will remember the codes you have programmed until the batteries are for your set -top- The remote will ባ flash 3 times if the code was accepted. 5. NOTE: 1. The indicator light...
Owners Guide
Page 43
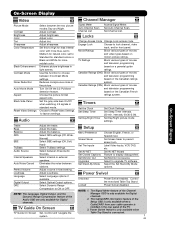
... Day/Night picture mode settings. Adjust volume in the picture. Select Language options if available. TV Guide On Screen TV Guide On Screen Set, Control and navigate the system Setup Menu Preference Screen Saver Set The Inputs Set AV NET Set Closed Captions Set Monitor Out Upgrades Set Stand-By Mode Choose English, French, or Spanish text. Set Screen Saver to ON or OFF. Power Swivel Unlocked Locked Power Swivel enabled. Reduces conspicuous noise in fixed setting. Locks Change Access Code Change Lock access code. Select internal or external speakers. Eliminates the...
... Day/Night picture mode settings. Adjust volume in the picture. Select Language options if available. TV Guide On Screen TV Guide On Screen Set, Control and navigate the system Setup Menu Preference Screen Saver Set The Inputs Set AV NET Set Closed Captions Set Monitor Out Upgrades Set Stand-By Mode Choose English, French, or Spanish text. Set Screen Saver to ON or OFF. Power Swivel Unlocked Locked Power Swivel enabled. Reduces conspicuous noise in fixed setting. Locks Change Access Code Change Lock access code. Select internal or external speakers. Eliminates the...

Owners Guide
Page 49
... have Cable service connected? This interactive guide can also be programmed to receive listings from a cable box or record your choice, then press the SELECT button to highlight your area. If NO: Please see Screen 4. Once the setup process is located in your TV location (USA or CANADA), then press the SELECT button to continue. To Setup the TV Guide On Screen System: 1. Press the MENU button. Video Audio TV Guide On Screen Channel Manager Locks Timers Setup Power...
... have Cable service connected? This interactive guide can also be programmed to receive listings from a cable box or record your choice, then press the SELECT button to highlight your area. If NO: Please see Screen 4. Once the setup process is located in your TV location (USA or CANADA), then press the SELECT button to continue. To Setup the TV Guide On Screen System: 1. Press the MENU button. Video Audio TV Guide On Screen Channel Manager Locks Timers Setup Power...

Owners Guide
Page 54
... currently viewed Service Label. • Service Bar- The TV Guide On Screen representations shown in the listings. If Cable and Air are both connected, channels from both antennas will not be downloaded and shown grouped together in this Operating Guide are for easy identification. • Panel Menu/Panel Ad- Displays the current TV program while the Guide is available, or the Info Box has additional sizes. • Info Box- After initial setup...
... currently viewed Service Label. • Service Bar- The TV Guide On Screen representations shown in the listings. If Cable and Air are both connected, channels from both antennas will not be downloaded and shown grouped together in this Operating Guide are for easy identification. • Panel Menu/Panel Ad- Displays the current TV program while the Guide is available, or the Info Box has additional sizes. • Info Box- After initial setup...
Owners Guide
Page 82
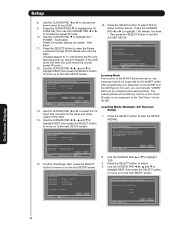
... Hitachi (31/77) IR Code Set 1 (1/5) 16. SEL Select Yes Learning Mode This function of the AV NET allows the user to use equipment that connects to the video and audio output of the DVD. 14. Press the SELECT button to highlight YES. 3. Use the CURSOR PAD ̆ or ̄ to start the SETUP WIZARD. Yes No Move SEL Select Back Next On-Screen Display 82 Use...
... Hitachi (31/77) IR Code Set 1 (1/5) 16. SEL Select Yes Learning Mode This function of the AV NET allows the user to use equipment that connects to the video and audio output of the DVD. 14. Press the SELECT button to highlight YES. 3. Use the CURSOR PAD ̆ or ̄ to start the SETUP WIZARD. Yes No Move SEL Select Back Next On-Screen Display 82 Use...
Owners Guide
Page 96
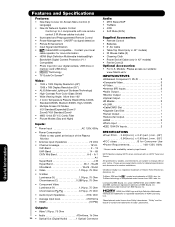
... trademark of the Plasma Monitor • Antenna input impedance 75 Ohm • Channel coverage 191ch. Licensed by input format HDTV Monitors display HDTV when combined with one remote control 2 IR Mouse cables included • Illuminated and Preprogrammed Remote Control • Power Management: ON/OFF via signal detection • Picture Enhancement • Input Signal Identification • CableCARD compatible - Manufactured under license from Dolby Laboratories. All specifications, weights, and dimensions are subject to rear panel at the back of...
... trademark of the Plasma Monitor • Antenna input impedance 75 Ohm • Channel coverage 191ch. Licensed by input format HDTV Monitors display HDTV when combined with one remote control 2 IR Mouse cables included • Illuminated and Preprogrammed Remote Control • Power Management: ON/OFF via signal detection • Picture Enhancement • Input Signal Identification • CableCARD compatible - Manufactured under license from Dolby Laboratories. All specifications, weights, and dimensions are subject to rear panel at the back of...

Owners Guide
Page 99
... a HITACHI brand digital television (the "DTV"), and HITACHI America, Ltd., Home Electronics Division ("HITACHI"). IF YOU DO NOT AGREE WITH ALL THE TERMS AND CONDITIONS OF THIS AGREEMENT OR ALL THE TERMS AND CONDITIONS OF ANY DIFFERENT OR SUPPLEMENTARY LICENSE THAT MAY ACCOMPANY SUCH UPGRADE, (A) DO NOT USE ANY HITACHI-PROVIDED FLASH CARD OR OTHER MEDIA, (B) DO NOT PERFORM INSTALL ANY HITACHI-PROVIDED UPGRADE SOFTWARE...
... a HITACHI brand digital television (the "DTV"), and HITACHI America, Ltd., Home Electronics Division ("HITACHI"). IF YOU DO NOT AGREE WITH ALL THE TERMS AND CONDITIONS OF THIS AGREEMENT OR ALL THE TERMS AND CONDITIONS OF ANY DIFFERENT OR SUPPLEMENTARY LICENSE THAT MAY ACCOMPANY SUCH UPGRADE, (A) DO NOT USE ANY HITACHI-PROVIDED FLASH CARD OR OTHER MEDIA, (B) DO NOT PERFORM INSTALL ANY HITACHI-PROVIDED UPGRADE SOFTWARE...

Owners Guide
Page 102
... Photo Input 27-28 Picture Mode 44 Picture-in-Picture (PIP 31-33 Power Swivel 4, 5, 7, 90 R Remote Control Functions 23-41 Programming Codes 40-41 Installing Batteries 4 S Screen Saver 78 Sharpness 44 Speakers 48 Connecting External Speakers 20 Internal 48 Split Mode 32 T Timers 75-76 Tint 44 Treble 47 TV Guide On ScreenTM 49-67 Troubleshooting 93-94 V H Video Settings 44-46 HDMI 17 I Input Setup 79 L Language Set the Language 77 Locks Change Access Code 70 Set Channel Lock 70 Front Panel Lock...
... Photo Input 27-28 Picture Mode 44 Picture-in-Picture (PIP 31-33 Power Swivel 4, 5, 7, 90 R Remote Control Functions 23-41 Programming Codes 40-41 Installing Batteries 4 S Screen Saver 78 Sharpness 44 Speakers 48 Connecting External Speakers 20 Internal 48 Split Mode 32 T Timers 75-76 Tint 44 Treble 47 TV Guide On ScreenTM 49-67 Troubleshooting 93-94 V H Video Settings 44-46 HDMI 17 I Input Setup 79 L Language Set the Language 77 Locks Change Access Code 70 Set Channel Lock 70 Front Panel Lock...


