User Guide
Page 2
...-Packard Development Company, L.P. The only warranties for HP products and services are set forth in this document is subject to another language without notice. No part of its proprietor and used by copyright law. Microsoft and Windows are trademarks of Microsoft Corporation. HP assumes no responsibility for technical or editorial errors or omissions contained herein. Adobe and Acrobat are...
...-Packard Development Company, L.P. The only warranties for HP products and services are set forth in this document is subject to another language without notice. No part of its proprietor and used by copyright law. Microsoft and Windows are trademarks of Microsoft Corporation. HP assumes no responsibility for technical or editorial errors or omissions contained herein. Adobe and Acrobat are...
User Guide
Page 3
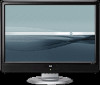
... v216w LCD Monitor. In such cases, the specific presentation of data, and tells you how to avoid the problem. Preface About This Guide This guide is mandated by regulatory authority. 3 It describes the monitor's features, setup, and operation. The sections are used as follows: • Safety and Maintenance Guidelines • Setup • Using the Monitor • Installing Drivers and Using the Auto-Adjustment Feature • Technical Support FAQs • Specifications...
... v216w LCD Monitor. In such cases, the specific presentation of data, and tells you how to avoid the problem. Preface About This Guide This guide is mandated by regulatory authority. 3 It describes the monitor's features, setup, and operation. The sections are used as follows: • Safety and Maintenance Guidelines • Setup • Using the Monitor • Installing Drivers and Using the Auto-Adjustment Feature • Technical Support FAQs • Specifications...
User Guide
Page 4
... (earthed) power outlet. Connect the equipment to the LCD screen; Do not pull on or trip over them so that the grounded power outlet you can replace your safety, be specifically labeled as possible. CAUTION: To protect your monitor, as well as a monitor, printer, or scanner) to determine the ampere rating (Amps or A) for use only a power source and connection compatible with your monitor. WARNING: To...
... (earthed) power outlet. Connect the equipment to the LCD screen; Do not pull on or trip over them so that the grounded power outlet you can replace your safety, be specifically labeled as possible. CAUTION: To protect your monitor, as well as a monitor, printer, or scanner) to determine the ampere rating (Amps or A) for use only a power source and connection compatible with your monitor. WARNING: To...
User Guide
Page 5
... an outlet that are described in the operating instructions. • Turn your monitor off the monitor when not in use water to clean an LCD screen. 3 Wipe the screen with isopropyl alcohol. 5 Plug in the monitor. 6 Turn on the cord. • Install your monitor from the wall outlet before cleaning. • Do not drop your monitor cabinet or attempt to service this product yourself. Do not walk on the...
... an outlet that are described in the operating instructions. • Turn your monitor off the monitor when not in use water to clean an LCD screen. 3 Wipe the screen with isopropyl alcohol. 5 Plug in the monitor. 6 Turn on the cord. • Install your monitor from the wall outlet before cleaning. • Do not drop your monitor cabinet or attempt to service this product yourself. Do not walk on the...

User Guide
Page 7
Adjusting the Tilt For optimal viewing, adjust the screen tilt to your own preference, as follows: 1 Face the front of the base to the panel front. Removing the Base 1 Set the panel face-down on a flat, protected surface. 2 Squeeze the tabs in the bottom of the monitor and hold the stand so that you . CAUTION: To prevent damage, avoid applying pressure to release the lock. 3 Remove the base from you...
Adjusting the Tilt For optimal viewing, adjust the screen tilt to your own preference, as follows: 1 Face the front of the base to the panel front. Removing the Base 1 Set the panel face-down on a flat, protected surface. 2 Squeeze the tabs in the bottom of the monitor and hold the stand so that you . CAUTION: To prevent damage, avoid applying pressure to release the lock. 3 Remove the base from you...
User Guide
Page 8
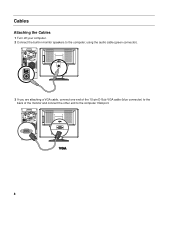
Cables Attaching the Cables 1 Turn off your computer. 2 Connect the built-in monitor speakers to the computer, using the audio cable (green connector). 3 If you are attaching a VGA cable, connect one end of the 15-pin D-Sub VGA cable (blue connector) to the back of the monitor and connect the other end to the computer VGA port. 8
Cables Attaching the Cables 1 Turn off your computer. 2 Connect the built-in monitor speakers to the computer, using the audio cable (green connector). 3 If you are attaching a VGA cable, connect one end of the 15-pin D-Sub VGA cable (blue connector) to the back of the monitor and connect the other end to the computer VGA port. 8
User Guide
Page 9
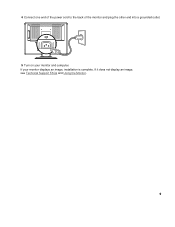
If your monitor and computer. If it does not display an image, see Technical Support FAQs and Using the Monitor. 9 4 Connect one end of the power cord to the back of the monitor and plug the other end into a grounded outlet. 5 Turn on your monitor displays an image, installation is complete.
If your monitor and computer. If it does not display an image, see Technical Support FAQs and Using the Monitor. 9 4 Connect one end of the power cord to the back of the monitor and plug the other end into a grounded outlet. 5 Turn on your monitor displays an image, installation is complete.
User Guide
Page 10
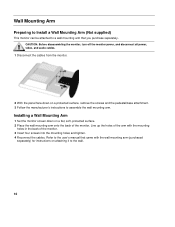
... power, video, and audio cables. 1 Disconnect the cables from the monitor. 2 With the panel face-down on attaching it to assemble the wall mounting arm. Line up the holes of the arm with the wall mounting arm (purchased separately) for instructions on a flat, soft, protected surface. 2 Place the wall mounting arm onto the back of the monitor. 3 Insert four screws into the mounting holes and tighten. 4 Reconnect the cables. Installing a Wall Mounting Arm 1 Set...
... power, video, and audio cables. 1 Disconnect the cables from the monitor. 2 With the panel face-down on attaching it to assemble the wall mounting arm. Line up the holes of the arm with the wall mounting arm (purchased separately) for instructions on a flat, soft, protected surface. 2 Place the wall mounting arm onto the back of the monitor. 3 Insert four screws into the mounting holes and tighten. 4 Reconnect the cables. Installing a Wall Mounting Arm 1 Set...
User Guide
Page 11
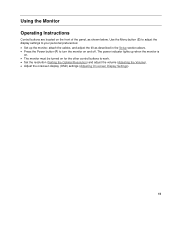
... monitor must be turned on and off. Using the Monitor Operating Instructions Control buttons are located on the front of the panel, as described in the Setup section above. • Press the Power button (F) to turn the monitor on for the other control buttons to work. • Set the resolution (Setting the Optimal Resolution) and adjust the volume (Adjusting the Volume). • Adjust the onscreen display (OSD) settings (Adjusting On-screen Display Settings). 11 The power indicator lights up the monitor, attach the cables, and adjust the tilt as...
... monitor must be turned on and off. Using the Monitor Operating Instructions Control buttons are located on the front of the panel, as described in the Setup section above. • Press the Power button (F) to turn the monitor on for the other control buttons to work. • Set the resolution (Setting the Optimal Resolution) and adjust the volume (Adjusting the Volume). • Adjust the onscreen display (OSD) settings (Adjusting On-screen Display Settings). 11 The power indicator lights up the monitor, attach the cables, and adjust the tilt as...
User Guide
Page 12
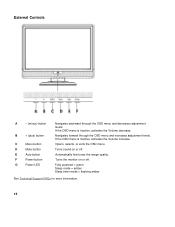
Turns sound on or off . Turns the monitor on or off . Navigates forward through the OSD menu and decreases adjustment levels. If the OSD menu is inactive, activates the Volume decrease. If the OSD menu is inactive, activates the Volume increase. External Controls A - (minus) button B + (plus) button C Menu button D Mute button E Auto button F Power button G Power LED Navigates backward through the OSD menu and increases adjustment levels. Opens, selects, or exits the OSD menu. Automatically fine-tunes the image quality. Fully powered = green Sleep mode = ...
Turns sound on or off . Turns the monitor on or off . Navigates forward through the OSD menu and decreases adjustment levels. If the OSD menu is inactive, activates the Volume decrease. If the OSD menu is inactive, activates the Volume increase. External Controls A - (minus) button B + (plus) button C Menu button D Mute button E Auto button F Power button G Power LED Navigates backward through the OSD menu and increases adjustment levels. Opens, selects, or exits the OSD menu. Automatically fine-tunes the image quality. Fully powered = green Sleep mode = ...
User Guide
Page 13
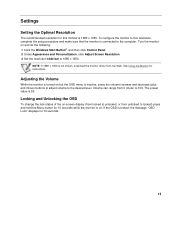
... 1680 x 1050. Adjusting the Volume While the monitor is turned on and do the following: 1 Click the Windows Start Button®, and then click Control Panel. 2 Under Appearance and Personalization, click Adjust Screen Resolution. 3 Set the resolution slide bar to the desired level. The preset value is locked, the message "OSD Lock" displays for instructions. If the OSD is 50. Turn the monitor on but the OSD menu is not shown, download the monitor driver from 0 (mute...
... 1680 x 1050. Adjusting the Volume While the monitor is turned on and do the following: 1 Click the Windows Start Button®, and then click Control Panel. 2 Under Appearance and Personalization, click Adjust Screen Resolution. 3 Set the resolution slide bar to the desired level. The preset value is locked, the message "OSD Lock" displays for instructions. If the OSD is 50. Turn the monitor on but the OSD menu is not shown, download the monitor driver from 0 (mute...
User Guide
Page 14
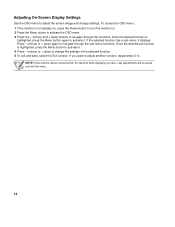
..., press the Power button to turn the monitor on. 2 Press the Menu button to activate the OSD menu. 3 Press the - (minus) and + (plus ) to change settings. Adjusting On-Screen Display Settings Use the OSD menu to adjust the screen image and change the settings of the selected function. 5 To exit and save, select the Exit function. NOTE: If the buttons remain untouched for 30 seconds while displaying a menu, new adjustments will be saved and exit the menu. 14 If...
..., press the Power button to turn the monitor on. 2 Press the Menu button to activate the OSD menu. 3 Press the - (minus) and + (plus ) to change settings. Adjusting On-Screen Display Settings Use the OSD menu to adjust the screen image and change the settings of the selected function. 5 To exit and save, select the Exit function. NOTE: If the buttons remain untouched for 30 seconds while displaying a menu, new adjustments will be saved and exit the menu. 14 If...
User Guide
Page 15
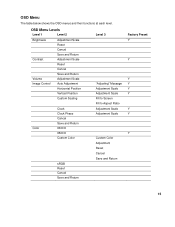
... 1 Level 2 Brightness Adjustment Scale Reset Cancel Save and Return Contrast Adjustment Scale Reset Cancel Save and Return Volume Adjustment Scale Image Control Auto Adjustment Horizontal Position Vertical Position Custom Scaling Color Clock Clock Phase Cancel Save and Return 9300 K 6500 K Custom Color sRGB Reset Cancel Save and Return Level 3 "Adjusting" Message Adjustment Scale Adjustment Scale Fill to Screen Fill to Aspect Ratio Adjustment Scale Adjustment Scale Custom Color Adjustment Reset Cancel Save and Return Factory Preset Y Y Y Y Y Y Y Y Y 15 OSD Menu The table...
... 1 Level 2 Brightness Adjustment Scale Reset Cancel Save and Return Contrast Adjustment Scale Reset Cancel Save and Return Volume Adjustment Scale Image Control Auto Adjustment Horizontal Position Vertical Position Custom Scaling Color Clock Clock Phase Cancel Save and Return 9300 K 6500 K Custom Color sRGB Reset Cancel Save and Return Level 3 "Adjusting" Message Adjustment Scale Adjustment Scale Fill to Screen Fill to Aspect Ratio Adjustment Scale Adjustment Scale Custom Color Adjustment Reset Cancel Save and Return Factory Preset Y Y Y Y Y Y Y Y Y 15 OSD Menu The table...
User Guide
Page 16
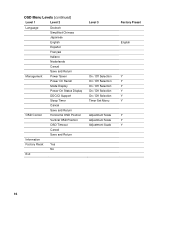
... Français Italiano Nederlands Cancel Save and Return Management Power Saver Power On Recall Mode Display Power-On Status Display DDC/CI Support Sleep Timer Cancel Save and Return OSD Control Horizontal OSD Position Vertical OSD Position OSD Timeout Cancel Save and Return Information Factory Reset Yes No Exit Level 3 On / Off Selection On / Off Selection On / Off Selection On / Off Selection On / Off Selection Timer Set Menu Adjustment Scale Adjustment Scale Adjustment Scale Factory Preset English Y Y Y Y Y Y Y Y Y 16
... Français Italiano Nederlands Cancel Save and Return Management Power Saver Power On Recall Mode Display Power-On Status Display DDC/CI Support Sleep Timer Cancel Save and Return OSD Control Horizontal OSD Position Vertical OSD Position OSD Timeout Cancel Save and Return Information Factory Reset Yes No Exit Level 3 On / Off Selection On / Off Selection On / Off Selection On / Off Selection On / Off Selection Timer Set Menu Adjustment Scale Adjustment Scale Adjustment Scale Factory Preset English Y Y Y Y Y Y Y Y Y 16
User Guide
Page 17
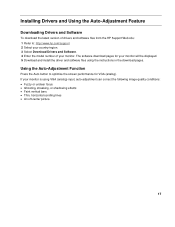
....hp.com/support 2 Select your country/region. 3 Select Download Drivers and Software. 4 Enter the model number of your monitor will be displayed. 5 Download and install the driver and software files using VGA (analog) input, auto-adjustment can correct the following image quality conditions: • Fuzzy or unclear focus • Ghosting, streaking, or shadowing effects • Faint vertical bars • Thin, horizontal scrolling lines • An off-center picture 17 Installing Drivers and Using the Auto-Adjustment Feature Downloading Drivers and Software...
....hp.com/support 2 Select your country/region. 3 Select Download Drivers and Software. 4 Enter the model number of your monitor will be displayed. 5 Download and install the driver and software files using VGA (analog) input, auto-adjustment can correct the following image quality conditions: • Fuzzy or unclear focus • Ghosting, streaking, or shadowing effects • Faint vertical bars • Thin, horizontal scrolling lines • An off-center picture 17 Installing Drivers and Using the Auto-Adjustment Feature Downloading Drivers and Software...
User Guide
Page 18
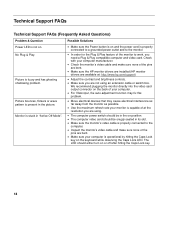
... using . • The computer power switch should be snugly seated in its slot. • Make sure the monitor's video cable is on . The LED should be in the on position. • The computer video card should either turn on the keyboard while observing the Caps Lock LED. Picture bounces, flickers or wave pattern is present in "Active Off-Mode". • Make sure the Power button is properly connected to work, you need a Plug & Play compatible...
... using . • The computer power switch should be snugly seated in its slot. • Make sure the monitor's video cable is on . The LED should be in the on position. • The computer video card should either turn on the keyboard while observing the Caps Lock LED. Picture bounces, flickers or wave pattern is present in "Active Off-Mode". • Make sure the Power button is properly connected to work, you need a Plug & Play compatible...

User Guide
Page 19
... white). • Inspect the monitor's video cable and make sure that the latest supported driver is installed for your graphics card. 19 Screen image is not centered or sized properly. Technical Support FAQs (Frequently Asked Questions) (continued) Problem & Question Possible Solutions Missing one of the pins are bent. • Make sure the monitor's video cable is properly connected to the computer. • Adjust horizontal and vertical screen position. • For VGA input, the auto-adjustment function may fix this problem...
... white). • Inspect the monitor's video cable and make sure that the latest supported driver is installed for your graphics card. 19 Screen image is not centered or sized properly. Technical Support FAQs (Frequently Asked Questions) (continued) Problem & Question Possible Solutions Missing one of the pins are bent. • Make sure the monitor's video cable is properly connected to the computer. • Adjust horizontal and vertical screen position. • For VGA input, the auto-adjustment function may fix this problem...
User Guide
Page 20
.... Specifications All specifications represent the typical specifications provided by HP's component manufacturers; v216w Display Type Viewable Image Size Tilt Face Treatment Maximum Weight (unpacked) Dimensions (including pedestal) Height Depth Width Optimum Display Resolution Text Mode Dot Pitch Horizontal Frequency Vertical Refresh Rate Audio Power Output Speaker (R/L) Power Consumption Input Terminal Environmental Requirements Temperature: Operating Non-operating Relative Humidity Power Source Altitude: Operating Non-operating 21.6 inches, TFT LCD 21.6-inch diagonal...
.... Specifications All specifications represent the typical specifications provided by HP's component manufacturers; v216w Display Type Viewable Image Size Tilt Face Treatment Maximum Weight (unpacked) Dimensions (including pedestal) Height Depth Width Optimum Display Resolution Text Mode Dot Pitch Horizontal Frequency Vertical Refresh Rate Audio Power Output Speaker (R/L) Power Consumption Input Terminal Environmental Requirements Temperature: Operating Non-operating Relative Humidity Power Source Altitude: Operating Non-operating 21.6 inches, TFT LCD 21.6-inch diagonal...
User Guide
Page 22
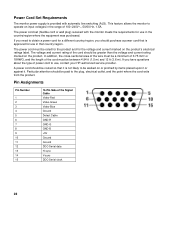
.... The voltage and current rating of the cord should be routed so that it is not likely to use, contact your HP-authorized service provider. The power cord set (flexible cord or wall plug) received with automatic line switching (ALS). A power cord should be walked on the product. Power Cord Set Requirements The monitor power supply is provided with the monitor meets the requirements for use in the range of 100-240V∿...
.... The voltage and current rating of the cord should be routed so that it is not likely to use, contact your HP-authorized service provider. The power cord set (flexible cord or wall plug) received with automatic line switching (ALS). A power cord should be walked on the product. Power Cord Set Requirements The monitor power supply is provided with the monitor meets the requirements for use in the range of 100-240V∿...

User Guide
Page 23
..., to the HP LCD Monitor. These limits are caused by one blue subpixel. • A defective whole pixel is always turned on (a bright spot on a dark background), or it is always off and on the level of DDC used in accordance with the instructions, may have cosmetic imperfections that interference will not occur in a residential installation. Nevertheless, the display may cause harmful...
..., to the HP LCD Monitor. These limits are caused by one blue subpixel. • A defective whole pixel is always turned on (a bright spot on a dark background), or it is always off and on the level of DDC used in accordance with the instructions, may have cosmetic imperfections that interference will not occur in a residential installation. Nevertheless, the display may cause harmful...


