Warranty Guide
Page 2
...use (whichever comes first) Limited hardware warranty HP Digital Projector Cables, Remote Control, and other parts (purchased separately) 90 days Limited hardware warranty hp digital projector limited warranty statement extent of purchase. 2. HP shall have been subject to that the operation... = 3 years Limited parts & labor warranty HP Digital Projector Lamp Module (included with the projector) Same period as projector Limited hardware warranty HP Digital Projector Cables, Remote Control, and other parts (included with the projector or purchased separately) 90 days or 500 hours...
...use (whichever comes first) Limited hardware warranty HP Digital Projector Cables, Remote Control, and other parts (purchased separately) 90 days Limited hardware warranty hp digital projector limited warranty statement extent of purchase. 2. HP shall have been subject to that the operation... = 3 years Limited parts & labor warranty HP Digital Projector Lamp Module (included with the projector) Same period as projector Limited hardware warranty HP Digital Projector Cables, Remote Control, and other parts (included with the projector or purchased separately) 90 days or 500 hours...
User Guide
Page 3
Contents 1 Setting Up What's in the Box 8 Identifying Common Features 9 Projector at a glance 10 Projector buttons and lights 11 Back panel 12 Remote control 13 Accessories 14 Setting Up the Projector 15 To position the projector 16 To set up on a table 17 To connect power 18 To connect a computer 19 To... a handheld organizer 20 To connect video sources 21 Turning On and Off 24 To turn the projector on 24 To turn the projector off 25 Making Basic Adjustments 26 To aim the projector 26 To adjust the focus and zoom 27 2 Giving Presentations Using the Remote Control 29 Showing ...
Contents 1 Setting Up What's in the Box 8 Identifying Common Features 9 Projector at a glance 10 Projector buttons and lights 11 Back panel 12 Remote control 13 Accessories 14 Setting Up the Projector 15 To position the projector 16 To set up on a table 17 To connect power 18 To connect a computer 19 To... a handheld organizer 20 To connect video sources 21 Turning On and Off 24 To turn the projector on 24 To turn the projector off 25 Making Basic Adjustments 26 To aim the projector 26 To adjust the focus and zoom 27 2 Giving Presentations Using the Remote Control 29 Showing ...
User Guide
Page 4
... To adjust the image according to the type of picture 34 To adjust other image settings 34 To adjust the audio 34 To adjust the projector setup 35 Using the On-Screen Menu 36 To change settings using the on-screen menu 37 Quick choice menu 38 Select input menu 39... Adjust picture menu 40 Setup menu 42 Help menu 42 4 Maintaining the Projector Performing Routine Maintenance 43 To get the projector status 43 To clean the projector lens 44 To replace the lamp module 44 To replace the battery in the remote control 46 Upgrading the...
... To adjust the image according to the type of picture 34 To adjust other image settings 34 To adjust the audio 34 To adjust the projector setup 35 Using the On-Screen Menu 36 To change settings using the on-screen menu 37 Quick choice menu 38 Select input menu 39... Adjust picture menu 40 Setup menu 42 Help menu 42 4 Maintaining the Projector Performing Routine Maintenance 43 To get the projector status 43 To clean the projector lens 44 To replace the lamp module 44 To replace the battery in the remote control 46 Upgrading the...

User Guide
Page 5
Contents 6 Fixing Problems Troubleshooting Suggestions 55 Start-up problems 56 Picture problems 57 Sound problems 61 Interruption problems 61 Remote control problems 62 Testing the Projector 63 To run the projector diagnostics 63 7 Reference Specifications 65 Safety Information 70 Safety precautions 70 LED safety 71 Mercury safety 71 Regulatory Information 72 U.S.A 72 Canada 72 Japan 73 Korea 73 International 74 Index User's Guide 5
Contents 6 Fixing Problems Troubleshooting Suggestions 55 Start-up problems 56 Picture problems 57 Sound problems 61 Interruption problems 61 Remote control problems 62 Testing the Projector 63 To run the projector diagnostics 63 7 Reference Specifications 65 Safety Information 70 Safety precautions 70 LED safety 71 Mercury safety 71 Regulatory Information 72 U.S.A 72 Canada 72 Japan 73 Korea 73 International 74 Index User's Guide 5
User Guide
Page 7
1 Setting Up The chapter explains how to install and set up the HP digital projector. ■ "What's in the Box?" on page 8 ■ "Identifying Common Features" on page 9 ■ "Setting Up the Projector" on page 15 ■ "Turning On and Off" on page 24 ■ "Making Basic Adjustments" on page 26 User's Guide 7
1 Setting Up The chapter explains how to install and set up the HP digital projector. ■ "What's in the Box?" on page 8 ■ "Identifying Common Features" on page 9 ■ "Setting Up the Projector" on page 15 ■ "Turning On and Off" on page 24 ■ "Making Basic Adjustments" on page 26 User's Guide 7
User Guide
Page 8
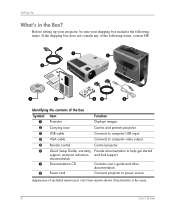
Setting Up What's in the Box? Before setting up your projector, be sure your shipping box includes the following items. If the shipping box does not contain any of the following items, contact HP. 1 2 8 7 6 54 3 Identifying the contents of included remote may vary from ...remote shown. documentation 7 Documentation CD Contains user's guide and other documentation. 8 Power cord Connects projector to help get started support, and port activation ...
Setting Up What's in the Box? Before setting up your projector, be sure your shipping box includes the following items. If the shipping box does not contain any of the following items, contact HP. 1 2 8 7 6 54 3 Identifying the contents of included remote may vary from ...remote shown. documentation 7 Documentation CD Contains user's guide and other documentation. 8 Power cord Connects projector to help get started support, and port activation ...
User Guide
Page 9
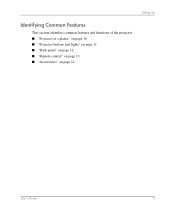
Setting Up Identifying Common Features This section identifies common features and functions of the projector. ■ "Projector at a glance" on page 10 ■ "Projector buttons and lights" on page 11 ■ "Back panel" on page 12 ■ "Remote control" on page 13 ■ "Accessories" on page 14 User's Guide 9
Setting Up Identifying Common Features This section identifies common features and functions of the projector. ■ "Projector at a glance" on page 10 ■ "Projector buttons and lights" on page 11 ■ "Back panel" on page 12 ■ "Remote control" on page 13 ■ "Accessories" on page 14 User's Guide 9
User Guide
Page 10
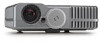
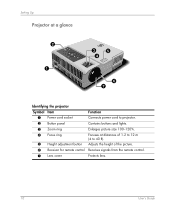
Adjusts the height of 1.2 to 12 m (4 to projector. Contains buttons and lights. Receives signals from the remote control. Enlarges picture size 100-120%. Focuses at a glance 2 1 3 5 4 6 7 Identifying the projector Symbol Item 1 Power cord socket 2 Button panel 3 Zoom ring 4 Focus ring 5 Height adjustment button 6 Receiver for remote control 7 Lens cover Function Connects power cord to 40 ft). Protects lens. 10 User's Guide Setting Up Projector at distances of the picture.
Adjusts the height of 1.2 to 12 m (4 to projector. Contains buttons and lights. Receives signals from the remote control. Enlarges picture size 100-120%. Focuses at a glance 2 1 3 5 4 6 7 Identifying the projector Symbol Item 1 Power cord socket 2 Button panel 3 Zoom ring 4 Focus ring 5 Height adjustment button 6 Receiver for remote control 7 Lens cover Function Connects power cord to 40 ft). Protects lens. 10 User's Guide Setting Up Projector at distances of the picture.
User Guide
Page 11
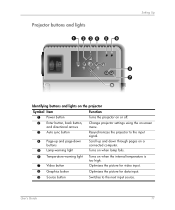
... Up auto sync back 8 7 9 Identifying buttons and lights on the projector Symbol Item 1 Power button Function Turns the projector on or off. 2 Enter button, back button, Change projector settings using the on-screen and directional arrows menu. 3 Auto sync button Resynchronizes the projector to the input signal. 4 Page-up and page-down buttons Scroll...
... Up auto sync back 8 7 9 Identifying buttons and lights on the projector Symbol Item 1 Power button Function Turns the projector on or off. 2 Enter button, back button, Change projector settings using the on-screen and directional arrows menu. 3 Auto sync button Resynchronizes the projector to the input signal. 4 Page-up and page-down buttons Scroll...
User Guide
Page 12
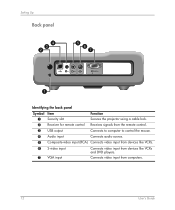
Connects video input from devices like VCRs and DVD players. Setting Up Back panel 4 3 2 5 6 7 in in S VGA in 1 Identifying the back panel Symbol Item 1 Security slot Function Secures the projector using a cable lock. 2 Receiver for remote control Receives signals from the remote control. 3 USB output Connects to computer to control the mouse. 4 Audio input Connects audio source. 5 Composite-video input (RCA) Connects video input from devices like VCRs. 6 S-video input 7 VGA input Connects video input from computers. 12 User's Guide
Connects video input from devices like VCRs and DVD players. Setting Up Back panel 4 3 2 5 6 7 in in S VGA in 1 Identifying the back panel Symbol Item 1 Security slot Function Secures the projector using a cable lock. 2 Receiver for remote control Receives signals from the remote control. 3 USB output Connects to computer to control the mouse. 4 Audio input Connects audio source. 5 Composite-video input (RCA) Connects video input from devices like VCRs. 6 S-video input 7 VGA input Connects video input from computers. 12 User's Guide
User Guide
Page 13
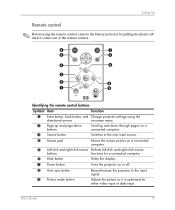
... 6 7 5 5 4 2 3 2 8 1 9 Identifying the remote control buttons Symbol Item Function 1 Enter button, back button, and Change projector settings using the remote control, remove the battery protector by pulling the plastic tab until it is optimized for a connected computer. 6 Hide button Hides ...the display. 7 Power button Turns the projector on or off. 8 Auto sync button 9 Picture mode button Resynchronizes the projector to the next input source. 4 Mouse pad Moves the mouse pointer on a connected computer. ...
... 6 7 5 5 4 2 3 2 8 1 9 Identifying the remote control buttons Symbol Item Function 1 Enter button, back button, and Change projector settings using the remote control, remove the battery protector by pulling the plastic tab until it is optimized for a connected computer. 6 Hide button Hides ...the display. 7 Power button Turns the projector on or off. 8 Auto sync button 9 Picture mode button Resynchronizes the projector to the next input source. 4 Mouse pad Moves the mouse pointer on a connected computer. ...
User Guide
Page 14
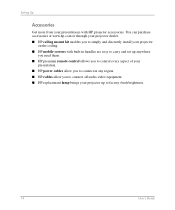
... you to control every aspect of your projector on the ceiling. ■ HP mobile screens with HP projector accessories. You can purchase accessories at www.hp.com or through your projector dealer. ■ HP ceiling mount kit enables you to connect all audio-video equipment. ■ HP replacement lamp brings your projector up to simply and discreetly install your...
... you to control every aspect of your projector on the ceiling. ■ HP mobile screens with HP projector accessories. You can purchase accessories at www.hp.com or through your projector dealer. ■ HP ceiling mount kit enables you to connect all audio-video equipment. ■ HP replacement lamp brings your projector up to simply and discreetly install your...
User Guide
Page 15
Setting Up the Projector This section describes how to set up, plan, and connect the projector. ■ "To position the projector" on page 16 ■ "To set up on a table" on page 17 ■ "To connect power" on page 18 ■ "To connect a computer" on page 19 ■ "To connect a handheld organizer" on page 20 ■ "To connect video sources" on page 21 Setting Up User's Guide 15
Setting Up the Projector This section describes how to set up, plan, and connect the projector. ■ "To position the projector" on page 16 ■ "To set up on a table" on page 17 ■ "To connect power" on page 18 ■ "To connect a computer" on page 19 ■ "To connect a handheld organizer" on page 20 ■ "To connect video sources" on page 21 Setting Up User's Guide 15
User Guide
Page 16
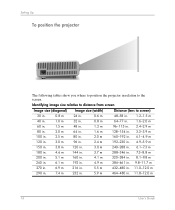
... following tables show you where to position the projector in relation to screen) 30 in. 0.8 m 24 in. 0.6 m 48-58 in. 1.2-1.5 m 40 in. 1.0 m 32 in. 0.8 m 64-77 in. 1.6-2.0 m 60 in. 1.5 m 48 in. 1.2 m 96-115 in. 2.4-2.9 m ...
... following tables show you where to position the projector in relation to screen) 30 in. 0.8 m 24 in. 0.6 m 48-58 in. 1.2-1.5 m 40 in. 1.0 m 32 in. 0.8 m 64-77 in. 1.6-2.0 m 60 in. 1.5 m 48 in. 1.2 m 96-115 in. 2.4-2.9 m ...
User Guide
Page 17
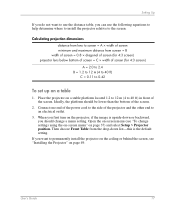
...215; diagonal of screen (for 4:3 screen) A = 2.0 to 2.4 B = 1.2 to 12 m (4 to 40 ft) C = 0.11 to 0.42 To set up on a table 1. Place the projector on a stable platform located 1.2 to 12 m (4 to an electrical outlet. 3. Ideally, the platform should change settings using the on-screen menu" on page 37) and...; width of the screen. Setting Up If you do not want to use the following equations to help determine where to install the projector relative to the screen. Calculating projection dimensions distance from lens to screen = A × width of screen minimum and maximum distance from...
...215; diagonal of screen (for 4:3 screen) A = 2.0 to 2.4 B = 1.2 to 12 m (4 to 40 ft) C = 0.11 to 0.42 To set up on a table 1. Place the projector on a stable platform located 1.2 to 12 m (4 to an electrical outlet. 3. Ideally, the platform should change settings using the on-screen menu" on page 37) and...; width of the screen. Setting Up If you do not want to use the following equations to help determine where to install the projector relative to the screen. Calculating projection dimensions distance from lens to screen = A × width of screen minimum and maximum distance from...

User Guide
Page 18
Setting Up To connect power ■ Connect one end of the power cord to the side of the projector 1 and the other end to an electrical outlet 2. 2 1 18 User's Guide
Setting Up To connect power ■ Connect one end of the power cord to the side of the projector 1 and the other end to an electrical outlet 2. 2 1 18 User's Guide
User Guide
Page 19
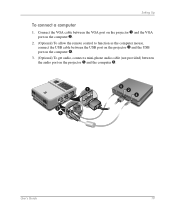
Setting Up To connect a computer 1. Connect the VGA cable between the VGA port on the projector 1 and the VGA port on the computer 2. 2. (Optional) To allow the remote control to function as the computer mouse, connect the USB cable between the USB port on the projector 3 and the USB port on the computer 4. 3. (Optional) To get audio, connect a mini-phone audio cable (not provided) between the audio port on the projector 5 and the computer 6. 5 3 1 VGA in S in in 6 2 4 User's Guide 19
Setting Up To connect a computer 1. Connect the VGA cable between the VGA port on the projector 1 and the VGA port on the computer 2. 2. (Optional) To allow the remote control to function as the computer mouse, connect the USB cable between the USB port on the projector 3 and the USB port on the computer 4. 3. (Optional) To get audio, connect a mini-phone audio cable (not provided) between the audio port on the projector 5 and the computer 6. 5 3 1 VGA in S in in 6 2 4 User's Guide 19
User Guide
Page 20
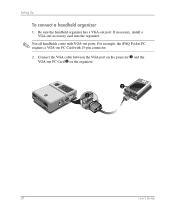
Connect the VGA cable between the VGA port on the projector 1 and the VGA-out PC Card 2 on the organizer. 2 1 VGA in 20 User's Guide For example, the iPAQ Pocket PC requires a VGA-out PC Card with VGA-out ports. Setting Up To connect a handheld organizer 1. Be sure the handheld organizer has a VGA-out port. If necessary, install a VGA-out accessory card into the organizer. ✎ Not all handhelds come with 15-pin connector. 2.
Connect the VGA cable between the VGA port on the projector 1 and the VGA-out PC Card 2 on the organizer. 2 1 VGA in 20 User's Guide For example, the iPAQ Pocket PC requires a VGA-out PC Card with VGA-out ports. Setting Up To connect a handheld organizer 1. Be sure the handheld organizer has a VGA-out port. If necessary, install a VGA-out accessory card into the organizer. ✎ Not all handhelds come with 15-pin connector. 2.
User Guide
Page 21
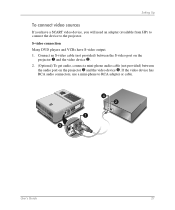
... an S-video cable (not provided) between the S-video port on the projector 1 and the video device 2. 2. (Optional) To get audio, connect a mini-phone audio cable (not provided) between the audio port on the projector 3 and the video device 4. S-video connection Many DVD players and VCRs have a ...SCART video device, you will need an adapter (available from HP) to connect the device to RCA adapter or cable. 1 3 S in in 4...
... an S-video cable (not provided) between the S-video port on the projector 1 and the video device 2. 2. (Optional) To get audio, connect a mini-phone audio cable (not provided) between the audio port on the projector 3 and the video device 4. S-video connection Many DVD players and VCRs have a ...SCART video device, you will need an adapter (available from HP) to connect the device to RCA adapter or cable. 1 3 S in in 4...
User Guide
Page 22
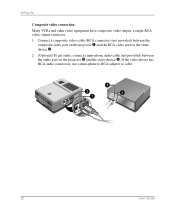
Setting Up Composite video connection Many VCRs and other video equipment have composite video output, a single RCA video output connector. 1. Connect a composite video cable (RCA connector) (not provided) between the composite video port on the projector 1 and the RCA video port on the video device 2. 2. (Optional) To get audio, connect a mini-phone audio cable (not provided) between the audio port on the projector 3 and the video device 4. If the video device has RCA audio connectors, use a mini-phone to RCA adapter or cable. 4 3 2 1 S in in 22 User's Guide
Setting Up Composite video connection Many VCRs and other video equipment have composite video output, a single RCA video output connector. 1. Connect a composite video cable (RCA connector) (not provided) between the composite video port on the projector 1 and the RCA video port on the video device 2. 2. (Optional) To get audio, connect a mini-phone audio cable (not provided) between the audio port on the projector 3 and the video device 4. If the video device has RCA audio connectors, use a mini-phone to RCA adapter or cable. 4 3 2 1 S in in 22 User's Guide


