
Quick Start Guide
Page 1
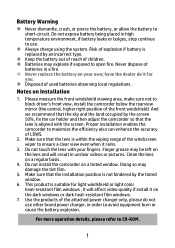
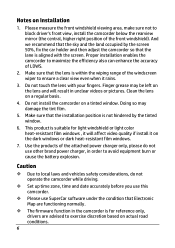
Always charge using the system. Never replace the battery on the lens and will affect video quality if install it on Installation 1. Finger grease may be left on your fingers. Clean the lens on a tinted window. have the dealer do not use . Make sure that the lens is replaced by an incorrect type. Do not install the camcorder on a regular basis. 4. Use the products of the attached power charger only, please...
Always charge using the system. Never replace the battery on the lens and will affect video quality if install it on Installation 1. Finger grease may be left on your fingers. Clean the lens on a tinted window. have the dealer do not use . Make sure that the lens is replaced by an incorrect type. Do not install the camcorder on a regular basis. 4. Use the products of the attached power charger only, please...

Quick Start Guide
Page 5
... for light windshield or light color heat-resistant film windows, it will affect video quality if install it on to Windshield 1. Push the bracket into bracket slot on a tinted window. Do not install the camcorder on top of the bracket, install the bracket onto the windshield, then lock the lever to swivel the camcorder vertically or horizontally. 2. 2.2 Installing in place. Connect the power cable then power...
... for light windshield or light color heat-resistant film windows, it will affect video quality if install it on to Windshield 1. Push the bracket into bracket slot on a tinted window. Do not install the camcorder on top of the bracket, install the bracket onto the windshield, then lock the lever to swivel the camcorder vertically or horizontally. 2. 2.2 Installing in place. Connect the power cable then power...
Quick Start Guide
Page 6
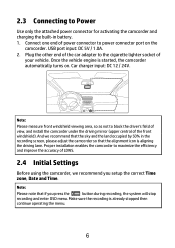
... the recording screen, please adjust the camcorder so that if you setup the correct Time zone, Date and Time. Make sure the recording is aligning the driving lane. Once the vehicle engine is started, the camcorder automatically turns on the camcorder. Connect one end of your vehicle. 2.3 Connecting to power connector port on . Note: Please note that the alignment icon is already stopped then continue operating the menu. 6 And...
... the recording screen, please adjust the camcorder so that if you setup the correct Time zone, Date and Time. Make sure the recording is aligning the driving lane. Once the vehicle engine is started, the camcorder automatically turns on the camcorder. Connect one end of your vehicle. 2.3 Connecting to power connector port on . Note: Please note that the alignment icon is already stopped then continue operating the menu. 6 And...
Quick Start Guide
Page 8
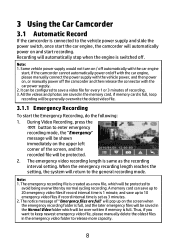
... OK button to enter emergency recording mode, the "Emergency" message will be generally overwrite the oldest video file. 3.1.1 Emergency Recording To start the Emergency Recording, do the following: 1. The emergency video recording length is same as 3 minutes. 2. Note: 1. It can save up to 20 emergency video files if record interval time is 1 minute, and save a video file for every 1 or 3 minutes of "Emergency files are saved in the memory card, if memory card is...
... OK button to enter emergency recording mode, the "Emergency" message will be generally overwrite the oldest video file. 3.1.1 Emergency Recording To start the Emergency Recording, do the following: 1. The emergency video recording length is same as 3 minutes. 2. Note: 1. It can save up to 20 emergency video files if record interval time is 1 minute, and save a video file for every 1 or 3 minutes of "Emergency files are saved in the memory card, if memory card is...
Quick Start Guide
Page 9
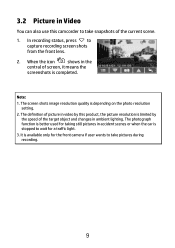
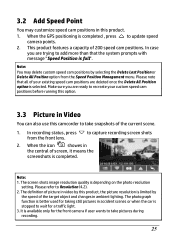
... current scene. 1. In recording status, press to capture recording screen shots from the front lens. 2. It is available only for the front camera if user wants to take snapshots of screen, it means the screenshots is depending on the photo resolution setting. 2. The screen shots image resolution quality is completed. 3.2 Picture in Video You can also use this product, the picture resolution is stopped to wait for...
... current scene. 1. In recording status, press to capture recording screen shots from the front lens. 2. It is available only for the front camera if user wants to take snapshots of screen, it means the screenshots is depending on the photo resolution setting. 2. The screen shots image resolution quality is completed. 3.2 Picture in Video You can also use this product, the picture resolution is stopped to wait for...

Quick Start Guide
Page 10
.... Menu option Speed Cam Alert Parking Mode Description If the Speed Cam Alert function is enabled, once your car's location is determined by GPS and approaches a speed cam, this camcorder starts emergency recording once it detects any others countries. 3.3 Driving Safety The following driving safety function is for the worldwide countries. There is no guarantee the speed cam datum will issue audible alert and screen message when vehicle speed...
.... Menu option Speed Cam Alert Parking Mode Description If the Speed Cam Alert function is enabled, once your car's location is determined by GPS and approaches a speed cam, this camcorder starts emergency recording once it detects any others countries. 3.3 Driving Safety The following driving safety function is for the worldwide countries. There is no guarantee the speed cam datum will issue audible alert and screen message when vehicle speed...

Quick Start Guide
Page 11
... / button to switch the front and rear lens recording file. (Rear Camera is dual-lens recording. Press the repetitively to enter Playback Mode. Press the / button to enter the OSD menu. 2. Please contact distributor for further information.) 5. Press / button to browse video files, select the video file and then press OK button to return recording screen. 11 Press the button to select Video / Parking Mode / Emergency, and then press the OK button for entering function menu. 3. 3.4 File Playback 3.4.1 Playing Videos Playback video record files...
... / button to switch the front and rear lens recording file. (Rear Camera is dual-lens recording. Press the repetitively to enter Playback Mode. Press the / button to enter the OSD menu. 2. Please contact distributor for further information.) 5. Press / button to browse video files, select the video file and then press OK button to return recording screen. 11 Press the button to select Video / Parking Mode / Emergency, and then press the OK button for entering function menu. 3. 3.4 File Playback 3.4.1 Playing Videos Playback video record files...

User Manual
Page 2
... Overview 9 2 Getting Started 10 2.1 Storage Media 10 2.1.1 Insert the Memory Card 10 2.1.2 Remove the Memory Card 10 2.2 Installing in Vehicles 11 2.2.1 2.2.2 2.2.2.1 2.2.2.2 Mount the Camcorder to Windshield 11 Adjust the Camcorder 12 Dismount the Camcorders 12 Dismount the Bracket 13 2.3 Connecting to Power 14 2.4 LED Indicator 16 2.5 Powering the Camcorder On / Off 17 2.5.1 Auto Power On/Off 17 2.5.2 Manual Power On/Off and Reset 17 2.5.2.1 Manual Power On 17 2.5.2.2 Manual Power Off 17 2.5.2.3 Reset the Camcorder 17 1
... Overview 9 2 Getting Started 10 2.1 Storage Media 10 2.1.1 Insert the Memory Card 10 2.1.2 Remove the Memory Card 10 2.2 Installing in Vehicles 11 2.2.1 2.2.2 2.2.2.1 2.2.2.2 Mount the Camcorder to Windshield 11 Adjust the Camcorder 12 Dismount the Camcorders 12 Dismount the Bracket 13 2.3 Connecting to Power 14 2.4 LED Indicator 16 2.5 Powering the Camcorder On / Off 17 2.5.1 Auto Power On/Off 17 2.5.2 Manual Power On/Off and Reset 17 2.5.2.1 Manual Power On 17 2.5.2.2 Manual Power Off 17 2.5.2.3 Reset the Camcorder 17 1
User Manual
Page 7
... be left on the lens and will affect video quality if install it will result in the camcorder is aligned with your fingers. Do not touch the lens with the screen. This product is suitable for light windshield or light color heat-resistant film windows , it on a tinted window. Set up time zone, time and date accurately before you use other brand power charger, in order to local...
... be left on the lens and will affect video quality if install it will result in the camcorder is aligned with your fingers. Do not touch the lens with the screen. This product is suitable for light windshield or light color heat-resistant film windows , it on a tinted window. Set up time zone, time and date accurately before you use other brand power charger, in order to local...

User Manual
Page 12
... sound is suitable for light windshield or light color heat-resistant film windows, it will affect video quality if install it on the dark windows or dark heat-resistant film windows. 3. Please refer to Connecting to complete the 2 installation. 5. Release the lever of the bracket, install the bracket onto the windshield, then 1 lock the lever to Power (2.3), and Powering the Camcorder On / Off (2.5). 3. Connect the power cable then power...
... sound is suitable for light windshield or light color heat-resistant film windows, it will affect video quality if install it on the dark windows or dark heat-resistant film windows. 3. Please refer to Connecting to complete the 2 installation. 5. Release the lever of the bracket, install the bracket onto the windshield, then 1 lock the lever to Power (2.3), and Powering the Camcorder On / Off (2.5). 3. Connect the power cable then power...

User Manual
Page 15
... recording screen, please adjust the camcorder so that the sky and the land occupied by 50% in battery. 1. Note: Please measure front windshield viewing area, so as not to maximize the efficiency and improve the accuracy of power connector to power connector port on . Car charger input: DC 12 / 24V. Proper installation enables the camcorder to block the driver's field of view, and install the camcorder...
... recording screen, please adjust the camcorder so that the sky and the land occupied by 50% in battery. 1. Note: Please measure front windshield viewing area, so as not to maximize the efficiency and improve the accuracy of power connector to power connector port on . Car charger input: DC 12 / 24V. Proper installation enables the camcorder to block the driver's field of view, and install the camcorder...
User Manual
Page 18
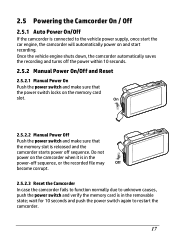
..., the camcorder automatically saves the recording and turns off the power within 10 seconds. 2.5.2 Manual Power On/Off and Reset 2.5.2.1 Manual Power On Push the power switch and make sure that the power switch locks on the camcorder when it is in the removable state; Do not power on the memory card slot. wait for 10 seconds and push the power switch again to restart the camcorder. 17 2.5 Powering the Camcorder On / Off 2.5.1 Auto Power On...
..., the camcorder automatically saves the recording and turns off the power within 10 seconds. 2.5.2 Manual Power On/Off and Reset 2.5.2.1 Manual Power On Push the power switch and make sure that the power switch locks on the camcorder when it is in the removable state; Do not power on the memory card slot. wait for 10 seconds and push the power switch again to restart the camcorder. 17 2.5 Powering the Camcorder On / Off 2.5.1 Auto Power On...

User Manual
Page 21
2.6.2 Set the Date / Time To set the next field. 4. Press the / button to adjust the value, and then press the OK button to enter the OSD menu. 2. Note: To ensure the accuracy of the video file time, please reset the date and time when the battery power runs out or when not in use over 7 days. 20 Press the button to set the correct date and time, do the following: 1. Press the / button to select Date / Time, and then press the OK button for entering function menu. 3. Repeat step 3 until the date and time setting is completed.
2.6.2 Set the Date / Time To set the next field. 4. Press the / button to adjust the value, and then press the OK button to enter the OSD menu. 2. Note: To ensure the accuracy of the video file time, please reset the date and time when the battery power runs out or when not in use over 7 days. 20 Press the button to set the correct date and time, do the following: 1. Press the / button to select Date / Time, and then press the OK button for entering function menu. 3. Repeat step 3 until the date and time setting is completed.
User Manual
Page 26
... this option. 3.3 Picture in accident scenes or when the car is completed. The screen shots image resolution quality is full". It is selected. In case you are ready to recreate your existing speed cam positions are trying to update speed camera points. 2. Please note that the system prompts with message "Speed Position is depending on the photo resolution setting. In recording status, press...
... this option. 3.3 Picture in accident scenes or when the car is completed. The screen shots image resolution quality is full". It is selected. In case you are ready to recreate your existing speed cam positions are trying to update speed camera points. 2. Please note that the system prompts with message "Speed Position is depending on the photo resolution setting. In recording status, press...

User Manual
Page 27
..., at the same time. 3.4 Driving Safety The following : 1. If a voice and alert message have been triggered, any other alarm will be ignored until either of insufficient lighting. Press the button to exercise discretion based on actual road conditions. The Driving Safety function is determined by GPS and approaches a speed cam, this product produces audible alert and screen message. Drivers are advised to...
..., at the same time. 3.4 Driving Safety The following : 1. If a voice and alert message have been triggered, any other alarm will be ignored until either of insufficient lighting. Press the button to exercise discretion based on actual road conditions. The Driving Safety function is determined by GPS and approaches a speed cam, this product produces audible alert and screen message. Drivers are advised to...
User Manual
Page 30
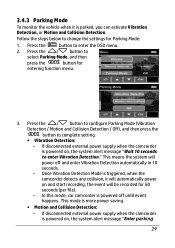
... press the OK button to enter the OSD menu. 2. In this mode, car camcorder is powered on, the system alert message "Enter parking 29 If disconnected external power supply when the camcorder is more power saving. • Motion and Collision Detection: - Press the button to complete setting. • Vibration Detection: - This means the system will be recorded for 60 seconds (per file). - 3.4.3 Parking Mode To monitor the...
... press the OK button to enter the OSD menu. 2. In this mode, car camcorder is powered on, the system alert message "Enter parking 29 If disconnected external power supply when the camcorder is more power saving. • Motion and Collision Detection: - Press the button to complete setting. • Vibration Detection: - This means the system will be recorded for 60 seconds (per file). - 3.4.3 Parking Mode To monitor the...

User Manual
Page 31
... the external power supply is used, the battery storage capacity will keep recording up to return recording screen. Press any motion in front of lens, or when the camcorder detects collision, the automatic record will be deleted. In the Motion and Collision Detection mode, when the camcorder detects any motion in Motion and Collision Detection mode. In this mode, when the camcorder detects collision or any button to save about 30 minutes video...
... the external power supply is used, the battery storage capacity will keep recording up to return recording screen. Press any motion in front of lens, or when the camcorder detects collision, the automatic record will be deleted. In the Motion and Collision Detection mode, when the camcorder detects any motion in Motion and Collision Detection mode. In this mode, when the camcorder detects collision or any button to save about 30 minutes video...

User Manual
Page 39
... lens recording file. (Rear Camera is dual-lens recording. In the recording mode, you can use button to select Video / Parking Mode / Emergency, and then press the OK button for entering function menu. 3. 3.5 File Playback 3.5.1 Playing Videos Playback video record files as follows: 1. If thumbnail shows D icon, it indicates that the file is not included in standard package. Press the repetitively to select File Playback, and then press the OK button for entering menu. 4. Press the / button to return recording screen...
... lens recording file. (Rear Camera is dual-lens recording. In the recording mode, you can use button to select Video / Parking Mode / Emergency, and then press the OK button for entering function menu. 3. 3.5 File Playback 3.5.1 Playing Videos Playback video record files as follows: 1. If thumbnail shows D icon, it indicates that the file is not included in standard package. Press the repetitively to select File Playback, and then press the OK button for entering menu. 4. Press the / button to return recording screen...

User Manual
Page 42
... viewing pictures, press the 13 Next File button will switch over to switch files with dual lens recording file. (Rear Camera is not included in standard package. Please contact distributor for further information.) 9 Battery icon Indicates Battery or charging status. 10 00:10 / 01:00 Playback Duration / Total Duration Indicates video playback time and total duration. 11 Date and time Indicates the date and time of filming. Icon Item Description In playback mode, press button 8 Lens Switch Button...
... viewing pictures, press the 13 Next File button will switch over to switch files with dual lens recording file. (Rear Camera is not included in standard package. Please contact distributor for further information.) 9 Battery icon Indicates Battery or charging status. 10 00:10 / 01:00 Playback Duration / Total Duration Indicates video playback time and total duration. 11 Date and time Indicates the date and time of filming. Icon Item Description In playback mode, press button 8 Lens Switch Button...
User Manual
Page 51
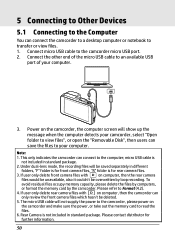
... your camcorder, select "Open folder to view files", or open the "Removable Disk", then users can save the files to an available USB port of the micro USB cable to your computer. Connect the other end of your computer. This only indicates the camcorder can connect to Format (4.2). 4. If user only delete front camera files with D on the camcorder and make sure the power, or take out the memory card to transfer or view files. 1. Under dual-lens mode, the recording files...
... your camcorder, select "Open folder to view files", or open the "Removable Disk", then users can save the files to an available USB port of the micro USB cable to your computer. Connect the other end of your computer. This only indicates the camcorder can connect to Format (4.2). 4. If user only delete front camera files with D on the camcorder and make sure the power, or take out the memory card to transfer or view files. 1. Under dual-lens mode, the recording files...


