
Product Support
Page 1
...Cam, Car Camcorder, and Mini Wi-Fi Cam Support 全球 Worldwide Region 中国 China Taiwan/Hong Kong/ Macao Japan Thailand USA / Canada Latin America Europe India South Africa 东南亚 Philippines/ Malaysia/ Vietnam Thailand 越南 Vietnam(Action Cameras) 越南 Vietnam(Car Cameras) Ukraine Kazakhstan Service...9:00 am to Fri. hp.support@max-mobile.us bl_escalations@hp.com hp.support@riepl.co.in hp.support@koloksa.co.za [email protected] hp.support@spa-office.com Support@rambo.vn Service@CadProAuto.com hpsupport@line-llc...
...Cam, Car Camcorder, and Mini Wi-Fi Cam Support 全球 Worldwide Region 中国 China Taiwan/Hong Kong/ Macao Japan Thailand USA / Canada Latin America Europe India South Africa 东南亚 Philippines/ Malaysia/ Vietnam Thailand 越南 Vietnam(Action Cameras) 越南 Vietnam(Car Cameras) Ukraine Kazakhstan Service...9:00 am to Fri. hp.support@max-mobile.us bl_escalations@hp.com hp.support@riepl.co.in hp.support@koloksa.co.za [email protected] hp.support@spa-office.com Support@rambo.vn Service@CadProAuto.com hpsupport@line-llc...
User Manual
Page 5
... frequency energy and, if not installed and used in a residential installation. This device complies with Part 15 of the FCC Rules. However, there is encouraged to try to correct the interference by the party responsible for compliance could void the user's authority to provide reasonable protection against harmful interference in accordance with the instructions, may cause undesired operation.
... frequency energy and, if not installed and used in a residential installation. This device complies with Part 15 of the FCC Rules. However, there is encouraged to try to correct the interference by the party responsible for compliance could void the user's authority to provide reasonable protection against harmful interference in accordance with the instructions, may cause undesired operation.

User Manual
Page 6
WEEE通知 CE Regulatory Notice The product herewith complies with the requirements of the Low Voltage Directive 2006/95/EC, the EMC Directive 2014/30/EU, the R&TTE Directive 1999/5/EC and the RoHS Directive 2011/65/EC. 电池警告 5
WEEE通知 CE Regulatory Notice The product herewith complies with the requirements of the Low Voltage Directive 2006/95/EC, the EMC Directive 2014/30/EU, the R&TTE Directive 1999/5/EC and the RoHS Directive 2011/65/EC. 电池警告 5

User Manual
Page 39
SuperCar Windows 38 6 SuperCar 1 2 3 4 5 6 7 8 9 10 11 12 13 14 15 16 编号 项目 1 2 3 上一个 4 下一个 5 停止 6 7 指北针 8 时速表 编号 项目 9 文件路径 10 11 文件列表 12 文件名称 13 音量 14 15 SNR) 16 注: 1 2 MOV/TS) 与 GPS/G-Sensor 文件 (NMEA 3.
SuperCar Windows 38 6 SuperCar 1 2 3 4 5 6 7 8 9 10 11 12 13 14 15 16 编号 项目 1 2 3 上一个 4 下一个 5 停止 6 7 指北针 8 时速表 编号 项目 9 文件路径 10 11 文件列表 12 文件名称 13 音量 14 15 SNR) 16 注: 1 2 MOV/TS) 与 GPS/G-Sensor 文件 (NMEA 3.
Quick Start Guide
Page 2
... an incorrect type. Notes on your fingers. To use the products of used batteries observing local regulations. Do not expose battery being placed in high temperature environment, if battery leaks or bulges, stop continue to use other brand power charger, in unclear videos or snapshots. Battery warning Never dismantle, crush, or pierce the battery, or allow the battery to CD-ROM. 1 Never replace the battery on Installation 1. Disposed...
... an incorrect type. Notes on your fingers. To use the products of used batteries observing local regulations. Do not expose battery being placed in high temperature environment, if battery leaks or bulges, stop continue to use other brand power charger, in unclear videos or snapshots. Battery warning Never dismantle, crush, or pierce the battery, or allow the battery to CD-ROM. 1 Never replace the battery on Installation 1. Disposed...
Quick Start Guide
Page 3
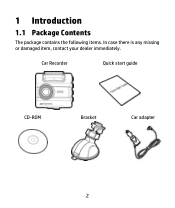
Car Recorder Quick start guide CD-ROM Bracket Car adapter 2 1 Introduction 1.1 Package Contents The package contains the following items. In case there is any missing or damaged item, contact your dealer immediately.
Car Recorder Quick start guide CD-ROM Bracket Car adapter 2 1 Introduction 1.1 Package Contents The package contains the following items. In case there is any missing or damaged item, contact your dealer immediately.

Quick Start Guide
Page 4
1.2 Product Overview 1 4 2 3 9 11 10 12 5 6 7 13 8 14 No. Item 8 Enter Button ( ) 9 GPS Antenna 10 Speaker 11 Wide Angle Lens 12 Microphone 13 LED Indicator 14 LCD Panel 3 Item 1 Bracket Socket 2 Power Switch 3 Memory Card Slot 4 USB / Power Connector 5 Back Button ( ) 6 Up Button ( ) 7 Down Button ( ) No.
1.2 Product Overview 1 4 2 3 9 11 10 12 5 6 7 13 8 14 No. Item 8 Enter Button ( ) 9 GPS Antenna 10 Speaker 11 Wide Angle Lens 12 Microphone 13 LED Indicator 14 LCD Panel 3 Item 1 Bracket Socket 2 Power Switch 3 Memory Card Slot 4 USB / Power Connector 5 Back Button ( ) 6 Up Button ( ) 7 Down Button ( ) No.

Quick Start Guide
Page 5
... illustrated. When removing the memory card, please take note that the memory card will be ejected quickly and may damage the memory card. 2. Push the memory card in position. Please use . 4. This is in until a click sound is heard, indicating the card is a characteristic of the memory card ejection slot to 32GB. 3. up to facilitate easy removal by the user. 4 Do not remove or insert the memory card when the camcorder is turned on.
... illustrated. When removing the memory card, please take note that the memory card will be ejected quickly and may damage the memory card. 2. Push the memory card in position. Please use . 4. This is in until a click sound is heard, indicating the card is a characteristic of the memory card ejection slot to 32GB. 3. up to facilitate easy removal by the user. 4 Do not remove or insert the memory card when the camcorder is turned on.
Quick Start Guide
Page 6
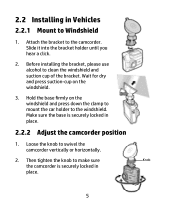
...hear a click. 2. Make sure the base is securely locked in place. 5 Loose the knob to make sure Knob the camcorder is securely locked in Vehicles 2.2.1 Mount to the windshield. Wait for dry and press suction-cup on the windshield and press ...Windshield 1. Hold the base firmly on the windshield. 3. 2.2 Installing in place. 2.2.2 Adjust the camcorder position 1. Then tighten the knob to swivel the camcorder vertically or horizontally. 2. Attach the bracket to clean the windshield and suction cup of the bracket. Before installing the bracket, please use alcohol to the...
...hear a click. 2. Make sure the base is securely locked in place. 5 Loose the knob to make sure Knob the camcorder is securely locked in Vehicles 2.2.1 Mount to the windshield. Wait for dry and press suction-cup on the windshield and press ...Windshield 1. Hold the base firmly on the windshield. 3. 2.2 Installing in place. 2.2.2 Adjust the camcorder position 1. Then tighten the knob to swivel the camcorder vertically or horizontally. 2. Attach the bracket to clean the windshield and suction cup of the bracket. Before installing the bracket, please use alcohol to the...
Quick Start Guide
Page 7
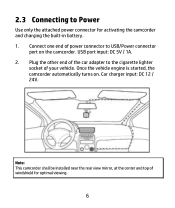
Once the vehicle engine is started, the camcorder automatically turns on the camcorder. Car charger input: DC 12 / 24V. USB port input: DC 5V / 1A. 2. Note: This camcorder shall be installed near the rear view mirror, at the center and top of your vehicle. Connect one end of power connector to USB/Power connector port on . 2.3 Connecting to the cigarette lighter socket of windshield for activating the camcorder and charging the built-in battery. 1. Plug the other end of the car adapter to Power Use only the attached power connector for optimal viewing. 6
Once the vehicle engine is started, the camcorder automatically turns on the camcorder. Car charger input: DC 12 / 24V. USB port input: DC 5V / 1A. 2. Note: This camcorder shall be installed near the rear view mirror, at the center and top of your vehicle. Connect one end of power connector to USB/Power connector port on . 2.3 Connecting to the cigarette lighter socket of windshield for activating the camcorder and charging the built-in battery. 1. Plug the other end of the car adapter to Power Use only the attached power connector for optimal viewing. 6
Quick Start Guide
Page 8
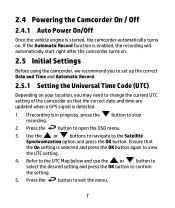
2.4 Powering the Camcorder On / Off 2.4.1 Auto Power On/Off Once the vehicle engine is started, the camcorder automatically turns on your location, you may need to change the current UTC setting of the camcorder so that the On setting is in progress, press the recording. Press the button to stop 2. Ensure that the correct date and time are updated when a GPS signal is detected. 1. button to open the OSD menu. 3. Use the...
2.4 Powering the Camcorder On / Off 2.4.1 Auto Power On/Off Once the vehicle engine is started, the camcorder automatically turns on your location, you may need to change the current UTC setting of the camcorder so that the On setting is in progress, press the recording. Press the button to stop 2. Ensure that the correct date and time are updated when a GPS signal is detected. 1. button to open the OSD menu. 3. Use the...

Quick Start Guide
Page 9
* Be sure to adjust for daylight saving time (DST) by adding +1 hour to the UTC offset. ** These areas may observe half hour increments and daylight saving time (DST). 8
* Be sure to adjust for daylight saving time (DST) by adding +1 hour to the UTC offset. ** These areas may observe half hour increments and daylight saving time (DST). 8

Quick Start Guide
Page 10
... manually turn off . Press the to enter emergency recording mode. During the recording period, press the button to stop recording immediately. 9 3 Using the Car Camcorder 3.1 Recording Videos 3.1.1 Record videos while driving When the vehicle engine starts up and the Automatic Record function is switched off. Recording stops and shut down after the engine is enabled, the camcorder automatically turns on the top right-hand corner of the display screen. The wordings, "Emergency", will be displayed...
... manually turn off . Press the to enter emergency recording mode. During the recording period, press the button to stop recording immediately. 9 3 Using the Car Camcorder 3.1 Recording Videos 3.1.1 Record videos while driving When the vehicle engine starts up and the Automatic Record function is switched off. Recording stops and shut down after the engine is enabled, the camcorder automatically turns on the top right-hand corner of the display screen. The wordings, "Emergency", will be displayed...

Quick Start Guide
Page 11
... product produces voice and screen message alerts when you drive off of or change lanes at speeds over 50 km/h (31 mile/h). The function will be void if the product are less than 20m away from the country you use of you changes its images in the camera. 3.1.3 Driving Safety Menu Item LDWS FCWS FCMD Collision Detection Parking Mode Speed Cam Alert Description Once your...
... product produces voice and screen message alerts when you drive off of or change lanes at speeds over 50 km/h (31 mile/h). The function will be void if the product are less than 20m away from the country you use of you changes its images in the camera. 3.1.3 Driving Safety Menu Item LDWS FCWS FCMD Collision Detection Parking Mode Speed Cam Alert Description Once your...

Quick Start Guide
Page 12
... button to stop recording. 1. Press the / button to view the previous/next file and then press the button to view the file on the screen. 11 Note: You can press the button from the standby screen and directly enter the playback mode. The final recoding will be shown on full screen. The product never guarantee the speed cam datum will be included for the worldwide countries. 3.2 Playback Videos and Photos If recording...
... button to stop recording. 1. Press the / button to view the previous/next file and then press the button to view the file on the screen. 11 Note: You can press the button from the standby screen and directly enter the playback mode. The final recoding will be shown on full screen. The product never guarantee the speed cam datum will be included for the worldwide countries. 3.2 Playback Videos and Photos If recording...

Quick Start Guide
Page 13
... the button. 4. button to enter the deletion menu. 5. Item Description Delete One Delete the current file. Press the / button, select "File Deletion", and press the button. 3. Press the / button, select the file that files have been backed up before deleting. 12 Delete All Delete all files. 6. Press the / button to enter the OSD menu. 2. Press the button, please confirm deletion. Please ensure that you wish to delete and then press the button to stop recording. 3.2.1 Deleting Files If recording...
... the button. 4. button to enter the deletion menu. 5. Item Description Delete One Delete the current file. Press the / button, select "File Deletion", and press the button. 3. Press the / button, select the file that files have been backed up before deleting. 12 Delete All Delete all files. 6. Press the / button to enter the OSD menu. 2. Press the button, please confirm deletion. Please ensure that you wish to delete and then press the button to stop recording. 3.2.1 Deleting Files If recording...


