Quick Start Guide
Page 2
... condition/ heater. Tinted window will continue to operate when powered by the car adapter. • Due to modify the product by yourself, which may occur if exposed to these elements. • This product is not intended to use to record barcodes. • For more details about the product operation and trouble shooting, please read the User Manual located on the CDROM...
... condition/ heater. Tinted window will continue to operate when powered by the car adapter. • Due to modify the product by yourself, which may occur if exposed to these elements. • This product is not intended to use to record barcodes. • For more details about the product operation and trouble shooting, please read the User Manual located on the CDROM...

Quick Start Guide
Page 4
... choose another way to route the power cable.) Install in Vehicles Attach the bracket to eject the memory card out of the slot. Insert the Micro SDHC Card / Connect to Power (Please use class 6 or above the micro SDHC cards for this camcorder.) Insert the memory card with the gold contacts facing the back of the Mobile Camera and then plug the other end to the...
... choose another way to route the power cable.) Install in Vehicles Attach the bracket to eject the memory card out of the slot. Insert the Micro SDHC Card / Connect to Power (Please use class 6 or above the micro SDHC cards for this camcorder.) Insert the memory card with the gold contacts facing the back of the Mobile Camera and then plug the other end to the...

Quick Start Guide
Page 5
... manually turn off the power within 10 seconds. To reset, press and hold the Power button for at least 2 seconds. - Adjust Device Position KNOB Rotate the knob to 360°. To turn on the power, press the Power button. - Once the vehicle engine is started, the Mobile Camera automatically starts recording. - Manual Power / Auto Power Manual Power On/Off - Once the vehicle engine shuts down, the Mobile Camera automatically saves the recording and turns...
... manually turn off the power within 10 seconds. To reset, press and hold the Power button for at least 2 seconds. - Adjust Device Position KNOB Rotate the knob to 360°. To turn on the power, press the Power button. - Once the vehicle engine is started, the Mobile Camera automatically starts recording. - Manual Power / Auto Power Manual Power On/Off - Once the vehicle engine shuts down, the Mobile Camera automatically saves the recording and turns...

Quick Start Guide
Page 6
.... 5 Motion Detection Enable/Disable the motion detection. If recording is pressed, the system alert message, "Press OK Key to Power off button is in progress, press the button to enter emergency recording mode, the "Emergency" message will be shown immediately on the screen when the emergency recording files are full, and the oldest emergency file will be protected. Taking Snapshot / Emergency Recording You can also use this function...
.... 5 Motion Detection Enable/Disable the motion detection. If recording is pressed, the system alert message, "Press OK Key to Power off button is in progress, press the button to enter emergency recording mode, the "Emergency" message will be shown immediately on the screen when the emergency recording files are full, and the oldest emergency file will be protected. Taking Snapshot / Emergency Recording You can also use this function...
User Manual
Page 2
... Guide 5 FCC Statement 5 WEEE Notice 5 CE Regulatory Notice 6 Notes on Installation 6 Caution 6 1 Introduction 8 1.1 Features 8 1.2 Package Contents 8 1.3 Product Overview 9 2 Getting Started 10 2.1 Inserting the Memory Card 10 2.2 Installing in Vehicles 11 2.2.1 Mount to Windshield 11 2.2.2 Adjust the device position 12 2.3 Connecting to Power 13 2.4 Powering the Device On / Off 14 2.4.1 Auto Power On/Off 14 2.4.2 Manual Power On/Off 14 2.5 Initial Settings 15 2.5.1 2.5.2 2.5.3 Set Automatic Recording 15 Set the Date and Time...
... Guide 5 FCC Statement 5 WEEE Notice 5 CE Regulatory Notice 6 Notes on Installation 6 Caution 6 1 Introduction 8 1.1 Features 8 1.2 Package Contents 8 1.3 Product Overview 9 2 Getting Started 10 2.1 Inserting the Memory Card 10 2.2 Installing in Vehicles 11 2.2.1 Mount to Windshield 11 2.2.2 Adjust the device position 12 2.3 Connecting to Power 13 2.4 Powering the Device On / Off 14 2.4.1 Auto Power On/Off 14 2.4.2 Manual Power On/Off 14 2.5 Initial Settings 15 2.5.1 2.5.2 2.5.3 Set Automatic Recording 15 Set the Date and Time...
User Manual
Page 3
3 Using the Car Recorder 18 3.1 Recording Videos 18 3.1.1 3.1.2 3.1.3 Record videos while driving 18 Manual Video Recording 18 Emergency Recording 19 3.1.4 3.1.5 3.1.6 The Recording Screen 20 Taking Snapshot 21 4 GRID FUNCTION DISPLAY in the LCD screen 22 3.2 Playback Videos and Photos 23 3.2.1 3.2.2 3.2.3 Playing Videos 24 Viewing Photos 24 The Playback Screen 25 3.2.4 Deleting Files 26 4 Adjusting the Settings 27 4.1 Using the Menu 27 4.2 Menu Tree 28 5 Installing the Software 32 6 SuperCar 33 7 Specifications 34
3 Using the Car Recorder 18 3.1 Recording Videos 18 3.1.1 3.1.2 3.1.3 Record videos while driving 18 Manual Video Recording 18 Emergency Recording 19 3.1.4 3.1.5 3.1.6 The Recording Screen 20 Taking Snapshot 21 4 GRID FUNCTION DISPLAY in the LCD screen 22 3.2 Playback Videos and Photos 23 3.2.1 3.2.2 3.2.3 Playing Videos 24 Viewing Photos 24 The Playback Screen 25 3.2.4 Deleting Files 26 4 Adjusting the Settings 27 4.1 Using the Menu 27 4.2 Menu Tree 28 5 Installing the Software 32 6 SuperCar 33 7 Specifications 34
User Manual
Page 4
... will help . This device complies with the instructions, may cause undesired operation. You must accept any errors and omissions that this User Guide is accurate and complete. These limits are designed to the applicable take-back scheme for the recycling of the FCC Rules. We made every effort to Part 15 of electrical and electronic equipment and/or battery...
... will help . This device complies with the instructions, may cause undesired operation. You must accept any errors and omissions that this User Guide is accurate and complete. These limits are designed to the applicable take-back scheme for the recycling of the FCC Rules. We made every effort to Part 15 of electrical and electronic equipment and/or battery...
User Manual
Page 5
...-circuit the battery. Exposing the camcorder to open -field view. Make sure that the installation position is within the wiping range of Radio and Telecom device (1995/5/EC); Do NOT install the camcorder in Electrical And Electronic Equipment Directive (2002/95/EC), Turkish EEE Directive; Clean the lens on the Approximation of the Laws of the Member States relating Electromagnetic Compatibility of...
...-circuit the battery. Exposing the camcorder to open -field view. Make sure that the installation position is within the wiping range of Radio and Telecom device (1995/5/EC); Do NOT install the camcorder in Electrical And Electronic Equipment Directive (2002/95/EC), Turkish EEE Directive; Clean the lens on the Approximation of the Laws of the Member States relating Electromagnetic Compatibility of...
User Manual
Page 6
.... The HP Car Camcorder f310 is intended for the loss of any data/content during operation. Before you start using the Car Camcorder it is assumed that you agree to the influence of the GPS satellite reception. GPS reception performance on weather and location such as speed, position, and the distance warning to the speed camera set points, may...
.... The HP Car Camcorder f310 is intended for the loss of any data/content during operation. Before you start using the Car Camcorder it is assumed that you agree to the influence of the GPS satellite reception. GPS reception performance on weather and location such as speed, position, and the distance warning to the speed camera set points, may...

User Manual
Page 7
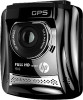
Car Recorder Video cable Bracket CD-ROM Quick start guide USB cable Car adapter This device is specifically designed for real time video and audio recording when driving. 1.1 Features Full HD camera (1920x1080 @ 30fps) 2.4" LCD color screen 130 degree Wide angle lens Motion detection Automatic Emergency recording for collision detection Supports micro-SDHC up to 32GB (Class 6 or greater speed required for purchasing this advanced Car Recorder. 1 Introduction Thank you for...
Car Recorder Video cable Bracket CD-ROM Quick start guide USB cable Car adapter This device is specifically designed for real time video and audio recording when driving. 1.1 Features Full HD camera (1920x1080 @ 30fps) 2.4" LCD color screen 130 degree Wide angle lens Motion detection Automatic Emergency recording for collision detection Supports micro-SDHC up to 32GB (Class 6 or greater speed required for purchasing this advanced Car Recorder. 1 Introduction Thank you for...
User Manual
Page 13
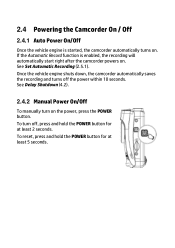
... camcorder automatically saves the recording and turns off , press and hold the POWER button for at least 5 seconds. To reset, press and hold the POWER button for at least 2 seconds. See Delay Shutdown (4.2). 2.4.2 Manual Power On/Off To manually turn off the power within 10 seconds. To turn on the power, press the POWER button. If the Automatic Record function is started, the camcorder automatically turns on. See Set Automatic Recording (2.5.1). 2.4 Powering the Camcorder On / Off 2.4.1 Auto Power...
... camcorder automatically saves the recording and turns off , press and hold the POWER button for at least 5 seconds. To reset, press and hold the POWER button for at least 2 seconds. See Delay Shutdown (4.2). 2.4.2 Manual Power On/Off To manually turn off the power within 10 seconds. To turn on the power, press the POWER button. If the Automatic Record function is started, the camcorder automatically turns on. See Set Automatic Recording (2.5.1). 2.4 Powering the Camcorder On / Off 2.4.1 Auto Power...

User Manual
Page 14
... after you turn on the power, do the following : 1. Repeat step 3 until the date and time setting is complete. Press the / button to another field. 4. Press the button to enter the OSD menu. 2. Press the button to enter the OSD menu. 2. Press the / button to select Automatic Record and press the button. 3. Press the / button to select Date / Time and press the button. 3. 2.5 Initial Settings Before using the device, we...
... after you turn on the power, do the following : 1. Repeat step 3 until the date and time setting is complete. Press the / button to another field. 4. Press the button to enter the OSD menu. 2. Press the button to enter the OSD menu. 2. Press the / button to select Automatic Record and press the button. 3. Press the / button to select Date / Time and press the button. 3. 2.5 Initial Settings Before using the device, we...
User Manual
Page 15
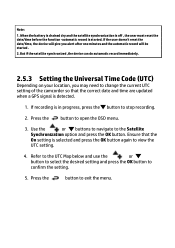
... OK button. Use the or buttons to navigate to open the OSD menu. 3. When the battery is drained dry and the satellite synchronization is off , the user must reset the date/time before the function -automatic record is detected. 1. Ensure that the correct date and time are updated when a GPS signal is started . 2. But if the satellite synchronized ,the device can do automatic record immediately. 2.5.3 Setting the Universal Time Code...
... OK button. Use the or buttons to navigate to open the OSD menu. 3. When the battery is drained dry and the satellite synchronization is off , the user must reset the date/time before the function -automatic record is detected. 1. Ensure that the correct date and time are updated when a GPS signal is started . 2. But if the satellite synchronized ,the device can do automatic record immediately. 2.5.3 Setting the Universal Time Code...
User Manual
Page 17
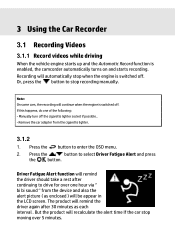
... OSD menu. 2. Note: On some cars, the recording will recalculate the alert time If the car stop when the engine is switched off. But the product will continue when the engine is enabled, the camcorder automatically turns on and starts recording. Or, press the button to select Driver Fatigue Alert and press the button. Press the button to drive for over 5 minutes. Manually turn off...
... OSD menu. 2. Note: On some cars, the recording will recalculate the alert time If the car stop when the engine is switched off. But the product will continue when the engine is enabled, the camcorder automatically turns on and starts recording. Or, press the button to select Driver Fatigue Alert and press the button. Press the button to drive for over 5 minutes. Manually turn off...
User Manual
Page 18
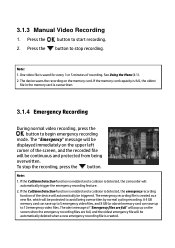
... automatically deleted when a new emergency recording file is overwritten. 3.1.4 Emergency Recording During normal video recording, press the button to begin emergency recording mode. To stop recording. The alert message of the screen, and the recorded file will be continuous and protected from being overwritten by normal cycling recording. If the memory card capacity is full, the oldest file in the memory card is created. See Using the Menu (4.1). 2. Note: 1. If the Collision Detection function...
... automatically deleted when a new emergency recording file is overwritten. 3.1.4 Emergency Recording During normal video recording, press the button to begin emergency recording mode. To stop recording. The alert message of the screen, and the recorded file will be continuous and protected from being overwritten by normal cycling recording. If the memory card capacity is full, the oldest file in the memory card is created. See Using the Menu (4.1). 2. Note: 1. If the Collision Detection function...
User Manual
Page 20
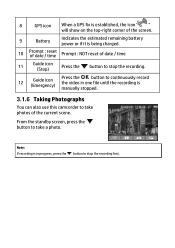
... video in one file until the recording is being charged. 10 Prompt : reset of date / time Prompt : NOT reset of date / time 11 Guide icon (Stop) Press the button to stop the recording first. 8 GPS icon When a GPS fix is established, the icon " " will show on the top-right corner of the screen. 9 Battery Indicates the estimated remaining battery power or if it is manually stopped. 3.1.6 Taking Photographs You can also use this camcorder...
... video in one file until the recording is being charged. 10 Prompt : reset of date / time Prompt : NOT reset of date / time 11 Guide icon (Stop) Press the button to stop the recording first. 8 GPS icon When a GPS fix is established, the icon " " will show on the top-right corner of the screen. 9 Battery Indicates the estimated remaining battery power or if it is manually stopped. 3.1.6 Taking Photographs You can also use this camcorder...

User Manual
Page 23
.... 3.2.2 Viewing Photos To view photos, do the following : 1. Press the / button to select File Playback and press the button. 4. Press the / button to enter the OSD menu. 3. Press it again to view the file in full screen. If recording is in progress, press the button to stop recording. 2. If recording is in progress, press the button to stop recording. 2. Press the / button to browse for the desired video file and press the button to pause the playback...
.... 3.2.2 Viewing Photos To view photos, do the following : 1. Press the / button to select File Playback and press the button. 4. Press the / button to enter the OSD menu. 3. Press it again to view the file in full screen. If recording is in progress, press the button to stop recording. 2. If recording is in progress, press the button to stop recording. 2. Press the / button to browse for the desired video file and press the button to pause the playback...
User Manual
Page 27
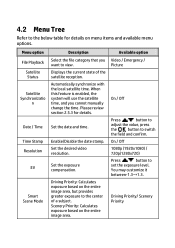
4.2 Menu Tree Refer to the below table for details. Displays the current state of a subject. Driving Priority: Calculates exposure based on the entire image area, but provides greater exposure to view. Driving Priority/ Scenery Priority Set the date and time. Video / Emergency / Picture On / Off Press / button to adjust the value, press the button to set the exposure level. Automatically synchronize with the local satellite time. Set the desired...
4.2 Menu Tree Refer to the below table for details. Displays the current state of a subject. Driving Priority: Calculates exposure based on the entire image area, but provides greater exposure to view. Driving Priority/ Scenery Priority Set the date and time. Video / Emergency / Picture On / Off Press / button to adjust the value, press the button to set the exposure level. Automatically synchronize with the local satellite time. Set the desired...

User Manual
Page 28
... is turned on the screen. Enable / Disable the device to Power off If this function is enabled and the power off button is pressed, the system alert message, "Press OK Key to automatically record video after video recording starts. On / Off High Sensitivity / Normal Sensitivity / Low Sensitivity / off , or enter motion detection after an hour of driving. Menu option Driver Fatigue Alert LCD Setting Voice Record Beep Speed Cam Alert Automatic Record Record Interval Motion...
... is turned on the screen. Enable / Disable the device to Power off If this function is enabled and the power off button is pressed, the system alert message, "Press OK Key to automatically record video after video recording starts. On / Off High Sensitivity / Normal Sensitivity / Low Sensitivity / off , or enter motion detection after an hour of driving. Menu option Driver Fatigue Alert LCD Setting Voice Record Beep Speed Cam Alert Automatic Record Record Interval Motion...

User Manual
Page 30
Reset all options to the factory default settings. Warning: Once a format has been initiated, ALL content on your local region. Available option NTSC / PAL Yes / No Yes / No Menu option TV standard Format Default Description Set the TV type based on the micro SD card will be deleted CANNOT be restored or recovered. Format the memory card.
Reset all options to the factory default settings. Warning: Once a format has been initiated, ALL content on your local region. Available option NTSC / PAL Yes / No Yes / No Menu option TV standard Format Default Description Set the TV type based on the micro SD card will be deleted CANNOT be restored or recovered. Format the memory card.


