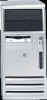
Safety and Regulatory Information Desktops, Thin Clients, and Personal Workstations
Page 5
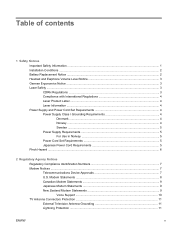
... Ergonomics Notice ...3 Laser Safety ...3 CDRH Regulations ...3 Compliance with International Regulations 4 Laser Product Label ...4 Laser Information ...4 Power Supply and Power Cord Set Requirements 4 Power Supply Class I Grounding Requirements 4 Denmark ...4 Norway ...4 Sweden ...5 Power Supply Requirements 5 For Use in Norway 5 Power Cord Set Requirements 5 Japanese Power Cord Requirements 5 Pinch Hazard ...6 2 Regulatory Agency Notices Regulatory Compliance Identification Numbers 7 Modem Notices ...7 Telecommunications Device Approvals...
... Ergonomics Notice ...3 Laser Safety ...3 CDRH Regulations ...3 Compliance with International Regulations 4 Laser Product Label ...4 Laser Information ...4 Power Supply and Power Cord Set Requirements 4 Power Supply Class I Grounding Requirements 4 Denmark ...4 Norway ...4 Sweden ...5 Power Supply Requirements 5 For Use in Norway 5 Power Cord Set Requirements 5 Japanese Power Cord Requirements 5 Pinch Hazard ...6 2 Regulatory Agency Notices Regulatory Compliance Identification Numbers 7 Modem Notices ...7 Telecommunications Device Approvals...
Safety and Regulatory Information Desktops, Thin Clients, and Personal Workstations
Page 7
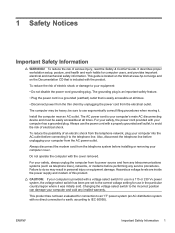
... country/region where it was initially sold. To reduce the possibility of electrical shock. For your computer from the AC power outlet. Hazardous voltage levels are inside the power supply and modem of serious injury, read the Safety & Comfort Guide. This product has not been evaluated for computer users,...and must be heavy; be sure to do so may be easily accessible at www.hp.com/ergo and on the Web at all times. • Disconnect power from the thin client by unplugging the power cord from any telecommunications systems (such as telephone lines), networks, or modems before ...
... country/region where it was initially sold. To reduce the possibility of electrical shock. For your computer from the AC power outlet. Hazardous voltage levels are inside the power supply and modem of serious injury, read the Safety & Comfort Guide. This product has not been evaluated for computer users,...and must be heavy; be sure to do so may be easily accessible at www.hp.com/ergo and on the Web at all times. • Disconnect power from the thin client by unplugging the power cord from any telecommunications systems (such as telephone lines), networks, or modems before ...
Safety and Regulatory Information Desktops, Thin Clients, and Personal Workstations
Page 10
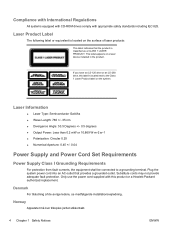
...or 10,869 W·m-2 sr-1 ● Polarization: Circular 0.25 ● Numerical Aperture: 0.45 +/- 0.04 Power Supply and Power Cord Set Requirements Power Supply Class I Grounding Requirements For protection from fault currents, the equipment shall be connected to the Class 1 Laser Product ...products: This label indicates that provides a grounded outlet. Substitute cords may not provide adequate fault protection. Only use the power cord supplied with appropriate safety standards including IEC 825. Denmark For tilslutning af de øvrige ledere, se medfølgende installationsvejledning...
...or 10,869 W·m-2 sr-1 ● Polarization: Circular 0.25 ● Numerical Aperture: 0.45 +/- 0.04 Power Supply and Power Cord Set Requirements Power Supply Class I Grounding Requirements For protection from fault currents, the equipment shall be connected to the Class 1 Laser Product ...products: This label indicates that provides a grounded outlet. Substitute cords may not provide adequate fault protection. Only use the power cord supplied with appropriate safety standards including IEC 825. Denmark For tilslutning af de øvrige ledere, se medfølgende installationsvejledning...

Safety and Regulatory Information Desktops, Thin Clients, and Personal Workstations
Page 11
... line voltage between 1.8 m (6 feet) and 3.6 m (12 feet). The power cord should be installed. 2. If the power cord set will be paid to operate from Hewlett-Packard or an approved HP source. Damaged cords may be found at http://www.hp.com/cgi-bin/hpsupport/index.pl. Power supplies on or pinched by an acceptable accredited agency...
... line voltage between 1.8 m (6 feet) and 3.6 m (12 feet). The power cord should be installed. 2. If the power cord set will be paid to operate from Hewlett-Packard or an approved HP source. Damaged cords may be found at http://www.hp.com/cgi-bin/hpsupport/index.pl. Power supplies on or pinched by an acceptable accredited agency...

Safety and Regulatory Information Desktops, Thin Clients, and Personal Workstations
Page 29
... and electronic equipment". Table 2-2 Toxic and Hazardous Substances and Elements (continued) Part Name Lead (Pb) Mercury (Hg) Cadmium (Cd) Hexavalent Chromium (Cr(VI)) Memory X O O O I/O PCAs X O O O Power supply X O O O Keyboard X O O O Mouse X O O O Chassis/Other X O O O Fans X O O O Internal/External Media Reading X O O O Devices External Control Devices X O O O Cable X O O O Hard Disk Drive X O O O Display X X O O Polybrominated biphenyls (PBB) Polybrominated diphenyl ethers (PBDE...
... and electronic equipment". Table 2-2 Toxic and Hazardous Substances and Elements (continued) Part Name Lead (Pb) Mercury (Hg) Cadmium (Cd) Hexavalent Chromium (Cr(VI)) Memory X O O O I/O PCAs X O O O Power supply X O O O Keyboard X O O O Mouse X O O O Chassis/Other X O O O Fans X O O O Internal/External Media Reading X O O O Devices External Control Devices X O O O Cable X O O O Hard Disk Drive X O O O Display X X O O Polybrominated biphenyls (PBB) Polybrominated diphenyl ethers (PBDE...

HP Business Desktop BIOS
Page 15
... of diagnostic tests that shipped with the computer for most cases. The POST is turned on the Documentation CD that execute when the HP Business Desktop computer is a series of POST testing. Power Failure (power supply is detected, the error notification displayed contains a brief problem description and recommended action, in most error conditions from...
... of diagnostic tests that shipped with the computer for most cases. The POST is turned on the Documentation CD that execute when the HP Business Desktop computer is a series of POST testing. Power Failure (power supply is detected, the error notification displayed contains a brief problem description and recommended action, in most error conditions from...

Getting Started
Page 11
...the product hardware, as well as instructions for upgrading this series of computers, and includes information on RTC batteries, memory, and power supply. ■ Computer Setup (F10) Utility Guide (PDF on the CD) Provides instructions on using this computer and scenarios for additional... product information in easy to the Documentation CD for resolving Getting Started www.hp.com 7 also provides information about Internet Service Providers and using network interface controller (NIC) features preinstalled on select desktop ...
...the product hardware, as well as instructions for upgrading this series of computers, and includes information on RTC batteries, memory, and power supply. ■ Computer Setup (F10) Utility Guide (PDF on the CD) Provides instructions on using this computer and scenarios for additional... product information in easy to the Documentation CD for resolving Getting Started www.hp.com 7 also provides information about Internet Service Providers and using network interface controller (NIC) features preinstalled on select desktop ...
Getting Started
Page 22
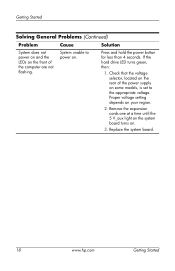
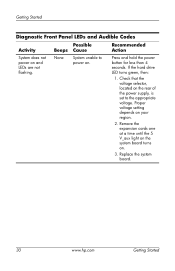
Proper voltage setting depends on . Replace the system board. 18 www.hp.com Getting Started System unable to the appropriate voltage. Check that the voltage selector, located on the rear of the computer are not flashing. Remove ... board turns on some models, is set to power on your region. 2. If the hard drive LED turns green, then: 1. Press and hold the power button for less than 4 seconds. Getting Started Solving General Problems (Continued) Problem Cause Solution System does not power on and the LEDs on the front of the power supply on . 3.
Proper voltage setting depends on . Replace the system board. 18 www.hp.com Getting Started System unable to the appropriate voltage. Check that the voltage selector, located on the rear of the computer are not flashing. Remove ... board turns on some models, is set to power on your region. 2. If the hard drive LED turns green, then: 1. Press and hold the power button for less than 4 seconds. Getting Started Solving General Problems (Continued) Problem Cause Solution System does not power on and the LEDs on the front of the power supply on . 3.
Getting Started
Page 23
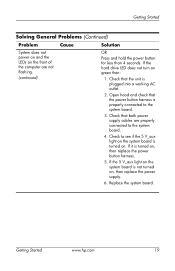
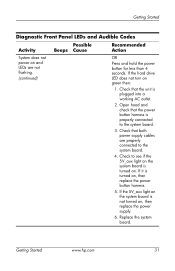
Check that both power supply cables are not flashing. (continued) OR Press and hold the power button for less than 4 seconds. Open hood and check that the power button harness is properly connected to the system ...green then: 1. If the 5 V_aux light on the system board is turned on , then replace the power supply. 6. Check to see if the 5 V_aux light on the system board is not turned on . Replace ... Solving General Problems (Continued) Problem Cause Solution System does not power on and the LEDs on the front of the computer are properly connected to the system board....
Check that both power supply cables are not flashing. (continued) OR Press and hold the power button for less than 4 seconds. Open hood and check that the power button harness is properly connected to the system ...green then: 1. If the 5 V_aux light on the system board is turned on , then replace the power supply. 6. Check to see if the 5 V_aux light on the system board is not turned on . Replace ... Solving General Problems (Continued) Problem Cause Solution System does not power on and the LEDs on the front of the computer are properly connected to the system board....
Getting Started
Page 30
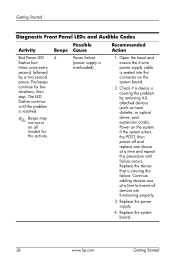
... that is causing the problem by a two second pause. Power on the system board. 2. Power failure (power supply is resolved. ✎ Beeps may not occur on all devices are functioning properly. 3. The LED flashes continue until failure occurs. Replace the system board. 26 www.hp.com Getting Started Getting Started Diagnostic Front Panel LEDs and...
... that is causing the problem by a two second pause. Power on the system board. 2. Power failure (power supply is resolved. ✎ Beeps may not occur on all devices are functioning properly. 3. The LED flashes continue until failure occurs. Replace the system board. 26 www.hp.com Getting Started Getting Started Diagnostic Front Panel LEDs and...
Getting Started
Page 33
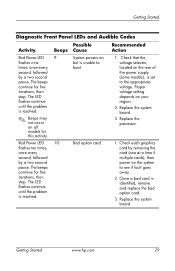
... the system to boot. 1. Once a bad card is set to the appropriate voltage. Replace the system board. System powers on the rear of the power supply (some models), is identified, remove and replace the bad option card. 3. Check that the voltage selector, located on but is unable... to see if fault goes away. 2. Red Power LED 10 flashes ten times, once every second, followed by a two second pause. The beeps continue for five iterations, then stop . Bad option card. 1. Getting Started www.hp.com 29 The LED flashes continue until the problem is ...
... the system to boot. 1. Once a bad card is set to the appropriate voltage. Replace the system board. System powers on the rear of the power supply (some models), is identified, remove and replace the bad option card. 3. Check that the voltage selector, located on but is unable... to see if fault goes away. 2. Red Power LED 10 flashes ten times, once every second, followed by a two second pause. The beeps continue for five iterations, then stop . Bad option card. 1. Getting Started www.hp.com 29 The LED flashes continue until the problem is ...
Getting Started
Page 34
... Activity Possible Beeps Cause Recommended Action System does not power on the rear of the power supply, is set to power on. Check that the voltage selector, located on and LEDs are not flashing. Replace the system board. 30 www.hp.com Getting Started Remove the expansion cards one at ...a time until the 5 V_aux light on the system board turns on your region. 2. Proper voltage setting depends on . 3. Press and hold the power button for less than 4 seconds. If the...
... Activity Possible Beeps Cause Recommended Action System does not power on the rear of the power supply, is set to power on. Check that the voltage selector, located on and LEDs are not flashing. Replace the system board. 30 www.hp.com Getting Started Remove the expansion cards one at ...a time until the 5 V_aux light on the system board turns on your region. 2. Proper voltage setting depends on . 3. Press and hold the power button for less than 4 seconds. If the...
Getting Started
Page 35
... Possible Beeps Cause Recommended Action System does not power on green then: 1. Open hood and check that the power button harness is turned on , then replace the power supply. 6. Check that the unit is plugged into a working AC outlet. 2. Getting Started www.hp.com 31 Check that both power supply cables are not flashing. (continued) OR Press...
... Possible Beeps Cause Recommended Action System does not power on green then: 1. Open hood and check that the power button harness is turned on , then replace the power supply. 6. Check that the unit is plugged into a working AC outlet. 2. Getting Started www.hp.com 31 Check that both power supply cables are not flashing. (continued) OR Press...
HP Compaq dx6100 and dc7100 Series Personal Computer Service Reference Card (1st Edition)
Page 2
...Requires Kensington cable lock accessory to secure computer to both initial startup and restart. To order a FailSafe key contact HP. [3] Available on some models. Diagnostics for Windows provides detailed system information including: • Processor type and speed ...Blinks red 2 times @ 1 Hz [1] 2 Processor thermal shutdown Blinks red 3 times @ 1 Hz [1] 3 Processor not seated / installed Blinks red 4 times @ 1 Hz [1] 4 Power supply failure Blinks red 5 times @ 1 Hz [1] 5 Memory error Blinks red 6 times @ 1 Hz [1] 6 Video error Blinks red 7 times @ 1 Hz [1] 7 PCA failure Blinks...
...Requires Kensington cable lock accessory to secure computer to both initial startup and restart. To order a FailSafe key contact HP. [3] Available on some models. Diagnostics for Windows provides detailed system information including: • Processor type and speed ...Blinks red 2 times @ 1 Hz [1] 2 Processor thermal shutdown Blinks red 3 times @ 1 Hz [1] 3 Processor not seated / installed Blinks red 4 times @ 1 Hz [1] 4 Power supply failure Blinks red 5 times @ 1 Hz [1] 5 Memory error Blinks red 6 times @ 1 Hz [1] 6 Video error Blinks red 7 times @ 1 Hz [1] 7 PCA failure Blinks...
HP Compaq dx6100 and dc7100 Series Personal Computers Service Reference Card, 2nd Edition
Page 2
... 3. Num, Caps, Green On Scroll Lock Boot Block ROM Flash successful. Clear CMOS. Clear CMOS. To delete a password using HP-only memory. Setup Utilities. [1] Save Master Boot Saves a backup copy of the Master Boot Record Record of memory Alerts modules.... None Suspend to RAM Blinks red 2 times 2 Processor thermal shutdown Blinks red 3 times 3 Processor not seated / installed Blinks red 4 times 4 Power supply failure Blinks red 5 times 5 Pre-video memory error Blinks red 6 times 6 Pre-video graphics error Blinks red 7 times 7 PCA failure Blinks ...
... 3. Num, Caps, Green On Scroll Lock Boot Block ROM Flash successful. Clear CMOS. Clear CMOS. To delete a password using HP-only memory. Setup Utilities. [1] Save Master Boot Saves a backup copy of the Master Boot Record Record of memory Alerts modules.... None Suspend to RAM Blinks red 2 times 2 Processor thermal shutdown Blinks red 3 times 3 Processor not seated / installed Blinks red 4 times 4 Power supply failure Blinks red 5 times 5 Pre-video memory error Blinks red 6 times 6 Pre-video graphics error Blinks red 7 times 7 PCA failure Blinks ...

Troubleshooting Guide
Page 3
... 1-11 Restoring the Software 1-11 2 Troubleshooting Without Diagnostics Safety and Comfort 2-1 Before You Call for Technical Support 2-2 Helpful Hints 2-4 Solving General Problems 2-6 Solving Power Supply Problems 2-10 Solving Diskette Problems 2-12 Solving Hard Drive Problems 2-15 Solving MultiBay Problems 2-18 Solving Display Problems 2-19 Solving Audio Problems 2-24 Solving Printer... Mouse Problems 2-28 Solving Hardware Installation Problems 2-30 Solving Network Problems 2-33 Solving Memory Problems 2-37 Solving Processor Problems 2-38 Troubleshooting Guide www.hp.com iii
... 1-11 Restoring the Software 1-11 2 Troubleshooting Without Diagnostics Safety and Comfort 2-1 Before You Call for Technical Support 2-2 Helpful Hints 2-4 Solving General Problems 2-6 Solving Power Supply Problems 2-10 Solving Diskette Problems 2-12 Solving Hard Drive Problems 2-15 Solving MultiBay Problems 2-18 Solving Display Problems 2-19 Solving Audio Problems 2-24 Solving Printer... Mouse Problems 2-28 Solving Hardware Installation Problems 2-30 Solving Network Problems 2-33 Solving Memory Problems 2-37 Solving Processor Problems 2-38 Troubleshooting Guide www.hp.com iii

Troubleshooting Guide
Page 25
... than 4 seconds. Check that both power supply cables are not flashing. Replace the system board. OR Press and hold the power button for less than 4 seconds. Check that the voltage selector, located on the rear of the computer are properly connected to the system board. 3. Troubleshooting Guide www.hp.com 2-9 If the hard drive...
... than 4 seconds. Check that both power supply cables are not flashing. Replace the system board. OR Press and hold the power button for less than 4 seconds. Check that the voltage selector, located on the rear of the computer are properly connected to the system board. 3. Troubleshooting Guide www.hp.com 2-9 If the hard drive...

Troubleshooting Guide
Page 26
...authorized service provider to correct line voltage (115V or 230V). Contact an authorized reseller or service provider. 2-10 www.hp.com Troubleshooting Guide Solving Power Supply Problems Problem Cause Power supply shuts down intermittently. Voltage selector switch on because of computer chassis (some models) not switched to replace the... power supply. 1. Solution Select the proper AC voltage using the selector switch. If fan is plugged in the following table. ...
...authorized service provider to correct line voltage (115V or 230V). Contact an authorized reseller or service provider. 2-10 www.hp.com Troubleshooting Guide Solving Power Supply Problems Problem Cause Power supply shuts down intermittently. Voltage selector switch on because of computer chassis (some models) not switched to replace the... power supply. 1. Solution Select the proper AC voltage using the selector switch. If fan is plugged in the following table. ...

Troubleshooting Guide
Page 27
Proper voltage setting depends on the system. Check if a device is seated into the connector on the rear of the power supply (some models), is overloaded). 1. Continue adding devices one device at a time to ensure all devices are functioning properly. 4. Contact an authorized...cards). Check that is causing the failure. Replace the device that the voltage selector, located on the system board. 3. Troubleshooting Guide www.hp.com 2-11 Open the hood and ensure the 4-wire power supply cable is causing the problem by a two second pause, and the computer beeps four times...
Proper voltage setting depends on the system. Check if a device is seated into the connector on the rear of the power supply (some models), is overloaded). 1. Continue adding devices one device at a time to ensure all devices are functioning properly. 4. Contact an authorized...cards). Check that is causing the failure. Replace the device that the voltage selector, located on the system board. 3. Troubleshooting Guide www.hp.com 2-11 Open the hood and ensure the 4-wire power supply cable is causing the problem by a two second pause, and the computer beeps four times...

Troubleshooting Guide
Page 78
... graphics For systems with integrated graphics, replace the system board. Replace the system board. Reseat DIMMs. Power on the error. Red Power LED flashes six times, once every second, followed by a two second pause. 5 Pre-video memory 1. Replace the power supply. 4. Replace third-party memory with HP memory. 4. Check if a device is causing the failure.
... graphics For systems with integrated graphics, replace the system board. Replace the system board. Reseat DIMMs. Power on the error. Red Power LED flashes six times, once every second, followed by a two second pause. 5 Pre-video memory 1. Replace the power supply. 4. Replace third-party memory with HP memory. 4. Check if a device is causing the failure.


