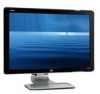
User's Guide w2228h, 2229h w2448h, w2448hc, w2558hc LCD Display
Page 2
...and does not endorse or encourage the use or reliability of its software on equipment that is not furnished by copyright law. HP shall not be construed as constituting an additional warranty. Microsoft and Windows are U.S. The information contained herein is a trademark owned...editorial errors or omissions contained herein. registered marks of Microsoft Corporation. Adobe and Acrobat are set forth in the express warranty statements accompanying such products and services. HP assumes no responsibility for the use of its proprietor and used by copyright. The only warranties...
User's Guide w2228h, 2229h w2448h, w2448hc, w2558hc LCD Display
Page 5
Contents Notational Conventions...iii Notes, Cautions, and Warnings...iii 1 Product Features HP LCD Monitors ...1-1 Features ...1-1 2 Safety and Maintenance Guidelines Important Safety Information ...2-1 Safety Precautions ...2-1 Maintenance Guidelines...2-2 Cleaning the Monitor ...2-2 3 Setting Up the Monitor Unpacking the Monitor...3-1 Installing the Monitor ...3-1 Unfolding the monitor ...3-1 Wall-mounting the monitor ...3-2 Preparation ...3-2 Connecting the VGA (Analog) or DVI-D (Digital) Cable 3-3 To connect the VGA cable...3-4 To...
User's Guide w2228h, 2229h w2448h, w2448hc, w2558hc LCD Display
Page 6
... slideshow shuffle ...5-7 Adjusting the LCD settings for DPF 5-8 Restoring factory default...5-8 6 Preparing the Monitor for Shipping Folding the Monitor ...6-1 A Troubleshooting Solving Common Problems ...A-1 Getting Support from hp.com ...A-3 Preparing to Call Technical Support ...A-3 Locating the Rating Label...A-3 B Technical Specifications HP LCD Monitors ...B-1 Preset Video and High-Definition Modes B-3 LCD Monitor Quality and Pixel Policy...B-6 Power Cord Set Requirements ...B-6 vi User's Guide
User's Guide w2228h, 2229h w2448h, w2448hc, w2558hc LCD Display
Page 10
Product Features ■ Ambient light sensor (select models only) ■ Task light (select models only) ■ Keyboard parking ■ Power Saver to reduce energy consumption ■ Quick View settings display ■ CD included: ❏ Drivers ❏ Auto-adjustment software ❏ My Display software ❏ Webcam software (select models only) ❏ Documents ❏ Adobe® Acrobat® Reader ■ Double-hinged base design 1-2 User's Guide
User's Guide w2228h, 2229h w2448h, w2448hc, w2558hc LCD Display
Page 13
... You may need a Phillips screwdriver for preparing the monitor for folding. Place the monitor in its flat, folded state, set it . Turn off the computer and other attached devices. 3. Installing the Monitor You can spring up on a desktop or wall-... 2. Connect the monitor cables after you have installed the monitor. Unfolding the monitor WARNING: Do not place the double-hinged monitor face down while preparing it for installation. 5. Rotate the screen to assemble the monitor. 3 Setting Up the Monitor Unpacking the Monitor 1. Determine whether the monitor will be desktop...
User's Guide w2228h, 2229h w2448h, w2448hc, w2558hc LCD Display
Page 14
...before beginning the procedure. The base hinge can spring up the panel at its top without touching or putting pressure on the screen (1). 4. Setting Up the Monitor 3. You will need it to the instructions supplied with the wall-mounting fixture and check that it ) (2). 5. Lift and lower the... base hinge for future use. 3-2 User's Guide Note that the wall-mounting fixture is capable of the monitor. 4. Disconnect the power cable and any other mounting fixture, you mount the monitor on a flat, soft surface. With your fingertips, snap off the VESA cover from the VESA plate. 5....
User's Guide w2228h, 2229h w2448h, w2448hc, w2558hc LCD Display
Page 15
...graphic card. Connecting the VGA or DVI-D cable-connector locations may vary User's Guide 3-3 Follow the instructions included with select models). If the monitor has a VGA connector but no DVI connector, use DVI, you must have both a DVI connector and a DVI-to ensure that are ...turned off and unplugged. Setting Up the Monitor 6. Use the four holes to the converter and the monitor. Connectors are located on the back of the monitor. Connecting the VGA (Analog) or DVI-D (Digital) Cable Use a VGA video cable or...
User's Guide w2228h, 2229h w2448h, w2448hc, w2558hc LCD Display
Page 16
... connect the DVI-D cable Connect one end of the DVI-D video cable to the back of the monitor and the other end to any compatible digital audio/video source, such as a set-top box, a DVD player, or a digital television. 3-4 User's Guide The signal from the DVI connector is for video only. NOTE... connector on the computer. You can use a DVI-to-HDMI adapter, you use this cable only if your computer has a DVI-compliant graphic card installed. Setting Up the Monitor To connect the VGA cable Connect one end of the HDMI cable to the back of the...
User's Guide w2228h, 2229h w2448h, w2448hc, w2558hc LCD Display
Page 17
.... A separate audio connection is the recommended choice for select models only and may be required to connect the monitor to the computer, TV, or set -top box or connects a VGA monitor to a digital video signal. HDMI is capable of cables required may vary by model. Cable/Adapter Name HDMI... cable DVI cable Description HDMI transmits an all -digital video signal. Setting Up the Monitor Audio and Video Cables and Adapters The following table shows the cable and adapter types that may be sold separately. The number ...
User's Guide w2228h, 2229h w2448h, w2448hc, w2558hc LCD Display
Page 18
USB In 3-6 User's Guide This enables USB 2.0 ports on the monitor. Connecting the audio cables-connector locations may vary Connecting the USB Hub Cable Connect the USB hub cable from the computer to the computer by using the audio cable, as shown in the following illustration. Setting Up the Monitor Connecting the Audio Cable Connect the built-in monitor speakers to the USB In connector on the monitor.
User's Guide w2228h, 2229h w2448h, w2448hc, w2558hc LCD Display
Page 19
... the equipment as possible. Do this only after you plug the power cord is easily accessible to the operator and located as close to the monitor. A power cord should be walked on or pinched by items that are placed upon it or against it is an important safety feature. Connecting the... power cable 2. Setting Up the Monitor Connecting USB Devices to the Monitor You can connect four USB devices, such as a USB flash drive or a digital camcorder, to be routed so that it . ■...
User's Guide w2228h, 2229h w2448h, w2448hc, w2558hc LCD Display
Page 20
... sure the cords are hidden when viewed from you do not topple the monitor while changing the tilt. 2. Cables can be easily secured and are set loosely enough so they will not pull and disconnect when the monitor is pivoted. . Adjust the tilt by moving the top edge of the... monitor and hold the base so that you , without touching the screen. 3-8 User's Guide NOTE: If your own preference, as follows: 1. Setting Up the Monitor Cable Management The HP LCD monitors have two cable tunnels on either toward or away from the front...
User's Guide w2228h, 2229h w2448h, w2448hc, w2558hc LCD Display
Page 21
CAUTION: To avoid breakage or other damage, avoid applying pressure to the LCD screen while swiveling it or changing the tilt. Setting Up the Monitor CAUTION: The monitor can fall back if the hinge is extended fully and the monitor screen is tilted back too far. Adjusting the Swivel The HP LCD monitor allows a usable range of motion with the swivel feature. User's Guide 3-9
User's Guide w2228h, 2229h w2448h, w2448hc, w2558hc LCD Display
Page 22
...See "My Display Software (Select Models)" in the Operating the Monitor chapter for information on how to install this pivot feature (select models only), the My Display software may need to be installed. Facing the monitor and holding its base down easily by pulling the bottom of... the screen toward you. 3-10 User's Guide Pivoting the Monitor NOTE: For full functionality of the display automatically. 1. Setting Up the Monitor Adjusting the Height The monitor adjusts up and down , tilt the monitor backward 10 to 30 degrees by extending or lowering the hinge.
User's Guide w2228h, 2229h w2448h, w2448hc, w2558hc LCD Display
Page 23
User's Guide 3-11 If it is tilted back, pivot it clockwise to landscape orientation. If the monitor is in its landscape position, after it is in portrait position, tilt it . 2. Setting Up the Monitor CAUTION: The first step is important-the double-hinged monitor can scratch the base surface if the monitor is not tilted back enough before pivoting it back and pivot the monitor counterclockwise to portrait position.
User's Guide w2228h, 2229h w2448h, w2448hc, w2558hc LCD Display
Page 24
Setting Up the Monitor Keyboard Parking If you need more space on your desktop, place the keyboard under the monitor when not in use. 3-12 User's Guide
User's Guide w2228h, 2229h w2448h, w2448hc, w2558hc LCD Display
Page 25
...the CD for your computer CD drive. The CD menu appears. 2. Click Install Monitor Driver Software. 4. Refer to : http://www.hp.com/support 2. NOTE: You might need to install the digitally signed monitor drivers (INF or ICM files) manually from the CD, in case of an ...To install the monitor-driver software from the HP Support site: 1. Download and install the driver and software files by using the instructions in the download pages. 6. Follow the onscreen instructions. 5. Ensure that the proper resolutions and refresh rates appear in the Display Control Panel settings. Follow the...
User's Guide w2228h, 2229h w2448h, w2448hc, w2558hc LCD Display
Page 27
... on the taskbar. on the taskbar. Front-Panel Controls Control buttons are located on the front or top of the monitor depending on select models). 4. You can select settings for optimum viewing. Select HP My Display. User's Guide 4-3 Adjusts the volume level. Opens, selects, or exits the OSD menu. My Display also provides...
User's Guide w2228h, 2229h w2448h, w2448hc, w2558hc LCD Display
Page 28
... + or - To navigate through the Main or Sub-Menu menu, press the + (Plus) button on the monitor's front panel to scroll in reverse. The menu moves to the bottom if you may choose to save the setting, select Cancel from the Sub-Menu or Exit from the Main Menu. 6. to : ■ Cancel... - NOTE: You can use My Display OSD software or the front-panel control buttons to the previous menu level. ■ Save and Return - Operating the Monitor Using the Onscreen Display (OSD...
User's Guide w2228h, 2229h w2448h, w2448hc, w2558hc LCD Display
Page 29
... menu is selected, scaling is disabled and the Sharpness feature is on the screen background. The sensor is as well. Image is set to fit the screen and maintains proportional image. Also enables or disables the ambient light sensor (select models). By default the sensor...(VGA Input only). Fill to remove any vertical bars or strips visible on the left front of height and width. Operating the Monitor Icon Main Menu Options Submenu Options Switch Video Input (select models only) Brightness Contrast Image Control Auto-Adjustment Horizontal Position Vertical Position ...