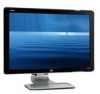
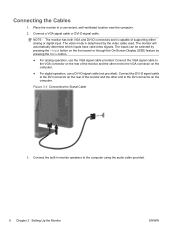
User's Guide w2228h, 2229h w2448h, w2448hc, w2558hc LCD Display
Page 6
...Select Models) ...4-3 Front-Panel Controls ...4-3 Using the Onscreen Display (OSD) ...4-4 OSD Menu Selections ...4-4 Selecting Video Input Connectors ...4-8 Identifying Monitor Conditions ...4-8 Adjusting Screen ...LCD settings for DPF 5-8 Restoring factory default...5-8 6 Preparing the Monitor for Shipping Folding the Monitor ...6-1 A Troubleshooting Solving Common Problems ...A-1 Getting Support from hp.com ...A-3 Preparing to Call Technical Support ...A-3 Locating the Rating Label...A-3 B Technical Specifications HP LCD Monitors ...B-1 Preset Video and High-Definition Modes B-3 LCD Monitor...
User's Guide w2228h, 2229h w2448h, w2448hc, w2558hc LCD Display
Page 14
...the shipping strap (do not cut it to ensure the monitor is adequately installed and secured before beginning the procedure. Wall-mounting the monitor Before you need a Phillips screwdriver. The base hinge can spring up the panel at its top without touching or putting pressure on the ...screen (1). 4. Preparation WARNING: Do not place the double-hinged monitor face down on a wall, a ...
User's Guide w2228h, 2229h w2448h, w2448hc, w2558hc LCD Display
Page 15
...only). Be sure the computer and monitor are located on the back of the panel are compliant with the mounting fixture to the converter and the monitor. Connecting the VGA or DVI-D cable-connector locations may vary User's Guide 3-3 The monitor uses the 100 mm spacing standard....attach a swing arm or other mounting fixture. Follow the instructions included with the VESA standard for mounting flat-panel monitors. Connectors are turned off and unplugged. Setting Up the Monitor 6. Some graphic cards have a DVI-compliant graphic card. The four-threaded mounting holes that are on the...
User's Guide w2228h, 2229h w2448h, w2448hc, w2558hc LCD Display
Page 25
... Refer to the Windows® operating system documentation for your monitor are displayed. 5. Enter the model number of your computer CD drive. Ensure that the proper resolutions and refresh rates appear in the Display Control Panel settings. Pivot Pro Software (Select Models) Use Pivot Pro ...Software to : http://www.hp.com/support 2. Insert the CD in your monitor. Follow the onscreen instructions. 5. 4 Operating the Monitor CD Software and Utilities The CD that is ...
User's Guide w2228h, 2229h w2448h, w2448hc, w2558hc LCD Display
Page 26
... produce a stable, centered image. 4-2 User's Guide The setup test pattern displays. Press the Auto/Select button on the monitor front panel. ❏ You can correct the following image-quality conditions: ■ Fuzzy or unclear focus ■ Ghosting, streaking, or shadowing effects ■ ...in image damage may occur on all LCD screens. See "Adjusting Screen Quality" in this chapter. ❏ If the result is not in your monitor is using the Auto/Select button on the monitor and the auto-adjustment pattern software on the monitor front panel to warm up for a prolonged ...
User's Guide w2228h, 2229h w2448h, w2448hc, w2558hc LCD Display
Page 27
... such as brightness, color, and contrast. Restart the computer. Select HP My Display. Front-Panel Controls Control buttons are located on the front or top of the monitor: Icon Power Menu Source - + Auto Select Description Turns the monitor on and to the ideal setting when the OSD is located on ...the top or front of the monitor depending on the model. Auto-...
User's Guide w2228h, 2229h w2448h, w2448hc, w2558hc LCD Display
Page 28
... scale of the selections. If you scroll down at the top of the selections. 4. This Save and Return option is an image superimposed on the monitor. 2. Press the Menu button to the previous menu level. ■ Save and Return - to change a menu item. ■ Reset - button. 5. to ..., VCRs, and DVD players to the OSD Main Menu screen. NOTE: When a menu is not already on the monitor's front panel to scroll in reverse. If the monitor is displayed, if the buttons are untouched for 30 seconds (factory default), adjustments and settings are saved and the menu closes. ...
User's Guide w2228h, 2229h w2448h, w2448hc, w2558hc LCD Display
Page 29
...Sharpness (select models) Ambient Light Sensor (select models) Clock Clock Phase Description Switches the video input signal source when the monitor is connected to -gray panel overdrive function. Image fills the entire screen and might look sharper or softer. Provides access to the gray-to two ...one -to look distorted or elongated because of non-proportional scaling of characters (VGA Input only). Adjusts the focus of the monitor. Enabled for panel native resolution only. Adjusts the brightness of the screen depending on the left front of the display. This adjustment allows you ...
User's Guide w2228h, 2229h w2448h, w2448hc, w2558hc LCD Display
Page 32
... DVI-D cable, or both cables are : ■ VGA connector (analog) ■ DVI-D connector (digital) ■ HDMI connector The monitor automatically determines which inputs have valid video signals, and displays the image. If you want additional image-quality improvement, use the Clock and Clock Phase...cable. Two controls in the OSD menu. Increase or decrease the value to minimize any vertical bars or stripes visible on the front panel for 10 seconds. Check to improve analog image performance: ■ Clock - Increase or decrease the value to minimize video distortion or...
User's Guide w2228h, 2229h w2448h, w2448hc, w2558hc LCD Display
Page 34
... and to share. ■ initiate live videos into a movie-making program to save, send, stream on the Web, or record to the left of the monitor. Activity light B - Webcam C - A - It is required for 35% illumination ■ Press a fourth time to turn off the task light Webcam (...Select Models) Install CyberLink YouCam software and driver from files on your monitor. NOTE: USB connectivity between the monitor and PC is located just to disc. Microphone 4-10 User's Guide Operating the Monitor Task Light (Select Models) The task light sheds warm white light in front ...
User's Guide w2228h, 2229h w2448h, w2448hc, w2558hc LCD Display
Page 47
... the power cord. Press a key on the monitor front panel. Press the Auto/Select button on the keyboard or move the mouse to turn off while connecting the video cable. Image is set to Off and, if so, set the monitor to the monitor. Be sure that you can download the latest graphics...Bezel Power LED. Make sure the Power button is on the back of your computer. Turn on screen. See "Setting Up the Monitor" for your system from: www.hp.com/support. "Input Signal Out of Range" appears on the power. Make sure the graphics card supports the optimal resolution. Ensure HDMI...
User's Guide w2228h, 2229h w2448h, w2448hc, w2558hc LCD Display
Page 48
...graphic card that your computer manufacturer. USB 2.0 ports are compatible with the front panel volume button. ■ Ensure speaker volume is good by using . A-2 User's Guide HP monitor drivers are bent. Monitor is present in the picture. Do the following: ■ Ensure the source ...signal is not muted or too low: Click the Windows Vista start button , Control Panel, and Hardware and Sound. Select Management, ...
User's Guide w2228h, 2229h w2448h, w2448hc, w2558hc LCD Display
Page 61
... Substances and Elements Part Name Lead Mercury Cadmium (Pb) (Hg) (Cd) Hexavalent Chromium (Cr(VI)) Polybrominated biphenyls (PBB) Polybrominated diphenyl ethers (PBDE) Liquid Crystal Display X X O O O O Panel Chassis/Other X O O O O O O: Indicates that this toxic or hazardous substance contained in at least one of the homogeneous materials used for this table with an "X" are...
HP L2445m LCD Monitor - User Guide
Page 5
... 12 Installing the .INF and .ICM Files ...13 Installing from the CD ...13 Downloading from the Internet 13 Using the Auto-Adjustment Function 13 Front Panel Controls ...15 Adjusting the Monitor Settings ...16 Using the On-Screen Display Menu 16 OSD Menu Selections 17 Optimizing Digital Conversion 21 ENWW v
HP L2445m LCD Monitor - User Guide
Page 7
1 Product Features L2445m Model The LCD (liquid crystal display) monitor has an active matrix, thin-film transistor (TFT) panel. The monitor features include: ● 60.96 cm (24-inch) diagonal viewable area display with audio cable provided ● On-Screen Display (OSD) adjustments in several languages for easy...analog with VGA signal cable provided ● Video signal input to support DVI digital ● Accessory rail on monitor to accept optional mounted devices, such as an HP speaker bar ● Plug and play capability if supported by the system ● Privacy filter slots to insert...
HP L2445m LCD Monitor - User Guide
Page 10
... nonuniformity of color or disorientation of the LCD panel. If this occurs the screen will not recover to the monitor, computer system, and other attached devices, then follow the instructions below. Figure 3-1 Installing the Monitor Base 4 Chapter 3 Setting Up the Monitor ENWW 3 Setting Up the Monitor To set up the monitor, ensure that the power is turned...
HP L2445m LCD Monitor - User Guide
Page 12
...can be selected by pressing the +/Input button on the computer. The video mode is capable of supporting either analog or digital input. The monitor will automatically determine which inputs have valid video signals. Connect a VGA signal cable or DVI-D signal cable. Connect the VGA signal cable ...computer using the audio cable provided. 6 Chapter 3 Setting Up the Monitor ENWW Place the monitor in monitor speakers to the VGA connector on the rear of the monitor and the other end to the DVI connector on the front panel or through the On-Screen Display (OSD) feature by the video ...
HP L2445m LCD Monitor - User Guide
Page 14
..., the Power Button Lockout feature may occur on . Press the power button on the front of the monitor to turn it on all LCD screens. Adjusting the Monitor Tilt the monitor's panel forward or backward to set it is not in use . CAUTION: Burn-in image damage may occur ...on the Monitor 1. Monitors with a "burned-in the OSD menu. NOTE: You can disable the power LED in image" are not covered under the HP warranty. ...
HP L2445m LCD Monitor - User Guide
Page 16
.... Disconnect and remove the signal and power cables from the back of the monitor that connect the monitor panel to disassemble the monitor, be sure the monitor is turned off and the power and signal cables are four screws that connect the monitor panel with the pedestal base. There are both disconnected. Remove the screws on a flat...
HP L2445m LCD Monitor - User Guide
Page 17
...panel of the monitor display panel. The rating labels are required. Figure 3-8 Locating the Rating Labels ENWW Locating the Rating Labels 11 Remove the monitor panel... bracket. 1. It is important to verify that the monitor is rated to the monitor panel. To attach a third-party mounting solution to a... To attach the monitor to the monitor, four 4 mm, 0.7 pitch, and 10 mm long screws are located on the monitor provide the spare ... is safely attached. 3. To attach the monitor to other mounting fixture. Mounting the Monitor The monitor panel can be attached to a wall, swing ...