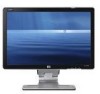
1859m,2009m,2009v, 2009f, 2159m,2159v,2309m,2309v, 2509m, 2709m LCD Monitor User Guide
Page 6
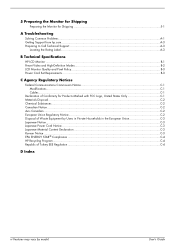
A Troubleshooting Solving Common Problems ...A-1 Getting Support from hp.com ...A-3 Preparing to Call Technical Support...A-3 Locating the Rating Label...A-3 B Technical Specifications HP LCD Monitors ...B-1 Preset Video and High-Definition Modes B-4 LCD Monitor Quality and Pixel Policy...B-6 Power Cord Set Requirements ...B-6 C Agency Regulatory Notices Federal Communications Commission ... Cord Notice...C-3 Japanese Material Content Declaration C-3 Korean Notice ...C-3 EPA ENERGY STAR® Compliance ...C-4 HP Recycling Program...C-4 D Index vi Features may vary by model. User's Guide
A Troubleshooting Solving Common Problems ...A-1 Getting Support from hp.com ...A-3 Preparing to Call Technical Support...A-3 Locating the Rating Label...A-3 B Technical Specifications HP LCD Monitors ...B-1 Preset Video and High-Definition Modes B-4 LCD Monitor Quality and Pixel Policy...B-6 Power Cord Set Requirements ...B-6 C Agency Regulatory Notices Federal Communications Commission ... Cord Notice...C-3 Japanese Material Content Declaration C-3 Korean Notice ...C-3 EPA ENERGY STAR® Compliance ...C-4 HP Recycling Program...C-4 D Index vi Features may vary by model. User's Guide

1859m,2009m,2009v, 2009f, 2159m,2159v,2309m,2309v, 2509m, 2709m LCD Monitor User Guide
Page 31
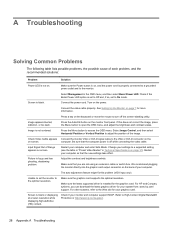
.... Make sure the Power button is on, and the power cord is installed for your settings to the monitor. "Check Video Cable" appears on the monitor front panel. For HP and Compaq systems, you are not using an extension cable or switch box. See "Setting Up the... recommend plugging the monitor directly into the graphic card output connector on the back of the image. Click Sound, and in the operating system. Check if the Bezel Power LED option is next to turn off while connecting the video cable. A Troubleshooting Solving Common Problems The...
.... Make sure the Power button is on, and the power cord is installed for your settings to the monitor. "Check Video Cable" appears on the monitor front panel. For HP and Compaq systems, you are not using an extension cable or switch box. See "Setting Up the... recommend plugging the monitor directly into the graphic card output connector on the back of the image. Click Sound, and in the operating system. Check if the Bezel Power LED option is next to turn off while connecting the video cable. A Troubleshooting Solving Common Problems The...
1859m,2009m,2009v, 2009f, 2159m,2159v,2309m,2309v, 2509m, 2709m LCD Monitor User Guide
Page 32
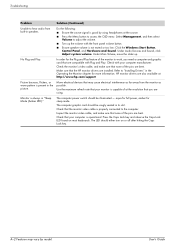
... always in the picture. Check with Plug and Play. Make sure that may vary by using . Move electrical devices that the HP monitor drivers are installed. The computer power switch should be in speakers. Make sure the USB hub cable is securely connected to adjust ..."Sleep Mode (Amber LED)." The LED should either turn on most keyboards. HP monitor drivers are using headphones at the resolution that none of the pins are not working. USB 2.0 ports are bent. Troubleshooting Problem Solution (Continued) Unable to access the OSD menu. A-2 Features may ...
... always in the picture. Check with Plug and Play. Make sure that may vary by using . Move electrical devices that the HP monitor drivers are installed. The computer power switch should be in speakers. Make sure the USB hub cable is securely connected to adjust ..."Sleep Mode (Amber LED)." The LED should either turn on most keyboards. HP monitor drivers are using headphones at the resolution that none of the pins are not working. USB 2.0 ports are bent. Troubleshooting Problem Solution (Continued) Unable to access the OSD menu. A-2 Features may ...

1859m,2009m,2009v, 2009f, 2159m,2159v,2309m,2309v, 2509m, 2709m LCD Monitor User Guide
Page 33
Troubleshooting Getting Support from hp.com Before you are using the troubleshooting tips in the Information menu) ■ Purchase date on invoice ■ Conditions under which the problem occurred ■ Error messages received ■ Hardware configuration ■ Name and version of the monitor. User's Guide A-3 Have the following information available when you call technical support...
Troubleshooting Getting Support from hp.com Before you are using the troubleshooting tips in the Information menu) ■ Purchase date on invoice ■ Conditions under which the problem occurred ■ Error messages received ■ Hardware configuration ■ Name and version of the monitor. User's Guide A-3 Have the following information available when you call technical support...
HP 2210i/2310i/2510i LCD Monitors - User Guide
Page 3
NOTE: Text set off in this manner indicates that failure to follow directions could result in damage to follow directions could result in bodily harm or loss of information. CAUTION: Text set off in this manner indicates that failure to equipment or loss of life. WARNING! About This Guide This guide provides information on setting up the monitor, installing drivers, using the on-screen display menu, troubleshooting and technical specifications. iii Text set off in this manner provides important supplemental information.
NOTE: Text set off in this manner indicates that failure to follow directions could result in damage to follow directions could result in bodily harm or loss of information. CAUTION: Text set off in this manner indicates that failure to equipment or loss of life. WARNING! About This Guide This guide provides information on setting up the monitor, installing drivers, using the on-screen display menu, troubleshooting and technical specifications. iii Text set off in this manner provides important supplemental information.

HP 2210i/2310i/2510i LCD Monitors - User Guide
Page 6
Appendix A Troubleshooting ...28 Solving Common Problems ...28 Getting Support from hp.com ...29 Preparing to Call Technical Support 29 Locating the Rating Label ...30 Appendix B Technical Specifications ...31 HP LCD Monitors ...31 Preset Video Modes ...35 LCD Monitor Quality and Pixel Policy 36 Appendix C Agency Regulatory Notices ...38 Federal Communications Commission ......41 Disposal of Waste Equipment by Users in Private Household in the European Union ..... 41 Chemical Substances ...41 HP Recycling Program ...42 Restriction of Hazardous Substances (RoHS 42 Turkey EEE Regulation ...43 vi
Appendix A Troubleshooting ...28 Solving Common Problems ...28 Getting Support from hp.com ...29 Preparing to Call Technical Support 29 Locating the Rating Label ...30 Appendix B Technical Specifications ...31 HP LCD Monitors ...31 Preset Video Modes ...35 LCD Monitor Quality and Pixel Policy 36 Appendix C Agency Regulatory Notices ...38 Federal Communications Commission ......41 Disposal of Waste Equipment by Users in Private Household in the European Union ..... 41 Chemical Substances ...41 HP Recycling Program ...42 Restriction of Hazardous Substances (RoHS 42 Turkey EEE Regulation ...43 vi
HP 2210i/2310i/2510i LCD Monitors - User Guide
Page 34
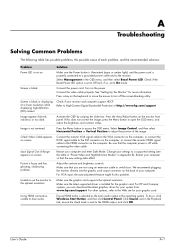
...computer and enter Safe Mode. Connect the video cable properly. For HP and Compaq systems, you are not using an extension cable or switch box. If this problem (VGA input only). A Troubleshooting Solving Common Problems The following table lists possible problems, the possible ...appears blurred, indistinct, or too dark. Check Video Cable appears Connect the monitor VGA or DVI-D signal cable to High-Content Digital Bandwidth Protection or http://www.hp.com/support. 28 Appendix A Troubleshooting Refer to the VGA or DVI-D connector on the on , and the...
...computer and enter Safe Mode. Connect the video cable properly. For HP and Compaq systems, you are not using an extension cable or switch box. If this problem (VGA input only). A Troubleshooting Solving Common Problems The following table lists possible problems, the possible ...appears blurred, indistinct, or too dark. Check Video Cable appears Connect the monitor VGA or DVI-D signal cable to High-Content Digital Bandwidth Protection or http://www.hp.com/support. 28 Appendix A Troubleshooting Refer to the VGA or DVI-D connector on the on , and the...

HP 2210i/2310i/2510i LCD Monitors - User Guide
Page 35
... : http://www.hp.com/support Select your monitor is not muted or too low: Click the Windows start button™, Control Panel, and Hardware and Sound. Ensure HDMI audio is next to Call Technical Support If you cannot solve a problem by using the troubleshooting tips in the ...operating system. Inspect the monitor video cable, and make sure that may cause electrical interference as far away from the monitor as the main audio output in this section, you contact customer service...
... : http://www.hp.com/support Select your monitor is not muted or too low: Click the Windows start button™, Control Panel, and Hardware and Sound. Ensure HDMI audio is next to Call Technical Support If you cannot solve a problem by using the troubleshooting tips in the ...operating system. Inspect the monitor video cable, and make sure that may cause electrical interference as far away from the monitor as the main audio output in this section, you contact customer service...

HP 2210i/2310i/2510i LCD Monitors - User Guide
Page 36
... version of the monitor. 30 Appendix A Troubleshooting The rating label is on the back of hardware and software you call: ● Monitor model number (located on label on back of monitor) ● Monitor serial number (located on label on back of monitor or in the OSD... display in the Information menu) ● Purchase date on the monitor provides the product number and serial number. You may need these numbers when contacting HP about your monitor...
... version of the monitor. 30 Appendix A Troubleshooting The rating label is on the back of hardware and software you call: ● Monitor model number (located on label on back of monitor) ● Monitor serial number (located on label on back of monitor or in the OSD... display in the Information menu) ● Purchase date on the monitor provides the product number and serial number. You may need these numbers when contacting HP about your monitor...
User's Guide 2309p, 2509p LCD Display
Page 6
5 Preparing the Monitor for Shipping Preparing the Monitor for Shipping 5-1 A Troubleshooting Solving Common Problems ...A-1 Getting Support from hp.com ...A-3 Preparing to Call Technical Support ...A-3 Locating the Rating Label...A-3 B Technical Specifications HP LCD Monitor ...B-1 Preset Video and High-Definition Modes B-2 LCD Monitor Quality and Pixel Policy...B-3 Power Cord... Content Declaration C-3 Korean Notice ...C-3 EPA ENERGY STAR® Compliance ...C-4 HP Recycling Program...C-4 Republic of Turkey EEE Regulation ...C-4 D Index vi Features may vary by model. User's Guide
5 Preparing the Monitor for Shipping Preparing the Monitor for Shipping 5-1 A Troubleshooting Solving Common Problems ...A-1 Getting Support from hp.com ...A-3 Preparing to Call Technical Support ...A-3 Locating the Rating Label...A-3 B Technical Specifications HP LCD Monitor ...B-1 Preset Video and High-Definition Modes B-2 LCD Monitor Quality and Pixel Policy...B-3 Power Cord... Content Declaration C-3 Korean Notice ...C-3 EPA ENERGY STAR® Compliance ...C-4 HP Recycling Program...C-4 Republic of Turkey EEE Regulation ...C-4 D Index vi Features may vary by model. User's Guide
User's Guide 2309p, 2509p LCD Display
Page 33
...and has ghosting, shadowing problem. Press the Menu button to High-Content Digital Bandwidth Protection or http://www.hp.com/support Image appears blurred, indistinct, or too dark. Connect the monitor VGA signal cable to the VGA connector on the computer, or connect the DVI-D signal cable to ...or connect the monitor HDMI signal cable to open the OSD menu, and adjust the brightness and contrast scales. For HP and Compaq systems, you are not using an extension cable or switch box. To do so, click Windows Start Button, and then click Control Panel. A Troubleshooting Solving Common Problems ...
...and has ghosting, shadowing problem. Press the Menu button to High-Content Digital Bandwidth Protection or http://www.hp.com/support Image appears blurred, indistinct, or too dark. Connect the monitor VGA signal cable to the VGA connector on the computer, or connect the DVI-D signal cable to ...or connect the monitor HDMI signal cable to open the OSD menu, and adjust the brightness and contrast scales. For HP and Compaq systems, you are not using an extension cable or switch box. To do so, click Windows Start Button, and then click Control Panel. A Troubleshooting Solving Common Problems ...
User's Guide 2309p, 2509p LCD Display
Page 34
... Check with the front panel volume button. ■ Ensure speaker volume is good by model. Inspect the monitor video cable, and make sure that the HP monitor drivers are bent. A-2 Features may cause electrical interference as possible. Use the maximum refresh rate that your ...'s Guide Move electrical devices that are also available at the resolution that the monitor video cable is always in its slot. Troubleshooting Problem Solution (Continued) Unable to hear audio from the monitor as far away from built-in speakers. Refer to "Installing Drivers" in the...
... Check with the front panel volume button. ■ Ensure speaker volume is good by model. Inspect the monitor video cable, and make sure that the HP monitor drivers are bent. A-2 Features may cause electrical interference as possible. Use the maximum refresh rate that your ...'s Guide Move electrical devices that are also available at the resolution that the monitor video cable is always in its slot. Troubleshooting Problem Solution (Continued) Unable to hear audio from the monitor as far away from built-in speakers. Refer to "Installing Drivers" in the...

User's Guide 2309p, 2509p LCD Display
Page 35
... of hardware and software you are using the troubleshooting tips in the Information menu) ■ Purchase date on the monitor provides the product number and serial number. User's Guide A-3 Troubleshooting Getting Support from hp.com Before you contact customer service, refer to HP Technical Support at: http://www.hp.com/support Select your country/region, and...
... of hardware and software you are using the troubleshooting tips in the Information menu) ■ Purchase date on the monitor provides the product number and serial number. User's Guide A-3 Troubleshooting Getting Support from hp.com Before you contact customer service, refer to HP Technical Support at: http://www.hp.com/support Select your country/region, and...
HP w185,w1858, w2338h LCD Monitor - User Guide
Page 6
...On-screen Display (OSD) ...4-4 OSD Menu Selections ...4-4 Selecting Video Input Connectors ...4-8 Identifying Monitor Conditions ...4-8 Adjusting Screen Quality ...4-8 Optimizing Analog Video ...4-8 Power-Saver Feature ...4-9 Ambient Light ...Monitor for Shipping Removing the Cantilever Base ...6-1 Folding the Double-Hinged Monitor 6-2 A Troubleshooting Solving Common Problems ...A-1 Getting Support from hp.com ...A-3 Preparing to Call Technical Support ...A-3 Locating the Rating Label...A-3 B Technical Specifications HP LCD Monitors ...B-1 Preset Video and High-Definition Modes B-4 LCD Monitor...
...On-screen Display (OSD) ...4-4 OSD Menu Selections ...4-4 Selecting Video Input Connectors ...4-8 Identifying Monitor Conditions ...4-8 Adjusting Screen Quality ...4-8 Optimizing Analog Video ...4-8 Power-Saver Feature ...4-9 Ambient Light ...Monitor for Shipping Removing the Cantilever Base ...6-1 Folding the Double-Hinged Monitor 6-2 A Troubleshooting Solving Common Problems ...A-1 Getting Support from hp.com ...A-3 Preparing to Call Technical Support ...A-3 Locating the Rating Label...A-3 B Technical Specifications HP LCD Monitors ...B-1 Preset Video and High-Definition Modes B-4 LCD Monitor...
HP w185,w1858, w2338h LCD Monitor - User Guide
Page 51
...Select Management in the operating system. Change your graphics card. Picture is not centered. For HP and Compaq systems, you are not using an extension cable or switch box. A Troubleshooting Solving Common Problems The following table lists possible problems, the possible cause of your system ...so that the computer power is properly connected to a grounded power outlet and to access the OSD menu. We recommend plugging the monitor directly into the graphic card output connector on the back of each problem, and the recommended solutions: Problem Solution Power LED is ...
...Select Management in the operating system. Change your graphics card. Picture is not centered. For HP and Compaq systems, you are not using an extension cable or switch box. A Troubleshooting Solving Common Problems The following table lists possible problems, the possible cause of your system ...so that the computer power is properly connected to a grounded power outlet and to access the OSD menu. We recommend plugging the monitor directly into the graphic card output connector on the back of each problem, and the recommended solutions: Problem Solution Power LED is ...

HP w185,w1858, w2338h LCD Monitor - User Guide
Page 52
... picture. USB 2.0 ports are bent. A-2 User's Guide Under Audio Devices and Sound, click Adjust system volume. No Plug and Play. HP monitor drivers are bent. Use the maximum refresh rate that may cause electrical interference as possible. The computer power switch should either turn on most... signal is always in the Operating the Monitor chapter for the Plug and Play feature of the pins are not working. Check with Plug and Play. Monitor is good by using . Troubleshooting Problem Solution (Continued) Unable to hear audio from the monitor as far away from built-in its slot...
... picture. USB 2.0 ports are bent. A-2 User's Guide Under Audio Devices and Sound, click Adjust system volume. No Plug and Play. HP monitor drivers are bent. Use the maximum refresh rate that may cause electrical interference as possible. The computer power switch should either turn on most... signal is always in the Operating the Monitor chapter for the Plug and Play feature of the pins are not working. Check with Plug and Play. Monitor is good by using . Troubleshooting Problem Solution (Continued) Unable to hear audio from the monitor as far away from built-in its slot...

HP w185,w1858, w2338h LCD Monitor - User Guide
Page 53
... messages received ■ Hardware configuration ■ Name and version of the monitor. Troubleshooting Getting Support from hp.com Before you might have to call : ■ Monitor model number (located on label on back of monitor) ■ Monitor serial number (located on label on back of monitor or in the OSD display in this section, you contact customer...
... messages received ■ Hardware configuration ■ Name and version of the monitor. Troubleshooting Getting Support from hp.com Before you might have to call : ■ Monitor model number (located on label on back of monitor) ■ Monitor serial number (located on label on back of monitor or in the OSD display in this section, you contact customer...


