
End User License Agreement
Page 2
..., CD or DVD) or an equivalent solution delivered in the form of a hard disk drive-based solution, an external media-based recovery solution (e.g. TRANSFER. You may not be governed by HP as other applicable laws and international treaty provisions. PROPRIETARY RIGHTS. All intellectual property ...the upgrade. The use technical information you may make a one-time transfer of any term or condition of Authenticity. You shall not remove any other form, may not sublicense, assign or transfer the license or Software Product except as a consignment. f. b. TERM. CONSENT ...
..., CD or DVD) or an equivalent solution delivered in the form of a hard disk drive-based solution, an external media-based recovery solution (e.g. TRANSFER. You may not be governed by HP as other applicable laws and international treaty provisions. PROPRIETARY RIGHTS. All intellectual property ...the upgrade. The use technical information you may make a one-time transfer of any term or condition of Authenticity. You shall not remove any other form, may not sublicense, assign or transfer the license or Software Product except as a consignment. f. b. TERM. CONSENT ...
Watching and Recording TV
Page 4
...the guide 24 Recording quality and hard disk drive storage space 25 Watching TV programs stored on the HP Media Drive 26 About recording TV to the HP Media Drive 27 Recording TV programs to the HP Media Drive 27 Changing the TV recording path to the HP Media Drive 28 Changing the TV recording ...path to the local hard disk drive 28 Add TV recording folder for Windows Media Center to find 29 Changing disk space for recording TV programs 29 Updating recorded TV list after removing the HP Media Drive 29 System requirements ...
...the guide 24 Recording quality and hard disk drive storage space 25 Watching TV programs stored on the HP Media Drive 26 About recording TV to the HP Media Drive 27 Recording TV programs to the HP Media Drive 27 Changing the TV recording path to the HP Media Drive 28 Changing the TV recording ...path to the local hard disk drive 28 Add TV recording folder for Windows Media Center to find 29 Changing disk space for recording TV programs 29 Updating recorded TV list after removing the HP Media Drive 29 System requirements ...
Watching and Recording TV
Page 30
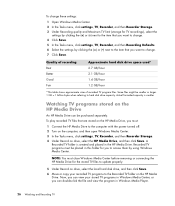
... using Windows Media Center. NOTE: You must be placed in the HP Media Drive. Recorded TV programs must close Windows Media Center before removing or connecting the HP Media Drive for the stored TV files to update properly. 5 Under Record on drive, select the local hard disk drive, and then click Save. 6 Move or copy your stored TV...
... using Windows Media Center. NOTE: You must be placed in the HP Media Drive. Recorded TV programs must close Windows Media Center before removing or connecting the HP Media Drive for the stored TV files to update properly. 5 Under Record on drive, select the local hard disk drive, and then click Save. 6 Move or copy your stored TV...
Watching and Recording TV
Page 31
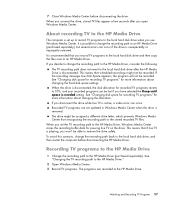
...be recorded. When you set up to record TV programs to the local hard disk drive when you record TV programs to the local hard disk drive and then copy the files over to the HP Media Drive, Windows Media Center stores the recording buffer data for more information about changing... "Changing the TV recording path to remove the drive safely. If you open Windows Media Center. The drive might not be recorded. Watching and Recording TV Programs 27 Recording TV programs to the HP Media Drive 1 Change the recording path to the HP Media Drive The computer is active, a video error...
...be recorded. When you set up to record TV programs to the local hard disk drive when you record TV programs to the local hard disk drive and then copy the files over to the HP Media Drive, Windows Media Center stores the recording buffer data for more information about changing... "Changing the TV recording path to remove the drive safely. If you open Windows Media Center. The drive might not be recorded. Watching and Recording TV Programs 27 Recording TV programs to the HP Media Drive 1 Change the recording path to the HP Media Drive The computer is active, a video error...

Warranty and Support Guide
Page 5
...APPLY TO CLAIMS FOR PERSONAL INJURY. This is made in writing and signed by an authorized representative of HP. UNITS SENT IN FOR SERVICE MAY HAVE THE DATA ERASED FROM THE HARD DRIVE AND THE PROGRAMS RESTORED TO THEIR ORIGINAL STATE. Limitation of a replacement. Replacement parts are warranted to... BEFORE RETURNING ANY UNIT FOR SERVICE, BE SURE TO BACK UP DATA AND REMOVE ANY CONFIDENTIAL, PROPRIETARY, OR PERSONAL INFORMATION. HP IS NOT RESPONSIBLE FOR DAMAGE TO OR LOSS OF ANY PROGRAMS, DATA, OR REMOVABLE STORAGE MEDIA. YOU MAY ALSO HAVE OTHER RIGHTS THAT MAY VARY FROM STATE ...
...APPLY TO CLAIMS FOR PERSONAL INJURY. This is made in writing and signed by an authorized representative of HP. UNITS SENT IN FOR SERVICE MAY HAVE THE DATA ERASED FROM THE HARD DRIVE AND THE PROGRAMS RESTORED TO THEIR ORIGINAL STATE. Limitation of a replacement. Replacement parts are warranted to... BEFORE RETURNING ANY UNIT FOR SERVICE, BE SURE TO BACK UP DATA AND REMOVE ANY CONFIDENTIAL, PROPRIETARY, OR PERSONAL INFORMATION. HP IS NOT RESPONSIBLE FOR DAMAGE TO OR LOSS OF ANY PROGRAMS, DATA, OR REMOVABLE STORAGE MEDIA. YOU MAY ALSO HAVE OTHER RIGHTS THAT MAY VARY FROM STATE ...

Warranty and Support Guide
Page 13
...: 3 Click the Windows Vista start button, Control Panel. 4 Under Programs, click Uninstall a program. 5 Select the program you want to remove, and then click Uninstall. 6 Click Yes if you want to reinstall software programs that came on page 14. For more information about software ... in the Recovery Manager: 1 Click the Windows Vista start button, All Programs, PC Help & Tools, and then click Recovery Manager. 2 Click Advanced Options, Reinstall software programs that came with your hard disk drive. To manually add restore points: 1 Close all open programs. 2 Click the ...
...: 3 Click the Windows Vista start button, Control Panel. 4 Under Programs, click Uninstall a program. 5 Select the program you want to remove, and then click Uninstall. 6 Click Yes if you want to reinstall software programs that came on page 14. For more information about software ... in the Recovery Manager: 1 Click the Windows Vista start button, All Programs, PC Help & Tools, and then click Recovery Manager. 2 Click Advanced Options, Reinstall software programs that came with your hard disk drive. To manually add restore points: 1 Close all open programs. 2 Click the ...
Warranty and Support Guide
Page 14
...The next time you run the program, it resumes where it (for your computer model. To purchase recovery discs, go to http://www.hp.com/support and visit the Software & Driver downloads page for this section to create a set . To create recovery discs, your computer ... Vista start button, All Programs, PC Help & Tools, and then click Recovery Disc Creation. 3 Follow the onscreen instructions. Therefore, ensure you have made recovery discs. Starting system recovery from the hard disk drive Choose one set of blank discs needed to a removable disc any data or programs that you...
...The next time you run the program, it resumes where it (for your computer model. To purchase recovery discs, go to http://www.hp.com/support and visit the Software & Driver downloads page for this section to create a set . To create recovery discs, your computer ... Vista start button, All Programs, PC Help & Tools, and then click Recovery Disc Creation. 3 Follow the onscreen instructions. Therefore, ensure you have made recovery discs. Starting system recovery from the hard disk drive Choose one set of blank discs needed to a removable disc any data or programs that you...

Warranty and Support Guide
Page 15
..."Performing the post-recovery procedure" on page 16. Therefore, ensure you have backed up to a removable disc any data that you want to save. After system recovery is complete, the computer restarts.... On button for performing a system recovery from the recovery discs you created as you see the desktop. 10 Turn off . 2 Disconnect all peripheral devices, and turn the computer back on. 15... A window may open, prompting you to choose between running system recovery from the discs or from your hard drive. 7 Choose to run from the recovery discs, and then click Next. 8 In the Recovery Manager ...
..."Performing the post-recovery procedure" on page 16. Therefore, ensure you have backed up to a removable disc any data that you want to save. After system recovery is complete, the computer restarts.... On button for performing a system recovery from the recovery discs you created as you see the desktop. 10 Turn off . 2 Disconnect all peripheral devices, and turn the computer back on. 15... A window may open, prompting you to choose between running system recovery from the discs or from your hard drive. 7 Choose to run from the recovery discs, and then click Next. 8 In the Recovery Manager ...
Getting Started Guide
Page 11
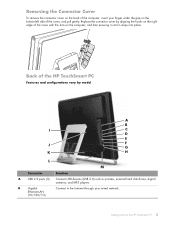
... cover by aligning the hooks on the right edge of the HP TouchSmart PC Features and configurations vary by model A B I C D E J F G K H L M Connector Function A USB 2.0 ports (3) Connect USB devices (USB 2.0) such as printers, external hard disk drives, digital cameras, and MP3 players. Getting to the Internet through... the slots on the bottom-left side of the cover, and pull gently. Removing the Connector Cover To remove the connector cover on the back of the computer, insert your wired network. B Gigabit Ethernet LAN (10/100/1G) Connect to Know the HP TouchSmart PC 5
... cover by aligning the hooks on the right edge of the HP TouchSmart PC Features and configurations vary by model A B I C D E J F G K H L M Connector Function A USB 2.0 ports (3) Connect USB devices (USB 2.0) such as printers, external hard disk drives, digital cameras, and MP3 players. Getting to the Internet through... the slots on the bottom-left side of the cover, and pull gently. Removing the Connector Cover To remove the connector cover on the back of the computer, insert your wired network. B Gigabit Ethernet LAN (10/100/1G) Connect to Know the HP TouchSmart PC 5
Getting Started Guide
Page 13
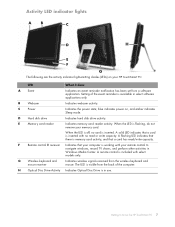
... The LED is included with select models only. H Optical Disc Drive Activity Indicates Optical Disc Drive is inserted with your remote control to Know the HP TouchSmart PC 7 E Memory card reader Indicates memory card reader activity. A ...remove your HP TouchSmart PC: LED What it does A Event Indicates an event reminder notification has been set from the wireless keyboard and mouse. F Remote control IR receiver Indicates that a card has read or write capacity. Setting of the computer. C Power Indicates the power state; D Hard disk drive Indicates hard disk drive...
... The LED is included with select models only. H Optical Disc Drive Activity Indicates Optical Disc Drive is inserted with your remote control to Know the HP TouchSmart PC 7 E Memory card reader Indicates memory card reader activity. A ...remove your HP TouchSmart PC: LED What it does A Event Indicates an event reminder notification has been set from the wireless keyboard and mouse. F Remote control IR receiver Indicates that a card has read or write capacity. Setting of the computer. C Power Indicates the power state; D Hard disk drive Indicates hard disk drive...
Getting Started Guide
Page 23
... the tool, visit www.windowsvista.com/upgradeadvisor Getting to the Upgrading and Servicing Guide that came with the operating system.* Upgrading your HP TouchSmart PC hardware To find detailed instructions on your computer. See www.microsoft.com/windowsvista/getready/hardwarereqs.mspx and www.microsoft.com/windowsvista/getready/capable...the computer. Make sure your hardware and software are compatible with your computer. NOTE: The Ambient Light will run on removing and replacing the memory and the hard disk drive for your HP TouchSmart PC, refer to Know the HP TouchSmart PC 17
... the tool, visit www.windowsvista.com/upgradeadvisor Getting to the Upgrading and Servicing Guide that came with the operating system.* Upgrading your HP TouchSmart PC hardware To find detailed instructions on your computer. See www.microsoft.com/windowsvista/getready/hardwarereqs.mspx and www.microsoft.com/windowsvista/getready/capable...the computer. Make sure your hardware and software are compatible with your computer. NOTE: The Ambient Light will run on removing and replacing the memory and the hard disk drive for your HP TouchSmart PC, refer to Know the HP TouchSmart PC 17

Getting Started Guide
Page 50
...the folder you dropped your photos into my HP TouchSmart Photo library? You might try turning off the RSS feeds. How do I get photos from your camera: 1 Remove the memory card from your camera, and insert it into the memory card reader on your hard drive with your fingertip, drag and drop the... pictures you want to create the feed. 6 Tap Subscribe. 7 Open HP TouchSmart, and tap the RSS feeds tile to view your...
...the folder you dropped your photos into my HP TouchSmart Photo library? You might try turning off the RSS feeds. How do I get photos from your camera: 1 Remove the memory card from your camera, and insert it into the memory card reader on your hard drive with your fingertip, drag and drop the... pictures you want to create the feed. 6 Tap Subscribe. 7 Open HP TouchSmart, and tap the RSS feeds tile to view your...
Getting Started Guide
Page 51
... on your hard drive in your music stored-either the Music folder or the iTunes folder within the Music folder-and open the library. 3 Put music into the Music folder or the iTunes folder within the Music folder in the text box. 7 Tap Save. Examples of HP TouchSmart Photo settings...: Dates, Folders, All Photos, or Removable Drive. 3 If you watch the slideshow, onscreen controls disappear. As you want , by tapping the Settings button, and select your slideshow and then tap Save, or the slide show up in HP TouchSmart Photo. 1 From your Windows desktop, browse to the photo or folder you...
... on your hard drive in your music stored-either the Music folder or the iTunes folder within the Music folder-and open the library. 3 Put music into the Music folder or the iTunes folder within the Music folder in the text box. 7 Tap Save. Examples of HP TouchSmart Photo settings...: Dates, Folders, All Photos, or Removable Drive. 3 If you watch the slideshow, onscreen controls disappear. As you want , by tapping the Settings button, and select your slideshow and then tap Save, or the slide show up in HP TouchSmart Photo. 1 From your Windows desktop, browse to the photo or folder you...

Upgrade and Service Guide
Page 3
Table of Contents Safety Information ...1 Before You Begin ...1 Locating Components of the HP TouchSmart PC 2 Opening the HP TouchSmart PC...3 Adding Memory...7 Before you begin...7 Removing a memory module...8 Installing a memory module ...10 Removing and Installing the Hard Disk Drive 12 Removing the hard disk drive 12 Installing a hard disk drive ...18 Closing the HP TouchSmart PC...23 Table of Contents iii
Table of Contents Safety Information ...1 Before You Begin ...1 Locating Components of the HP TouchSmart PC 2 Opening the HP TouchSmart PC...3 Adding Memory...7 Before you begin...7 Removing a memory module...8 Installing a memory module ...10 Removing and Installing the Hard Disk Drive 12 Removing the hard disk drive 12 Installing a hard disk drive ...18 Closing the HP TouchSmart PC...23 Table of Contents iii

Upgrade and Service Guide
Page 7
... back of the HP TouchSmart PC. A A Upgrading and Servicing Guide 3 Ensure that are discharged of the HP TouchSmart PC or optional equipment. Opening the HP TouchSmart PC To avoid injury and equipment damage, always complete the following steps in order, when opening the HP TouchSmart PC: 1 Remove any media (CD, DVD, memory cards, USB devices, and external hard disk drives) from the HP TouchSmart PC. 2 Disconnect any external...
... back of the HP TouchSmart PC. A A Upgrading and Servicing Guide 3 Ensure that are discharged of the HP TouchSmart PC or optional equipment. Opening the HP TouchSmart PC To avoid injury and equipment damage, always complete the following steps in order, when opening the HP TouchSmart PC: 1 Remove any media (CD, DVD, memory cards, USB devices, and external hard disk drives) from the HP TouchSmart PC. 2 Disconnect any external...
Upgrade and Service Guide
Page 10
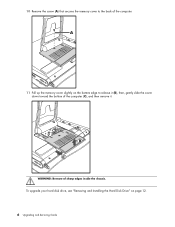
To upgrade your hard disk drive, see "Removing and Installing the Hard Disk Drive" on the bottom edge to the back of the computer. A 11 Pull up the memory cover slightly on page 12. 6 Upgrading and Servicing Guide B C WARNING: Beware of sharp edges inside the chassis. 10 Remove the screw (A) that secures the memory cover to release it (B), then, gently slide the cover down toward the bottom of the computer (C), and then remove it.
To upgrade your hard disk drive, see "Removing and Installing the Hard Disk Drive" on the bottom edge to the back of the computer. A 11 Pull up the memory cover slightly on page 12. 6 Upgrading and Servicing Guide B C WARNING: Beware of sharp edges inside the chassis. 10 Remove the screw (A) that secures the memory cover to release it (B), then, gently slide the cover down toward the bottom of the computer (C), and then remove it.
Upgrade and Service Guide
Page 16
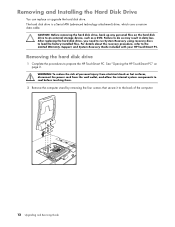
... load the factory-installed files. Removing and Installing the Hard Disk Drive You can replace or upgrade the hard disk drive. After replacing the hard disk drive, you need to run System Recovery using recovery discs to do so may result in data loss. See "Opening the HP TouchSmart PC" on the hard disk drive to prepare the HP TouchSmart PC. For details about the...
... load the factory-installed files. Removing and Installing the Hard Disk Drive You can replace or upgrade the hard disk drive. After replacing the hard disk drive, you need to run System Recovery using recovery discs to do so may result in data loss. See "Opening the HP TouchSmart PC" on the hard disk drive to prepare the HP TouchSmart PC. For details about the...
Upgrade and Service Guide
Page 19
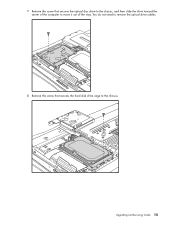
You do not need to remove the optical drive cables. 8 Remove the screw that secures the optical disc drive to the chassis, and then slide the drive toward the center of the computer to the chassis. Upgrading and Servicing Guide 15 7 Remove the screw that secures the hard disk drive cage to move it out of the way.
You do not need to remove the optical drive cables. 8 Remove the screw that secures the optical disc drive to the chassis, and then slide the drive toward the center of the computer to the chassis. Upgrading and Servicing Guide 15 7 Remove the screw that secures the hard disk drive cage to move it out of the way.
Limited Warranty, Support, and System Recovery Guide
Page 7
...may elect to give you with (a) a replacement unit of end-user-replaceable HP or HP-approved parts if available for the HP Hardware Product. YOU SHOULD MAKE PERIODIC BACKUP COPIES OF THE DATA STORED ON YOUR HARD DRIVE OR OTHER STORAGE DEVICES AS A PRECAUTION AGAINST POSSIBLE FAILURES, ALTERATION, OR LOSS ...(iii) your exclusive remedy for defective products. BEFORE RETURNING ANY UNIT FOR SERVICE, BE SURE TO BACK UP DATA AND REMOVE ANY CONFIDENTIAL, PROPRIETARY, OR PERSONAL INFORMATION. HP IS NOT LIABLE FOR ANY CLAIM MADE BY A THIRD PARTY OR MADE BY YOU FOR A THIRD PARTY. The date ...
...may elect to give you with (a) a replacement unit of end-user-replaceable HP or HP-approved parts if available for the HP Hardware Product. YOU SHOULD MAKE PERIODIC BACKUP COPIES OF THE DATA STORED ON YOUR HARD DRIVE OR OTHER STORAGE DEVICES AS A PRECAUTION AGAINST POSSIBLE FAILURES, ALTERATION, OR LOSS ...(iii) your exclusive remedy for defective products. BEFORE RETURNING ANY UNIT FOR SERVICE, BE SURE TO BACK UP DATA AND REMOVE ANY CONFIDENTIAL, PROPRIETARY, OR PERSONAL INFORMATION. HP IS NOT LIABLE FOR ANY CLAIM MADE BY A THIRD PARTY OR MADE BY YOU FOR A THIRD PARTY. The date ...
Limited Warranty, Support, and System Recovery Guide
Page 16
...: System Recovery deletes any data that you have backed up files, and you are prompted to back up to a removable disc any data or programs that you see the desktop. 10 Turn off the computer, reconnect all peripheral devices, and turn the computer back on. 11 Perform the procedure ...window, click the Advanced options button. 10 Click Recover your hard drive. 7 Choose to back up files, and you created or installed after purchase. When you want to keep . 1 Turn off . 2 Disconnect all the data files you are done, remove the backup disc from the recovery discs, and then click ...
...: System Recovery deletes any data that you have backed up files, and you are prompted to back up to a removable disc any data or programs that you see the desktop. 10 Turn off the computer, reconnect all peripheral devices, and turn the computer back on. 11 Perform the procedure ...window, click the Advanced options button. 10 Click Recover your hard drive. 7 Choose to back up files, and you created or installed after purchase. When you want to keep . 1 Turn off . 2 Disconnect all the data files you are done, remove the backup disc from the recovery discs, and then click ...


