Upgrading and Servicing
Page 4
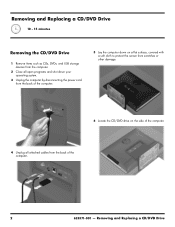
... by disconnecting the power cord from the back of the computer. 5 Lay the computer down on a flat surface, covered with a soft cloth to protect the screen from scratches or other damage. 6 Locate the CD/DVD drive on the side of the computer. 4 Unplug all attached cables from the back of the...
... by disconnecting the power cord from the back of the computer. 5 Lay the computer down on a flat surface, covered with a soft cloth to protect the screen from scratches or other damage. 6 Locate the CD/DVD drive on the side of the computer. 4 Unplug all attached cables from the back of the...
Upgrading and Servicing
Page 10
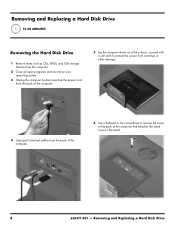
... by disconnecting the power cord from the back of the computer. 5 Lay the computer down on a flat surface, covered with a soft cloth to protect the screen from scratches or other damage. 4 Unplug all attached cables from the back of the computer. 6 Use a flathead or Torx screwdriver to remove the screw at...
... by disconnecting the power cord from the back of the computer. 5 Lay the computer down on a flat surface, covered with a soft cloth to protect the screen from scratches or other damage. 4 Unplug all attached cables from the back of the computer. 6 Use a flathead or Torx screwdriver to remove the screw at...
Upgrading and Servicing
Page 16
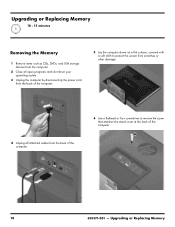
... by disconnecting the power cord from the back of the computer. 5 Lay the computer down on a flat surface, covered with a soft cloth to protect the screen from scratches or other damage. 4 Unplug all attached cables from the back of the computer. 6 Use a flathead or Torx screwdriver to remove the screw that...
... by disconnecting the power cord from the back of the computer. 5 Lay the computer down on a flat surface, covered with a soft cloth to protect the screen from scratches or other damage. 4 Unplug all attached cables from the back of the computer. 6 Use a flathead or Torx screwdriver to remove the screw that...
Upgrading and Servicing
Page 26
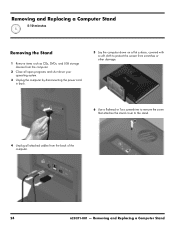
... system. 3 Unplug the computer by disconnecting the power cord in back. 5 Lay the computer down on a flat surface, covered with a soft cloth to protect the screen from scratches or other damage. 6 Use a flathead or Torx screwdriver to remove the screw that attaches the stand cover to the stand. 4 Unplug all attached...
... system. 3 Unplug the computer by disconnecting the power cord in back. 5 Lay the computer down on a flat surface, covered with a soft cloth to protect the screen from scratches or other damage. 6 Use a flathead or Torx screwdriver to remove the screw that attaches the stand cover to the stand. 4 Unplug all attached...
Getting Started Guide
Page 10
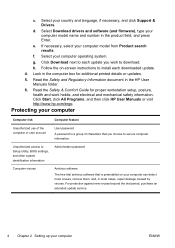
d. Click Start, click All Programs, and then click HP User Manuals or visit http://www.hp.com/ergo. For protection against new viruses beyond the trial period, purchase an extended update service. 4 Chapter 2 Setting up your computer model name ... computer Computer risk Computer feature Unauthorized use of characters that is a group of the computer or user account User password A password is preinstalled on -screen instructions to install each update you choose to download. e. Read the Safety and Regulatory Information document in most cases, repair damage caused by viruses....
d. Click Start, click All Programs, and then click HP User Manuals or visit http://www.hp.com/ergo. For protection against new viruses beyond the trial period, purchase an extended update service. 4 Chapter 2 Setting up your computer model name ... computer Computer risk Computer feature Unauthorized use of characters that is a group of the computer or user account User password A password is preinstalled on -screen instructions to install each update you choose to download. e. Read the Safety and Regulatory Information document in most cases, repair damage caused by viruses....
Getting Started Guide
Page 11
Follow the software manufacturer's directions to the Internet 5 Connect the hardware as shown on the computer, includes firewall software. Follow the on-screen instructions to select an ISP and set up the computer for your ISP, open a web browser and browse the Internet. Check the operating system, memory, ...
Follow the software manufacturer's directions to the Internet 5 Connect the hardware as shown on the computer, includes firewall software. Follow the on-screen instructions to select an ISP and set up the computer for your ISP, open a web browser and browse the Internet. Check the operating system, memory, ...
Getting Started Guide
Page 12
... connect two computers and to your new computer by the product manufacturer for additional troubleshooting options, see Internet access on page 12. Follow the on-screen instructions in the Windows Easy Transfer wizard to transfer your new computer. A standard USB cable does not work with a monitor or a printer. For more information...
... connect two computers and to your new computer by the product manufacturer for additional troubleshooting options, see Internet access on page 12. Follow the on-screen instructions in the Windows Easy Transfer wizard to transfer your new computer. A standard USB cable does not work with a monitor or a printer. For more information...
Getting Started Guide
Page 14
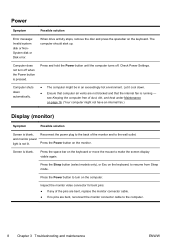
... the monitor. Computer shuts down . ● Ensure that computer air vents are bent, reconnect the monitor connector cable to make the screen display visible again. Let it cool down automatically. ● The computer might not have an internal fan.) Display (monitor) Symptom Possible solution...bent, replace the monitor connector cable. ● If no pins are not blocked and that the internal fan is not lit. Check Power Settings. Screen is pressed. Press the Sleep button (select models only), or Esc on the keyboard or move the mouse to the computer. 8 Chapter 3 ...
... the monitor. Computer shuts down . ● Ensure that computer air vents are bent, reconnect the monitor connector cable to make the screen display visible again. Let it cool down automatically. ● The computer might not have an internal fan.) Display (monitor) Symptom Possible solution...bent, replace the monitor connector cable. ● If no pins are not blocked and that the internal fan is not lit. Check Power Settings. Screen is pressed. Press the Sleep button (select models only), or Esc on the keyboard or move the mouse to the computer. 8 Chapter 3 ...

Getting Started Guide
Page 15
ENWW Display (monitor) 9 Click Start, and then click Control Panel. 2. NOTE: In addition to the information listed here, also refer to the documentation that came with your monitor. Under Appearance and Personalization, click Adjust Screen Resolution. 3. Adjust resolution as necessary, and then click Apply. Adjust the monitor resolution setting in Windows 7: 1. Symptom Possible solution Images on the screen are too large or too small, or the images are fuzzy.
ENWW Display (monitor) 9 Click Start, and then click Control Panel. 2. NOTE: In addition to the information listed here, also refer to the documentation that came with your monitor. Under Appearance and Personalization, click Adjust Screen Resolution. 3. Adjust resolution as necessary, and then click Apply. Adjust the monitor resolution setting in Windows 7: 1. Symptom Possible solution Images on the screen are too large or too small, or the images are fuzzy.

Getting Started Guide
Page 17
... and mouse to the receiver using the steps that the receiver did not time out instead, move the mouse and check for response on the screen. Unplug the receiver from other devices. 1. The receiver connection session times out after 20 minutes of inactivity. A Off Connect On B 3. Click the left mouse button...
... and mouse to the receiver using the steps that the receiver did not time out instead, move the mouse and check for response on the screen. Unplug the receiver from other devices. 1. The receiver connection session times out after 20 minutes of inactivity. A Off Connect On B 3. Click the left mouse button...

Getting Started Guide
Page 18
... Setup Poster to an audio connector, not a Line In or headphone connector. Use the front-panel buttons to the Audio Out (lime green) connector on -screen display (OSD) and ensure that audio is enabled and that the volume is very low or unsatisfactory. Ensure that they are using built-in to...
... Setup Poster to an audio connector, not a Line In or headphone connector. Use the front-panel buttons to the Audio Out (lime green) connector on -screen display (OSD) and ensure that audio is enabled and that the volume is very low or unsatisfactory. Ensure that they are using built-in to...
Getting Started Guide
Page 19
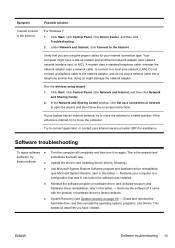
... the network adapter uses a network cable, to connect to connect again later, or contact your computer to open the wizard, and then follow the on-screen instructions. Try to a local area network (LAN). Update the drivers (see System recovery on again. Restores your Internet service provider (ISP) for your system has...
... the network adapter uses a network cable, to connect to connect again later, or contact your computer to open the wizard, and then follow the on-screen instructions. Try to a local area network (LAN). Update the drivers (see System recovery on again. Restores your Internet service provider (ISP) for your system has...
Getting Started Guide
Page 20
...can also set restore points manually. Click System protection, System Restore, click Next, and then follow the on -screen instructions. Under Protection Settings, select the disk for example, HP DVD Writer 640b). 5. To start a System Restore: 1. To add restore points manually: 1. Double-click the...you want to create a restore point. 4. Click Start. 2. To update a driver, click Update Driver, and then follow the on -screen instructions. NOTE: Always use System Restore to return the computer to open programs. 2. Close all open the Device Manager window. 3. Click ...
...can also set restore points manually. Click System protection, System Restore, click Next, and then follow the on -screen instructions. Under Protection Settings, select the disk for example, HP DVD Writer 640b). 5. To start a System Restore: 1. To add restore points manually: 1. Double-click the...you want to create a restore point. 4. Click Start. 2. To update a driver, click Update Driver, and then follow the on -screen instructions. NOTE: Always use System Restore to return the computer to open programs. 2. Close all open the Device Manager window. 3. Click ...

Getting Started Guide
Page 21
...computer box. Under I need help immediately, click Software Program Reinstallation. 3. Click Software Program Reinstallation, and then click Next at the Welcome screen. Uninstall the damaged program: a. b. Or check to be sure you initially installed it (for example, discs or the Internet). If prompted... to reinstall it by using the Recovery Manager: 1. Reinstall these programs directly from the Recovery Manager. Click Next at the Welcome screen. 3. and then click Recovery Manager. 2. Select the program you can reinstall from the CDs or DVDs. NOTE: Some features ...
...computer box. Under I need help immediately, click Software Program Reinstallation. 3. Click Software Program Reinstallation, and then click Next at the Welcome screen. Uninstall the damaged program: a. b. Or check to be sure you initially installed it (for example, discs or the Internet). If prompted... to reinstall it by using the Recovery Manager: 1. Reinstall these programs directly from the Recovery Manager. Click Next at the Welcome screen. 3. and then click Recovery Manager. 2. Select the program you can reinstall from the CDs or DVDs. NOTE: Some features ...
Getting Started Guide
Page 23
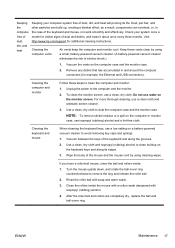
...the computer or monitor case, use a clean, dry cloth. Cleaning the keyboard and mouse When cleaning the keyboard keys, use a clean cloth and antistatic screen cleaner. 3. Vacuum between the keys of the keyboard and along its life. If you have a roller-ball mouse, clean the ball and rollers inside...and heat Keeping your system once a month for visible signs of the mouse and the mouse cord by using cleaning wipes. Visit http://www.hp.com/support for additional cleaning instructions. Cleaning the computer vents Air vents keep the computer and monitor cool. Do not use water on the ...
...the computer or monitor case, use a clean, dry cloth. Cleaning the keyboard and mouse When cleaning the keyboard keys, use a clean cloth and antistatic screen cleaner. 3. Vacuum between the keys of the keyboard and along its life. If you have a roller-ball mouse, clean the ball and rollers inside...and heat Keeping your system once a month for visible signs of the mouse and the mouse cord by using cleaning wipes. Visit http://www.hp.com/support for additional cleaning instructions. Cleaning the computer vents Air vents keep the computer and monitor cool. Do not use water on the ...
Getting Started Guide
Page 25
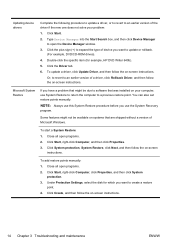
...), and then click Next. ENWW System recovery 19 NOTE: If your system does not detect a recovery partition, it prompts you see the Recovery Manager welcome screen again. Click Start, click All Programs, click Recovery Manager, and then click Recovery Manager. Select Yes, and then click Next. Under I need help immediately, click...
...), and then click Next. ENWW System recovery 19 NOTE: If your system does not detect a recovery partition, it prompts you see the Recovery Manager welcome screen again. Click Start, click All Programs, click Recovery Manager, and then click Recovery Manager. Select Yes, and then click Next. Under I need help immediately, click...
Getting Started Guide
Page 26
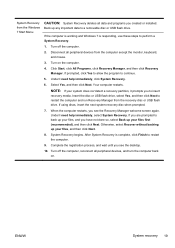
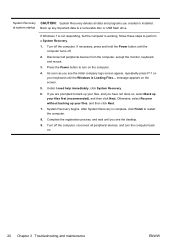
... turns off. 2. at system startup Back up your files first (recommended), and then click Next. If you see the initial company logo screen appear, repeatedly press F11 on the screen. 5. Turn off the computer. System Recovery CAUTION: System Recovery deletes all data and programs you have not done so, select Back up...
... turns off. 2. at system startup Back up your files first (recommended), and then click Next. If you see the initial company logo screen appear, repeatedly press F11 on the screen. 5. Turn off the computer. System Recovery CAUTION: System Recovery deletes all data and programs you have not done so, select Back up...
Getting Started Guide
Page 29
...it 's important to run system recovery. 4 Customer care Product information Before contacting the HP Customer Care Center, it in a secure place. Insert the USB flash drive into a USB port on -screen instructions. Select the USB flash drive from a media card and you make it (for... media using blank DVD(s), and then click Next. 4. NOTE: Recovery Media Creation formats the flash drive and deletes all on files on -screen instructions. Creating recovery media To create recovery discs: 1. Click Start > All Programs, select Recovery Manager, and then select Recovery Media Creation....
...it 's important to run system recovery. 4 Customer care Product information Before contacting the HP Customer Care Center, it in a secure place. Insert the USB flash drive into a USB port on -screen instructions. Select the USB flash drive from a media card and you make it (for... media using blank DVD(s), and then click Next. 4. NOTE: Recovery Media Creation formats the flash drive and deletes all on files on -screen instructions. Creating recovery media To create recovery discs: 1. Click Start > All Programs, select Recovery Manager, and then select Recovery Media Creation....
Getting Started Guide
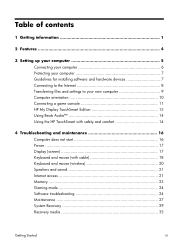
Page 3
... to your new computer 9 Computer orientation 10 Connecting a game console 11 HP My Display TouchSmart Edition 13 Using Beats Audio 14 Using the HP TouchSmart with safety and comfort 14 4 Troubleshooting and maintenance 16 Computer does not start 16 Power 17 Display (screen 17 Keyboard and mouse (with cable 18 Keyboard and mouse (wireless 20...
... to your new computer 9 Computer orientation 10 Connecting a game console 11 HP My Display TouchSmart Edition 13 Using Beats Audio 14 Using the HP TouchSmart with safety and comfort 14 4 Troubleshooting and maintenance 16 Computer does not start 16 Power 17 Display (screen 17 Keyboard and mouse (with cable 18 Keyboard and mouse (wireless 20...

Getting Started Guide
Page 8
...computer built into the carousel. 4 Chapter 2 Features Getting Started Select HP TouchSmart PC models can be mounted on the Magic Canvas and leave it in select HP TouchSmart PC models and can be purchased. Some of the screen. Make a left and right sliding motion with your finger over the... a submenu, by model. The HP TouchSmart PC is designed to maximize the touch-enabled capabilities of your Magic Canvas with magnets without having to open the application. ◦ Pin magnets to the Magic Canvas to prevent them from scrolling off the screen. ◦ Bring an application into...
...computer built into the carousel. 4 Chapter 2 Features Getting Started Select HP TouchSmart PC models can be mounted on the Magic Canvas and leave it in select HP TouchSmart PC models and can be purchased. Some of the screen. Make a left and right sliding motion with your finger over the... a submenu, by model. The HP TouchSmart PC is designed to maximize the touch-enabled capabilities of your Magic Canvas with magnets without having to open the application. ◦ Pin magnets to the Magic Canvas to prevent them from scrolling off the screen. ◦ Bring an application into...


